The Creation Analysis of A Sci-Fi Scene

The fast cloud rendering services provider and GPU & CPU render farm, Fox Renderfarm will share with you a creation analysis of a sci-fi scene.

Share the creative process of this piece of "Airport". The general idea is that the idea - modeling - lighting - material - rendering - synthesis, this is the production process that everyone is used to. Softwre used: 3ds Max, Zbrush, V-ray.

Scene points:

First of all, these are very important, scene work, especially for large scenes. Several key points are very important. Space, light and shadow, scale, composition, and color are all issues to be considered in large-scale operations. Difficult place. The "space" relationship can be roughly understood as the far and near reality. "Light and shadow" is the most important part of the big scene operation. The reason why the scene is true or not depends on the light and shadow. The "proportion" and "composition" are the framework of the scene. . "Color" is only the color.

1. The idea

The formal process of doing things should be the first-in-the-concept design, and then the production of different precision models in front, middle and far according to the composition.

The idea of this work comes from a CG animation of science fiction. The original idea was to build on the ground and make a block, as shown below:

A large number of abandoned cities and vehicles, the architecture is more traditional, are contemporary architecture, adding some science fiction spaceships, but later found that this atmosphere is not enough. Its a disaster scene to get rid of the spaceship. So I made changes. The building still retains the contemporary taste, adding more military feelings and some iron shelves, as shown below:

But this work doesn't look like science fiction, so it's all pushed off and new. (However, these pictures are kept as other types of works)

2. Modeling

That is to want a retro, sci-fi feeling, then collect a lot of reference pictures, Transformers, war machines and so on. Later I thought about it. The building does not have to be built on the ground. It can be created directly in the sky with a ship.

The aircraft carrier fits the vintage taste you want. Because this scenario is large, but the total number of models is high, the optimization of the model is crucial.

The model is divided into far, medium, near, and three levels in the scene composition. When doing the model, the different levels of the model have different precision and number of faces.

The aircraft carrier deck is here. It belongs to the level of the medium and long-distance. The model details are relatively simple. Only the accurate proportion and shape can be used. In order to make the smooth flow, it is best not to have too many model objects and perform the same material. The model material is the same as the model. All the models are attached together, and then converted to Eesh, so the smoothness of the operation will be greatly improved.
The aircraft carrier model is finished, because it is not the aircraft carrier to do the sci-fi scene, so only the reference element of the aircraft carrier is used. The lower part of the ship does not need to be done. The deck is ready to start the initial composition, as shown below:

The original composition of the building is too high, there will be a feeling of looking up, in order to highlight the scene, the vision can be expressed, raise the camera, and make it into a slightly overlooked composition.

After the composition is completed, the model begins to expand to the surrounding model based on the aerospace building, and the model of the different levels is also based on the near three scenes.

The aircraft carrier deck is very empty when it is not on the plane, adding rails, train guns, and some racks to make the model richer and fuller.

In addition to enriching the model of the current main building of the aircraft carrier, the distant model and the phase sequence of the sub-deck model are used to enhance the sense of space and highlight the level. Figure:

As seen in the above figure, the basic main body model architecture has come out, mainly divided into three layers, the number of models near the camera is slightly higher, the farther the model is, the lower the model, and so on.

The final main model is completed, and the most common mistake in large-scenario operations is the random heap model. The model is too dense and has too many details. Therefore, the combination of wholeand tightis especially important, including the character design. Try to use a large overall design to make a piecemeal and intensive design, so that the scene has emotions and will be breathable. (Now many big scenes are all full of details covering the whole picture, or all of them are big details without any details) as shown below:

The main building is completed, the number of faces is already high, and the computer is running very slowly. This is inevitable. The big scene is very demanding on the machine. Therefore, it can only be selected by sub-project files. The works are mainly divided into two project documents. After the main building is finished, it is rendered into a PNG image, or as a proxy object.

Create a new software window, directly render the PNG image, or add it to the new software window by proxy. It is recommended to use the method of rendering the PNG image for reference. Because the number of faces is too high, the proxy mode is easy to report. Figure:

This not only saves the number of faces, but also is very stable, and can also be a good reference for composition. Then we started making the model of the second project file.

The following is intended to be made into a mountain, the building above and below the mountain, the mountain model because it belongs to a far-reaching scene, the requirements are not so high, directly in the PS made a black and white displacement map to replace the general mountain structure, and then enter ZBrush for some subtle Debugging.

The lower-rise buildings are relatively dense and cumbersome. The work of one building and one building is very large, and the number of faces is not well controlled. Some small plug-ins can be used to achieve the desired effect.

The plugins are the same, here are some of the previous tutorials, haha, the same effect. Intensive building with a building cluster plugin, Gerrble.

CUT cut command to cut the new line.

Go to the face object set and select Squeeze.

Complete the above operation and add the building group plugin command.

The building group plug-in can only do some simple building effects and some layouts. It is basically enough in the long-distance scene. After the urban building layout is completed, some whole-piece models are added, and the pavement elements break up the structure.

The substructure is basically completed, you can make some adjustments and add some elements according to your needs, but you must pay attention to the composition, so that the picture is full and not too tight.

Once the model is complete, start testing the lights.

3. Lighting

Because the scene is very large and there are too many models, I have omitted the material step directly. I intend to directly render it into a white mode through channel synthesis and post-overlay. The material representation in this scene is not so important. In the first place. The sci-fi scene is relatively tough, and the light selects the VRay sun light plus the Vrayligh's curved top mode.

The main light source selects VRay sun light, and VRayligh's curved top mode light is used as sky light.

4. The material

After the lighting is debugged, the material is given a material ball. The material is VRaymtl (VR standard material), the color is gray by default, and the inverse color channel is added to the Falloff program. The inverse color is set to 0.6. The attenuation black and white RGB is set to 0.0.0 57.57.57. As shown below:

5. Rendering

The rendering test is shown below, the first is the main building rendering test, and the second is the foreground building rendering test.

Light and shadow projection information effects are quite satisfactory, and relatively realistic.

Rendering testing is a cumbersome process, repeatedly adjusting the position of the light until it is satisfactory (mainly because the rendering speed is too slow, and each test has to wait a long time).

The following is the rendering of some channels, this scene mainly uses reflection, AO, color, Z, these channels. As shown below:

6. Synthesis

Enter the PS for primary synthesis.

Stack the AO and color channels in a superimposed manner, then collapse the layer to enhance contrast.

Find a texture as a whole and add it to the texture.

This way the whole scene has some graininess and basic texture. Then there is the long work of painting textures. In fact, the method is very simple. Just use this image as a UV expansion, and add corresponding textures, pull, match, overlay, and paint on it.

Then add snow, dirty, light and other elements.

Adding the background in the process of adjustment makes the picture more complete. Of course, this is the initial background. Just for a simple look, the final effect still needs to be repeated and the material is finished.

So after the material is finished, enter the final stage of synthesis.
Layer one

Layer two

The third layer is more full of the picture, the story is stronger, and some models of the spacecraft are made. The spacecraft model refers to the spacecraft in the ninth district.

The fourth layer joins the pigeons, the smoke, and the snow fluttering in the sky highlights the atmosphere of the scene.

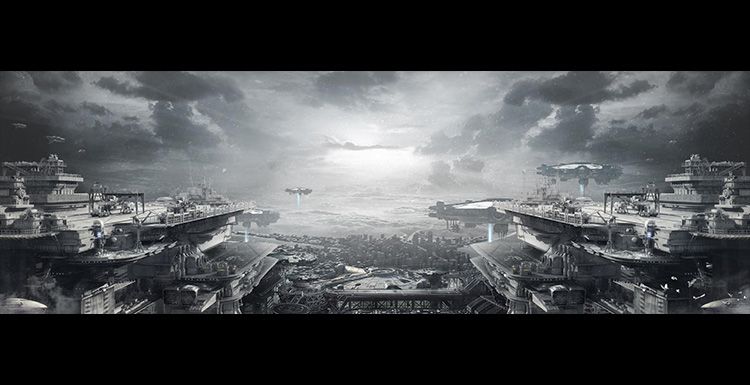
The final overall color, enhance the light effect, and finish.

Of course, in the process of synthesis, I also tried a combination of various versions, watch the following picture:

Final renderings:

Fox Renderfarm hopes it will be of some help to you. It is well known that Fox Renderfarm is an excellent cloud rendering services provider in the CG world, so if you need to find a render farm, why not try Fox Renderfarm, which is offering a free $25 trial for new users? Thanks for reading!

Author: Zhang Huanhuan

Welcome to join us

render farm free trial

Recommended reading


How to Render High-quality Images in Blender

2023-01-13


Top 9 Best And Free Blender Render Farms of 2024

2023-05-06


Revealing the Techniques Behind the Production of Jibaro "Love, Death & Robots", Which Took Two Years to Draw the Storyboard

2023-01-13


How to Render Large Scenes with Redshift in Cinema 4D

2022-06-09


Top 10 Free And Best Cloud Rendering Services in 2024

2023-09-26


Top 8 After Effects Render Farm Recommended of 2023

2023-02-02


How to Reduce Noise in Corona Renderer - Corona Denoising

2023-01-13


Arnold for Maya Tutorial: How to Render Wireframe

2023-01-13


Partners

Interested

Interview with Iavor Trifonov from Chaosgroup for the Future Cooperation
2018 must be a big year for Fox Renderfarm, we sincerely hope to cooperate with more 3d software and renderer companines as much as we can, that's why we communicate with them so positively and discuss about the future cooperations and benefits for both parties. Here is the detail interview with Iavor Trifonov from Chaos Group as below:Iavor Trifonov,Vice-President Cloud &x26; IntegrationsChaos GroupFox Renderfarm:  Since the establishment of V-Ray in 1997, the growth and global presence of V-Ray has gained attention from various industries, especially CG industry. Tell us more about V-Ray's global influence and users usage worldwide.Chaos Group: From the very beginning, our goal has been to help people visualize anything and everything. And this means more than just pushing the technology. V-Ray is a result of listening to and working with artists and designers directly. It’s important to really understand the daily challenges creatives face and see what we can do with our development to help, and move rendering forward. Today, V-Ray is prominent in multiple industries worldwide. V-Ray’s Academy Award-winning rendering technology is still developed with the same goal of helping artists and designers.Fox Renderfarm: Share with us about V-Ray's current brand awareness and situation in China.Chaos Group: V-Ray is very popular in the architectural visualization industry in China, but people probably aren’t as familiar with our company name — Chaos Group. There are many resources online for learning V-Ray, and the V-Ray community is very supportive. Our main developers are also very involved online since we take feedback very seriously. The new V-Ray Next for 3ds Max beta is the latest example of how we listen to our customers, and work to provide features that save time and hopefully make your life a little easier.Fox Renderfarm:  Share with us regarding the product development strategy and promotion in the near future?Chaos Group: At the moment, our key development revolves around the completely upgraded and optimized rendering inside of V-Ray Next. We’ve already got a few blog posts actually that highlight some of the new features of V-Ray Next and there are more articles in the works. You’ll also see us at events worldwide and this year we’re excited to host our very own special event dedicated to artists and developers - Total Chaos.Fox Renderfarm:  How about your thoughts on cloud rendering service and how it can benefit CG artists?Chaos Group: Cloud rendering is something that gives the smallest studios the same firepower that big studios have enjoyed for some time now. Anyone’s computer can be a supercomputer, thanks to the ease and power of cloud computing. Deadlines are inescapable in a studio environment, and having access to rendering in the cloud can take a lot of pressure off. Plus you don’t have to worry about large hardware expenses, not to mention maintenance. This also frees up computers for design work, and costs related to cloud rendering are easily tracked and can be billed by the job.Fox Renderfarm:  How can Chaos Group work with Fox Renderfarm and what are the benefits that Chaos Group can offer to Fox Renderfarm's customers?Chaosgroup: Fox Renderfarm is one of Chaos Group’s main render farm partners in China as well as in Asia. As an authorized partner, Fox Renderfarm receives dedicated support from Chaos Group both in terms of account management and technical optimization expertise. This allows Fox to react quickly when helping customers and resolve even the most complex workflow issues with the help of Chaos Group’s developers.Moreover, Chaos Group and Fox are also looking to partner on initiatives related to the educational institutions in China which will lead to opening excellent opportunities to thousands of Chinese students interested in becoming V-Ray professionals. Boosting the awareness of V-Ray among Chinese users from as early stage in their professional careers as possible together with expanding the availability of Chaos Group’s products across China is at the very core of the partnership between both companies. We’re excited to have such a strong partner in China and we look forward to helping the CG industry in China with Fox Renderfarm.Fox Renderfarm:  Originally started as Atmos Blender, then the first release of V-Ray for 3ds Max in 2002. Up to date, various mainstream 3D software is well-supported by V-Ray. V-Ray has been around with us for almost 21 years! Tell us about the new features and highlights of V-Ray that we can look forward to in 2018?Chaosgroup: We don’t want to reveal too much yet, but we’re very excited about the V-Ray for Unreal beta which just recently started. We’ll have more big news in regards to other V-Ray Next products in the near future to share with you as well!(Check our interview with MAXON and Isotropix if you are interested.)
More
2022-07-01
V-Ray for Maya Tutorial: A Cute 3D Cat Emoji Making Process
This article is organized by Fox Renderfarm, a well-known render farm in the CG industry, and shares the process of making a 3D version of a cute emoji package from 3d artist Bao Xiaoge. The software used is Maya, V-Ray, etc. The inspiration for the creation comes from a mobile game, and the prototype is very cute, so I want to make it a 3D dynamic version. The overall is very simple, and there is no technical difficulty.ModelingThe model production is not complicated. Because the surface of the prototype is smooth and the structure is few, it is more efficient to make directly from the simple basic block. So I chose to use the box as the base model to start making and then used the basic polygon modeling: starting from the points and lines to adjust the outline, we must pay attention to the line to be uniform. And remember to check the model more so that no obvious defects appear after smoothing.If you still feel dissatisfied with the model later, you can also use the moving brush in the Maya sculpting tool to make fine adjustments.Another thing to note is that in the model stage, you need to take into account the bone binding, such as the elbow needs to do bending movements, then the line segmentation of the elbow part should be sufficient. And the parts that need to be squeezed and deformed also need more segments to avoid problems such as model interpolation during animation.RiggingThe rigging part is also very simple, without using deformers or the like, but using the most basic bones. Note that when you create a bone, remember to repair the bone axis. Generally, the X-axis points to the next bone, and the Z-axis is the rotation axis. The operation is as follows:Turn on axial display: Select all bones and click Display-Transform Display-Local Rotation AxesRepair the axial method: Select the bones, switch to the Rigging tab, and click Skeleton-Orient Joint.The final axis is shown below:And the hand bone part uses Spline IK because Spline IK is really simple to use, especially for novices.After adjusting the final binding effect:AnimationThe main difficulty of animation is to make the feeling of soft and cute Q bombs. In order to achieve this purpose, some very basic but useful techniques are used in the animation:Keep the same volume: Keep the same volume when squeezing and stretching the body. Simply put, squeezing becomes a cake, and pulling will become a bar.Follow and buffer the action: the body moves first, and the eyes move later (because the kinetic energy transmission of the fluid is different from that of a rigid body)The shape of the eyes also needs to be squeezed when squeezing (such as closing eyes)To sum up the above three points, a gif was drawn. Although it is very simple, you can basically see the effect of the above three points.What, too fast to see clearly? Here is the slow version. Pay attention to the volume change and eye movement.As long as you keep the three points above, the overall animation will be very flexible and cute, and you only need to add a little detail.RenderingThe V-Ray renderer was selected for rendering. The part of the light is to weaken the ambient light as much as possible and let the light stick be a part of the light source. Because the character is waving a light stick in his hand, it will form a lighting effect at different angles during the movement, which is really suitable as a moving light source. Not only does this increase the atmosphere of the scene, but the changing colors will also make the whole picture more dynamic.The remaining lighting arrangements choose to use three rectangular lights, of which the light source above the head is the main light, and the other two light sources are the auxiliary light. The three lights are disconnected from the ground so that the lights will only illuminate the character itself without letting The scene becomes very bright, let the lighting of the scene be left to the light stick!The production of the material part is very simple. It is a mixture of Lambert material and luminous material. Since most of the body is covered by hair, a very simple Lambert gray-black material is used, while the cat's claws and eyes in the ear part are a blend of glowing materials.To make the color change dynamically, here we choose to directly control the color to achieve keyframe control. Of course, you can also use the time axis to control the Ramp UV sampling output color, as shown in the figure below. The advantage of this is that the color control is more convenient, color transition and playback speed and better control.As long as the production of hair is simple and quick, the function can be used. So choose to use V-Ray Fur. Just a few parameter adjustments can produce the effect. V-Ray Fur's basic functions are also very comprehensive, making small fluff without close-ups perfect.If you observe carefully, there is no hair in the eyes and ears of the character. I use the mask map to control the growth range of the hair. I can also use the map to control the color and other parameters. Of course, the model must be divided into UVs first.After doing this, you can render. And you will find that the above productions are all basic processes without using too many skills and operations.Above is all you need to know how to make this cute 3D kitten emoji, we're sure you can make it! If you need a rendering service, why not try us at Fox Renderfarm, we have been the leading cloud rendering services provider in the industry for many years. Don't understand why you need a render farm? Then why not find out what is a render farm? Fox Renderfarm continues to bring news of modelling with various 3D software, so feel free to follow us!
More
2022-06-02
"Coffin Dance" Produced by Peru Animation Studio According to Ghana’s Dancing Pallbearers(2)
The TPN-Accredited Maya render farm will still share the production experiences of the CG artwork "Coffin Dance" and "Cookie Cat" with you. Hope that helps you.How about other artworks created by your studio?Marsha Pavlich: "Cookie Cat" is also a social short film with a similar purpose to "Coffin Dance". We hope to produce eye-catching animations to attract more people's curiosity on social media. So I thought of the character created in the past-cat biscuit, if I use it to imitate human actions, it must be very interesting. After that, we chose to reproduce the most popular scene in the classic movie "Flash Dance" in the 1980s-the dancer starring Jennifer Bells, dancing with water while stretching out the chair. So we wrote a short story for the film, let the cat biscuit go through the sweets production line, and sprinkle chocolate and dragees to make it look more delicious.The animation is mainly produced using software such as Maya, After Effects, Substance Painter, Phoenix FD, and V-Ray. The biggest challenge is mainly the fluid simulation of chocolate. In order to make the flow of the chocolate natural and at the same time look delicious. We tested it back and forth several times. In addition, we want to make the behavior at each stage appear organized and tell a story smoothly. Just like the first cat biscuit is topped with chocolate, it can't reach the second stage. The scene still has chocolate sauce. So we cleverly used the characteristics of the conveyor belt to solve this problem, so that the picture looks like the character is leading to the next stage and let the things leftover from the previous stage disappear. Another important point is music. We chose a classic and interesting singing style. After all, the rhythm of the music will affect the action and speed of the character, so we must first confirm the style of music.Can you share with us your production experiences?Marsha Pavlich: Every project can always bring us new inspirations or learn new technologies. For example, in "Coffin Dance", in order to create a cyclical character dynamic similar to that in the hit movie, we tried many new techniques to make the characters dance in their respective positions to create a perfect loopit animation. In addition, different ideas were created in cooperation with Studio Uku. We shared different views and knowledge in the process learned from each other and inspired each other. This experience is great!Where did your inspiration come from? Marsha Pavlich: In the studio, we want to create stories or animations whenever we have the opportunity. The inspiration is based on personal experience, favorite animations or movies, special days, and even some factors of Internet popularity. For example, we created a simple animated story on the eve of Valentine's Day and released it on the day of the show. At that time, the cat Cupid, who was different from the cute image, was designed with a bit of rebellious and rogue character, and the story developed in an interesting direction.Could you share your creative skills with us?Marsha Pavlich:Only exaggerated actions can show the cartoon style.The most important key to making cartoon style is the "exaggerated" character dynamics, which is also an interesting part of the animation. After all, animated characters are not limited by the physical rules of the real world, so as long as the movements are natural, the audience will pay. Therefore, when creating, you can ask yourself if you can make the character's actions more exaggerated to show your style.Extract creative nutrients in lifeAll-natural characters are inspired by real life. The best way is to observe in life and begin to pay attention to minor movements and details that are not normally found, such as raised eyebrows or bent fingers. You can also search for references on the Internet, or shoot videos to watch your actions.Could you share with us the CG industry in Peru?Marsha Pavlich: Peru’s animation industry is booming and has gradually become one of the competitive industries. Many large-scale projects have been made public, such as animated films, albums, etc., and some are in progress. However, due to the impact of the epidemic, the animation industry has also been affected to a certain extent. It is just that our country has gotten rid of the worst moment. I believe that Peru's powerful creative energy can attract the attention of the world.Would you share with us your next step?Marsha Pavlich: We hope to become one of the most important local animation studios and show our creative strength. Therefore, we set our goal on the development of original animation and look forward to attracting young people through films, albums, or short films.
More
2020-08-12
  • Foxrenderfarm

    Powerful Render Farm Service

  • TPN
  • TPN

    Business Consulting

    Global Agent Contact:Gordon Shaw

    Email: gordon@foxrenderfarm.com

    Marketing Contact: Rachel Chen

    Email: rachel@foxrenderfarm.com

    Connect with Us

Fackbook Customer Reviews