V-Ray RT for SketchUp Tutorial: Hand-made Model Style Rendering

Fox Renderfarm, a powerful but affordable V-Ray render farm and cloud rendering services provider, will introduce to you a share from ArchStudio on the rendering of the hand-made model style made with V-Ray RT for SketchUp. The design inspiration comes from the design drawings of a country house.
Model-style renderings refer to making a model through 3D software and rendering it through a renderer and drawing an effect similar to manual model making in a computer. Compared with the method of making a real solid model and then taking a later photo, this method not only can save a lot of time and energy and model cost, but also facilitate us to modify the program itself in real-time according to the performance results (of course, this is only for performance, and the role of the solid model making itself in architectural education is still irreplaceable).
Among the current major firms and rendering companies, Penda is undoubtedly the leader of this style. Almost every scheme on Penda's official website will have several renderings of this model style, and the purple villain that often appears in it has also become one of Penda's logos.


Although this kind of graphic expression is not a common method of traditional architectural expression, as an excellent expression, it is still worthy of our study and reference to its techniques.
STEP 1: Drawing analysis
Whether it is the model drawing we finally made or a series of drawings made by Penda, we can summarize several characteristics of model style drawings through observation.


1. Lighting
Unlike the lighting that simulates the natural environment (sun, ambient light, etc.) in real realistic rendering, the model-style drawings create an indoor lighting effect similar to the studio model photo room. Most of the environment is brighter white light. The shadow of the model itself is also very soft.
2. Material
Different from other expressions, the material of the model style is very simple. Basically, it is the materials we usually make models, such as wood, PVC, glass, metal, etc.
3. Model scale
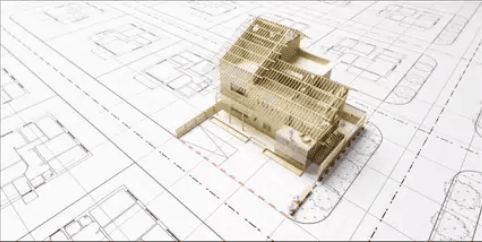
Of course, in addition to the unique lighting and materials of the model, the model style needs to be expressed with the help of the unique model size. For example, in the above drawings, in addition to its own architectural model, the metal villain, the CAD drawings underneath, scattered wooden strips, etc., remind the reader that this is a model-scale rendering, and the sense of the model should also be applied. Born.
STEP 2: Modeling and rendering
The production of the model itself is very simple. These are very simple farmhouse designs, so try to enrich the details in Revit.

Then import the model into SketchUp and add basic textures. In order to better show the details, you can remove the wall and tile roof on the east side, so that the final renderings can directly see part of the interior.

According to the previous analysis, the first problem to be solved first is the problem of lighting. As I said just now, the model style effect picture is an indoor lighting effect similar to the studio model photo room, so the light in the renderer can be as long as the actual lighting method when taking pictures of the model. Personally, I am most used to a method called three-point lighting. Similar to the shooting of the model in the figure below, there is a main light source for the main lighting, a supplementary light source for supplementary lighting, and a supplementary light source for softening shadows.

The actual arrangement in the model is shown in the following figure. Of course, the fine-tuning of the specific light position and the setting of the light intensity still need to be continuously adjusted in conjunction with V-Ray RT real-time rendering.

Then comes the material. The process of model style rendering is very simple, as long as you use a few simple model materials.

Metal man

Glass

Wooden floor
For wood, you can choose the official wood material

Diffuse Map


Create a new color correction, copy the previously cut texture into the texture, and then change the following parameters to get different colors of wood. There is no need to modify the map in PS before importing it into SketchUp, which can greatly speed up work efficiency.

Finally, you need to modify the model size. In addition to the metal villain placed in the previous modeling process, the most notable feature in this drawing is the CAD base map below. This process is very simple. The basic line drawing is completed in CAD, and it is poured into AI to complete the modification of the line type and the filling of the basic material.

Export a transparent PNG image with only line drafts, then import SketchUp, and pour this PNG image. You can first pull this drawing up to a certain height, according to the location of the building, enter the top view for alignment.

In the process of performing this operation, if you find that the picture is very blurry and cannot be aligned, you need to check whether the maximum texture size in the preference is turned on, and if not, you need to check it.

Finally, you only need to move this image to a very small height (such as 1mm) on the model ground in the Z direction. This is to avoid possible rendering problems caused by the SketchUp heavy surface, and you can then render it.

STEP 3: Post-production
The post-production is very simple, because the color of the rendered paper is a bit dark, and the contrast is not strong enough.

Simply use camera raw to change the lower exposure value and increase the lower contrast, the final effect will be just fine.
Fox Renderfarm hopes it will be of some help to you. It is well known that Fox Renderfarm is an excellent cloud rendering services provider in the CG world, so if you need to find a render farm for V-Ray, why not try Fox Renderfarm, which is offering a free $25 trial for new users? Thanks for reading!