Using Octane for C4D to Make a Natural Scenes (1)

Using Octane for C4D to make a natural scenes

As the leading Cinema 4D render farm in the CG industry, Fox Renderfarm will always gather some tutorial about 3D software, renderers. In this article, we will teach you how to make a natural scene in Octane for C4D. In terms of scenes, there are many types, like sci-fi scenes, realistic natural scenes, cartoon scenes, and so on. Different scenarios have different ways of creating them.

We will use one of the production methods to explain the process and ideas of the creation of realistic natural scenes.

Using Octane for C4D to make a natural scenes

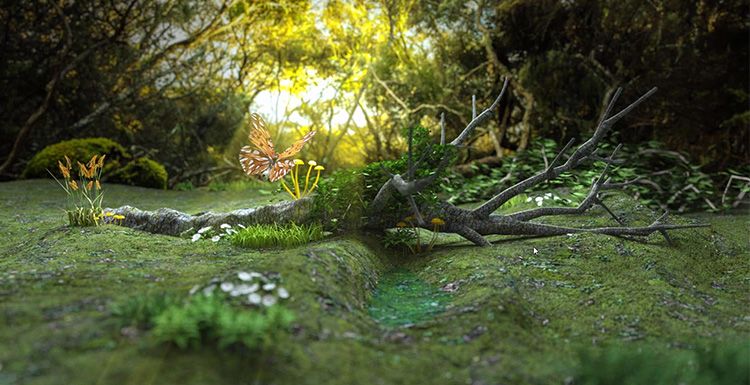
Realistic natural scene reference

Scene Construction

Taking the reference picture as an example, the scene ground is mainly divided into two materials, the middle is the road, and the two sides are the muddy mountains.

According to the reference picture, the middle ground is a long road, so first create a ground in the C4D according to the reference picture, then use an ‘Octane Daylight’ to properly adjust the angle of the light to simulate the sunset.

Using Octane for C4D to make a natural scenes(4)

Firstly, creating a standard shader to make the land, in the mountains you can turn off some unwanted reflections, just use diffuse reflection, then add color, AO, Normal map, and adjust the UV mapping.

Using Octane for C4D to make a natural scenes(5) Using Octane for C4D to make a natural scenes(6)

The next step is to add plants using Cinema 4D’s Forester Tree and modify the tree type in the Tree Library. Before the modification, you can look at the trees in the reference picture and modify the size, height, color of the leaves, length of the branches, etc. according to the reference trees. After modifying the parameters,

Using Octane for C4D to make a natural scenes(7)

Before using cloning, you need to make several different shapes of trees. Adjust the height and shape of the tree to use as a cloning template to avoid being too repetitive in the final use.

Using Octane for C4D to make a natural scenes(8)

Here we use the Octane’s Clone. First, create an ‘Octane Scatter_Tree’ group and drag the three trees you just made below the ‘Octane Scatter_Tree’. Then use ‘Octane Scatter’ to clone the tree onto the ground of the well-prepared land.

Changing the way of generated trees by Distribution to clone in the Surface.

Using Octane for C4D to make a natural scenes(9)

Add a layer of Noise in the Distribution under ‘’Octane Scatter to find the appropriate Noise type. Adjust the size of the tree and the direction of rotation.

Using Octane for C4D to make a natural scenes(10)

Now adjust the material of the leaf, first convert the material to the material of Octane, and then adjust. Copy a copy of Diffuse to the Transmission to increase the transparency of the leaves and look closer to the real feeling.

Using Octane for C4D to make a natural scenes(11)

Then adjust the trunk to achieve the final effect.

Using Octane for C4D to make a natural scenes(12)

Next, use Multiflora under Forester to select a suitable grass for adjustment.

Using Octane for C4D to make a natural scenes(14) Using Octane for C4D to make a natural scenes(1)

Use Multiflora to add some other plants.

Using Octane for C4D to make a natural scenes(15)

Continue to add other plants, adjust the size and position of the plants, make the grass look diverse, and adjust the plant material.

Using Octane for C4D to make a natural scenes(13)

The big environment has been built, and we will publish the part 2 next time.

Using-Octane-for-C4D-to-make-a-natural-scenes

Now follow the leading cloud rendering services provider, Fox Renderfarm to read the next part: Using Octane for C4D to make a natural scenes (2)

Article written by 3d artist Qixi.

Welcome to join us

render farm free trial

Recommended reading


How to Render High-quality Images in Blender

2023-01-13


Top 9 Best And Free Blender Render Farms of 2024

2023-05-06


Revealing the Techniques Behind the Production of Jibaro "Love, Death & Robots", Which Took Two Years to Draw the Storyboard

2023-01-13


How to Render Large Scenes with Redshift in Cinema 4D

2022-06-09


Top 10 Free And Best Cloud Rendering Services in 2024

2023-09-26


Top 8 After Effects Render Farm Recommended of 2023

2023-02-02


How to Reduce Noise in Corona Renderer - Corona Denoising

2023-01-13


Arnold for Maya Tutorial: How to Render Wireframe

2023-01-13


Partners

Interested

Octane For C4D Tutorial: How To Make A Strange Cube
As the leading cloud rendering services provider and GPU &x26; CPU render farm, Fox Renderfarm is here to share with you a Octane for C4D tutotial.It is not difficult to make the above-mentioned block effect. It is mainly the application of the mixed material of Octane renderer. Let us look at how this strange cube is made. The main software that we use including Cinema 4D, Octane renderer and so on.Firstly, we should create a rounded cube, and a new clone of the cube.In this file, 15 copies are cloned in each axis, because the cube is 100 * 50 * 100 px, so the size is 1400 * 700 * 1400 px.On the premise of selecting the cloned object, create a new motion graphics-effects-simple effector, turn on the attenuation, the attenuation type is square, the attenuation is adjusted to 100%, then adjust the attenuation size, and then adjust the position of the Y-axis parameters. The feeling of layer by layer is coming out.The material of the ground material under the middle cube of the reference picture is different from the material of the scene. Here, a new plane is placed on top, and a new cube is placed again, placed in the middle, and the rounded corners are also given to a parameter.The model part has almost been created, and now you can start making the lighting part. Create a new HDR light for lighting.Firstly, create a new reflective material, modify its color, roughness and reflection intensity to adjust to the appropriate effect. Create a new transparent material, here modified the refractive index, the real effect may be seen when rendering, can be fine-tuned after rendering.Create a new hybrid material again, mix the transparent material and the reflective material, and add a noise map to select the type of noise as a unit, so that the texture will be displayed in the form of a square, then control the global zoom, brightness, contrast Wait to control the range of the display.Directly copy the noise map directly to the replacement channel, and the parameters of the replacement can also be adjusted.I feel that there should be another layer outside the cube, so I copied a cube and slightly enlarged it to give a transparent material. Temporarily hide the two cubes just now, and then create a smaller cube to create a glowing material.The scene material is a reflection material, where 3 stone texture maps are attached, and the texture can be modified to change the gamma value or intensity depending on the situation. Then the UV map is projected in a cube. The plane below the cube is also a reflective material, then a noise is added to properly adjust the roughness and the intensity of the reflection.Now set the output size, place the camera, then fill the light, change the color temperature, and if the cube reflects the light.The cube also needs to add some decorative spheres, create a new emitter and sphere, make the sphere a subset of the emitter, adjust the emitter parameters appropriately, and check the display object. Add the analog tag rigid body to the emitter, apply the inheritance tag to the subset, and select the individual elements. Add the analog tag collision body to the cloned object and the outermost glass cube. Click the play button and the ball will naturally fall on it.Now add a little depth of field, the effect is almost the same. That's all.Fox Renderfarm hopes it will be of some help to you. It is well known that Fox Renderfarm is an excellent cloud rendering services provider in the CG world, so if you need to find a render farm, why not try Fox Renderfarm, which is offering a free $25 trial for new users? Thanks for reading!Reference Source: Https://www.bilibili.com/read/cv2176795?from=search
More
2022-07-28
Octane For C4D Tutorial - Making Forest Scene Model Light Rendering (2)
As the leading cloud rendering service provider, Fox Renderfarm, is going to share with you the second part of the tutorial of Octane for C4D, making forest scene model light rendering as an example.Octane For C4D Tutorial - Making Forest Scene Model Light Rendering (1)In the previous tutorial, in order to make the scene more natural, many kinds of plants were added to the scene. After preparing to use the Octane renderer, all textures need to be converted to Octane's texture.You can select all shaders that are not Octane, and convert all shaders to Octane shaders in Convert Matenials under Materials.After converting the shader, remember to clean up the shaders before.What you need to deal with now is the texture of the ground and the texture of the dead tree. The texture of the ground is Octane GLossy Material, which adds a total of Diffuse, Specular, Bump, Normal, Displacement.Add a picture to the background and adjust it to the appropriate size and position.Add the mushroom material, create a new Octane Specular Material shader, modify the Medium and Fake Shadows, change the mushroom to yellow and modify the butterfly material.Now adjust the lights. Octane's Octane Arealight is used here, and the position of the light source simulates the sun's lighting effect according to the position in the background image. First illuminate the background with a light, then use another light to illuminate the tree.Remember to turn off the light display and the lights will not be rendered in the rendered view. Be sure to adjust the intensity of the light with reference to the background image. Now adjust the light while rendering. This is a step that needs to be tested continuously.The outlook is a bit dark, copying the care of the Octane Arealight supplement.In the process, I feel that the position of the mushroom has exposed. Now put the mushroom in a lower position to avoid exposure.Modify the camera settings, Kernels changed to Pathtracing option, Max samples changed to 1000, Diffuse depth changed to 8, the rendering speed will be slower. Change the GI clamp to 3 to reduce the noise of the exposure.When Cameralmager's Response is changed to Linear, the rendering effect will be closer to reality.Now focus on the butterfly and add some depth of field.Now that the effect is nearing completion, you only need to add some light fog in the later stage.ConclusionThe above is all of the tutorial of Octane For C4D for this time. Fox Renderfarm hope it will be of some help to you.As you know, Fox Renderfarm is an excellent cloud render farm and leading cloud rendering services provider in the CG world, so if you need to find a render farm, why not try Fox Renderfarm, which is offering a free $25 trial for new users? Thanks for reading!
More
2022-07-28
Octane For C4D Tutorial - Making Forest Scene Model Light Rendering (1)
As the leading cloud rendering service provider, Fox Renderfarm, is going to share with you a tutorial of Octane for C4D, making forest scene model light rendering as an example.This is a simple natural forest scene production, the main elements are composed of branches, butterflies, grass, mushrooms, vines and several kinds of grasses, divided into three parts including foreground, medium and background. The main production software and plugins for this small scene model lighting rendering tutorial include C4D, Forester, Levy Grower, Octane renderer.Making TerrainCreate a new terrain, turn the function off to sea level that can get the terrain. Modify the terrain to achieve a satisfactory effect, and create a surface behind the scene for background texture.Making BranchesForester's plant library is very rich, and you can choose a satisfactory tree to generate. The tree used in this scene should be a relatively dry tree, so make some adjustments on the basis of the original. Remove excess branches and twist the trunk.Adjust the Position of the Placed Tree.Firstly, we should determine the camera position, then place the model of other objects according to the camera position. It is recommended to use the Octane renderer’s camera. Now adjust the lens position in the view, in this process you need to mainly reserve the foreground and the background position.Now the interaction between the ground and the trunk is not enough, so you can use the brush to adjust some of the unevenness of the ground, so that the combination of the branches and the ground is more natural.Add a mushroom to this step. You can make a cluster first, then copy the mushrooms and then scale and place them.The butterfly directly uses an existing model to find the location directly in the camera. Now that the models that need to be prepared in the early stage are available, the rest of the elements can be created with plugins.In order to look more natural, there should be some vines placed in the distant background map, and Lvy Grower is very simple to make vines. Some vines are also added to the trunk.Don't forget to adjust the position of the plants in the lens. Remember that both the foreground and the mid-range need to be placed. Use Forester to continue adding other types of plants and adjust them while continuing to place.In the real-time selection, change the ground mode to the vertex drawing mode, and then you can draw the area that needs to grow the grass, which can be random. You can now select the Objects/Octane Scatter in the Octane renderer and add the grass to the Octane Scatter and place the terrain on the Surface of the Octane Scatter. Change the Distribution mode to Surface mode, and then map the previously drawn vertices to the Vertex Map under Octane Scatter. Now only the area that was previously drawn will grow out.Use the Octane renderer to see the effect.We need to add a random effect for the grass. Add effects to the Effectsor under the Octane Scatter and turn off the position changes in the random effects. Just select the zoom size and rotate randomly.Now the effect of the grass is ok, but some flowers are still missing. Continue to use Forester to plant some flowers for the grass.In order to enrich the level, you need to add a few shorter shrubs. The more plant species, the richer the picture looks.Now that the plant is almost finished, how to make it later, please follow the best cloud rendering services provider adn CPU &x26; GPU render farm to our next article — Octane For C4D Tutorial - Making Forest Scene Model Light Rendering (2).
More
2022-07-01
  • Foxrenderfarm

    Powerful Render Farm Service

  • TPN
  • TPN

    Business Consulting

    Global Agent Contact:Gordon Shaw

    Email: gordon@foxrenderfarm.com

    Marketing Contact: Rachel Chen

    Email: rachel@foxrenderfarm.com

    Connect with Us

Fackbook Customer Reviews