An Artwork Production Sharing By Octane For C4D

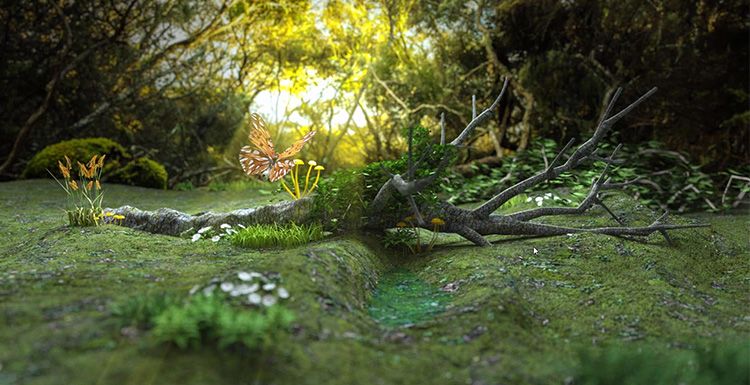
The idea at the beginning of the work “Gold Coin” was to make a piece of gold coin with C4D. I want it to feel like a commemorative coin of pirates. This gold coin is not an ordinary gold coin, so I hope it is strangely shaped, there is a gimmick that stands out, no one will I want to put it in my trouser pocket. It was left in a certain part of the woods, using moonlight, glowing fungi, fireflies. Making it a bit like a forest in a fairy tale, with a story atmosphere.
The software used are C4D, Megascans, Zbrush, Substance painter, Octane renderer
Collecting material
The early data collection is also necessary. I usually look for good ideas on Painterest and then find out what these things look like on Google. This method is not limited to this one. Making a model
In the ZBrush engraving model, I am not very good at ZBrush, but fortunately my model does not require too much delicate engraving, as long as it produces a large shape. UV
I import the model into Unfold3D and expand the UV. The UV parts are kept as continuous and do not overlap, but multi-stretching is good. Material and details
I use Substance painter to make the material and use the material to make up for the details without engraving. (I don't have a ZBrush topology. In order to keep the model number is not too big, I also saved a lot of small details. So I used bump in the Substance painter to make small details. C4D environment construction
I picked the right trees and stones and fungal models in megascans, then put them into C4D and built the environment and lighting. (At first I thought that only three lights could be used, but during the production process I added more lights to outline the gold coins. Rendering
I used the octane renderer for rendering, which has accurate spectral calculations. There are many ways to achieve the desired effect in post-production, and you can choose what you are good at.
The color of the original image is too saturated, I lowered the saturation and added a little dirty stain, and then adjusted to increase the blurring of the vignetting and the edge, making the lens feel stronger. This production process is shared here, and some processes may not be the best. But there are many ways to make a picture. The software is just a tool. How to use it is depending on the person who uses it. I hope everyone can like it.
My other works, By: Xclucis

Welcome to join us

render farm free trial

Recommended reading


How to Render High-quality Images in Blender

2023-01-13


Top 9 Best And Free Blender Render Farms of 2024

2023-05-06


Revealing the Techniques Behind the Production of Jibaro "Love, Death & Robots", Which Took Two Years to Draw the Storyboard

2023-01-13


How to Render Large Scenes with Redshift in Cinema 4D

2022-06-09


Top 10 Free And Best Cloud Rendering Services in 2024

2023-09-26


Top 8 After Effects Render Farm Recommended of 2023

2023-02-02


How to Reduce Noise in Corona Renderer - Corona Denoising

2023-01-13


Arnold for Maya Tutorial: How to Render Wireframe

2023-01-13


Partners

Interested

Top 5 Octane Render Farms For Your 3D Projects
As the world's first and fastest bias-free, spectrally correct GPU render engine, OctaneRender has impressed many artists with its extraordinary render quality and speed. Using Octane in combination with the right render farm, working efficiency will be greatly increased. However, there are not many providers offering Octane cloud rendering services, and this post will introduce 5 high-quality Octane render farms for you to choose from.Fox Renderfarm: Best Octane Render FarmFox Renderfarm is a large render farm with over a decade of rendering experience. They support a wide range of software and plugins, with an online rendering platform and desktop clients for Windows and Linux. Uploading files on their platform is very fast as they have a corresponding plugin to support the transfer. In terms of price, the lowest price for GPU rendering is $1 per node per hour, and the higher the membership level, the lower the price. Their real-time online customer service is available for any questions and is very nice. For new users who have not experienced the Fox Renderfarm's cloud rendering service, a $25 free trial is there.iRender: High-Speed Octane Render FarmiRender is an IaaS render farm that allows users to remotely control cloud servers to render projects. On their cloud servers, you can install any 3D software, render engines and 3D plugins you want. As an Octane render farm, they have powerful render nodes: 2/4/6/8x RTX 3090/4090. Their pricing is based on node/hour and prices vary depending on the servers offered. They also have real-time online customer service.Rebusfarm: Render Farm for OctaneRebusfarm is also a large render farm and they have rendered a lot of architectural works. It is based on a SaaS model, and with the help of their plugins, you can send projects directly from 3D software. They don't have real-time online customer service, which requires you to fill out a form with your question and wait for a reply. Rendering with their GPUs costs 3.79 cent/OBh and that price is independent of the number of machines used, they only charge for engine time.Ranch Computing: Render farm for Octane RendererRanch Computing is also a render farm based on the SaaS model, and their proven rendering experience allows them to provide very high quality rendering services to artists. They also have their own plugin to help users send rendering projects directly from the application. Their prices vary from Low-Medium-High levels, and you can choose according to your needs. Currently there is no customer service button visible on their page, but if you have problems, you can tell them through the form on the contact page and wait for a reply.Drop Render: Octane Renderfarm for Cinema 4DDrop Render is different from the render farms above, as it's a render farm designed for Cinema 4D rendering, but now supports Blender as well. Their plugin allows users to not leave the 3D application and will send the project directly to their servers and automatically store the rendered frames on your hard drive. Regarding pricing, you can choose a level based on the urgency of your project and your budget; the higher the level, the faster your project will receive rendering. They don't have an online customer service, though the support page can answer most of your questions or wait for their technical team to contact you.Each render farm has its own features and differences in service. Artists can choose your favorite one according to your preferences.
More
2023-09-08
Octane For C4D Tutorial: How To Make A Strange Cube
As the leading cloud rendering services provider and GPU &x26; CPU render farm, Fox Renderfarm is here to share with you a Octane for C4D tutotial.It is not difficult to make the above-mentioned block effect. It is mainly the application of the mixed material of Octane renderer. Let us look at how this strange cube is made. The main software that we use including Cinema 4D, Octane renderer and so on.Firstly, we should create a rounded cube, and a new clone of the cube.In this file, 15 copies are cloned in each axis, because the cube is 100 * 50 * 100 px, so the size is 1400 * 700 * 1400 px.On the premise of selecting the cloned object, create a new motion graphics-effects-simple effector, turn on the attenuation, the attenuation type is square, the attenuation is adjusted to 100%, then adjust the attenuation size, and then adjust the position of the Y-axis parameters. The feeling of layer by layer is coming out.The material of the ground material under the middle cube of the reference picture is different from the material of the scene. Here, a new plane is placed on top, and a new cube is placed again, placed in the middle, and the rounded corners are also given to a parameter.The model part has almost been created, and now you can start making the lighting part. Create a new HDR light for lighting.Firstly, create a new reflective material, modify its color, roughness and reflection intensity to adjust to the appropriate effect. Create a new transparent material, here modified the refractive index, the real effect may be seen when rendering, can be fine-tuned after rendering.Create a new hybrid material again, mix the transparent material and the reflective material, and add a noise map to select the type of noise as a unit, so that the texture will be displayed in the form of a square, then control the global zoom, brightness, contrast Wait to control the range of the display.Directly copy the noise map directly to the replacement channel, and the parameters of the replacement can also be adjusted.I feel that there should be another layer outside the cube, so I copied a cube and slightly enlarged it to give a transparent material. Temporarily hide the two cubes just now, and then create a smaller cube to create a glowing material.The scene material is a reflection material, where 3 stone texture maps are attached, and the texture can be modified to change the gamma value or intensity depending on the situation. Then the UV map is projected in a cube. The plane below the cube is also a reflective material, then a noise is added to properly adjust the roughness and the intensity of the reflection.Now set the output size, place the camera, then fill the light, change the color temperature, and if the cube reflects the light.The cube also needs to add some decorative spheres, create a new emitter and sphere, make the sphere a subset of the emitter, adjust the emitter parameters appropriately, and check the display object. Add the analog tag rigid body to the emitter, apply the inheritance tag to the subset, and select the individual elements. Add the analog tag collision body to the cloned object and the outermost glass cube. Click the play button and the ball will naturally fall on it.Now add a little depth of field, the effect is almost the same. That's all.Fox Renderfarm hopes it will be of some help to you. It is well known that Fox Renderfarm is an excellent cloud rendering services provider in the CG world, so if you need to find a render farm, why not try Fox Renderfarm, which is offering a free $25 trial for new users? Thanks for reading!Reference Source: Https://www.bilibili.com/read/cv2176795?from=search
More
2022-07-28
Octane For C4D Tutorial - Making Forest Scene Model Light Rendering (2)
As the leading cloud rendering service provider, Fox Renderfarm, is going to share with you the second part of the tutorial of Octane for C4D, making forest scene model light rendering as an example.Octane For C4D Tutorial - Making Forest Scene Model Light Rendering (1)In the previous tutorial, in order to make the scene more natural, many kinds of plants were added to the scene. After preparing to use the Octane renderer, all textures need to be converted to Octane's texture.You can select all shaders that are not Octane, and convert all shaders to Octane shaders in Convert Matenials under Materials.After converting the shader, remember to clean up the shaders before.What you need to deal with now is the texture of the ground and the texture of the dead tree. The texture of the ground is Octane GLossy Material, which adds a total of Diffuse, Specular, Bump, Normal, Displacement.Add a picture to the background and adjust it to the appropriate size and position.Add the mushroom material, create a new Octane Specular Material shader, modify the Medium and Fake Shadows, change the mushroom to yellow and modify the butterfly material.Now adjust the lights. Octane's Octane Arealight is used here, and the position of the light source simulates the sun's lighting effect according to the position in the background image. First illuminate the background with a light, then use another light to illuminate the tree.Remember to turn off the light display and the lights will not be rendered in the rendered view. Be sure to adjust the intensity of the light with reference to the background image. Now adjust the light while rendering. This is a step that needs to be tested continuously.The outlook is a bit dark, copying the care of the Octane Arealight supplement.In the process, I feel that the position of the mushroom has exposed. Now put the mushroom in a lower position to avoid exposure.Modify the camera settings, Kernels changed to Pathtracing option, Max samples changed to 1000, Diffuse depth changed to 8, the rendering speed will be slower. Change the GI clamp to 3 to reduce the noise of the exposure.When Cameralmager's Response is changed to Linear, the rendering effect will be closer to reality.Now focus on the butterfly and add some depth of field.Now that the effect is nearing completion, you only need to add some light fog in the later stage.ConclusionThe above is all of the tutorial of Octane For C4D for this time. Fox Renderfarm hope it will be of some help to you.As you know, Fox Renderfarm is an excellent cloud render farm and leading cloud rendering services provider in the CG world, so if you need to find a render farm, why not try Fox Renderfarm, which is offering a free $25 trial for new users? Thanks for reading!
More
2022-07-28
  • Foxrenderfarm

    Powerful Render Farm Service

  • TPN
  • TPN

    Business Consulting

    Global Agent Contact:Gordon Shaw

    Email: gordon@foxrenderfarm.com

    Marketing Contact: Rachel Chen

    Email: rachel@foxrenderfarm.com

    Connect with Us

Fackbook Customer Reviews