3ds Max Tutorials: The Production and Sharing of "Sci-Fi Guns" (3)

3ds Max Tutorial The Production and Sharing of Sci-Fi Guns 4

The best render farm, Fox Renderfarm still shares with you the production of the work "Sci-Fi Guns" which made with software 3ds Max and Substance Painter 2019 from 3d artist Zikai Wu. And this is part three of the sharing.

Texturing

Next, start the texture production. First, divide the whole into several large layers, and then create a selection area based on the id map made before. First, create a layer group and add a color selection mask. Then make the texture of each part in each layer group.

When making textures, my production process is to pave the color first, and then add details. First, give a basic color, then copy the layer to make the darker part, add Dirt generator to this layer, if the effect does not meet your requirements, you can modify the generator parameters and add a brush tool to draw the part you want The effect can be. I usually add the Edge generator to the bright edges to increase the volume and make the overall effect clear. For example, small white particles on part of the surface: first create a new filling layer, add a black mask to the layer, add a filling layer to the mask, then find the picture you want in the grayscale material library and drop it on top, modify the parameters to Control the particle effect.

3ds Max Tutorial The Production and Sharing of Sci-Fi Guns 6

After the texture is finished, I will create a new layer on the top and add sharpening to enhance the clarity of the details.

For the gun, I used some glow textures and halo effects. These halos used some basic layers, and then used a mask to draw the shape, leaving only the Emiss self-illumination, and then changed it to blue. Then duplicate this layer, and add a Blur filter on the mask, modify the blur intensity to achieve the halo effect.

3ds Max Tutorial The Production and Sharing of Sci-Fi Guns 13

Other parts of the texture also use this method, and the texture is exported after production. When exporting textures, you need to pay attention to texture size, texture location, channel, and format.

Rendering

After the texture is produced and exported, it enters the rendering stage. We also need to export the environment map used in Substance Painter to MarmosetToolbag 3 for use.

Import the low polygon and add the MarmosetToolbag 3 shader, paste the exported texture according to the channel, pay attention to the name of each channel. You need to flip the Y-axis on the normal channel, just click it. Because this also has an emissive map, you need to open the emissive channel in MarmosetToolbag 3. After the texture is the lighting, the lighting method: one main light source (warmer), one or two auxiliary lights. (Colder). The main light source is located 45 degrees above the front, and the auxiliary light is located on the side and back, which is mainly used to illuminate the dark parts and express silhouette contours.

3ds Max Tutorial The Production and Sharing of Sci-Fi Guns 4

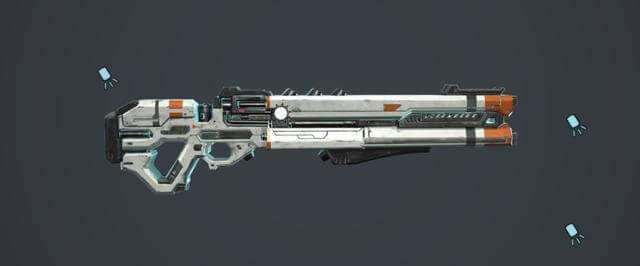
After all the settings are adjusted, you can render. Below is the final rendering effect:

3ds Max Tutorial The Production and Sharing of Sci-Fi Guns 3

The above is the whole process of making this gun. We hope this tutorial can be of some help to you. As the leading cloud rendering service provider, Fox Renderfarm continues to bring you the latest news about 3D art! Thank you for reading!

Welcome to join us

render farm free trial

Recommended reading


How to Render High-quality Images in Blender

2023-01-13


Top 9 Best And Free Blender Render Farms of 2024

2023-05-06


Revealing the Techniques Behind the Production of Jibaro "Love, Death & Robots", Which Took Two Years to Draw the Storyboard

2023-01-13


How to Render Large Scenes with Redshift in Cinema 4D

2022-06-09


Top 10 Free And Best Cloud Rendering Services in 2024

2023-09-26


Top 8 After Effects Render Farm Recommended of 2023

2023-02-02


How to Reduce Noise in Corona Renderer - Corona Denoising

2023-01-13


Arnold for Maya Tutorial: How to Render Wireframe

2023-01-13


Partners

Interested

3ds Max Tutorial: How to Make a Beautiful Pattern
In this article, Fox Renderfarm, the best could rendering services provider, will share with you a 3ds Max tutorial about how to make a beautiful pattern. This tutorial is written by 3d Artist Sam, hope this article will help you in the 3ds Max learning.This shape seems difficult, but it actually requires a higher level of logical thinking. And it is not difficult to make a card, it only has some requirements for the use of basic functions, especially the use of tools.On the left is the original picture, and on the right is the remade image:The effect after the final roundness:ProcessFirst create a platonic, and then adjust the parameters to become a hexahedron.Create a plane as the alignment object. Switch to normal alignment. Align the plane with the inclined triangular face under the image.Switch to the left view, we can see two parallel lines. Use tape to measure the angle of inclination of parallel lines. Copy the measured angle to the angle capture.Create a pentagon in the front view. Convert the model to poly polygons. Then copy one and pull it aside, remember to use the reference, the parent-child relationship.Use scatter to align the sub-objects to the vertices of the target model. The parameters are shown in the figure. Change the angle capture parameter to 18.Enter the parent level, rotate the angle, and then align the model. At the child level, move the parent object forward, observe the model next to it, and align it slowly.Select all five sides of the parent object. Add line. Move the middle surface of the parent object backwards in the child level and shrink inward to get the effect as shown in the figure.Cut the corners and break the five edges.While the coordinate points of the pentagon are still correct, create a decagon to align it, and delete the selected faces in the figure.Lock the rotation angle to 7 degrees, rotate the copy, and associate.The effect after copying. Select any object and drag to create a new edge.Modify the model just now, remember that the top side and the left side of the object in the upper left corner cannot move, this is the side that has been determined. The middle line can be removed and adjusted downward.Continue to drag out new faces, continue to adjust the space, and become a spiral structure.The final rotation reproduces the circular structure in the middle, and the three-dimensional structure looks like this when viewed from the side.Convert the middle decagon into a poly object, and combine the five related objects one by one. The purpose of this step is to use the correct coordinates of the decagon. Convert the middle decagon into a poly object, and combine the five related objects one by one. The purpose of this step is to use the correct coordinates of the decagon.Delete the original sub-objects and use the newly copied sub-objects to spread.Bridge the middle sides of these two objects. After rotating 180 degrees, align to the original parent object. Referring to the original decagonal structure, rotate and copy five related objects.Start the production of details. Select the face to insert, and then extrude the shape.Use the decagon again just now, combine these five objects with good details, and use the reference copy for the third time.Spread on the standard objects again, at the sub-level, move the face of the parent object so that the child objects on the left can be connected together.Initially completed. Not demanding, so that's good. Select all points for soldering. Enlarge the welding range and weld some misaligned points together.Select all, solder joints. Enlarge the welding range and weld some misaligned points together.Add shell and smooth effect, so we can see that the final model will look better.Add texture to get the model.Add smoothness to get the final effect.
More
2022-07-01
3ds Max Tutorials: The Production and Sharing of "Sci-Fi Guns" (2)
The best render farm, Fox Renderfarm shares with you the production of a work "Sci-Fi Guns" which made with software 3ds Max and Substance Painter 2019 from 3d artist Zikai Wu. And this is part two of the sharing.3ds Max Tutorials: The Production and Sharing of "Sci-Fi Guns" (1)")Unwrapping UVAfter the low-variability model is made, it is the job of splitting the UV. Before splitting the UV, you need to distinguish the smooth group first. My distinguishing standard is: the angle greater than 90 degrees is not separated, and the uniform smooth group is less than or equal to 90 degrees. Separate. Then there will be some large black parts after separation, which can be separated separately. When splitting the UV, first use the built-in tools to tile according to the smooth group, and then manually adjust some more complicated structures. When placing the UV in a straight line, try to keep it as straight as possible to facilitate the overall placement. The second is the allocation of UV space. The more important components will occupy a larger space, and the space utilization rate of UV should be maximized. Because most of this gun is symmetrical, half of the UV overlaps.Normal mapHere is the use of Substance Painter for baking. Before baking the Normal map, the high polygons and low polygons must be matched first. The edges of the model must be matched. The second is model naming, for example, the low polygon qiang01_low, the high polygon is qiang01_high. The low polygon export format is fixed.What is worth noting here is the export of high polygons. If you use one time to export all models, it will take a long time. And there may be some small problems when baking the Normal map, and then you have to go back to 3DSMAX to modify and re-export the entire model, which will take a lot of time. After a test, I will split the model into several parts and export them separately for easy modification.When you are ready for these tasks, start to use Substance Painter to bake textures, and use the PBR production process, import high polygons, set the parameters, select the matching method as naming, and bake a vertical normal first. The effect of the vertical normal baking is that the internal structure is clear, the small details such as screws are not offset, but there will be some defects in the edge, so it is necessary to bake an average normal to combine the two normals to retain their respective advantages, namely Keep the edges of the average normal inside the vertical normal.Then you need to re-import this normal into Substance Painter for use, and you need to check again for any problems for the first time.For small flaws like this kind of edge, you need to enter Substance Painter again to modify the normal edge.After the normal problem is solved, we will bake the id map. To bake the id map, you need to select this option, based on the texture color. The main reason is that I used high polygon layers to give textures of different colors in 3DSmax. Then you can bake other remaining textures after you get the normals and id.Follow the leading cloud rendering service provider, Fox Renderfarm, for the next part: 3ds Max Tutorials: The Production and Sharing of "Sci-Fi Guns" (3)").
More
2022-05-07
3ds Max Tutorials: The Production and Sharing of "Sci-Fi Guns" (1)
The best 3ds Max render farm, Fox Renderfarm will share with you the production of a work "Sci-Fi Guns" which made with software 3ds Max and Substance Painter 2019 from 3d artist Zikai Wu. And this is part one of the sharing.In the tutorial, he explained and showed in detail how to make high and low poly models in 3ds Max 2018, baking method of normal map and ID map, the texture map made by Substance Paint, and render the final effect in Marmoset Toolbag 3.Let me show you the original concept map first, because its color matching and style are very beautiful, which is why I wanted to make it a 3D version at first sight. The overall style is distinguished, with rich details.ModelingBecause the concept map of this gun has only one front view, the side and back parts need us to find more references or use our imagination. When making, you can import the concept map into 3ds Max 2018 as a background reference, which can help us make the shape of the gun more accurate in the production, especially in some corners and structures.In order to make the model more similar to the concept map, I used Line to create the model based on the outline of the concept map.After the shape of the gun is determined, the details can be continuously added on this basis to optimize the proportion. When making some bumps on the gun body, I used some basic 3ds Max tools to squeeze and push and pull the model. The disadvantage of this production method is that the lines will be messy and more. Then, on the suggestion of a friend, I separated the details from the surface, but the details on the surface, and later put the normal map on the model by baking. This way can also ensure that the lines of the model are kept as simple and tidy as possible.The model in this case is a hard surface model, so when making, adjust all the lines and add a smooth group. First, all models are distinguished according to similarities, and then the Chamfer function is added, and lines are added according to the smooth group.Then add turbos smooth on this basis to check the model. If the corners are deformed by pulling, or other problems occur, you need to go back to the bottom layer and distinguish the smooth group. If there is no change, you need to add it to the Chamfer command Edit Poly modify and adjust the corner line. It should be noted that after adding this command, you can't just go back to the first level to modify, because I added this command last.After modifying the model with a high face count, some checks are needed. For example, the position of the seams between the components, check the fit to see if the connection is better.When making a low-polygon model, you directly use the plug-in to reduce the lines of the high-poly model. The low-polygon model has strict requirements on the number of faces, especially for the use of lines, only the places that are as useful as possible are reserved, and the extra places are deleted. Try to keep the straight line of the model as straight as possible, and the overall look is simple and smooth.When making a low-polygon model, you directly use the plug-in to reduce the lines of the high-poly model. The low-polygon model has strict requirements on the number of faces, especially for the use of lines, only the places that are as useful as possible are reserved, and the extra places are deleted. Try to keep the straight line of the model as straight as possible, and the overall look is simple and smooth.Follow the TPN-Accredited cloud rendering service provider, Fox Renderfarm, for the next part: 3ds Max Tutorials: The Production and Sharing of "Sci-Fi Guns" (2)").
More
2022-05-07
  • Foxrenderfarm

    Powerful Render Farm Service

  • TPN
  • TPN

    Business Consulting

    Global Agent Contact:Gordon Shaw

    Email: gordon@foxrenderfarm.com

    Marketing Contact: Rachel Chen

    Email: rachel@foxrenderfarm.com

    Connect with Us

Fackbook Customer Reviews