How to Render Water Surface in KeyShot?

How to Render Water Surface in KeyShot

Fox Renderfarm, as the best render farm and cloud rendering services provider in the CG industry, we will often share some production skills and some of the industry's latest and hottest information, hoping to be helpful to your 3D learning. This time we will share how to render the water surface in KeyShot. I hope you like it.

Many people think that in the CG production steps, rendering water is a relatively big production challenge. In KeyShot, you can easily and quickly create a real and beautiful 3D rendered water surface. Especially the water texture of KeyShot can help us save a lot of working time, and its liquid map is also very simple.

First, create a bump map of the water in After Effects.

  1. Start After Effects, create a Composition with an aspect ratio of 2048 x 2048, and name it Noise.
  2. Create a solid with the same aspect ratio.
  3. Apply the layered noise from the Effect menu to the created solid.
  4. Under the Effect Controls tab, change the layering type to ‘Dynamic Twist’, the Noise type to ‘Spline’, check ‘Invert’, adjust the contrast to 55, brightness to -7, and complexity to 12.

How to Render Water Surface in KeyShot -10

  1. Click Composition> Save Frame As

How to Render Water Surface in KeyShot -4

  1. Choose a location to save the file, and then click ‘Render’.

Tile and blur the displacement maps in Photoshop.

  1. Open the Noise file in Photoshop.
  2. Under the Filter menu, apply the Offset effect.
  3. Set the horizontal pixels to +973 and the vertical pixels to +690.
  4. Use the clone tool to clone all the seams you see.

How to Render Water Surface in KeyShot -2

  1. Select the layer, apply the Gaussian blur filter, and set the radius to 5.
  2. Save the file as a jpeg image format.

How to Render Water Surface in KeyShot -0

Create the scene in Maya.

  1. Open Maya, create a plane, name it "water", and set the subdivision width and height to 20.
  2. Duplicate the plane, rename it to reflection, and move it below the "horizontal" plane.
  3. Create a camera>place the camera on the edge of the "water", facing the horizontal line.
  4. Change the window from perspective to camera 1, select all geometric figures and zoom in to fill the gap between the two sides.

How to Render Water Surface in KeyShot -3

  1. Create a poly sphere and place it on the water.

How to Render Water Surface in KeyShot -9

  1. Select the camera, navigate to the attribute editor, and modify the film aspect ratio to 1.78.
  2. Before exiting Maya, you need to make sure that every object in the scene has a different material. Create three different ‘lamberts’(luminance units) under the material editor, and assign one to each object.
  3. Export the scene in FBX format.

Render the model in KeyShot

  1. Open KeyShot and import the FBX file.
  2. Using the material editor, drag and drop the water material in the liquid group on the top of the plane.
  3. Next, drag and drop the Brick material from the architecture group onto the bottom plane.
  4. Click the right bottom plane to open the Brick material option and uncheck the ‘fresnel’ option.
  5. Assign a chrome alloy material to the sphere to reduce the brightness of the diffuse color.
  6. Under the Project> Camera tab, change the field of view to 1.
  7. Use the Environment tab to load HDRI, you can use the "hdri-locations_iceland_4k_hdz" that comes with KeyShot.
  8. Under the environment option, adjust the height to -0.400, the size to 8.5850, and the rotation to 21.180.

How to Render Water Surface in KeyShot -7

  1. Load the bump map created before, and modify the Scale U and V to 0.180.

How to Render Water Surface in KeyShot -1

  1. Under the camera options, turn on the depth of field and use the "select focus point" function to define the focal length of the sphere.

How to Render Water Surface in KeyShot -1

How to Render Water Surface in KeyShot -8

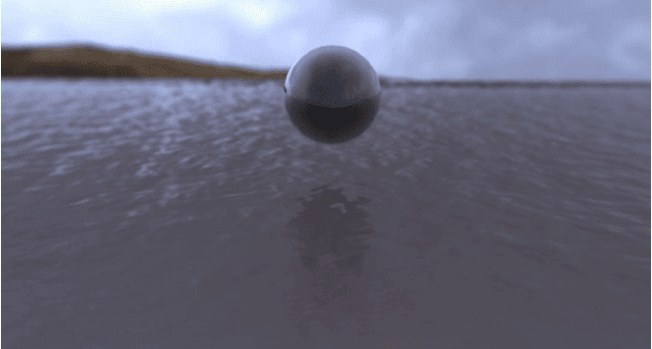
Now, click ‘Render’ to see the final effect!

How to Render Water Surface in KeyShot -6

Fox Renderfarm hopes it will be of some help to you. Fox Renderfarm is a very powerful cloud rendering farm in the CG world, so if you need to find a render farm, why not try Fox Renderfarm, which is offering a free $25 trial for new users? Thanks for reading!

Welcome to join us

render farm free trial

Recommended reading


How to Render High-quality Images in Blender

2023-01-13


Top 9 Best And Free Blender Render Farms of 2024

2023-05-06


Revealing the Techniques Behind the Production of Jibaro "Love, Death & Robots", Which Took Two Years to Draw the Storyboard

2023-01-13


How to Render Large Scenes with Redshift in Cinema 4D

2022-06-09


Top 10 Free And Best Cloud Rendering Services in 2024

2023-09-26


Top 8 After Effects Render Farm Recommended of 2023

2023-02-02


How to Reduce Noise in Corona Renderer - Corona Denoising

2023-01-13


Arnold for Maya Tutorial: How to Render Wireframe

2023-01-13


Partners

Interested

KeyShot 10 Tutorial:  How to Render a Perfume Bottle
KeyShot 10 Tutorial: How to Render a Perfume Bottle
Today, Fox Renderfarm, the best could rendering service provider and render farm, will share with you a KeyShot 10 tutorial about how to render a perfume bottle. This tutorial is written by 3d Artist Joy, hope this article will help you in the KeyShot learning.IntroductionI am going to render a perfume bottle. The rendering software used is KeyShot. The model of this perfume and leaves are downloaded from the Internet. You can see that the final rendering effect is good. The overall tone of the picture is also very similar to the current season. In this tutorial, I will introduce how to render a beautiful caustics rendering with KeyShot.First, import the model, find a better angle to establish the camera and adjust the angle of view to make the product perform better.Second, set up the scene and start lighting.Third, assign materials to each part and adjust parameters.Finally, it is the adjustment of parameters such as hue, caustics and bloom.ProcessImport the model into the KeyShot renderer (contains a simple bottle and a plant).Change the focal length to 135 to make the lens perspective smaller, which can reflect more product details.Use the camera to find a better angle to better display the model and build the camera, as shown in the figure.After fixing the camera, refer to the entire layout and the light and shadow and add some decorations. The geometric view is as follows.Add a point light source, adjust the position of the point light source in the geometric view, create a comfortable and beautiful projection, and adjust the brightness of the point light source.Next, adjust the material of each part. The first is to adjust the material of the ground. I added a plastic material with a gloss of about 60, as shown in the picture.Next, adjust the material of the leaves, pull the texture in and connect to the diffuse reflection of the leaves, and then adjust the colour with colour adjustment to make the colour of the leaves a little darker, in order to make the picture more layered, the node map is very simple, It was adjusted only after the test was modified, and the material was added.Now adjust the material of the bottle cap. I gave it a solid glass texture and slightly adjusted a light colour, as shown in the picture.Adjust the material of the bottle body, we can material the glass, change the colour to white, and check the refraction to make the bottle more three-dimensional and real, as shown in the figure below (remember to check the refraction).Next, we can adjust the material of the bow. We can choose the metal that has been measured, the default value is gold, or we can use the colour control, depending on our choice, the gloss is adjusted to about 70. Next, adjust the material of the perfume in the bottle, material the liquid, adjust the colour, transparent distance and refractive index, and finally add a fractal shape on the bumps to make the perfume have undulations, and the mapped caustics effect is better. The node graph and The effect is as follows.Adjust the material of the metal logo. The basic material is metal. Pull the texture in to make the logo truly reflect. Use shift to adjust the shifting height, offset and triangle size parameters. I also deliberately added a broken noise to the light and shadow to the liquid.Find the appropriate hdr in the hdr library on the left, hold down ctrl and rotate the hdr with the left button until the projection is consistent with the projection of the spotlight. Adjust the parameters in the lighting, turn on the global illumination, caustics, etc., to make the picture tones look better and the caustics effect better.Continue colouring, change the basic setting to photography, adjust the parameters, turn on bloom, adjust the intensity, radius and threshold, so that there are some halos in the picture and increase the beauty of details.Open the depth of field, set the focus and aperture, and the relevant parameters are shown in the figure below. After the adjustment, the picture can be produced, and the picture is finally rendered, and the final effect picture is as shown in the figure.
More
2022-08-15
How To Make A Car Rendering Fog Scene With KeyShot 8
As the leading cloud rendering service provider and render farm, Fox Renderfarm, will show how to make a car rendering fog scene. The scene uses an already-built car scene. In the picture below, a bunch of white light produces some smog, or a sly beam, but this is added in photoshop, so it looks a bit Rigid, lacking some changes, it looks a bit fake.Compare the effect of direct use of KeyShot 8 new material scattering medium, it is still natural. And test a variety of parameters, lighting, the final effect may be better, at present, a bit slow.Below are some tests for some lighting collocation parameters.In the shadow channel rendered in the figure below, this shadow channel is the effect of using a HDR+ plane self-luminous + scattering medium. It can be seen that the fog effect is not obvious, there is a little bit, of course, with the scattering medium parameter density and visibility related.Below is the rendering of the initial production. No render farm has been used yet, so as you can see, there is basically no effect, and there is no real beauty at all. So next, you need to adjust the parameters and lighting mix to continue testing.Next, test the spotlight and use a spotlight to illuminate it from the entrance. Everyone should have seen the spotlight on the stage. When the light is shining, you can see the light flowing under the light. This is to achieve this effect. As the image shown above, we need to increase the density and visibility of the scattering medium material, and set the color of the spotlight to yellow. At this time, the smoke generated by the scattering medium will also be affected by the spotlight and turn yellow. Then look at the rendered shadow channel map. As the picture shown below,Let's take a look at the final rendering comparison chart. Original image as below:HDR+ plane self-illumination + scattering medium, the rendering:The KeyShot 8 scattering media material, with different lights, may have unexpected effects. Another feeling is that the scattering medium will affect the light receiving of the surrounding objects, and it also meets the influence of the fog environment on the visibility of the object in the real environment. In order to make the picture more realistic, it is recommended to use the best Keyshot render farm to make the effect more realistic.
More
2022-08-15
How to Use KeyShot 9 to Render Christmas Scene - Tutorial
This article is a 3d rendering tutorial about Christmas scene shared by 3d artist Drown. The article is organized by Fox Renderfarm, the leading cloud render farm in the CG industry. Because there are so many items in the scene, this tutorial will focus on the lighting of the scene and the skills to create a Christmas atmosphere, and the adjustment of the material will be briefly described.Use KeyShot 9 to open the placed Christmas scene, add a camera and adjust the appropriate angle and save. The next work is to give the main body a crystal ball of glass material, and change it to the product mode in the lighting mode, so that light can pass through the glass ball to illuminate the internal details.The tablecloth in the scene and the curtains in the background were selected from red velvet material. The official velvet material of KeyShot 9 was selected to bring out the atmosphere of the Christmas scene.Next, we need to find a suitable HDR map. Because it is a Christmas scene, we need an indoor HDR map with many small bright light sources to simulate the scene atmosphere of the decorative chandelier on Christmas eve. After using the HDR map, rotate it to an appropriate angle to adjust the brightness, contrast, hue, saturation, etc. of the picture to make the scene warm and cold.Enter the image panel, change the image style to photography, adjust the exposure, contrast, etc., to further enhance the warm and cold, light and dark contrast of the scene.Next, open the HDR canvas and manually add a small warm light source to cover the cold-light incandescent light on the original image to further strengthen the Christmas Eve atmosphere. Pay attention to keep the cold light in the scene properly to avoid the scene being too warm. At the same time, the brightness of the small warm light source should be adjusted appropriately and the blending mode changed to ALPHA to ensure that the cold-light incandescent lamp can cover the original image.In order to highlight the crystal ball of the subject, add a sphere to the scene and set the material as a spotlight. After adjusting the position, illuminate the crystal ball.Further fine-tuning various lighting parameters, the atmosphere of the picture is already in place at this time, but now the picture is a little too warm and lacks a bit of realism.Add a cool rectangular light on the right side of the screen to reconcile the warm atmosphere of the screen, so that the screen effect will not be too false. Here we must pay attention to changing the blending mode of rectangular light to blending to avoid the glass ball reflecting pure white rectangular light directly and causing the realism of the picture to be lost.After the atmosphere of the screen comes out, you can start adjusting the texture. Start with the snow in the crystal ball. Use the noise texture node to add bumps to the snow and snow colors on the surface. If the screen freezes, you can hide other items in the scene, including the spotlight.Next, use the matching map to adjust the material of the lounger inside the crystal ball. Anything can be placed here, not necessarily the chair, as long as it is a suitable material and color. It is recommended to use a brighter color scheme to match the atmosphere of the scene.Next adjust the texture of the Christmas tree.After lighting the bulb material on the Christmas tree, observe the current effect. Note that the glass of the crystal ball must be given a transparent glass material, otherwise the light will not find the scene inside the crystal ball and let the light penetrate into the interior scene.Use the matching wood texture map to simply adjust the wood texture base material, and adjust it according to your favorite, such as using a black plastic base.Then open the texture of the glass ball, add the fingerprint texture that is official with KeyShot 9, and after adjusting the position size, turn off the texture repeat, and add the diffuse reflection texture as the fingerprint texture. After that, the fingerprint texture is connected to the label, and the texture is used as the color of the texture. Here, the brightness must be adjusted, and it should be reduced as much as possible to make the fingerprint faintly visible.Use scratched maps, adjust the contrast with color, and control the transparency effect on the glass. Repeat this step to make scratches and bumps on the glass. The effect of the scratches is a little bit, otherwise the glass will look fake.Next use to adjust the texture on the crystal ball name tag.Then use PS to edit a piece of text, pay attention to use a black background, pure white fonts, and use horizontal composition. After saving the black and white picture, use the 3D--Generate Normal Map option in the PS filter to generate a bump texture.Drag the texture to the texture of the brand, create a new texture as the material of the lettering, and adjust the color according to your preference. After adjusting the texture, the black and white image is used as the opacity, and the normal texture is used as the bump. Pay attention to the normal To complete the adjustment of the brand-name texture.Simply adjust the material of the board, and the color matching needs to be darker to avoid the board being too conspicuous. Then use the fuzzy nodes in the geometry to make fluff on the tablecloth. The surface material of the nodes can directly use the original red velvet material.In order to prevent fluff from passing through the model, you can simply render a top view, and then draw a black and white texture according to the position of the item in PS. Use a Gaussian blur filter to blur out the edges of the black and white texture. Then use the texture map as the length texture of the fur node. The length of the fluff where the texture is black is 0. After the geometry node is re-executed, the fluff will not pass through the model.The curtain can use the color gradient node. Change the gradient type to the viewing direction to enhance the volume of the curtain fabric. The background wall is not easy to be too dark or too bright, otherwise the background is too eye-catching and will destroy the atmosphere of the scene.The use of glass as the texture of the candle's wrapping paper can reduce the refractive index to make the texture of transparent plastic wrapping paper. Later, the translucent material is used to adjust the candles, and the color matching can be free.To color various gift boxes, it is recommended to color each gift box, and cool colors are recommended to use blue to correspond to the cold light atmosphere in the scene.Next, you need to adjust the surface effect of the gift box to make the bumpy texture on the gift box. The effect does not need to be too complicated, it can be simpler.Next, add a sphere to the inside of the crystal ball to make a snow effect inside the crystal ball. Finally, fine-tune the composition, lighting, and then render the image.ConclusionNow you know how to render a Christmas scene in KeyShot 9, don't you? Why not give it a try?If you want your rendered scenes to become more detailed and complex, try the best CPU &x26; GPU render farm, Fox Renderfarm, who provides a very good cloud rendering service and a free $25 trial!
More
2022-08-15
  • Foxrenderfarm

    Powerful Render Farm Service

  • TPN
  • TPN

    Business Consulting

    Global Agent Contact:Gordon Shaw

    Email: gordon@foxrenderfarm.com

    Marketing Contact: Rachel Chen

    Email: rachel@foxrenderfarm.com

    Connect with Us

Fackbook Customer Reviews