How to Use KeyShot 9 to Render Christmas Scene - Tutorial

This article is a 3d rendering tutorial about Christmas scene shared by 3d artist Drown. The article is organized by Fox Renderfarm, the leading cloud render farm in the CG industry. Because there are so many items in the scene, this tutorial will focus on the lighting of the scene and the skills to create a Christmas atmosphere, and the adjustment of the material will be briefly described.


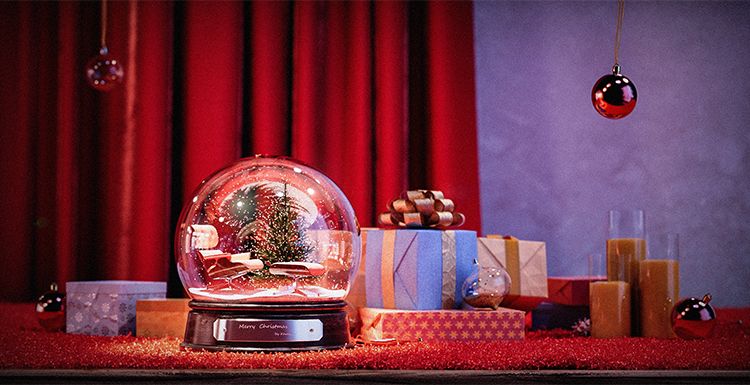
Use KeyShot 9 to open the placed Christmas scene, add a camera and adjust the appropriate angle and save. The next work is to give the main body a crystal ball of glass material, and change it to the product mode in the lighting mode, so that light can pass through the glass ball to illuminate the internal details.

The tablecloth in the scene and the curtains in the background were selected from red velvet material. The official velvet material of KeyShot 9 was selected to bring out the atmosphere of the Christmas scene.

Next, we need to find a suitable HDR map. Because it is a Christmas scene, we need an indoor HDR map with many small bright light sources to simulate the scene atmosphere of the decorative chandelier on Christmas eve. After using the HDR map, rotate it to an appropriate angle to adjust the brightness, contrast, hue, saturation, etc. of the picture to make the scene warm and cold.

Enter the image panel, change the image style to photography, adjust the exposure, contrast, etc., to further enhance the warm and cold, light and dark contrast of the scene.

Next, open the HDR canvas and manually add a small warm light source to cover the cold-light incandescent light on the original image to further strengthen the Christmas Eve atmosphere. Pay attention to keep the cold light in the scene properly to avoid the scene being too warm. At the same time, the brightness of the small warm light source should be adjusted appropriately and the blending mode changed to ALPHA to ensure that the cold-light incandescent lamp can cover the original image.
In order to highlight the crystal ball of the subject, add a sphere to the scene and set the material as a spotlight. After adjusting the position, illuminate the crystal ball.

Further fine-tuning various lighting parameters, the atmosphere of the picture is already in place at this time, but now the picture is a little too warm and lacks a bit of realism.

Add a cool rectangular light on the right side of the screen to reconcile the warm atmosphere of the screen, so that the screen effect will not be too false. Here we must pay attention to changing the blending mode of rectangular light to blending to avoid the glass ball reflecting pure white rectangular light directly and causing the realism of the picture to be lost.

After the atmosphere of the screen comes out, you can start adjusting the texture. Start with the snow in the crystal ball. Use the noise texture node to add bumps to the snow and snow colors on the surface. If the screen freezes, you can hide other items in the scene, including the spotlight.

Next, use the matching map to adjust the material of the lounger inside the crystal ball. Anything can be placed here, not necessarily the chair, as long as it is a suitable material and color. It is recommended to use a brighter color scheme to match the atmosphere of the scene.

Next adjust the texture of the Christmas tree.

After lighting the bulb material on the Christmas tree, observe the current effect. Note that the glass of the crystal ball must be given a transparent glass material, otherwise the light will not find the scene inside the crystal ball and let the light penetrate into the interior scene.

Use the matching wood texture map to simply adjust the wood texture base material, and adjust it according to your favorite, such as using a black plastic base.

Then open the texture of the glass ball, add the fingerprint texture that is official with KeyShot 9, and after adjusting the position size, turn off the texture repeat, and add the diffuse reflection texture as the fingerprint texture. After that, the fingerprint texture is connected to the label, and the texture is used as the color of the texture. Here, the brightness must be adjusted, and it should be reduced as much as possible to make the fingerprint faintly visible.

Use scratched maps, adjust the contrast with color, and control the transparency effect on the glass. Repeat this step to make scratches and bumps on the glass. The effect of the scratches is a little bit, otherwise the glass will look fake.

Next use to adjust the texture on the crystal ball name tag.
Then use PS to edit a piece of text, pay attention to use a black background, pure white fonts, and use horizontal composition. After saving the black and white picture, use the 3D--Generate Normal Map option in the PS filter to generate a bump texture.

Drag the texture to the texture of the brand, create a new texture as the material of the lettering, and adjust the color according to your preference. After adjusting the texture, the black and white image is used as the opacity, and the normal texture is used as the bump. Pay attention to the normal To complete the adjustment of the brand-name texture.
Simply adjust the material of the board, and the color matching needs to be darker to avoid the board being too conspicuous. Then use the fuzzy nodes in the geometry to make fluff on the tablecloth. The surface material of the nodes can directly use the original red velvet material.


In order to prevent fluff from passing through the model, you can simply render a top view, and then draw a black and white texture according to the position of the item in PS. Use a Gaussian blur filter to blur out the edges of the black and white texture. Then use the texture map as the length texture of the fur node. The length of the fluff where the texture is black is 0. After the geometry node is re-executed, the fluff will not pass through the model.
The curtain can use the color gradient node. Change the gradient type to the viewing direction to enhance the volume of the curtain fabric. The background wall is not easy to be too dark or too bright, otherwise the background is too eye-catching and will destroy the atmosphere of the scene.

The use of glass as the texture of the candle's wrapping paper can reduce the refractive index to make the texture of transparent plastic wrapping paper. Later, the translucent material is used to adjust the candles, and the color matching can be free.

To color various gift boxes, it is recommended to color each gift box, and cool colors are recommended to use blue to correspond to the cold light atmosphere in the scene.

Next, you need to adjust the surface effect of the gift box to make the bumpy texture on the gift box. The effect does not need to be too complicated, it can be simpler.

Next, add a sphere to the inside of the crystal ball to make a snow effect inside the crystal ball. Finally, fine-tune the composition, lighting, and then render the image.

Conclusion
Now you know how to render a Christmas scene in KeyShot 9, don't you? Why not give it a try?
If you want your rendered scenes to become more detailed and complex, try the best CPU & GPU render farm, Fox Renderfarm, who provides a very good cloud rendering service and a free $25 trial!
Recommended reading
Top 9 Best And Free Blender Render Farms of 2025
2024-12-30
Revealing the Techniques Behind the Production of Jibaro "Love, Death & Robots", Which Took Two Years to Draw the Storyboard
2025-02-10
Top 10 Free And Best Cloud Rendering Services in 2025
2025-03-03
Top 8 After Effects Render Farm Recommended of 2025
2025-02-10
Top 5 Best and Free 3d Rendering Software 2025
2025-02-10
Shocked! The Secret Behind Using 3D to Make 2D Animation was Revealed!
2025-02-10
How to Render High-quality Images in Blender
2024-12-04
Easy Cel Shading Tutorial for Cartoon in Blender Within 2 Minutes
2025-02-10
Partners
Previous: How To Make A Car Rendering Fog Scene With KeyShot 8
Next: KeyShot Tutorial: How to Render Realistic Ice
Interested


