Corona Renderer Tutorial: Depth of Field

Corona Renderer Tutorial Depth of Field

For beginners of the Corona renderer, a lot of features need to be understood. As a leading cloud rendering service provider in the CG industry, Fox Renderfarm supports a variety of mainstream software and plug-ins, like 3ds Max, Maya, C4D, Blender, V-Ray, Redshift, Corona, etc. then this article introduces the depth of field in the Corona renderer, we hope to help you.

What is DOF(Depth of Field)?

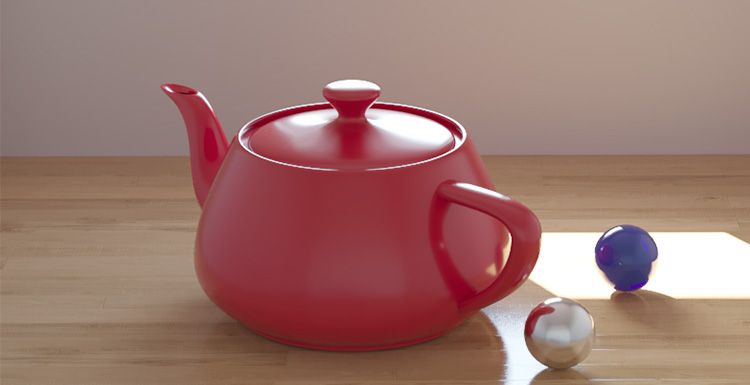
When the camera's lens is sharply focused on an object, the same plane point of the vertical lens axis at the center of the lens can form a fairly clear image on the film or receiver, putting the front and back of the plane The distance of all the scenes is called the depth of field of the camera.

Corona Renderer Tutorial Depth of Field-2

<p class=‘img-source’>(The focus of the camera is on the flower and the bottle)

The depth of field is related to the focal length of the lens. The lens with a long focal length has a small depth of field and a lens with a short focal length has a large depth of field. Secondly, the depth of field is related to the aperture, and the smaller the aperture (the larger the value, for example, the aperture of f16 is smaller than the aperture of f11), the greater the depth of field; the larger the aperture (the smaller the value, for example, the aperture of f2.8 is greater than f5.6) The depth of field is smaller. Secondly, the foreground is deeper than the depth of the back. That is to say, after precise focusing, the scene in the distance from the front of the focus can be clearly imaged, and the scene within a long distance behind the focus is clear.

The 3D software built-in renderer or plug-in can simulate and implement the depth of field effect of the camera. The Corona renderer also enables depth of field rendering.

How Does the Corona Renderer Set the Depth of Field?

  1. In the rendering settings, check DEPTH OF FIELD below, the default focus distance is 100, which is the initial setting.

Corona Renderer Tutorial Depth of Field-3

  1. Establish an environment in the scene: sky, ground. And create a set of spheres, add a C4D camera. Change to Corona renderer and render. The DEPTH OF FIELD is activated here, but there is no depth of field DOF effect.

Corona Renderer Tutorial Depth of Field-4

<p class=‘img-source’>(No depth of field, clear from front to back)

  1. Launch the C4D camera and right click on it to add the Corona camera tag. This converts the C4D camera into a Corona physical camera.

Corona Renderer Tutorial Depth of Field-5

  1. Select the C4D camera, select the "Object" panel - the target distance, use the recognizer, click on the clear object you want in the scene, and the distance will automatically calculate 1112.741CM.

  2. In the scene we can see the focal plane position of the camera.

Corona Renderer Tutorial Depth of Field-6

  1. Click on the Corona’s camera label and the FOCUS DISTANCE will automatically match the distance of the C4D camera. Check OVERRIDE to override the render settings parameters. In other words, this check, the camera's parameters are subject to this.

Corona Renderer Tutorial Depth of Field-7

  1. The OVERRIDE in the DOF of the Corona camera tag has no effect if it is not selected. Because the render settings panel is checked, the rendering settings are dominant. If this is checked, this setting is the main one.

Corona Renderer Tutorial Depth of Field-8

  1. Test rendering

Corona Renderer Tutorial Depth of Field-9

Test Data

  1. Aperture: Like photography, increasing the aperture value makes the DOF effect more subtle. Decreasing the aperture value (the aperture becomes larger and the depth of field becomes smaller) will make it more visible. Aperture value = 2

Corona Renderer Tutorial Depth of Field-10

Aperture value = 2 obvious DOF effect

  1. Aperture value = 4

Corona Renderer Tutorial Depth of Field-11

Aperture value = 4 The aperture of the aperture becomes smaller, the depth of field becomes larger, the clear range becomes larger, and the DOF effect is not as obvious as above.

  1. Aperture value = 16

Corona Renderer Tutorial Depth of Field-12

Aperture value = 16 The aperture hole becomes small, and the depth of field changes greatly. The clear range is changed greatly, and the DOF effect is lost.

  1. The camera focal plane is placed at the end.

Corona Renderer Tutorial Depth of Field-13

  1. The camera focal plane is placed in the middle.

Corona Renderer Tutorial Depth of Field-14

  1. The focal plane of the camera is placed on the front.

Corona Renderer Tutorial Depth of Field-15

  1. The size of the sensor also affects the appearance of the DoF effect. Note: In Cinema 4D, changing the sensor size keeps the focus static and automatically changes the effect. If you want to keep the same composite image in the image, be sure to reset the field of view after changing the Sensor Size.

Corona Renderer Tutorial Depth of Field-16 Corona Renderer Tutorial Depth of Field-17

F-stop = 4, sensor width = 35mm

Corona Renderer Tutorial Depth of Field-18

F-stop = 4, sensor width = 100mm

Corona's depth of field rendering is based on physical camera parameters. The depth of field rendering of the C4D's own renderer is analog and better controlled.

Using the 3D renderer to render the depth of field is very slow. It is better to use layered rendering, render the depth channel, and then go to the PS and AE post-compositing DOF effect, you can control any position clearly, the speed is faster than the renderer rendering, or you can use a render farm, it is more efficient.

Fox Renderfarm hopes it will be of some help to you. As you know, Fox Renderfarm is an excellent cloud rendering farm in the CG world, so if you need to find a render farm, why not try Fox Renderfarm, which is offering a free $25 trial for new users? Thanks for reading!

Welcome to join us

render farm free trial

Recommended reading


How to Render High-quality Images in Blender

2023-01-13


Top 9 Best And Free Blender Render Farms of 2024

2023-05-06


Revealing the Techniques Behind the Production of Jibaro "Love, Death & Robots", Which Took Two Years to Draw the Storyboard

2023-01-13


How to Render Large Scenes with Redshift in Cinema 4D

2022-06-09


Top 10 Free And Best Cloud Rendering Services in 2024

2023-09-26


Top 8 After Effects Render Farm Recommended of 2023

2023-02-02


How to Reduce Noise in Corona Renderer - Corona Denoising

2023-01-13


Arnold for Maya Tutorial: How to Render Wireframe

2023-01-13


Partners

Interested

How to Reduce Noise in Corona Renderer - Corona Denoising
Subtle high-frequency noise is normal for the Corona renderer, especially at the beginning of the rendering process, where bright noise and dark noise are unavoidable. To eliminate them, only increasing the number of photons, increasing the subdivision value of materials and lights, and spending a lot of time can be eliminated.So how to reduce noise in Corona renderer? One way is to increase the hardware speed, replace the CPU, increase the memory, etc., which is undoubtedly an increase in cost; another way, relying on software to improve the algorithm, cleverly eliminate noise, both noise reduction technology.The denoising feature was introduced in Corona 1.4, a feature that analyzes noise in 3D space and subtly reduces noise while not producing spots, maintaining sharp edges and texture details. This not only improves quality, but also reduces rendering time by 50% to 70%.How to Use Denoising Feature in Corana Render?As the best CPU &x26; GPU render farm service provider, Fox Renderfarm will tell you how to reduce noise in corona render step by step.Step 1. Enable denoising. You can enable denoising in "Render Settings - General Settings - Denoising".Denoising optionsDenoising ModeNoneOnly Remove FireliesFull DenoisingGather Data For Later For example, make a scene that uses Corona's own sky, sun and camera objects. The window object PORT seals the window outside, using Portal Matrial. Then, open the Render Settings panel and set the Denoising Mode to Full Denoising. Step 2. Start the VFB rendering window, click to render. This is a screenshot of PASSES TATAL = 4, there is a lot of noise in the scene. PASSES TATAL =25This is a screenshot of 25, and there is a lot less noise in the scene. My machine used 126 seconds, this speed depends on your CPU core and clock speed. The better the hardware, the faster the speed. Step 3. Click to pause the rendering and start the denoising program. Comparing the upper and lower two figures, the noise is removed a lot, but the scene is a bit black.Step 4. Go to the POST panel of the VFB window, adjust the exposure and highlight limit, and adjust the correct exposure. The current level of denoising is 0.65 by default.Manually adjust the noise reduction to a level of 1, to see if the noise reduction is more.The model material 16 points PASSES TATAL=10 . A lot of noise After noise reduction processing.Official DemoRendering ten minutes DOF, depth of field demonstration The denoising function is turned off, we can see a lot of noise in the photo.After the denoising function is turned on, no noise.Denoising radius test: Denoise radius: 1 Denoise amount: 1, the image is very clear, the details are many. Denoise radius: 4 Denoise amount: 1, The noise is reduced, the image becomes blurred, and the detail is reduced.Use the Corona renderer in C4D after opening the render settings panel -- enabling FULL DENOISING. If you use the VFB window to render, then when you manually stop, the denoising function will start automatically. If you use an interactive render window, then when you manually pause, the denoising program will not start.SummaryThis is all Fox Renderfarm's analysis of the problem of how to reduce noise in Corona render, hope you solve your problem successfully. Fox Renderfarm is a very powerful, safe and fast cloud rendering services, and you will never encounter such problem if you use Fox Renderfarm. Fortunately, Fox Renderfarm supports most popular 3D software, renderers and plugins incluindo Corona, and it offers a free $25 trial for new users who sign up, so just give it a try!
More
2023-01-13
Corona Renderer 7 for 3ds Max Released and for Cinema 4D Is Well Under Way!
Corona Renderer - Rendering is magic! The magic that will excite you this time is the Corona Renderer 7 for 3ds Max is released now! With Clearcoat and Sheen in the new Physical Material, easy and fast aerial perspective in the Corona Sky, faster rendering, and many more updates, this release will give you better results, all while making your 3D work easier and speedier!NEW FEATURES VIDEOA quick overview of some of the new features in Corona Renderer 7 for 3ds Max.00:04 - The new Physical Material00:08 - Physical Material, Clearcoat00:20 - Physical Material, Sheen, velvet appearance (from scene by Elena V Miller, https://evnvis.co.uk)00:24 - Physical Material, Sheen, satin appearance00:31 - Improved Fast Glass00:41 - Physical Material, Thin Glass with Rough Refraction00:50 - Physical Material, 35 built-in presets01:07 - Improvements to 2.5D Displacement01:18 - Turbidity, Altitude and Volume effects (PRG Clear Sky model)01:25 - Volume Effect ("aerial perspective" - PRG Clear Sky model)01:33 - Faster Rendering, example 101:36 - Faster Rendering, example 2 Opacity / Absorption (using free asset by Viz-People, https://www.3d-models.com/info/free-3d-models01:39 - Faster Rendering, example 301:44 - Faster Denoising01:48 - No artifacts in huge scenes (scenes far from the 3ds Max 0,0,0 origin)02:01 - Updated Material Library, Metals02:11 - Updated Material Library, Masonry02:19 - Updated Material Library, WoodsVisit the Corona Renderer blog for more details.BTW, Corona Renderer 7 for Cinema 4D is well under way &ndash; expect it soon!As the industry's leading cloud rendering service provider and Corona render farm, Fox Renderfarm supports Corona rendering!
More
2021-07-22
Corona for 3ds Max Tutorial: Modern Minimalist Style Loft Production Analysis
Fox Renderfarm, a powerful but affordable render farm, organizes and shares an analysis of the production of modern minimalist Loft using Corona for 3ds Max. This Loft has some living room furniture, doors, floors, sofas, and some accessories. The atmosphere needs to be warm and comfortable. The picture composition is 16: 9.After we had preliminary requirements, we began to discuss the concept design and decided to make a small apartment of modern Loft style. With many details, the material performance should be soft and comfortable. Compared with the sunny daytime scene, we tend to have rich color changes. The sunset scene is more suitable for expressing an interesting living space.ReferenceBefore making each project, you must choose a reference, which will be used as a reference for the future atmosphere, color, details and design inspiration. At this stage, we have the basic model and reference drawings. It is time to start the next step.The furniture is mainly divided into two areas: tables in the dining room, sofas in the living room, coffee tables, and large windows that are indispensable in Loft. Of course, the floor is also very important.Design and modelingThere will be many items in this scene that need to be modeled by 3ds Max, so the first step is to make basic models of some key items first. After confirming the model and space layout, start to enter the lighting, add details and texture map. Below are some pictures of angles. After the shape is confirmed, you can start adding details.Room modelingFor automatic mapping, the coordinates and different material channel IDs can be used as composite materials. The wooden grid ceiling and the floor are made by the Floor Generator plug-in. The plug-in can control the size of the model very well. Then use polygons to make shelves and windows.The windows are made with polygons and many details are added, and the wall is made with brick walls and replacements. The advantage is that each face can accurately show the details. It should be noted that the subdivision of the number of faces of each model must be enough to obtain the best results.You only need to find the reference picture in advance, and then make it according to a list. There are a lot of things, but it is relatively simple.The lantern is modeled as a polygon, and a spiral coil on the edge was added using Twist and Bend.The decorative vases in groups of three are also polygonal and Turbosmooth, and apply displacement and procedural noise maps.The sofa also continues to add details from a Box. The pillow and fabric are also made by Marvelous Designer. This software is simple and beautiful to make this material! When importing back to 3ds Max, an optimized editor was used to reduce the face. Other things are basically the same way. After finishing the model, split the UV, so that you can directly enter the production of the texture. In order to ensure the clarity of the ground texture, 25,000 pixels are used.TextureAfter doing some tests, I decided to choose the Corona renderer. Corona renderer is a powerful renderer, and it has concise parameters and lighting effects, and only requires simple steps to have a perfect effect.BlanketThis material is very simple, it is a Falloff in the texture channel, mixed two same textures, and used Color Correct to make the two images one brighter and one darker. Color Correct has many options for editing textures. In the Displacement channel is a mixed texture with a texture and a black and white texture.GroundWe have a physical sample of the floor and scanned to make a texture of up to 25,000 pixels, and then use CoronaRaySwitchMtl to avoid the scene from being affected by the ground with high color saturation and high texture. The texture map is loaded with the MultiTexture plugin Can cooperate with the floor generation plug-in to make a more natural and random effect.Shading clothThe key to this material is reasonable transparency. You need to make sure that the Thin option in the Refraction rollout is checked.The other materials are basically the same, all made with high-quality textures.LightingAfter the material is ready, you can start testing the light. I chose some reference images of dusk as the background to diffuse beautiful light and shadow.We set this twilight picture in Corona Lights, placed it as the main light source in the window, and placed some small but high-intensity area light to cast a clearer shadow. The next step is to make a simple background for testing and put it outside the window to enhance the realism.Post-productionBefore saving the rendering results, use Virtual Frame Buffer to make some color adjustments. It is necessary to pay attention to the contrast between exposure and shadow. Save the format as a 16-bit PNG file.Post-production is adjusted using After Effects CS6, and the final effect is as follows,
More
2020-04-14
  • Foxrenderfarm

    Powerful Render Farm Service

  • TPN
  • TPN

    Business Consulting

    Global Agent Contact:Gordon Shaw

    Email: gordon@foxrenderfarm.com

    Marketing Contact: Rachel Chen

    Email: rachel@foxrenderfarm.com

    Connect with Us

Fackbook Customer Reviews