A Teaching To Copy Farnsworth House Based On Corona Renderer

This is a case study based on the Corona renderer. The software used includes 3ds Max, Corona Renderer, Photoshop, After Effects, detailed tutorials, and drawing process specifications. The drawing ideas are worth reading. For users of Corona Renderer, I believe it will be more helpful.
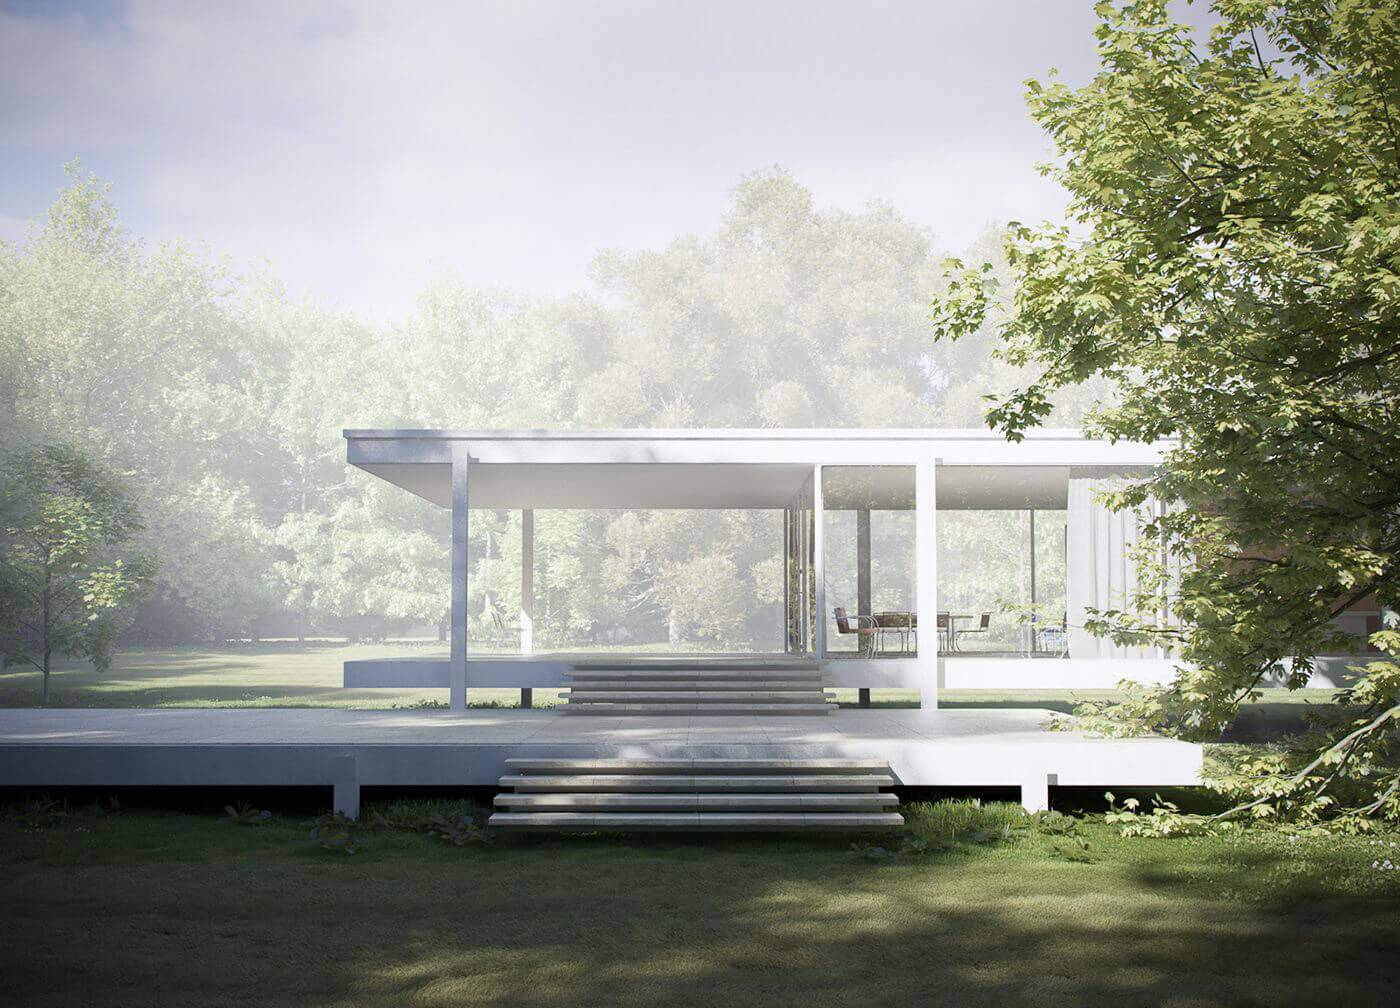
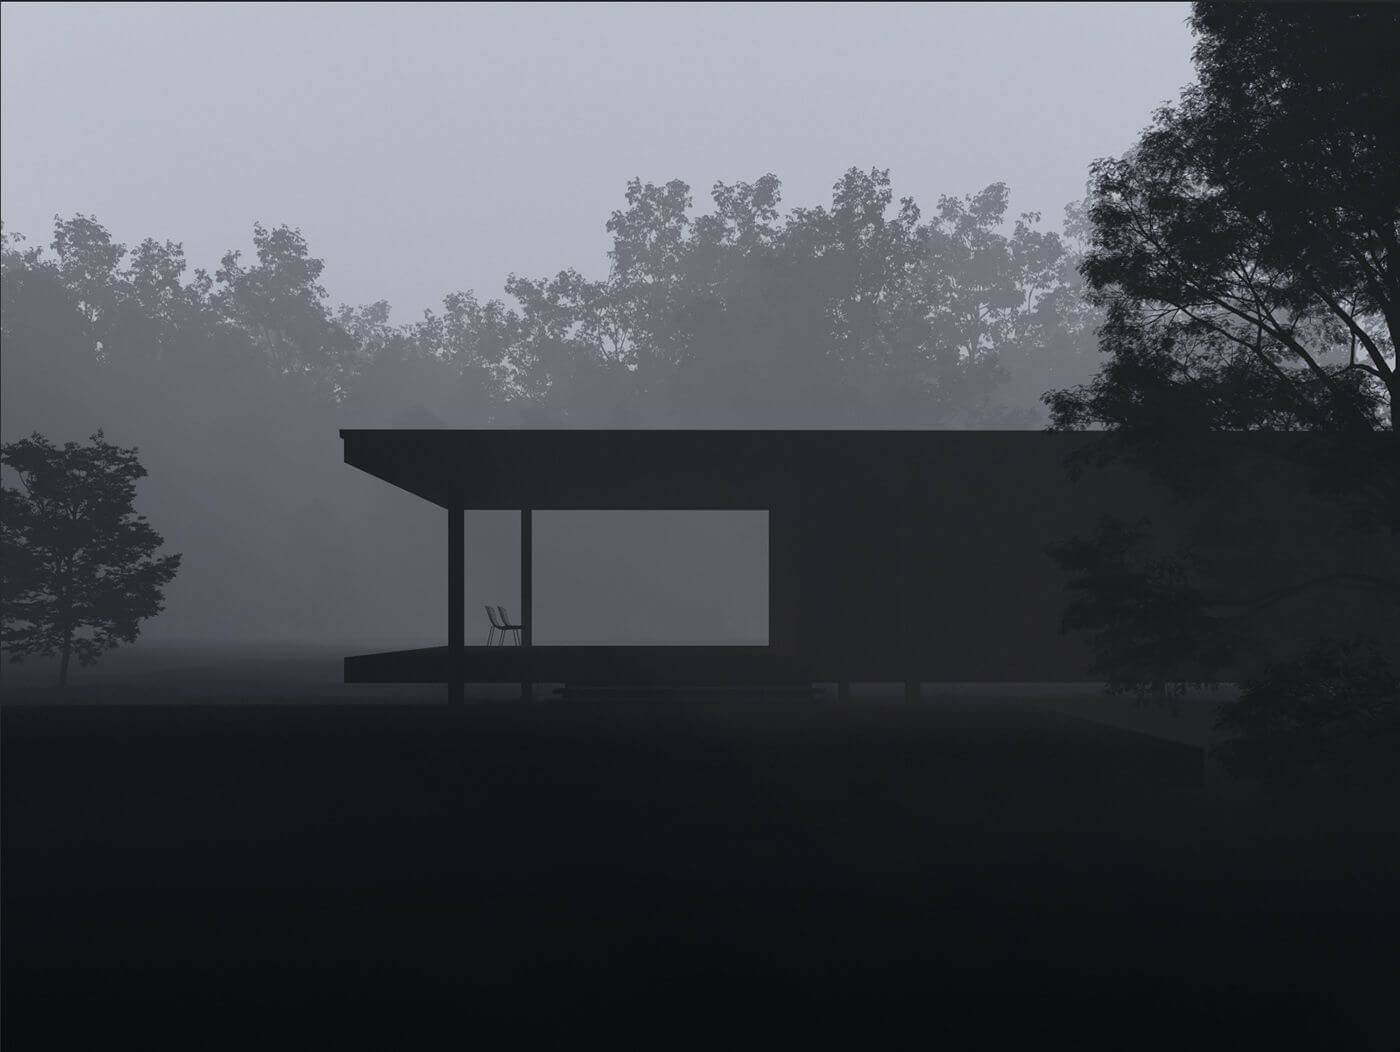
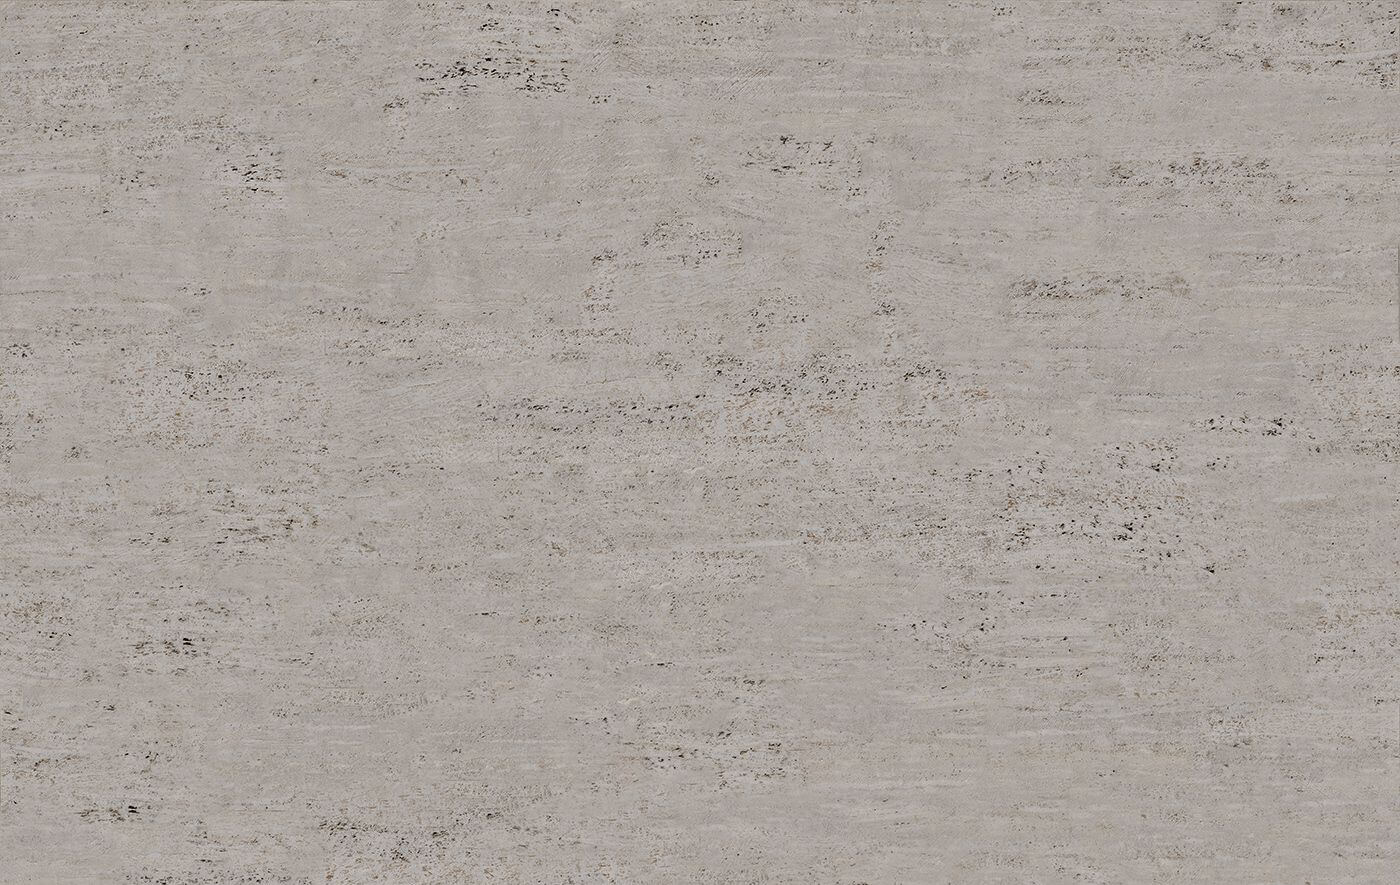
The reason for this picture was because of a series of renderings of the Farnsworth House, so I decided to copy one, in order to make a breakthrough in the direction of the outdoor natural environment.
Here are some of the reference pictures:

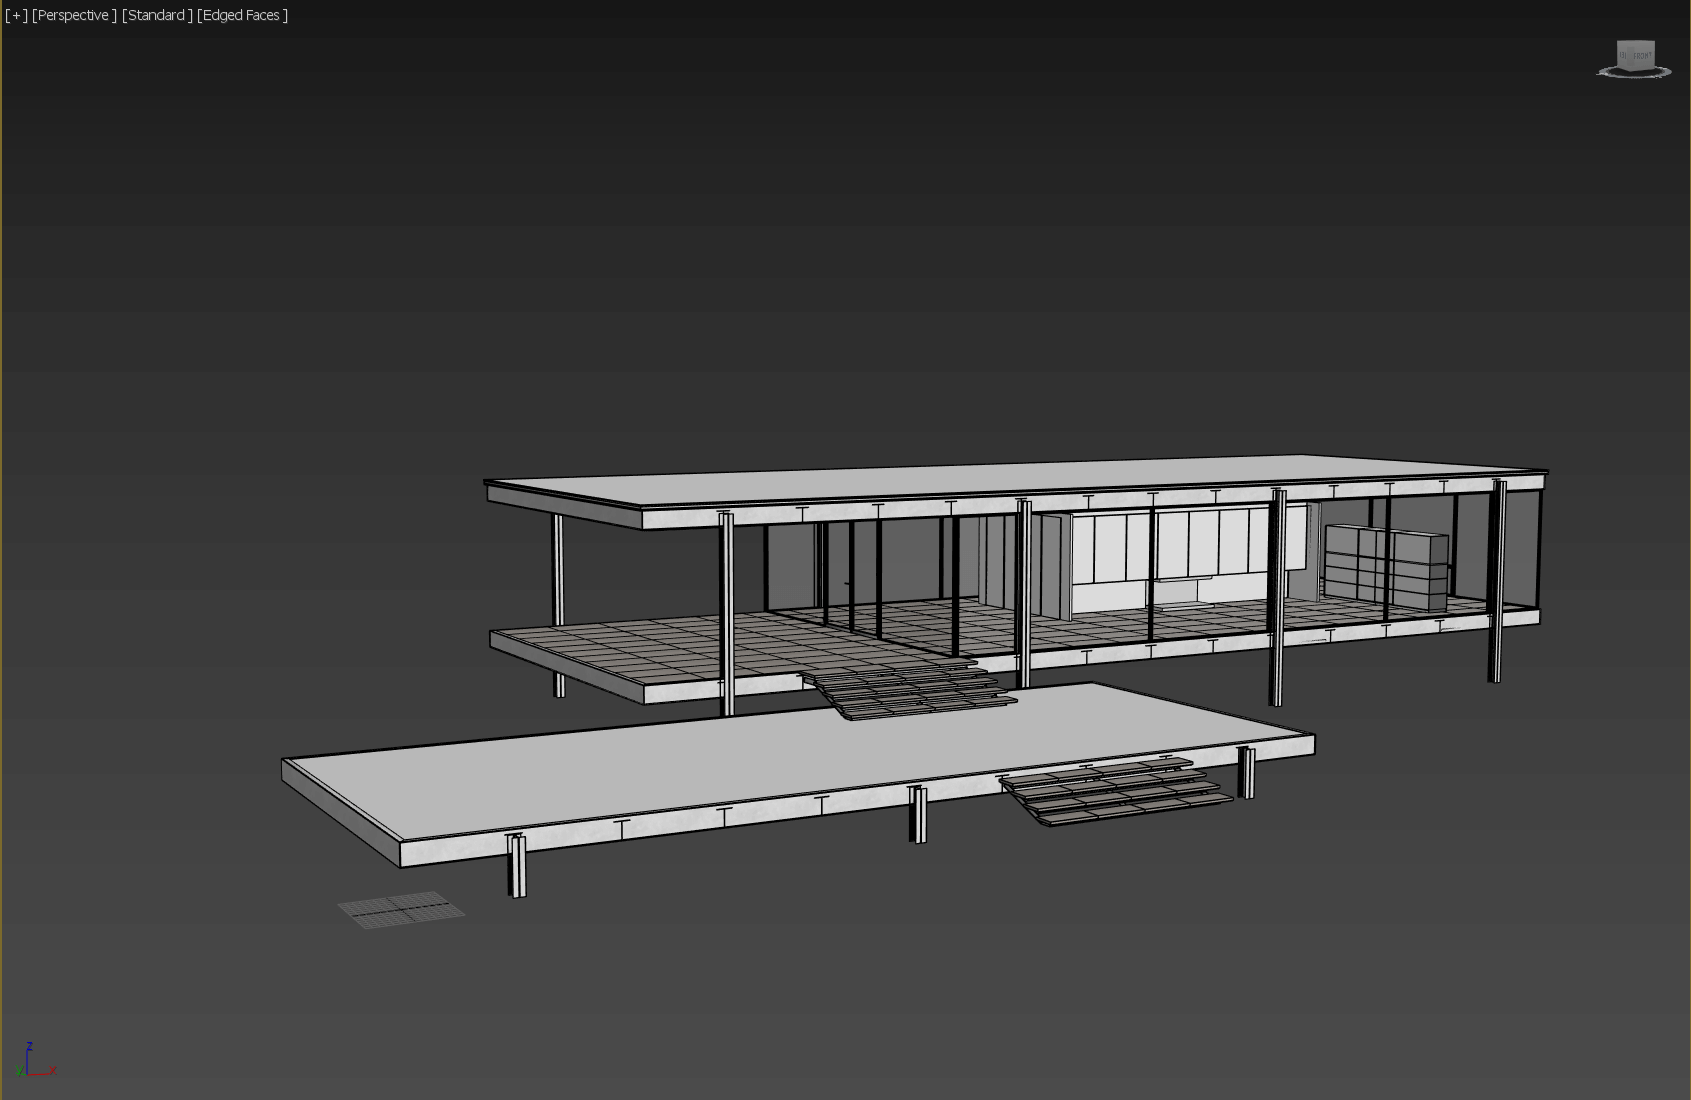
The construction of the scene

  1. Build a model building
  1. Composition

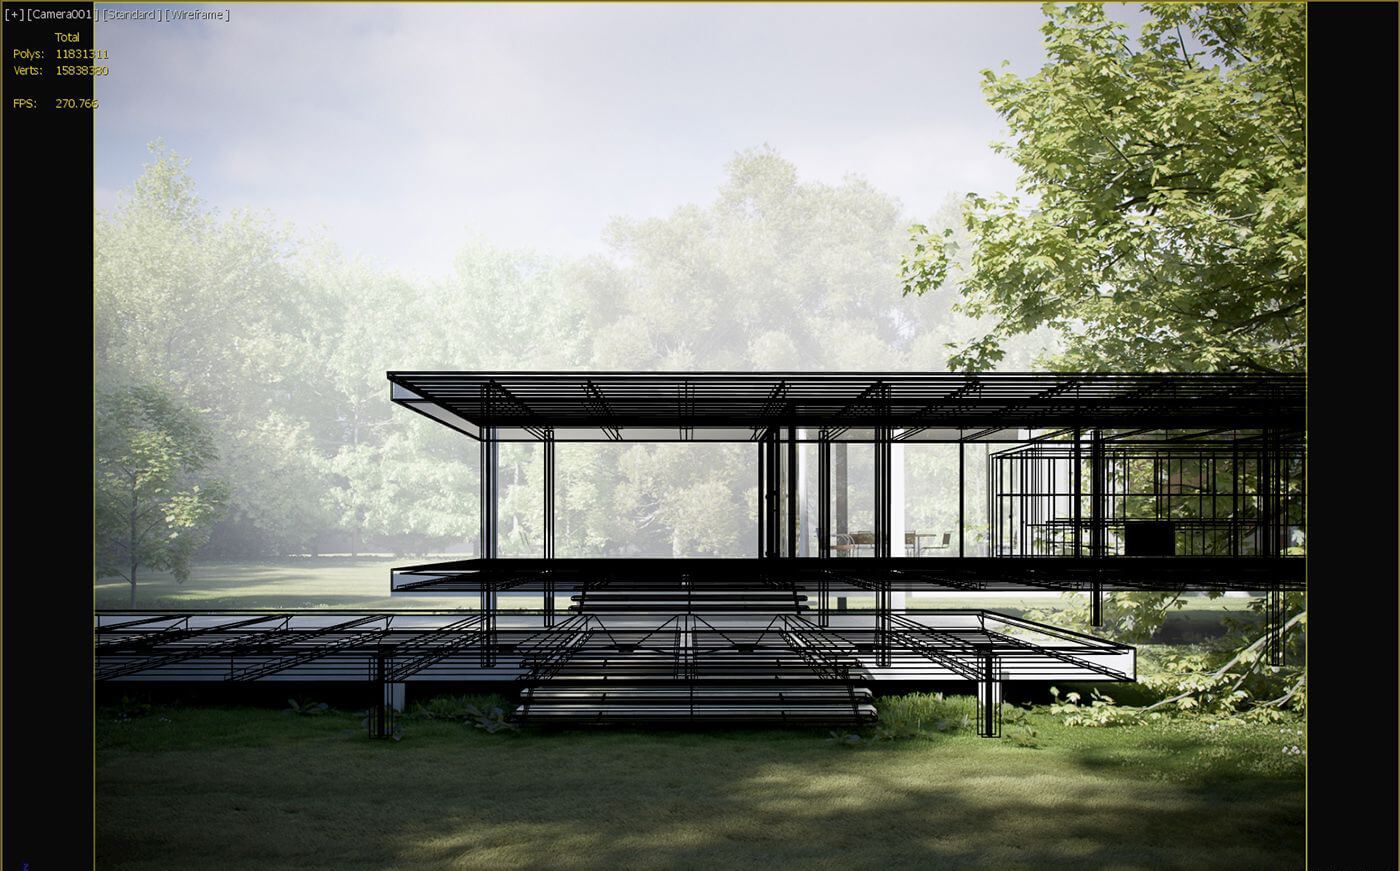
This is the reference.

Create a new camera, select target camera, Corona Renderer has a very good feature, you can adjust the exposure parameters at any time in the cache window, it is very convenient, but you can not use this function with a physical camera.
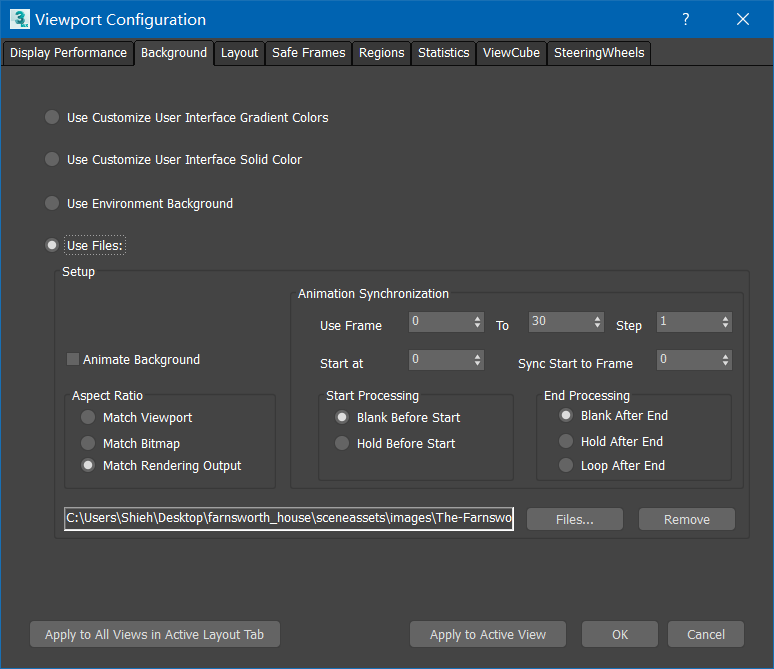
Modify the aspect ratio of the picture in the rendering settings to match the reference picture.
Adjust the background image in the camera view:

Select the camera to adjust the focus to match the background image in the property panel on the right. In the usual time we use max rendering, V-ray physical camera inside perspective correction function is very easy to use, can be quickly modified to two-point perspective, but Corona's camera modifier does not have this feature, this time we can select right click in the case of the camera:

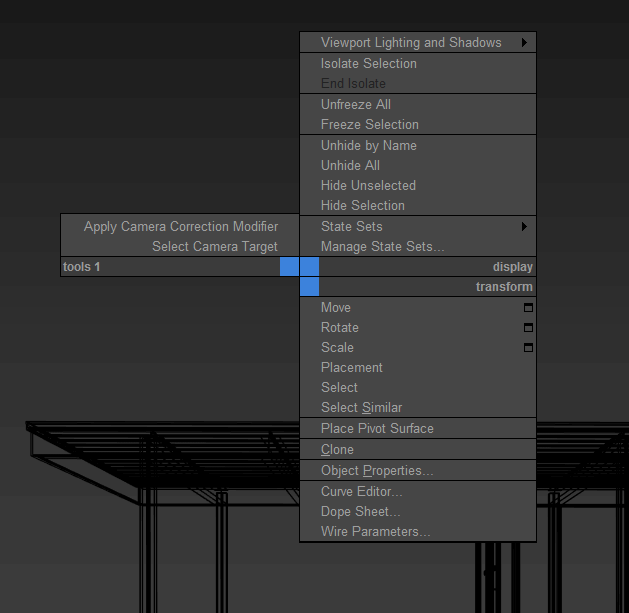
The apply camera correction modifier in the upper left corner of the figure can complete the correction of the two-point perspective. After some adjustments:

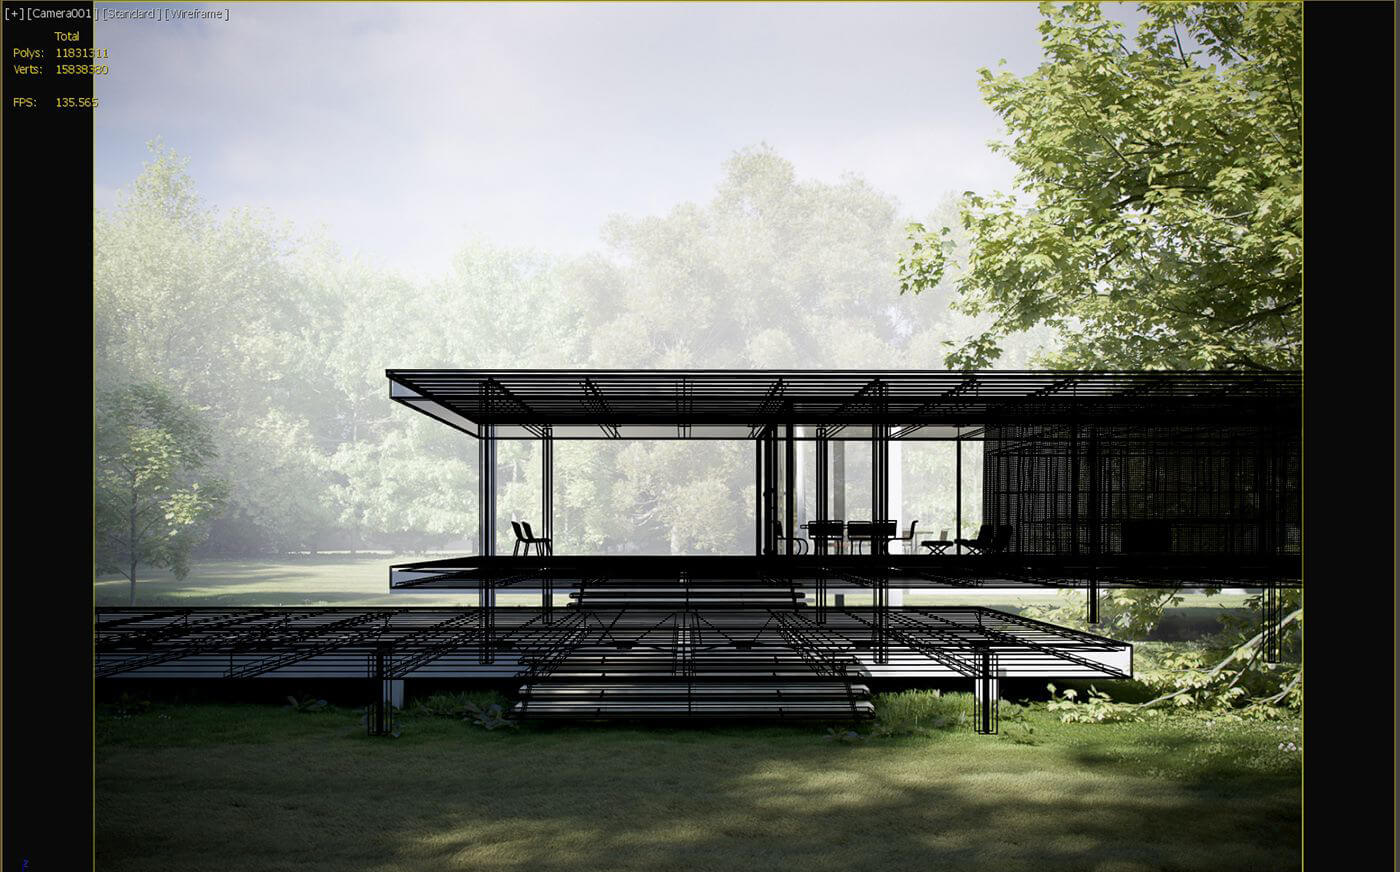
  1. Improve architectural model details

Compared with the reference picture, it was found that some tables, chairs and curtains were missing. The curtains were made using the 3ds Max fabric system.
Finally, the parts that can be seen in the picture are chamfered. After all, this time is to write the real rendering, there is no absolutely sharp edge in the real world.

The natural scene production
The production of the ground is very simple. You can create a new plane that is bigger than the screen. After adjusting the plane, add a noise modifier to adjust the value to a suitable value in the Z direction to complete an ups and downs ground.

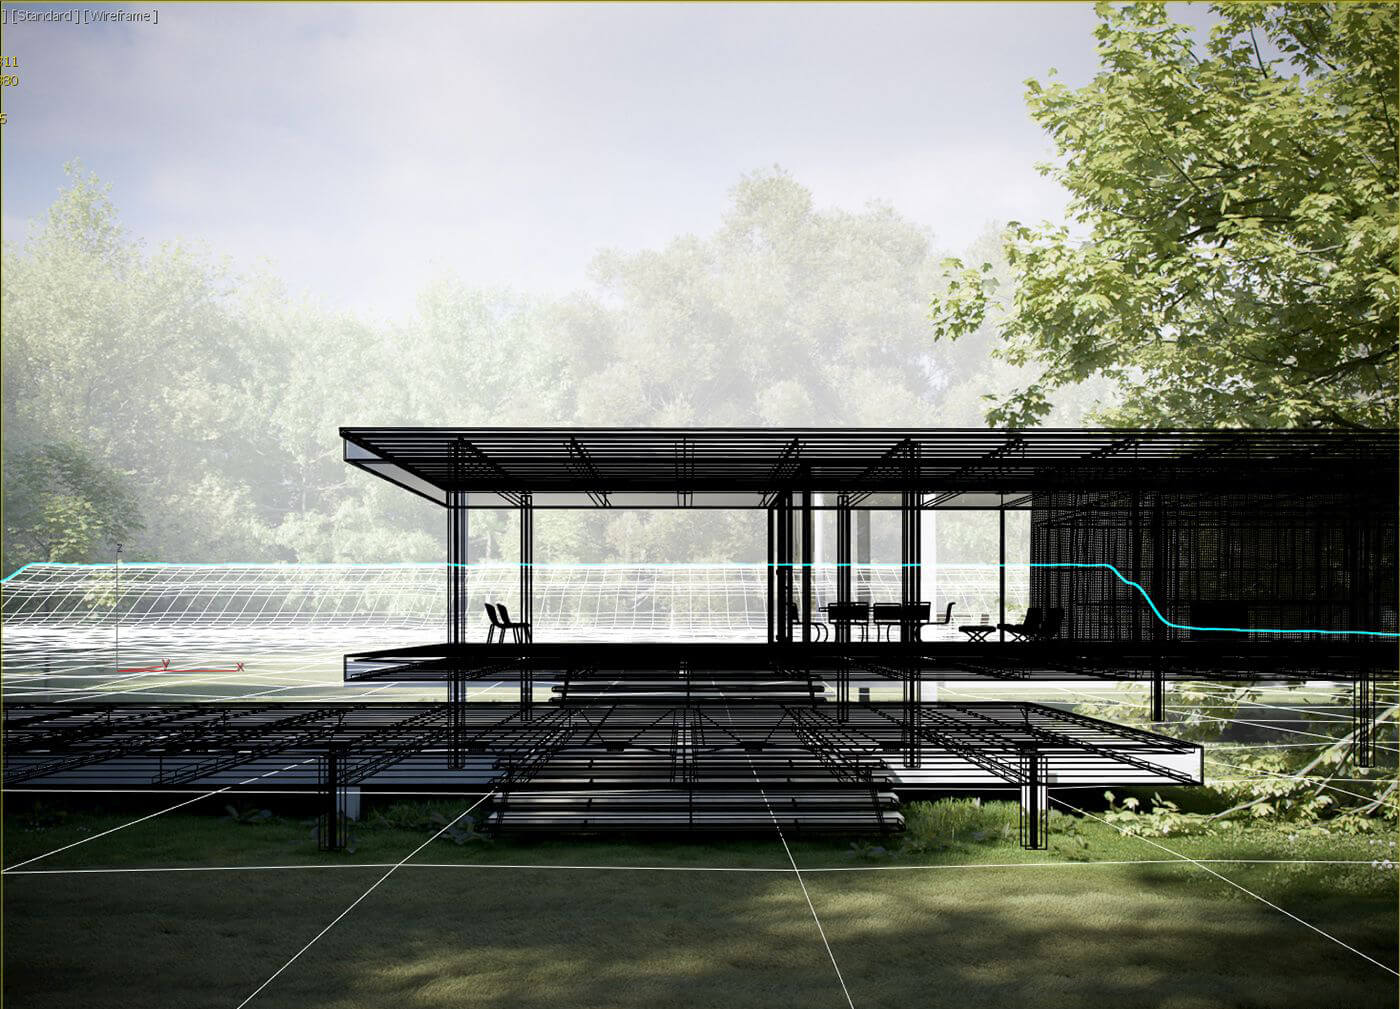
Here you can see that the ground is rising at a distance because the size of the ground is not close enough to the far horizon, and the rear tree will be exposed after the rendering, so a slope is made.
The distribution of plants and the configuration of species, we can see from the environment around us that trees and shrubs, flowers and herbs are very rich, because the real natural environment is a very complex ecology.

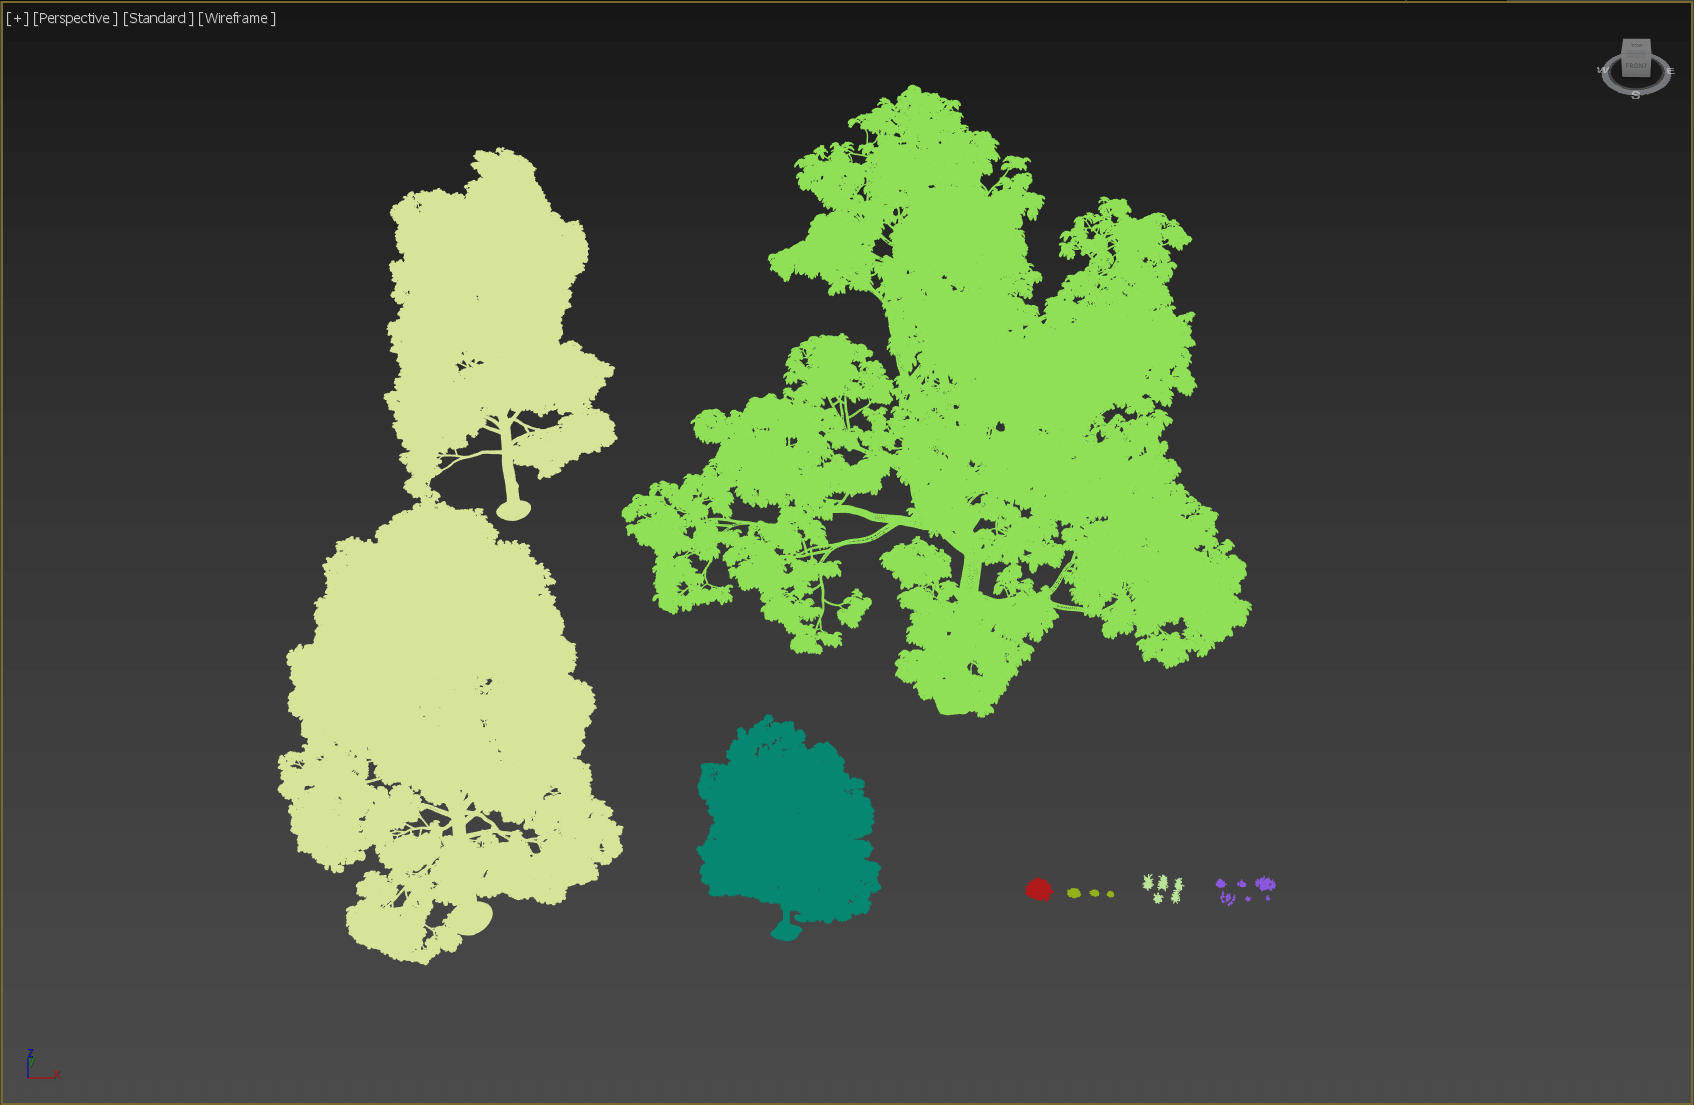
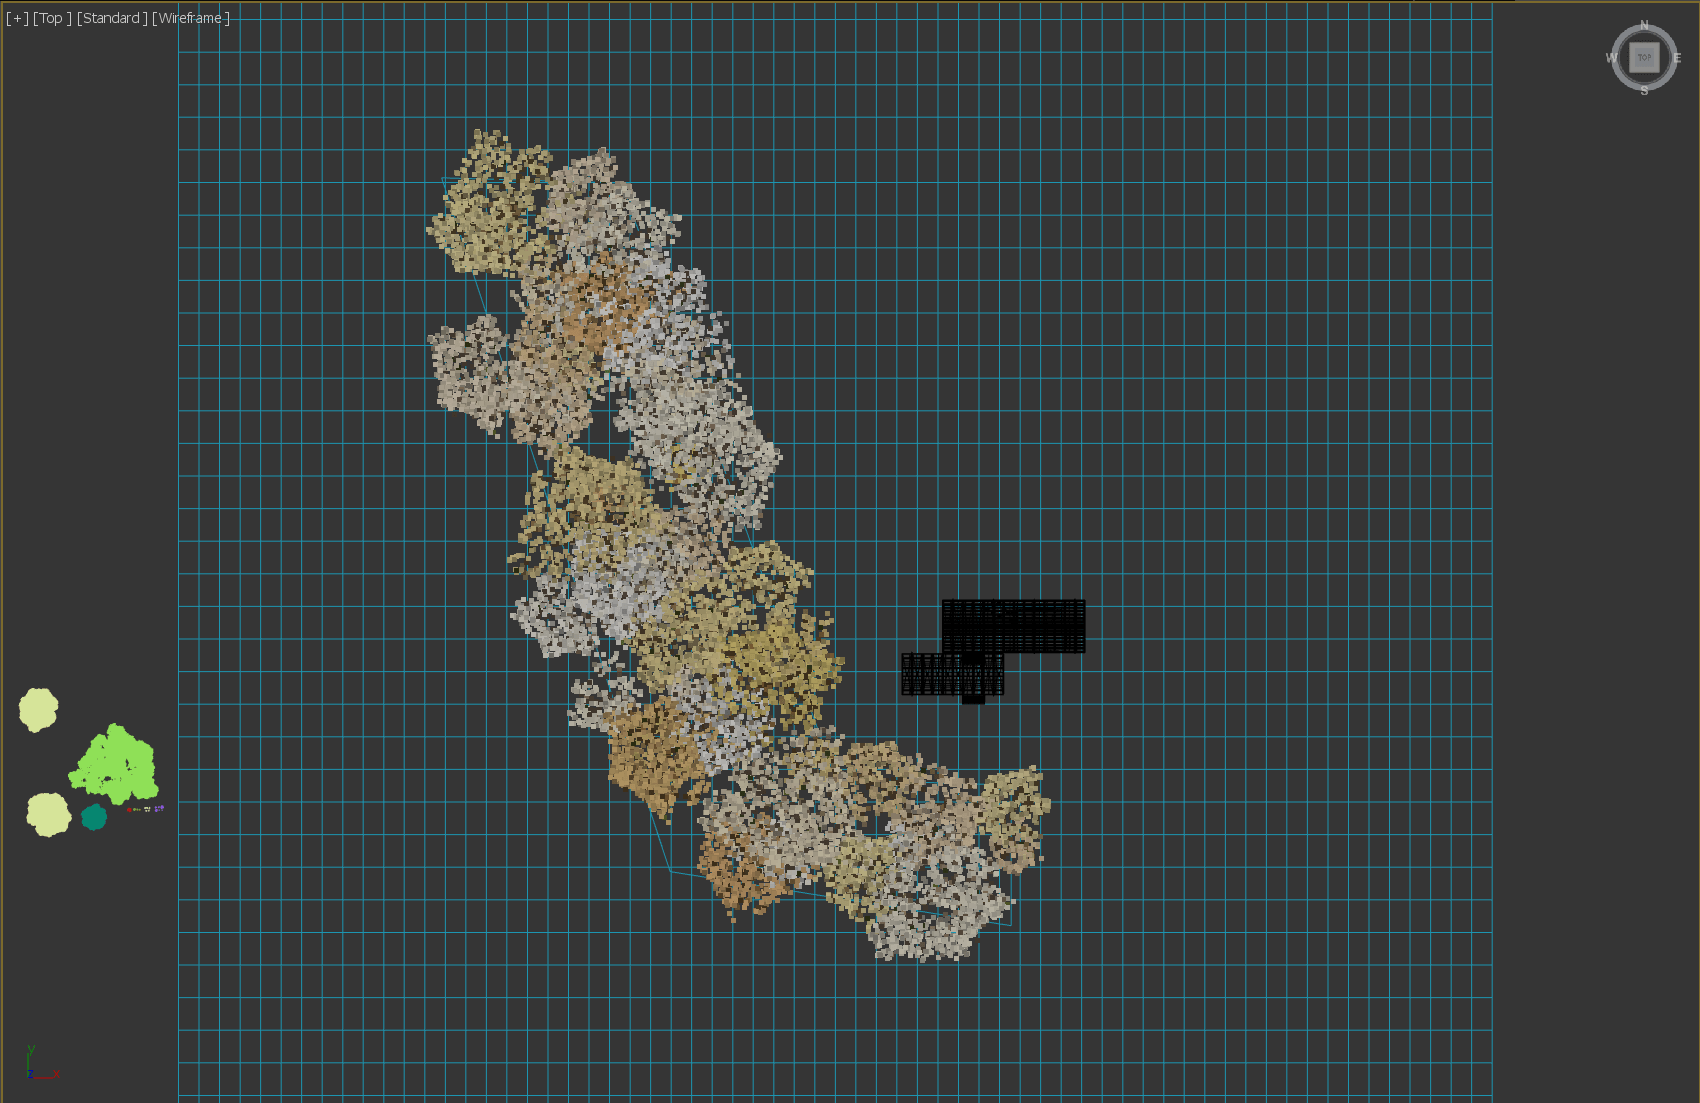
The placement of trees should take into account the difference between the front and the back.
The next step is to spread the plants.
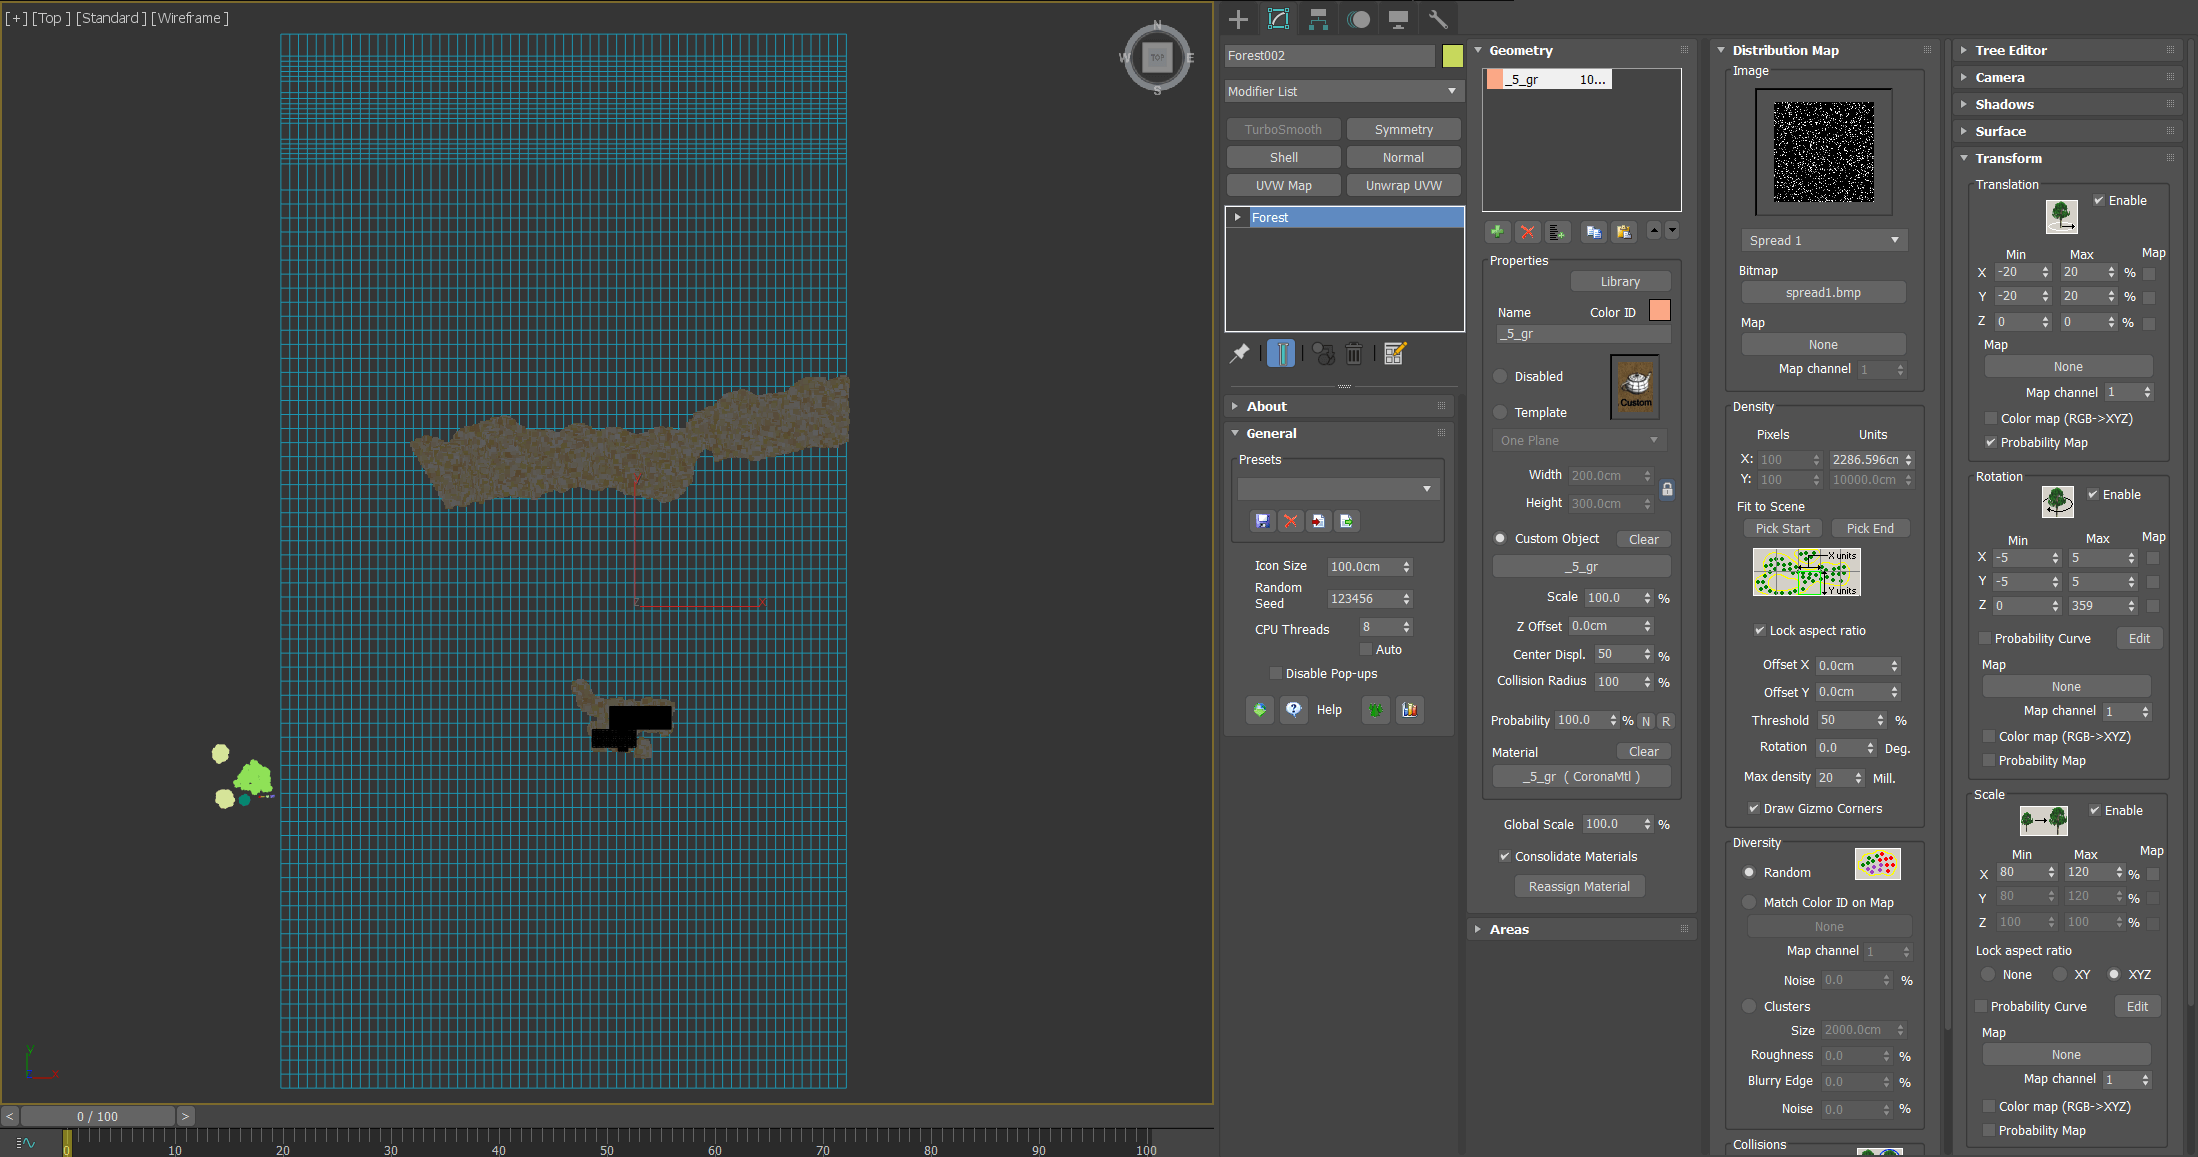
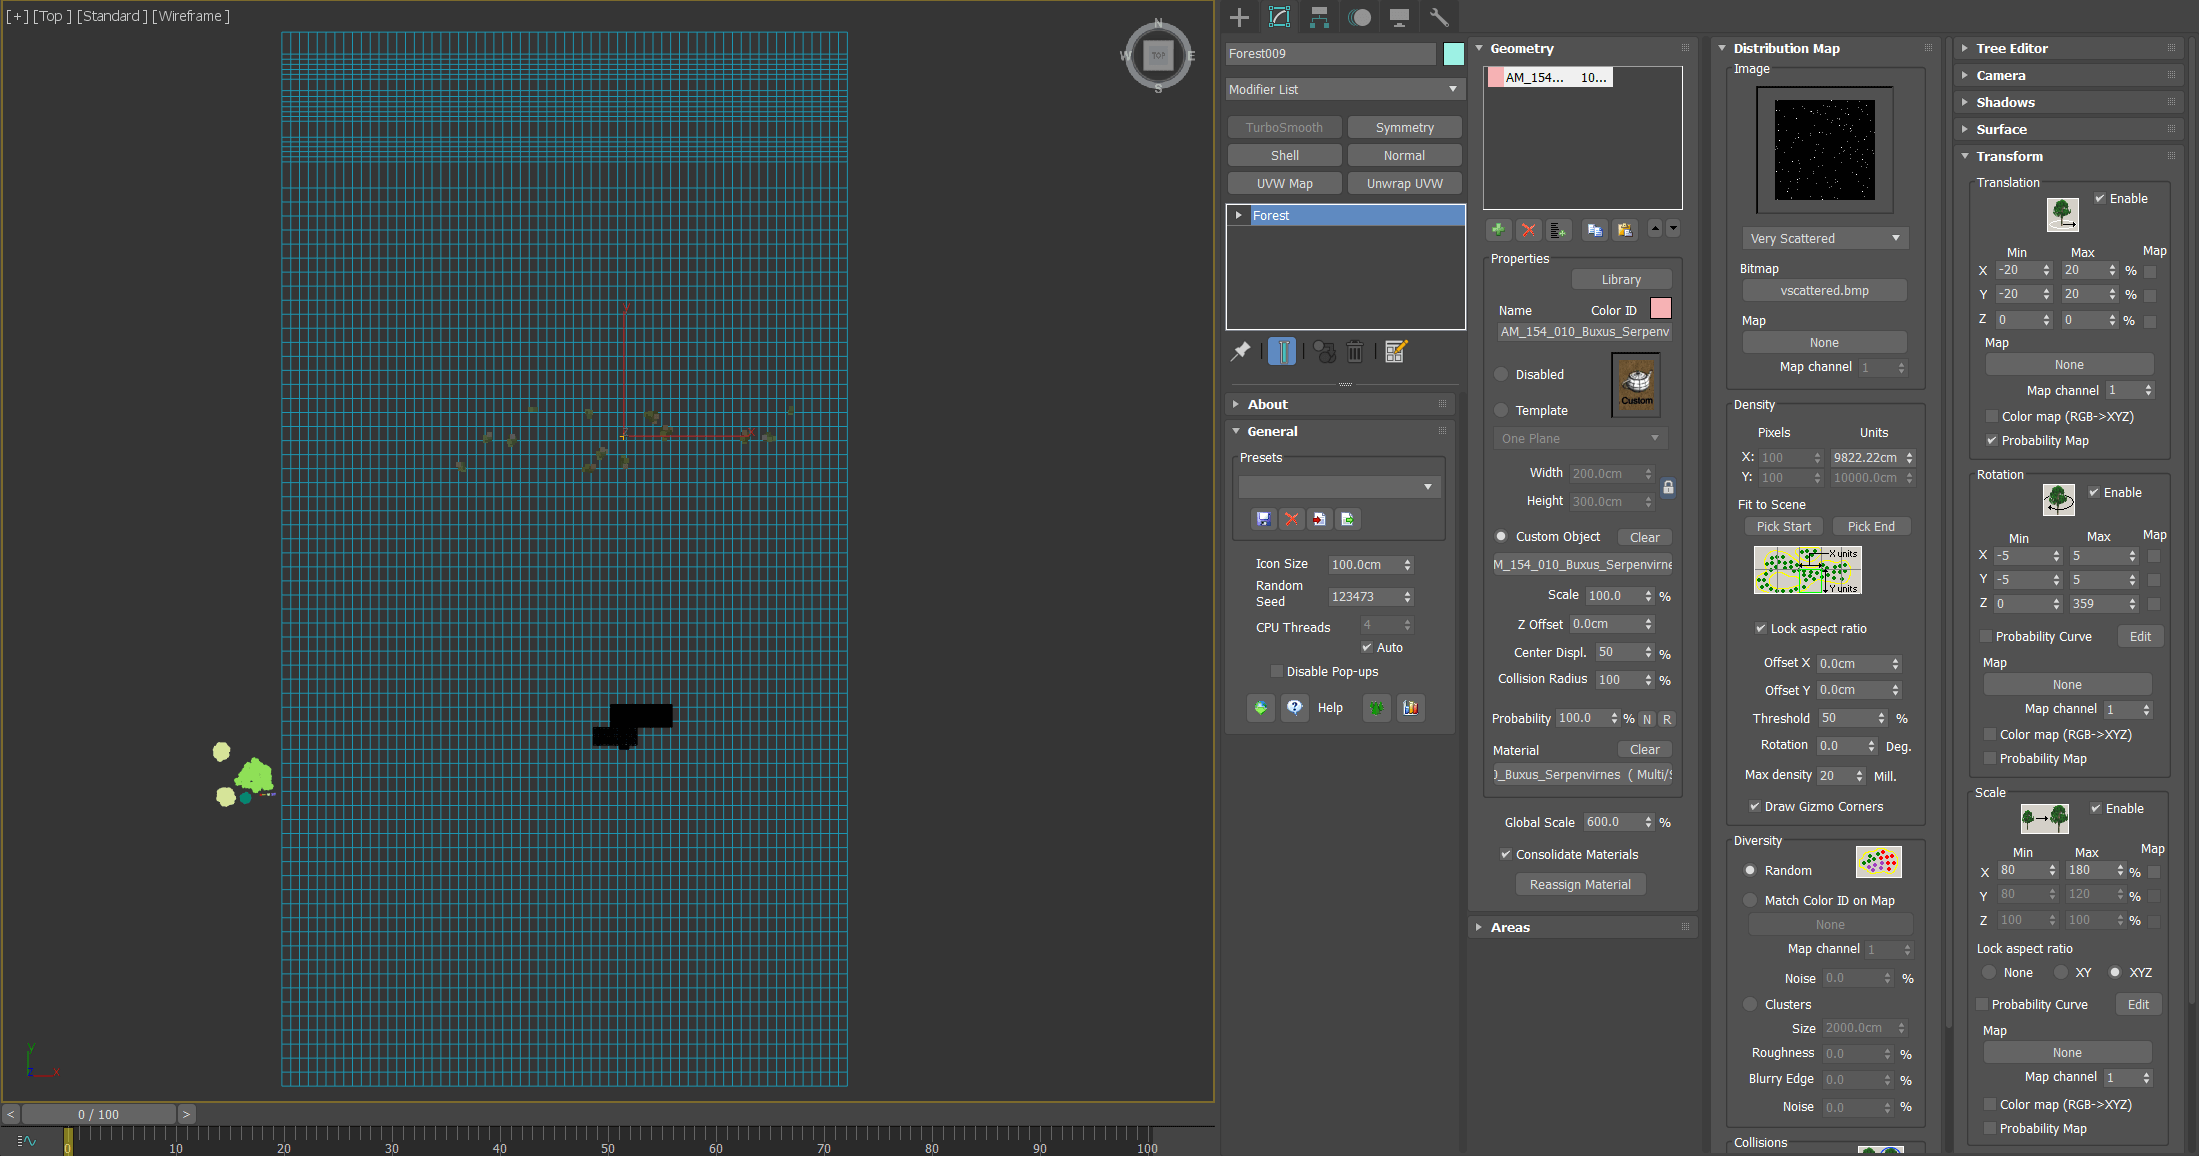
It must be said that the Forest Pack is a very useful plug-in that can be displayed in a point cloud after the source object is converted to a proxy, which is very intuitive to observe.

  1. Make the foreground tree, the medium tree, the distant tree, the grass, the flowers, and the weeds into separate objects. Although some of the presets in the Forest Pack contain both flowers and grass, I think it is as independent as possible. The walking objects are more convenient to control. In the scenario of this case, there are a total of 10 scatter objects.
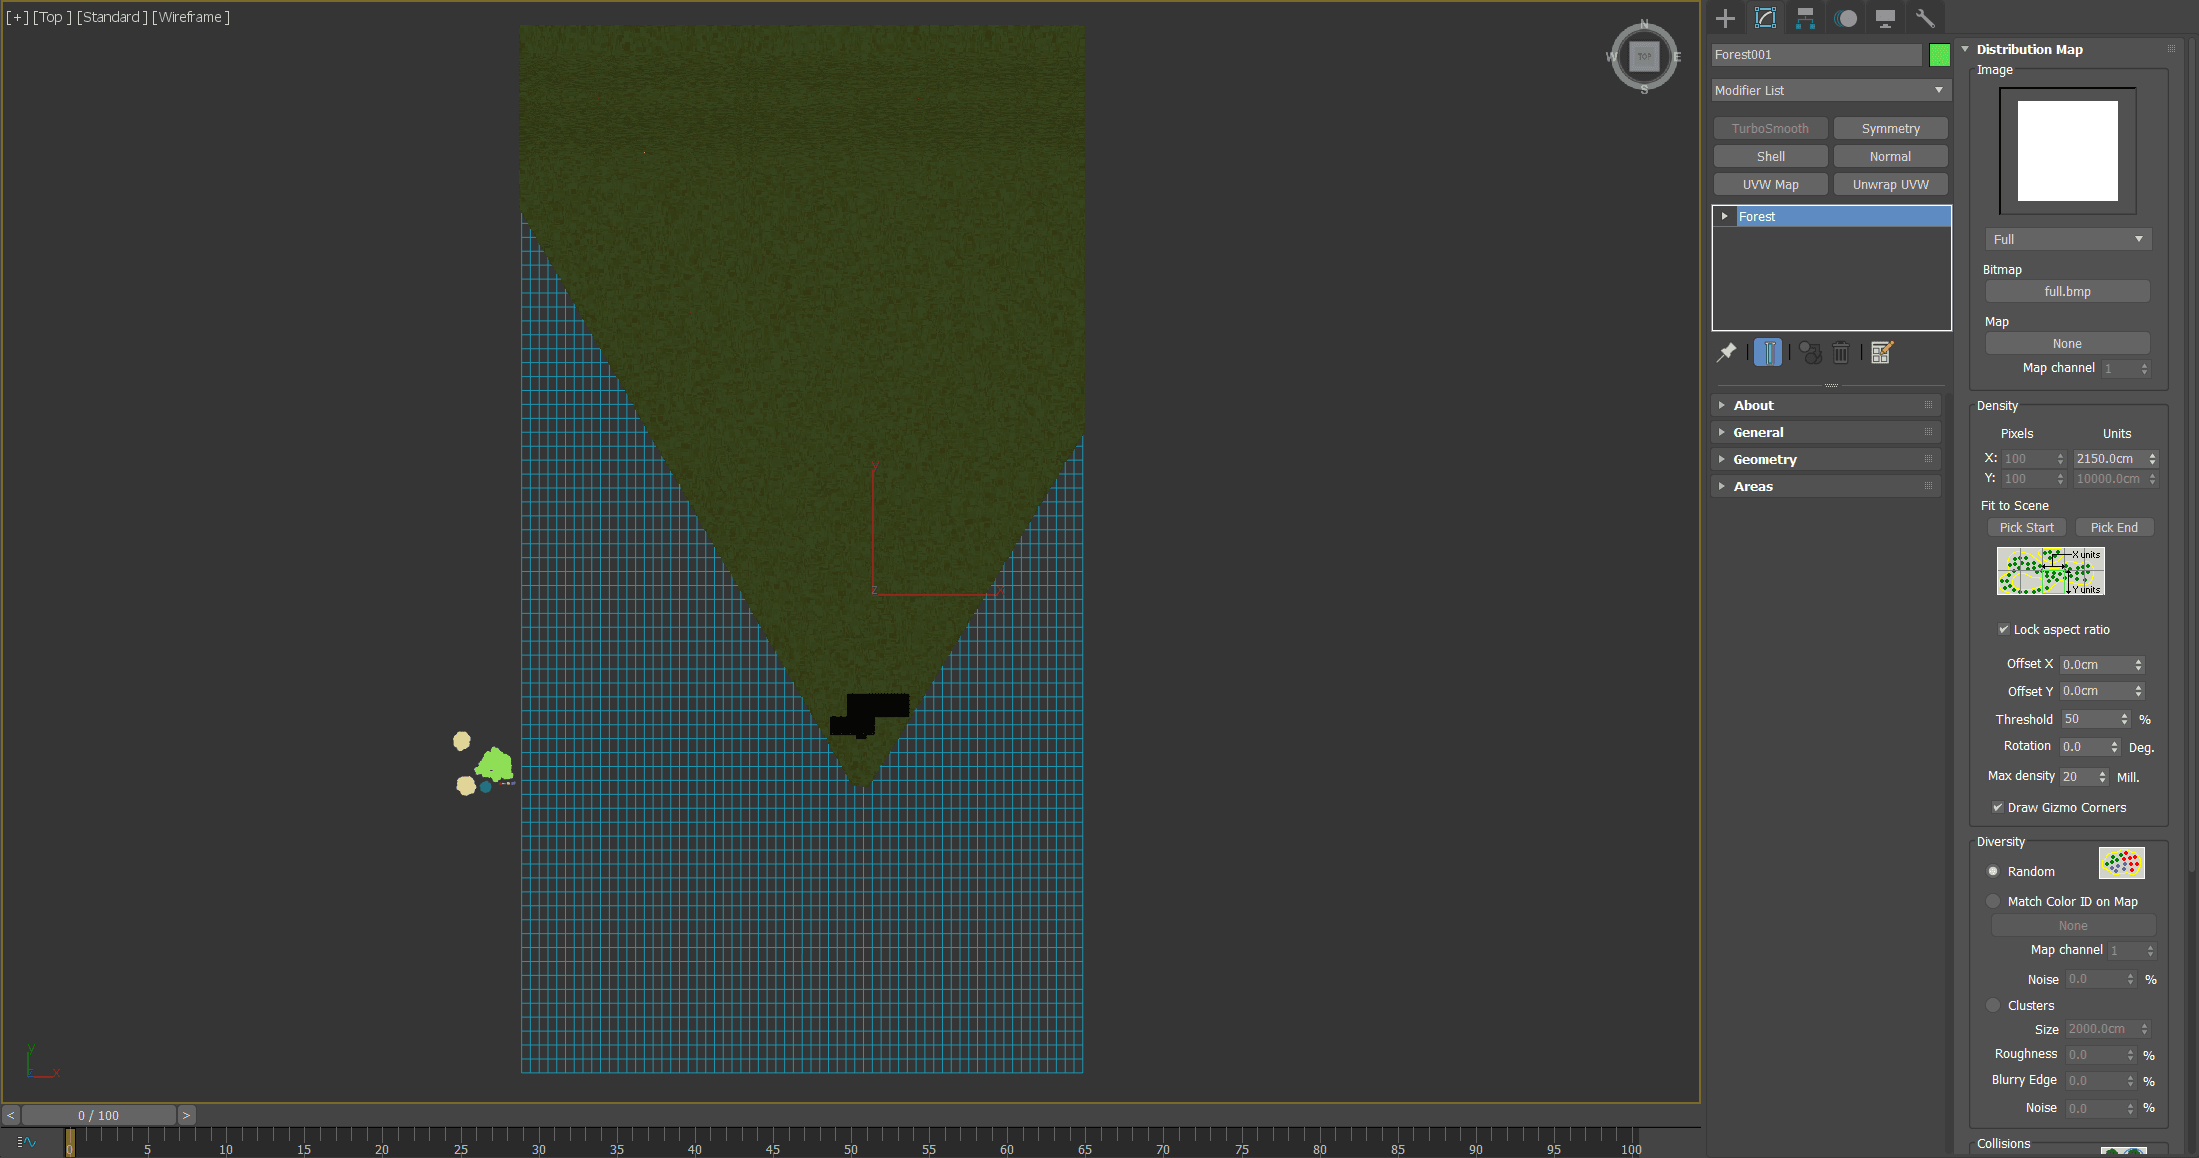
  2. Need to accurately draw the edge of the vegetation range, please select the surface object when making the Forest, only in the case of the distribution range is "face", you can use the brush tool to draw the specific range in the area rollout; To determine the approximate range, first draw the range with the curve, then select the curve when making Forest.
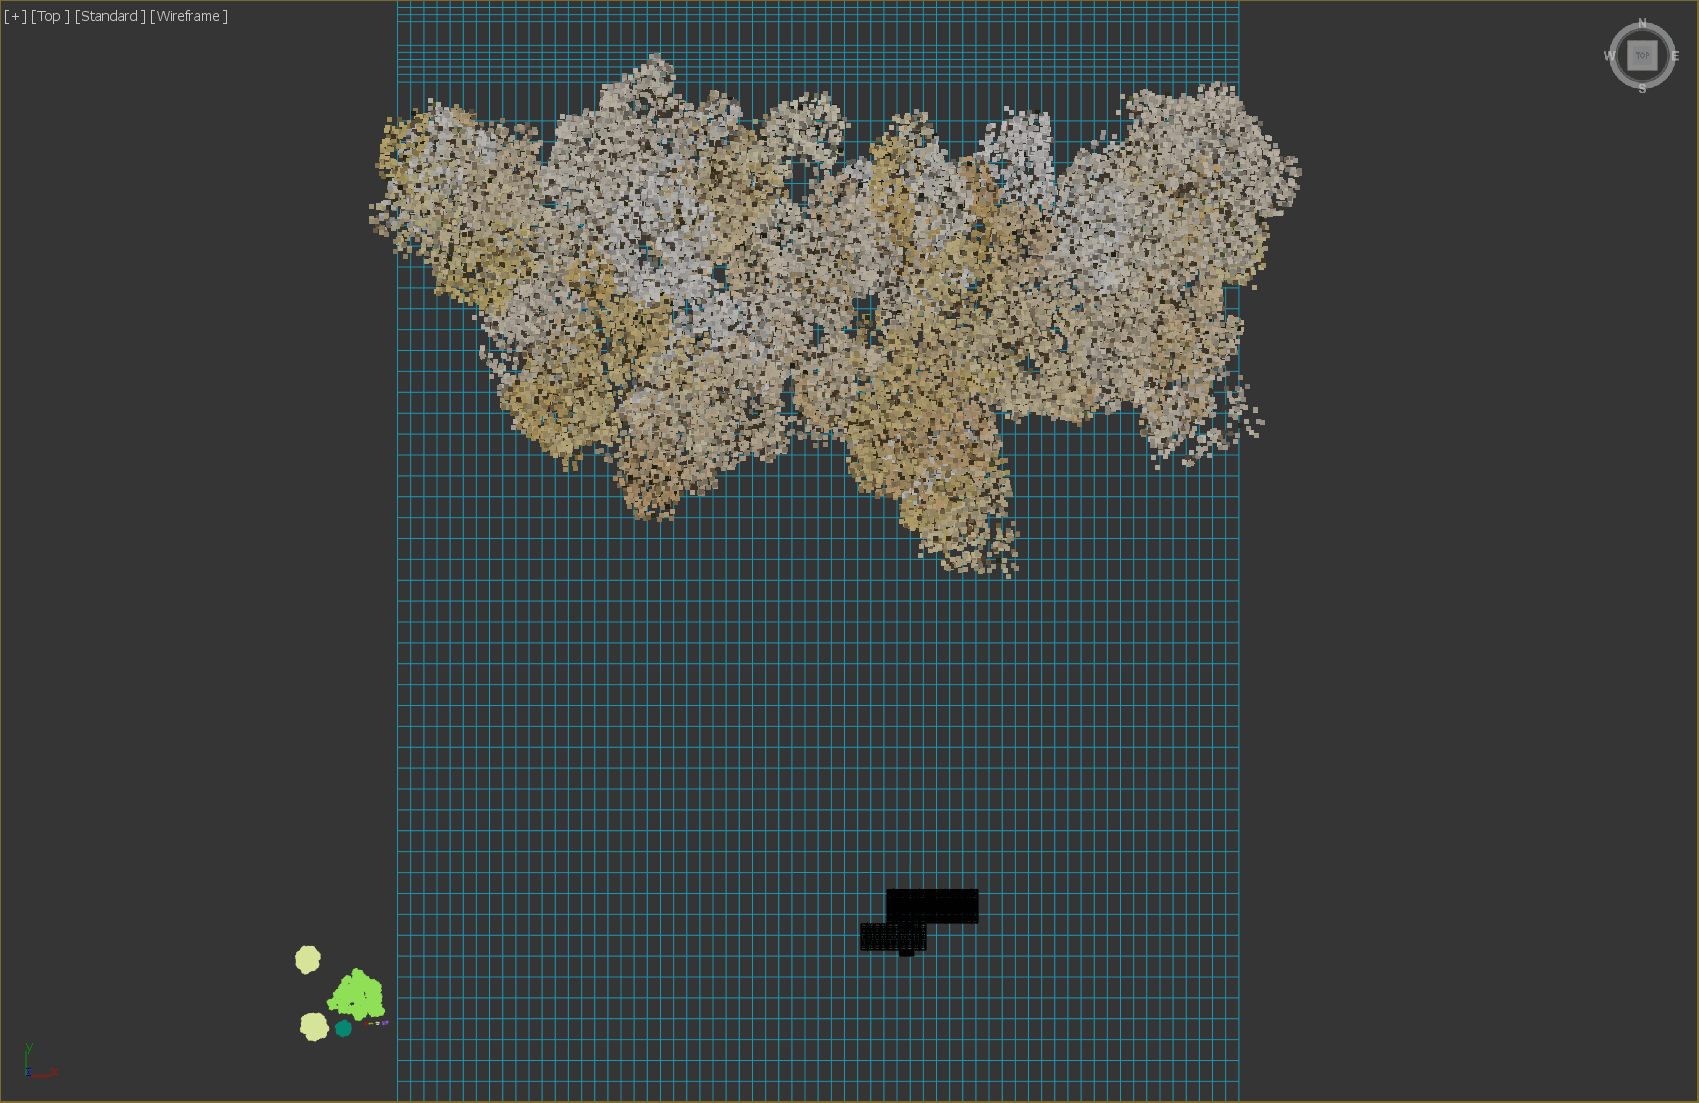
  1. Although the distribution of the Forest Pack can guarantee good randomness, it is mainly based on the overall automatic randomization, supplemented by local manual adjustment. In order to ensure the continuous curve shape of the distant tree crown, one is to control the boundary by brush, and then adjust the random seed to control the whole large shape; the second is to use the custom in the tree editor rollout when the overall effect is satisfactory. Tools, single adjustments to achieve the perfect composition.
  1. For plants of different distribution density, please use the appropriate distribution map. This option is controlled in the distribution map rollout. For example, when I spread the turf that needs to cover the entire terrain, I use the full texture. And if the distribution of other trees and flowers is more diffuse, you can choose the texture with the appropriate density.

Here are some of the parameters that are scattered:

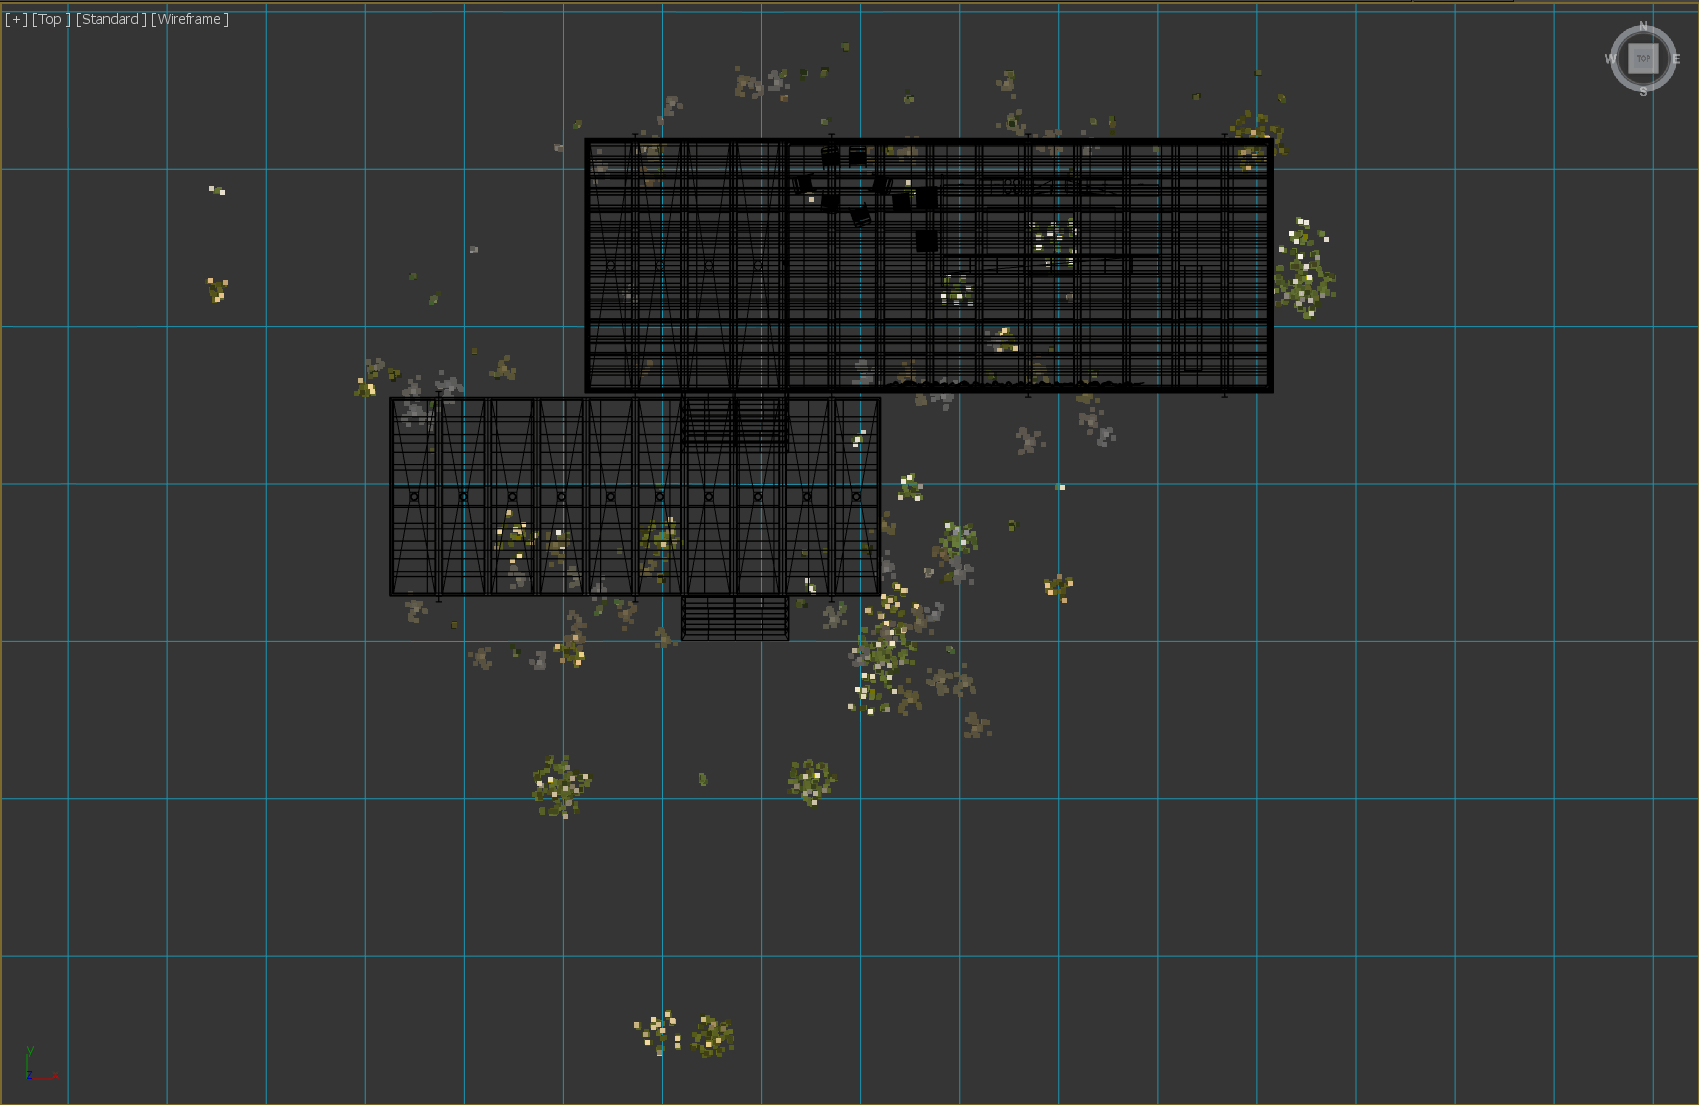
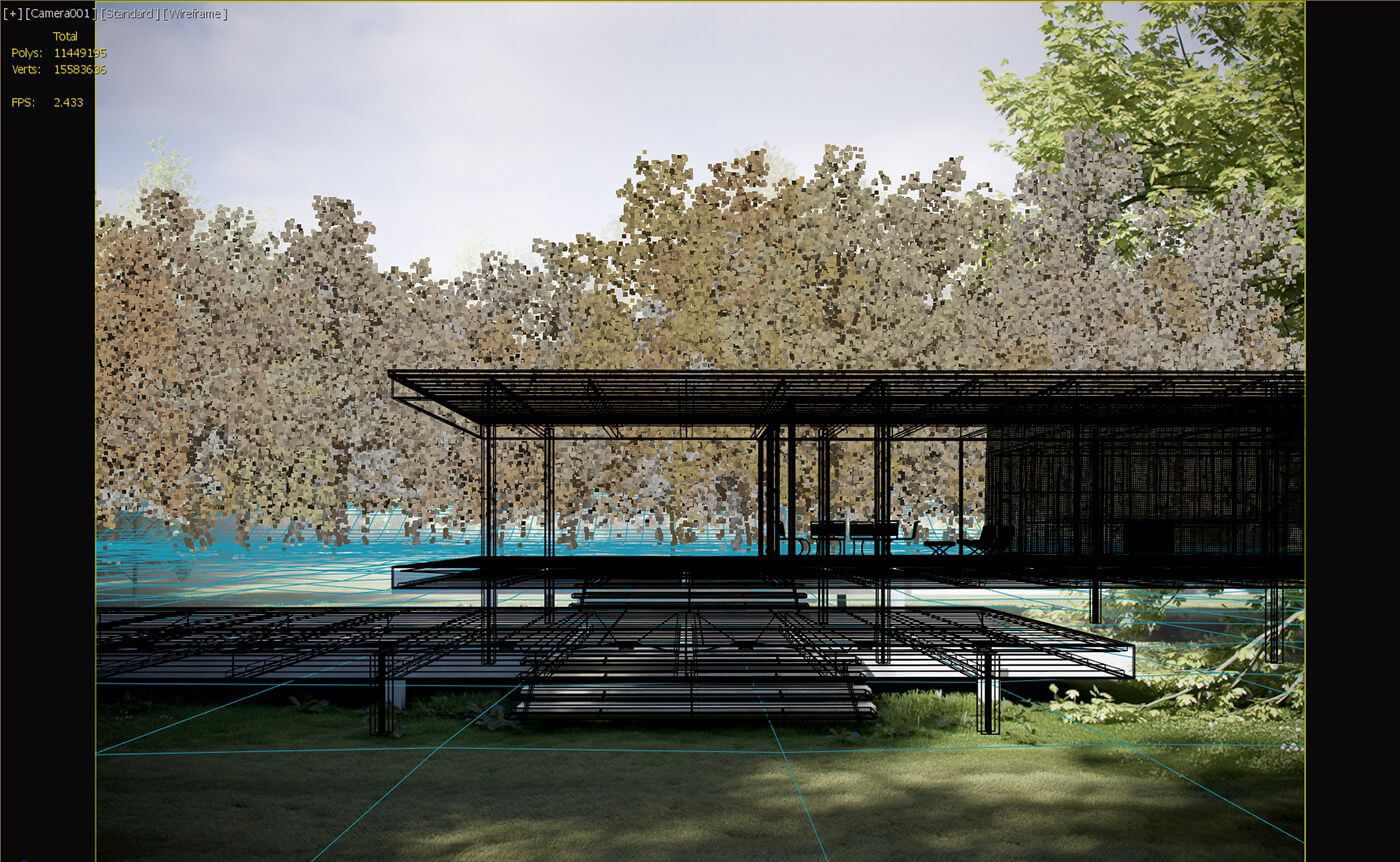
  1. Don't do anything you can't see in the picture.

In the context of the renderings, the walls that are blocked by the building and the wall structures that are not visible indoors should not be done.
6. The foreground and medium trees of the position need to be carefully adjusted, leaving the final adjustment position, rotation angle and size.

  1. The nearby flowers and plants, the weeds that are blocked by the building, the close-up, the medium-sized and the distant trees, the overall natural environment must have a sense of hierarchy. The level is rich enough to be true, but chaos must be avoided.

Lighting.
Create a new Corona Sun (refer to Vray Sun), adjust the sun to the same orientation as the background image according to the shadow, then link a sunny HDR in the environment panel (open shortcut: "8"), rotate the map, let The two suns coincide.

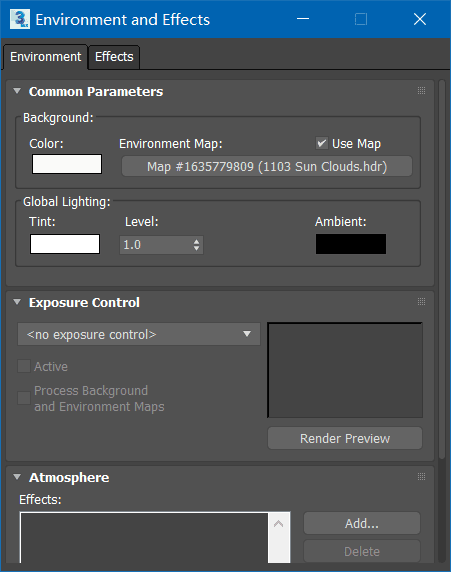
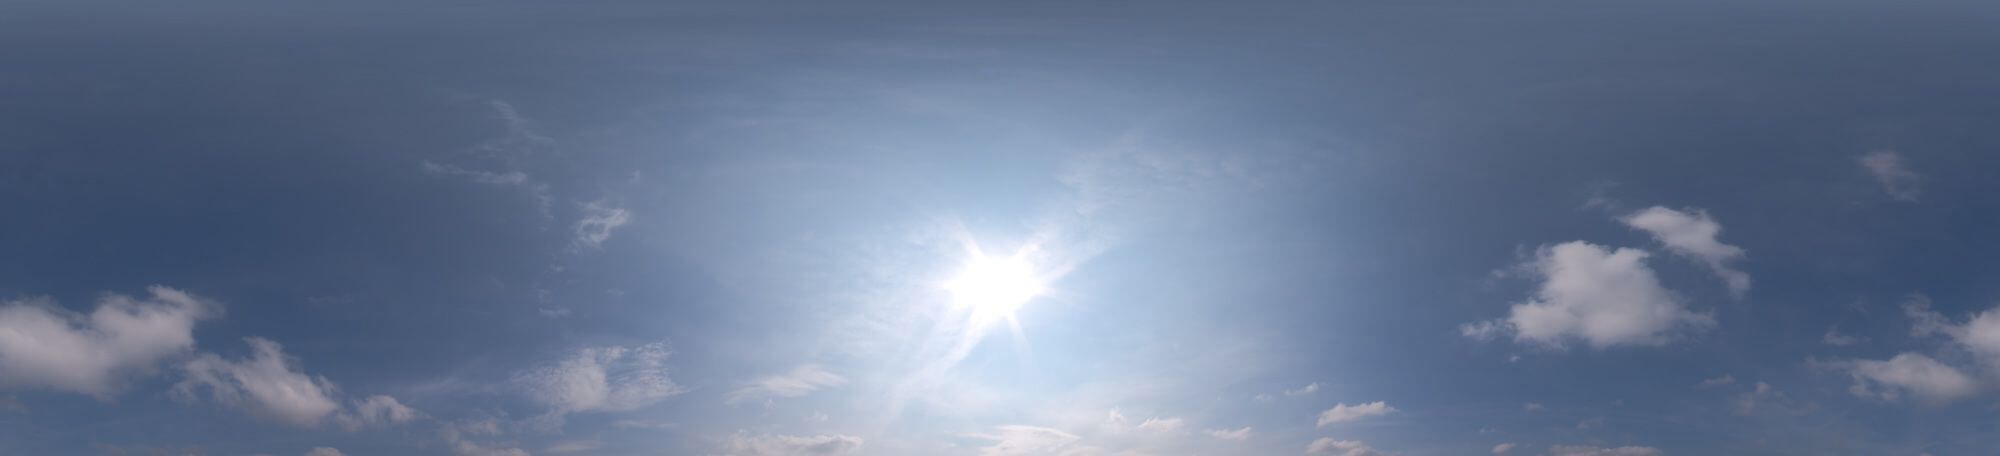
I am using a sky from Peter Guthrie. The parameters of the light are not adjusted, and the overall exposure is controlled by the exposure parameters of the frame buffer window. Remember to replace all materials with AO materials when testing light rendering.

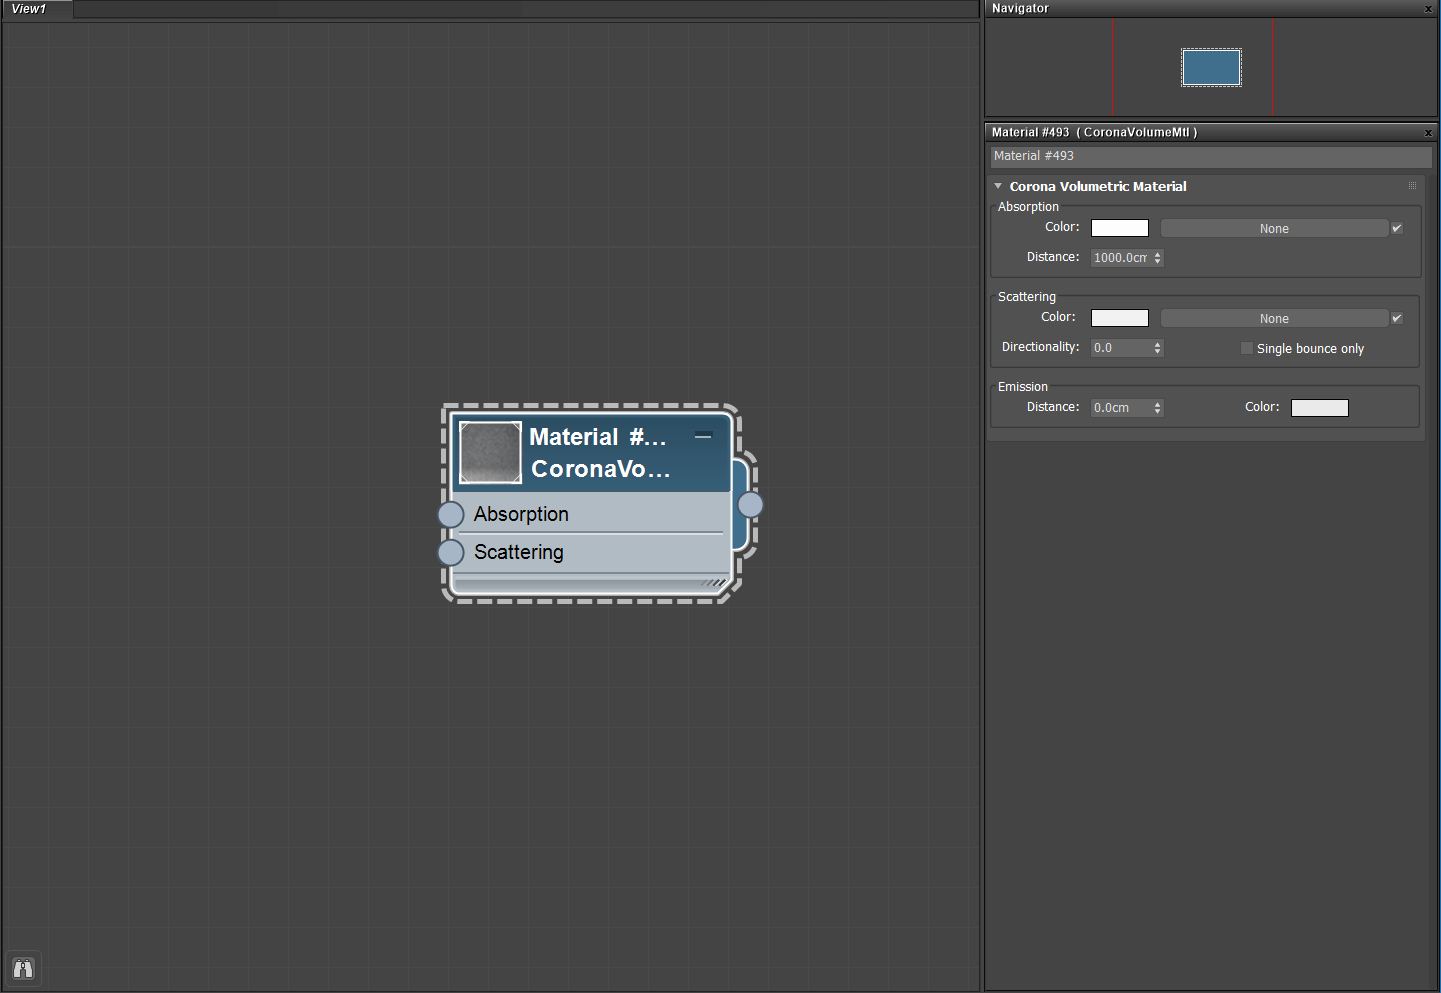
The ambient fog counts as part of the light, creating a new box to wrap the entire scene, then assigning a Corona Volumetirc Material, and adjusting the intensity of the fog by adjusting the color and distance parameters in the absorption.
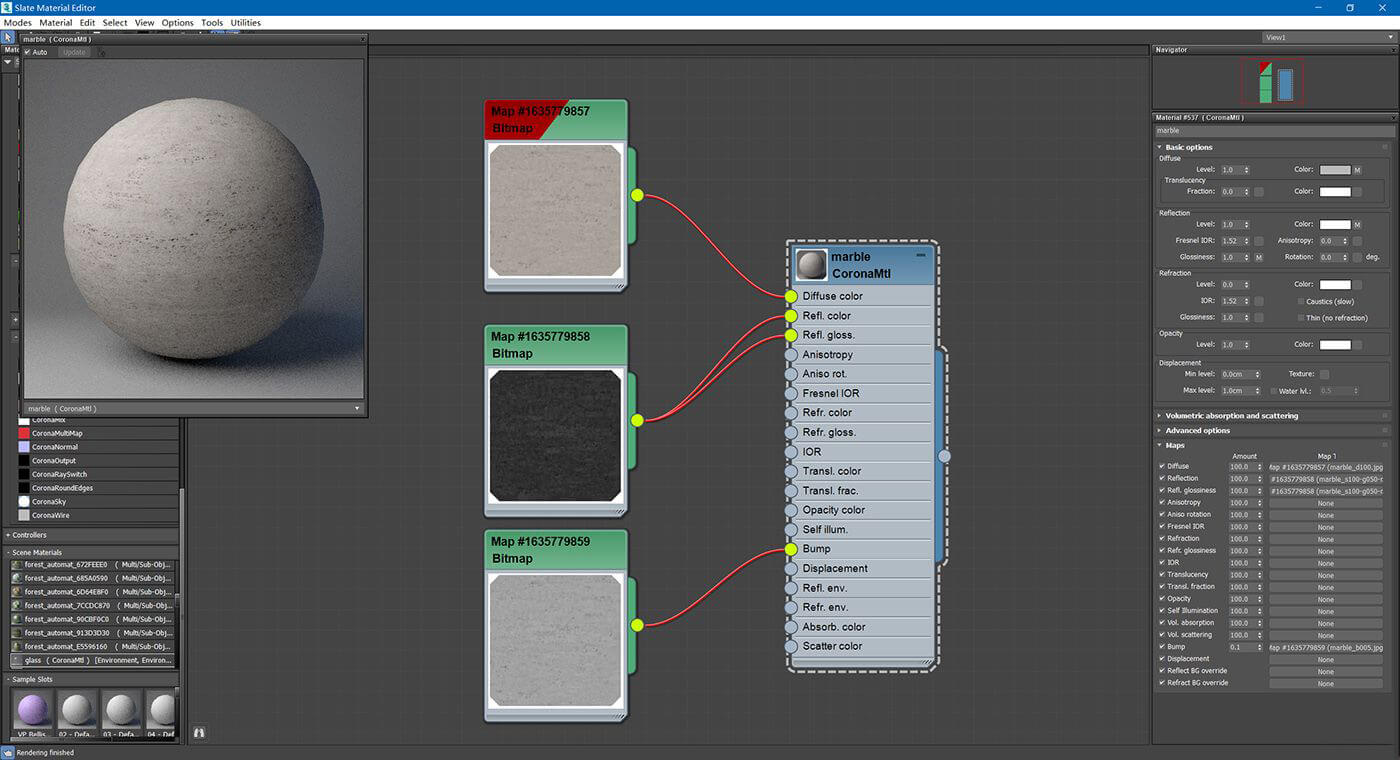
Material adjustment
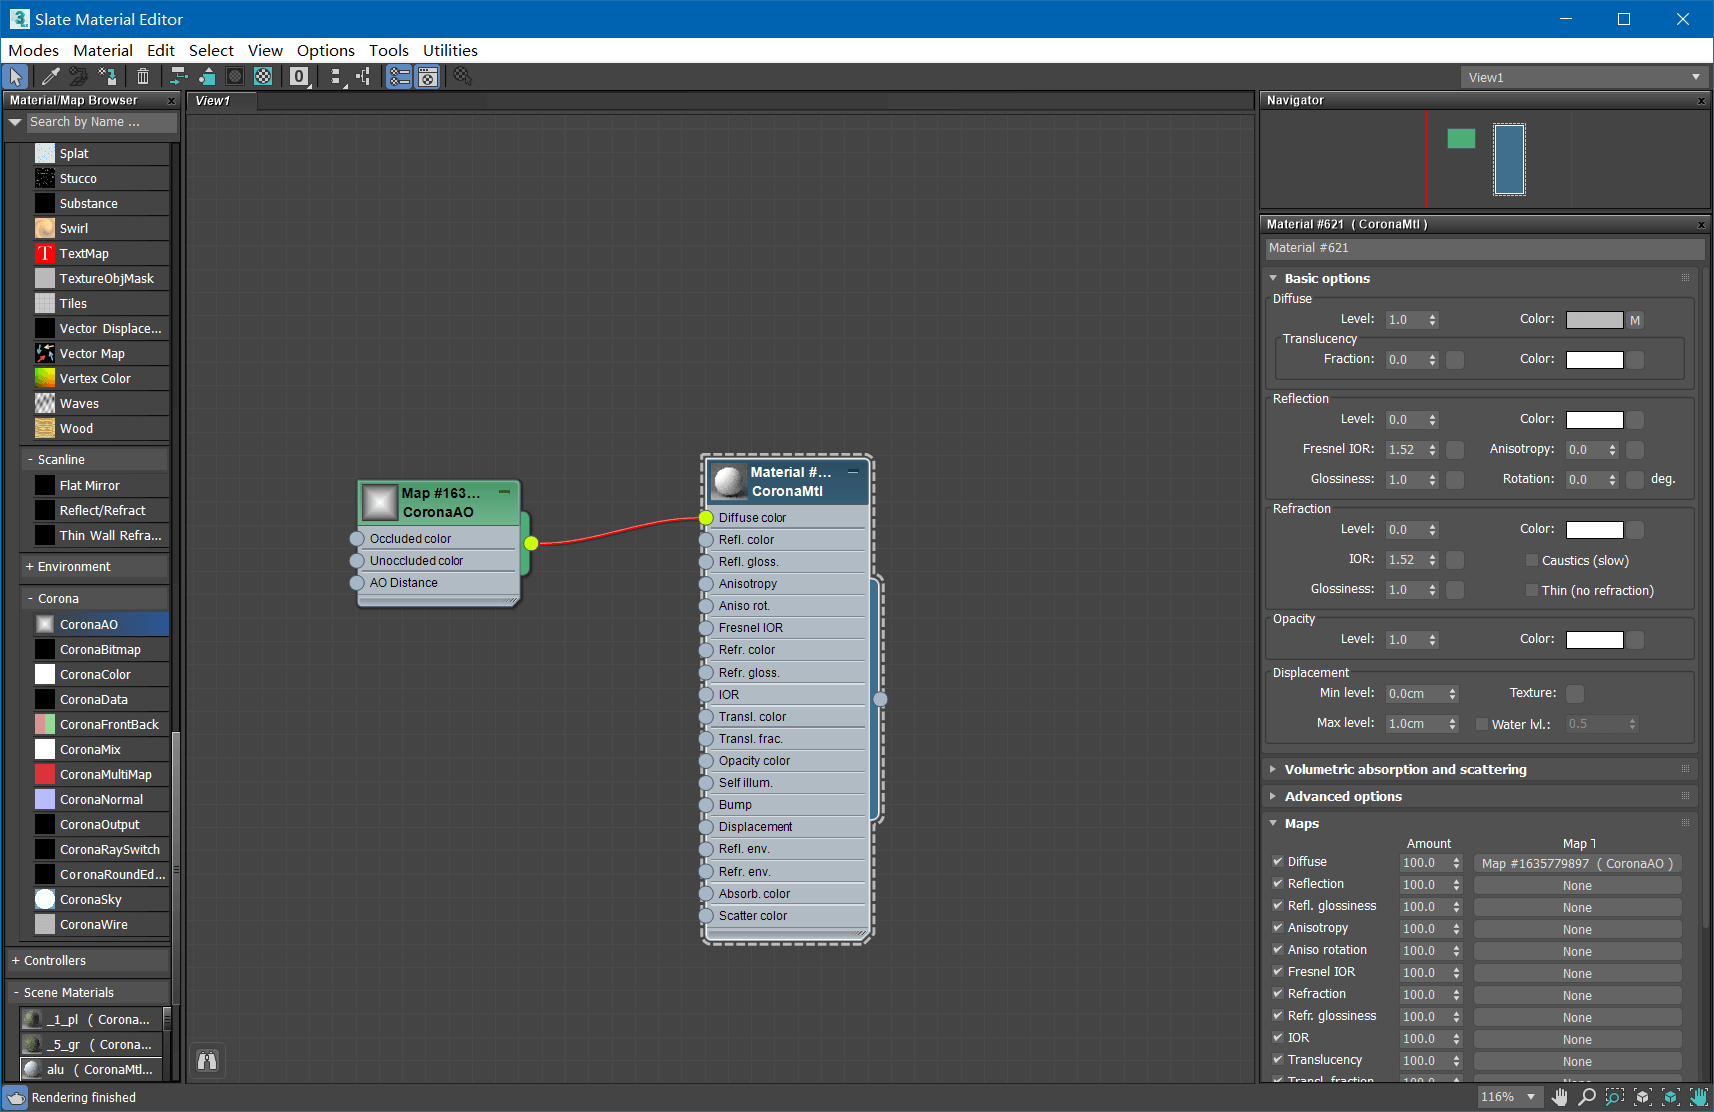
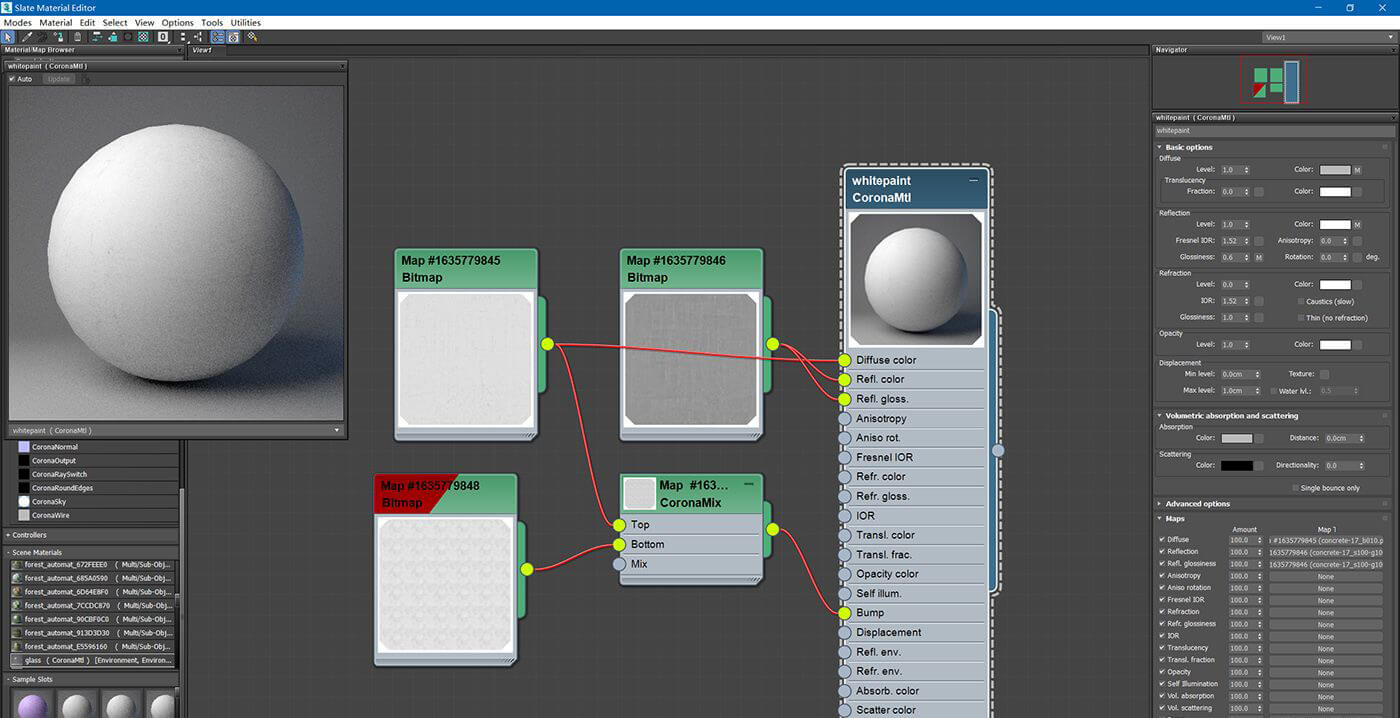
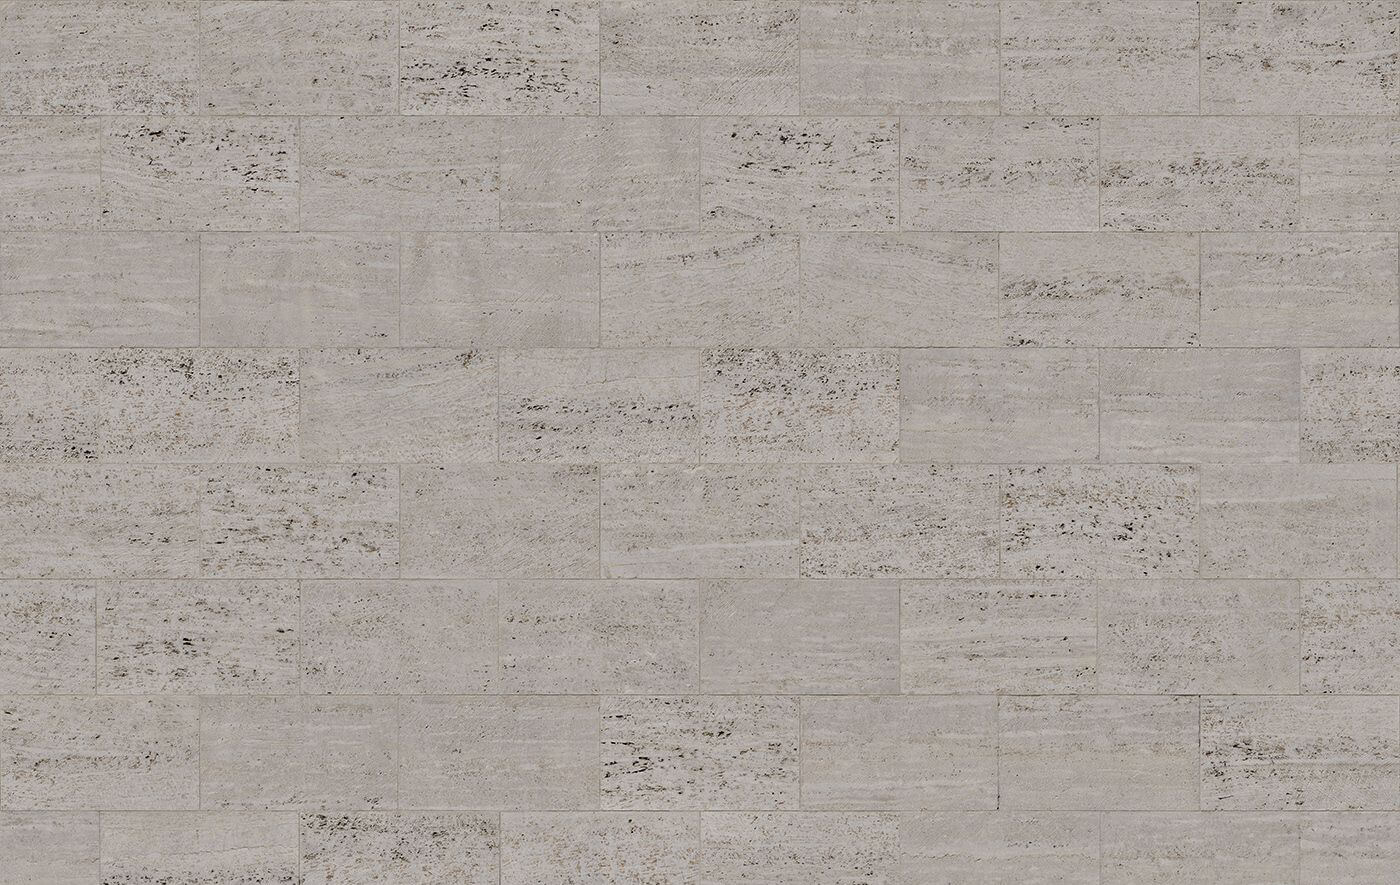
The place that looks white in the picture uses the same material. The difference is only in the small size of the window frame, which increases the repetition rate of the texture (using the same material, but adding UVW to the model) The map modifier to modify the repetition rate). The color map uses a concrete bump map of Arroway, and then mixes the color map and another dirty print map with a mix map through the mix node. Finally, the reflection and reflection glossiness are linked to the concrete material. Reflection map.

The stitching of the floor has been built in the model, and it is not necessary to rely on the texture to make the seams.

Plant material adjustment
Because the material used in the material of the plant is already very high, you only need to do some minor work:

  1. Reduce the texture saturation of all plant leaves, then adjust the hue to tend to be uniform.
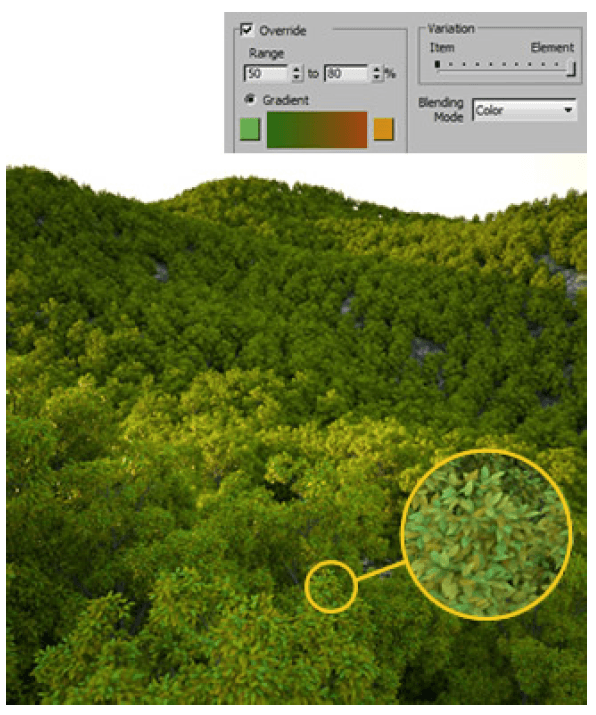
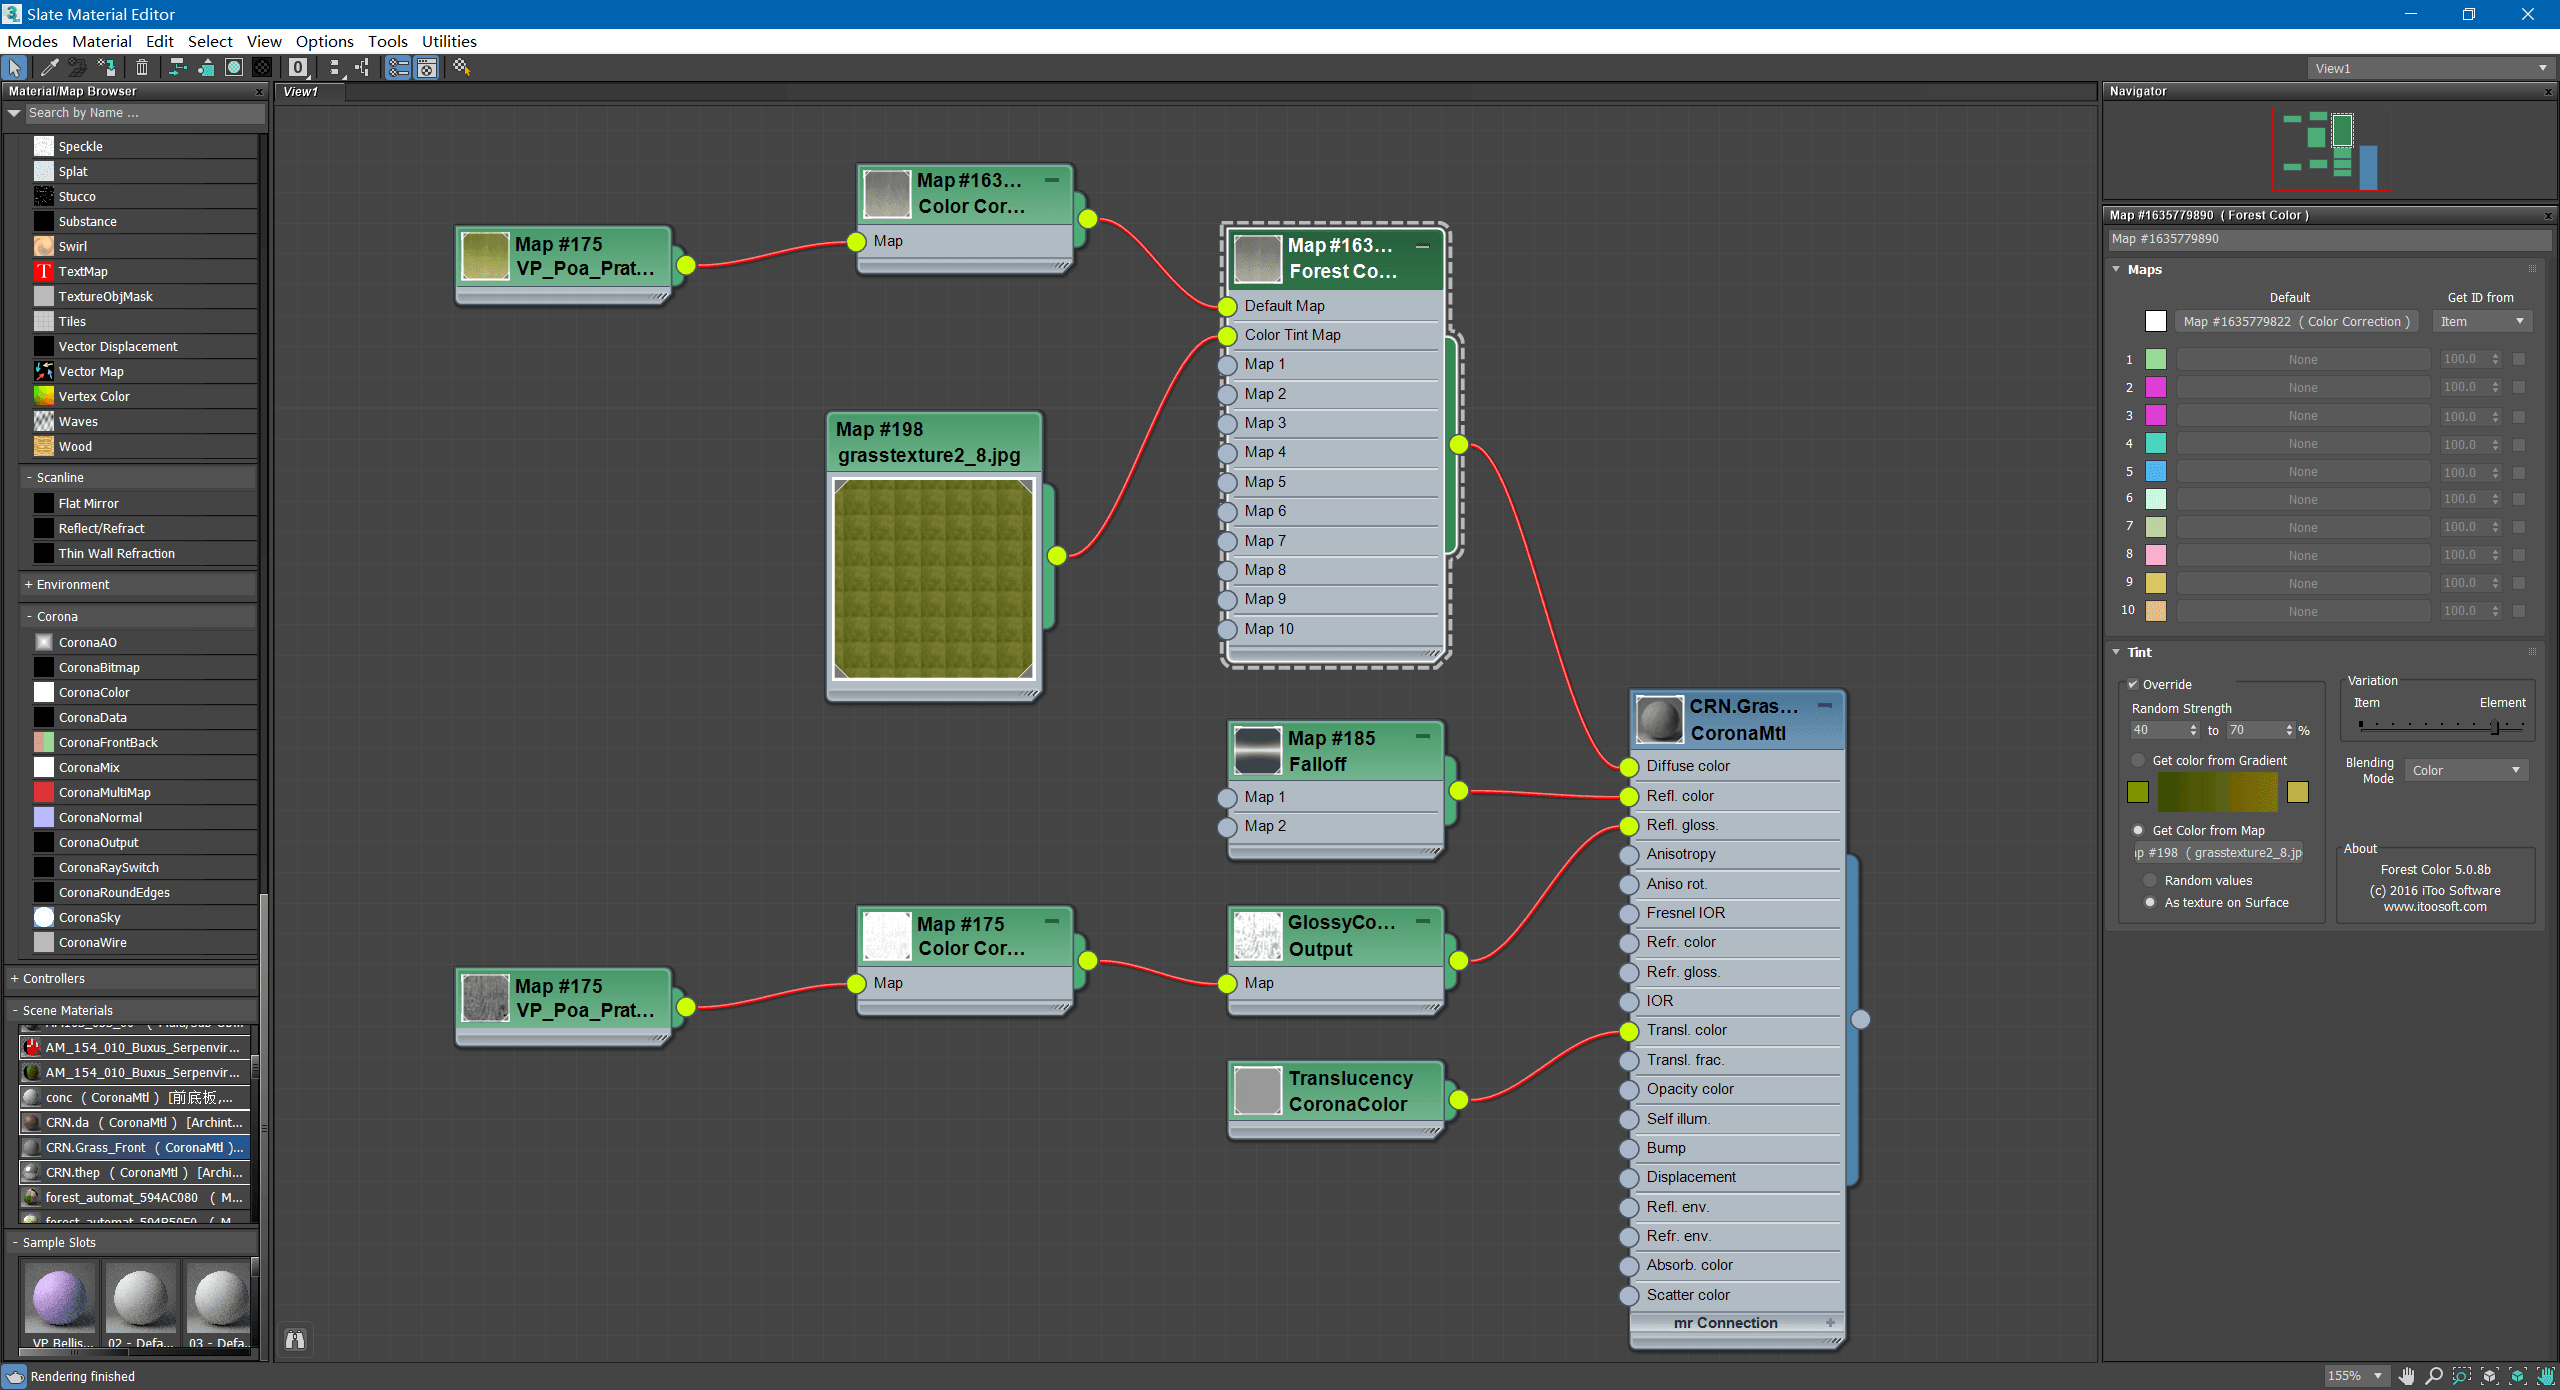
  2. A Forest Color node has been added to the leaf map of the tree.

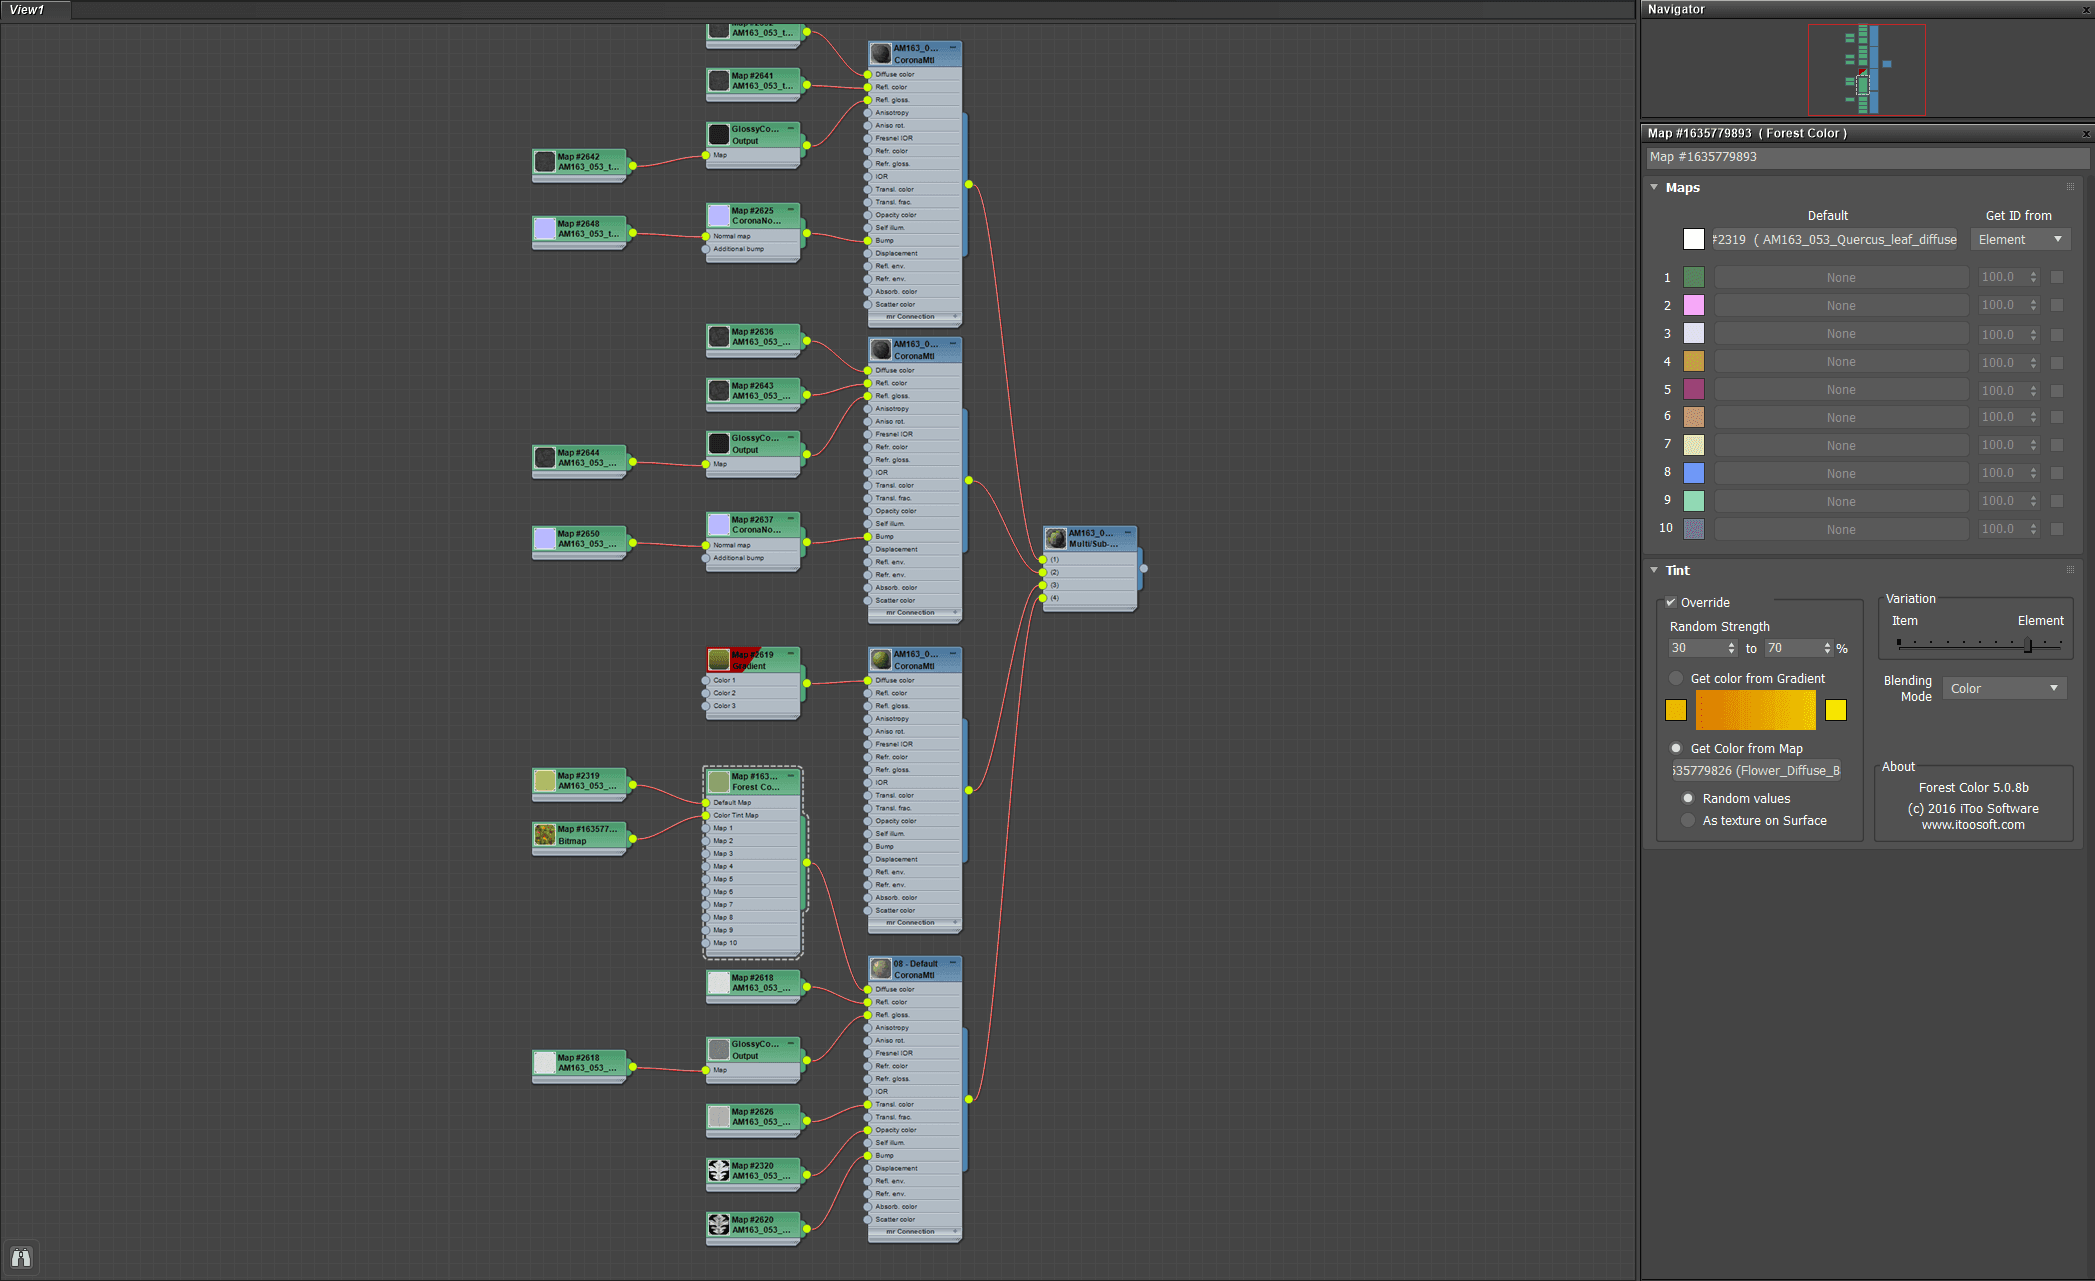
Forest Color can add rich color changes to plants. Take the material of one tree as an example. Link the leaf color map in the default map. In the color tint map, here is a texture with rich colors. Blur a bush picture. It is this picture that provides the color range of the color change.
In the right parameter panel, random strength is the blending intensity of the color change. The color source is the control option of get color from map, variation. The leftmost and rightmost correspond to the single plant as the basic element, added in the whole scattered Buri. Change, and use plant leaves as a basic element to add color changes within a single plant. Here is a demo from the official website:
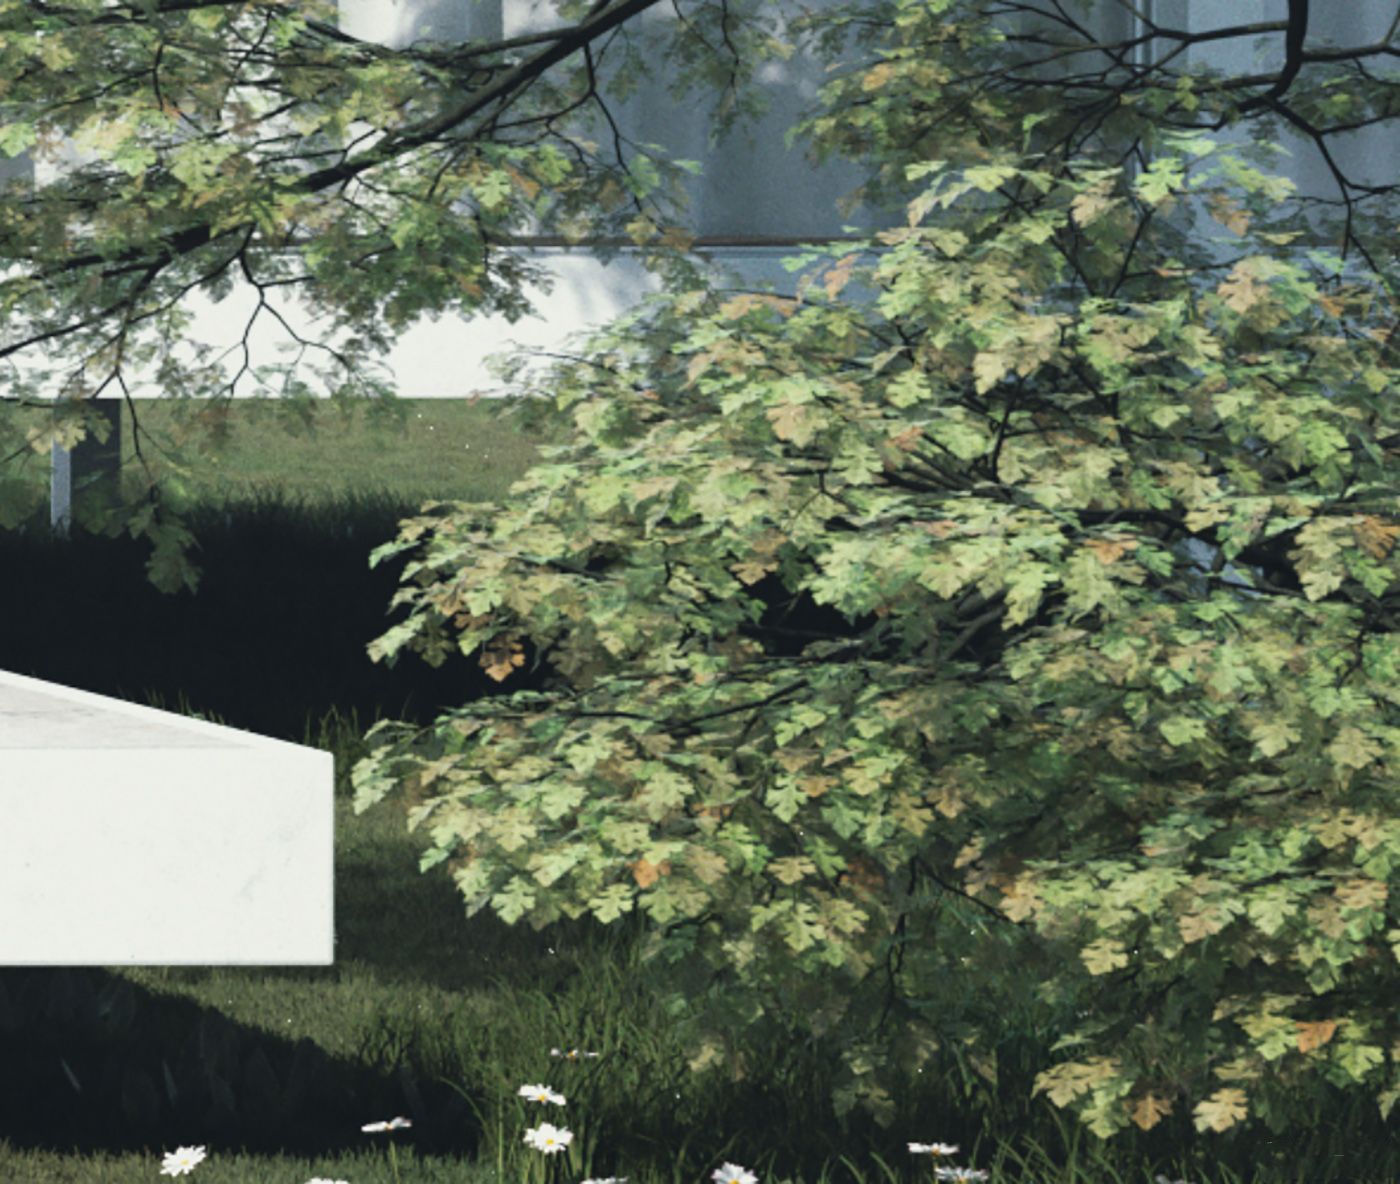
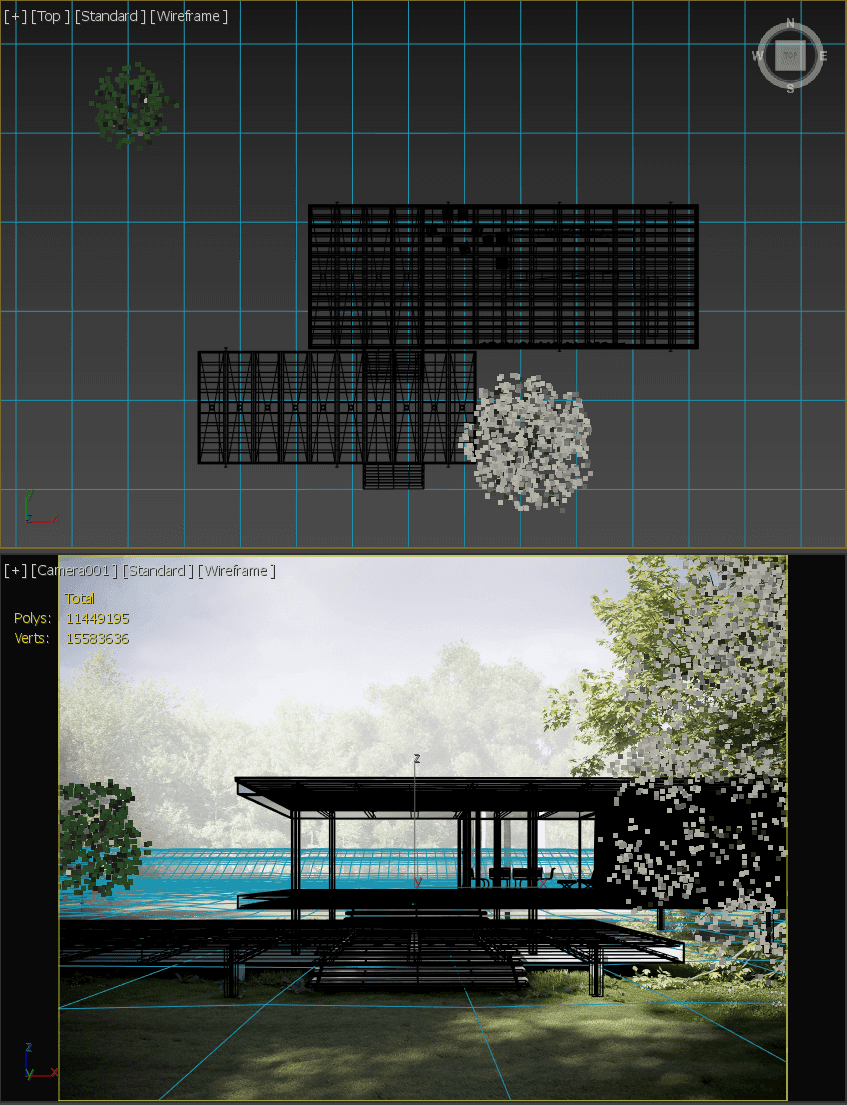
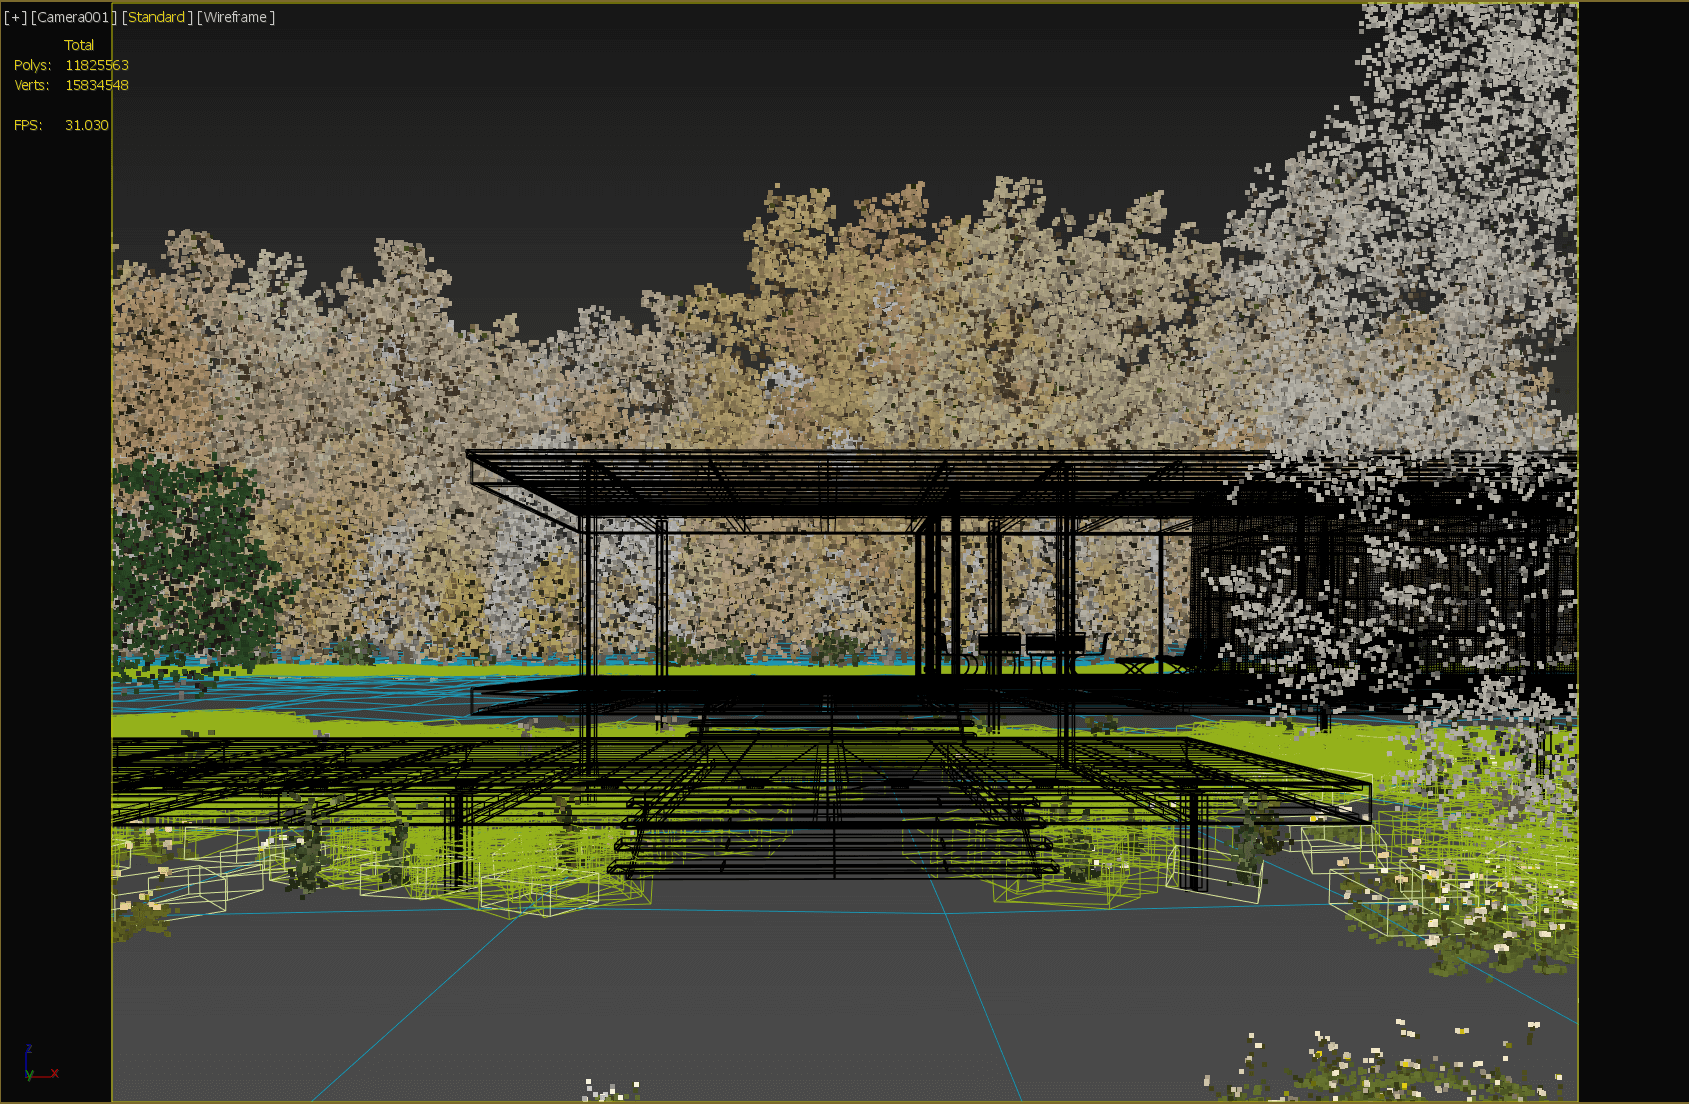
Rendered effect
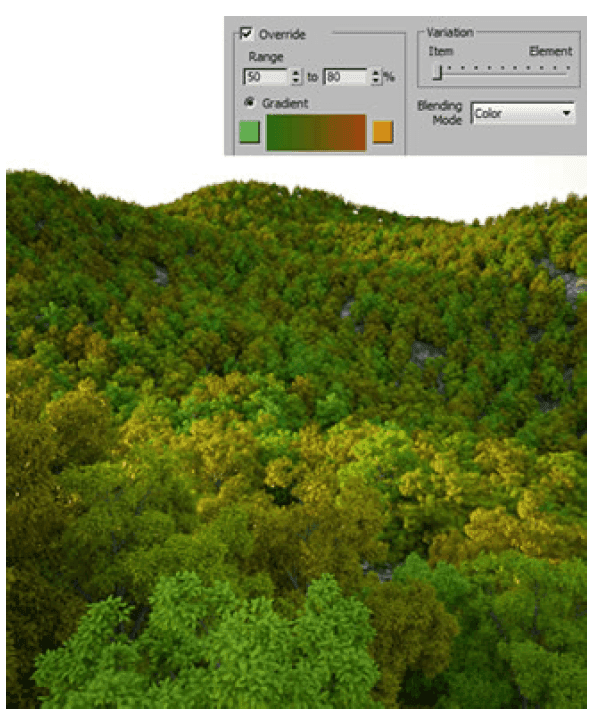
The color tint map of the grass is linked to a grass map, then check the texture on surface in the parameter panel, so that the color change of the texture will be superimposed on the whole grass. Finally, adjust the repetition rate of the texture. Can get a rich grassland.

Green and yellow gradient grass, full of realism
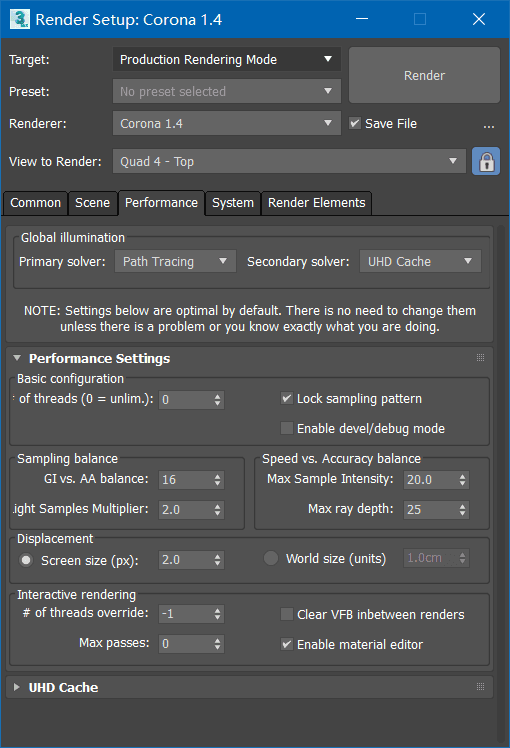
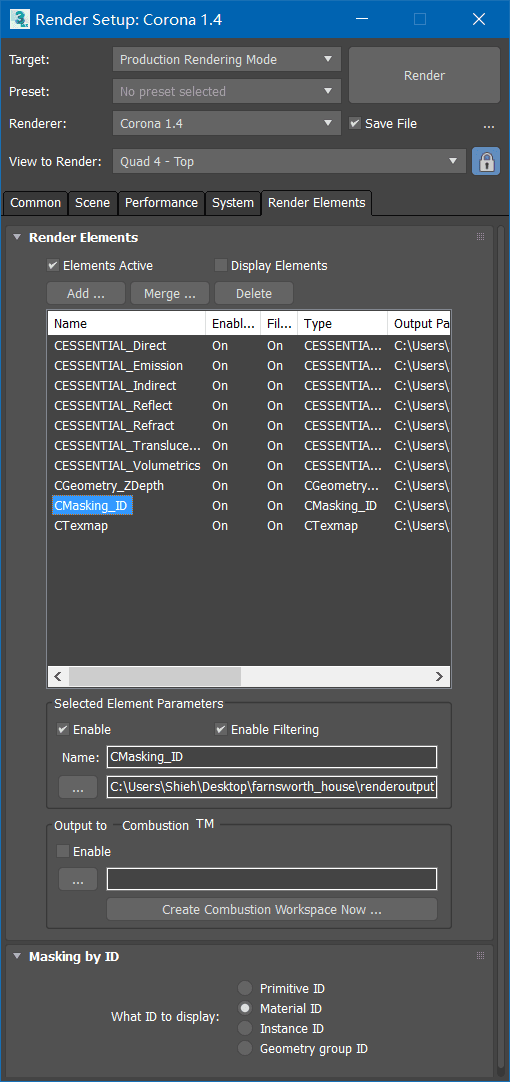
Tthe rendering output
The rendering uses the default parameters.

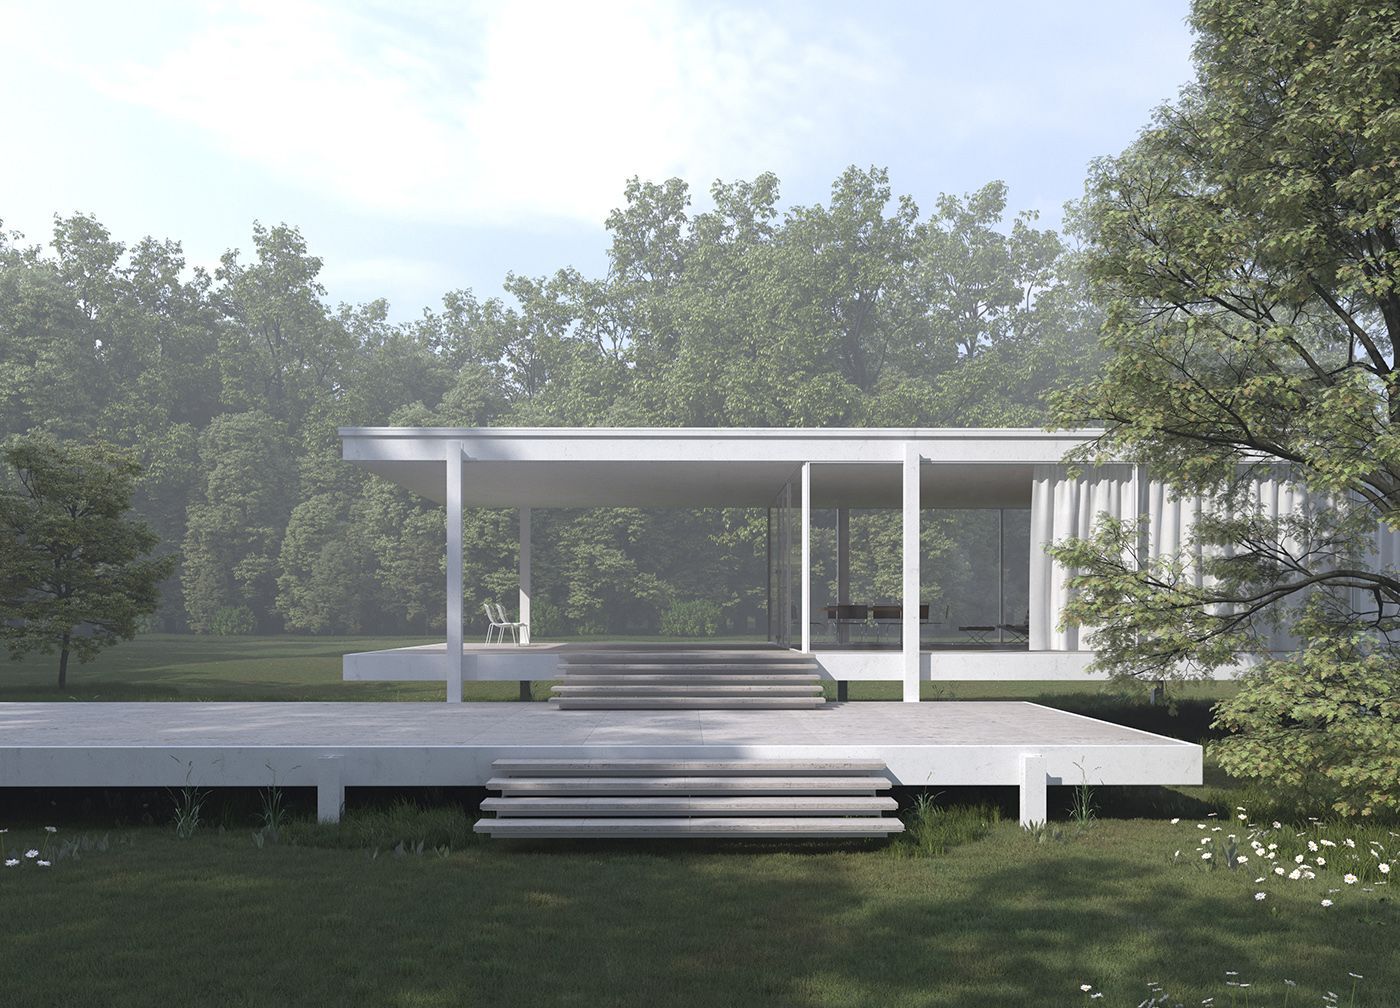
Next rendering image

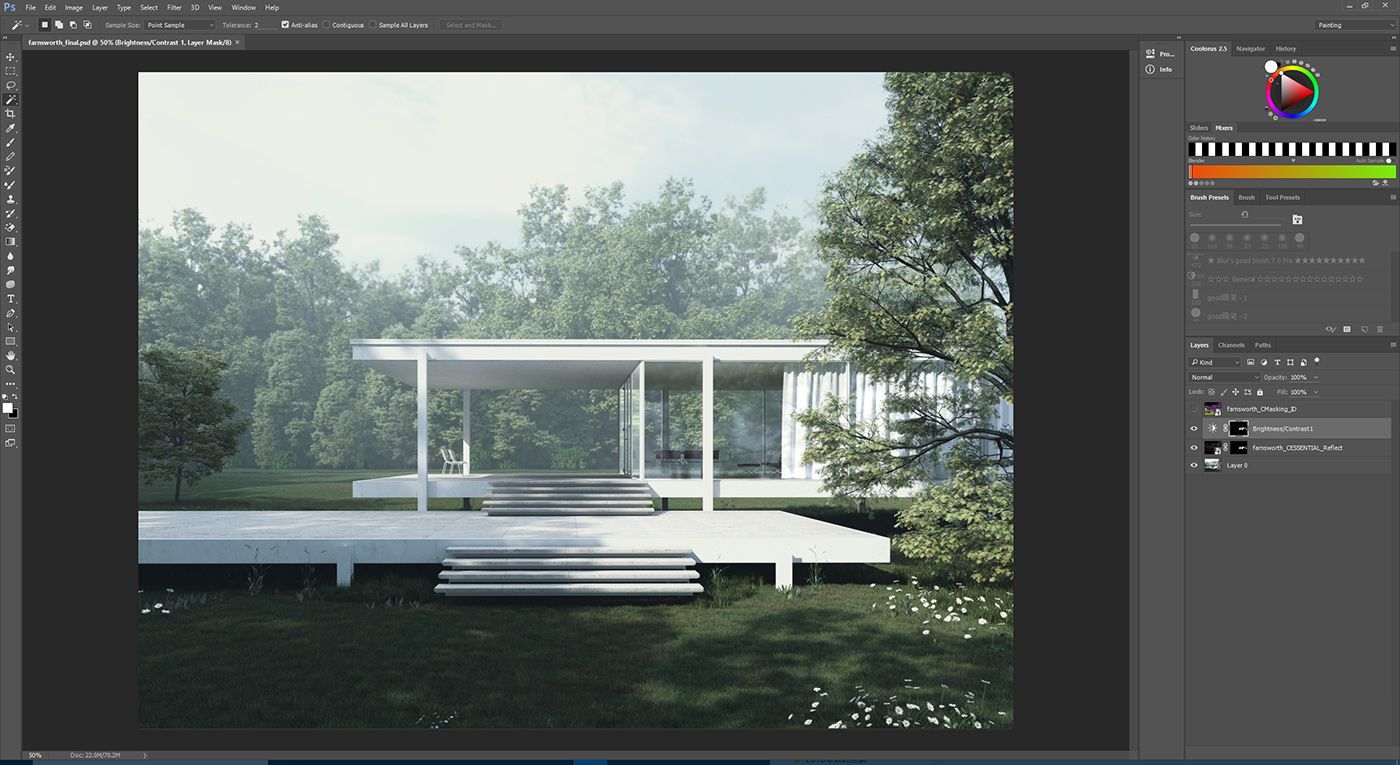
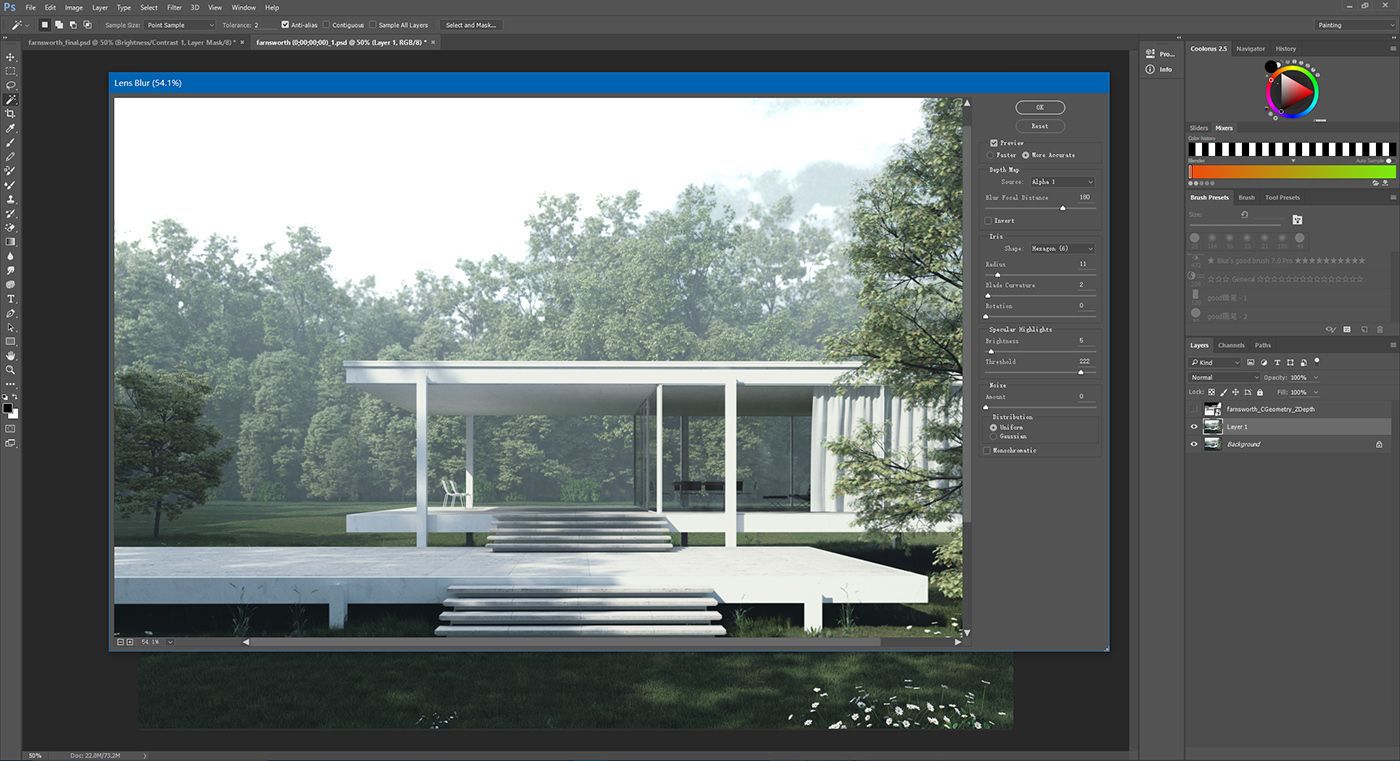
Post-production adjustment
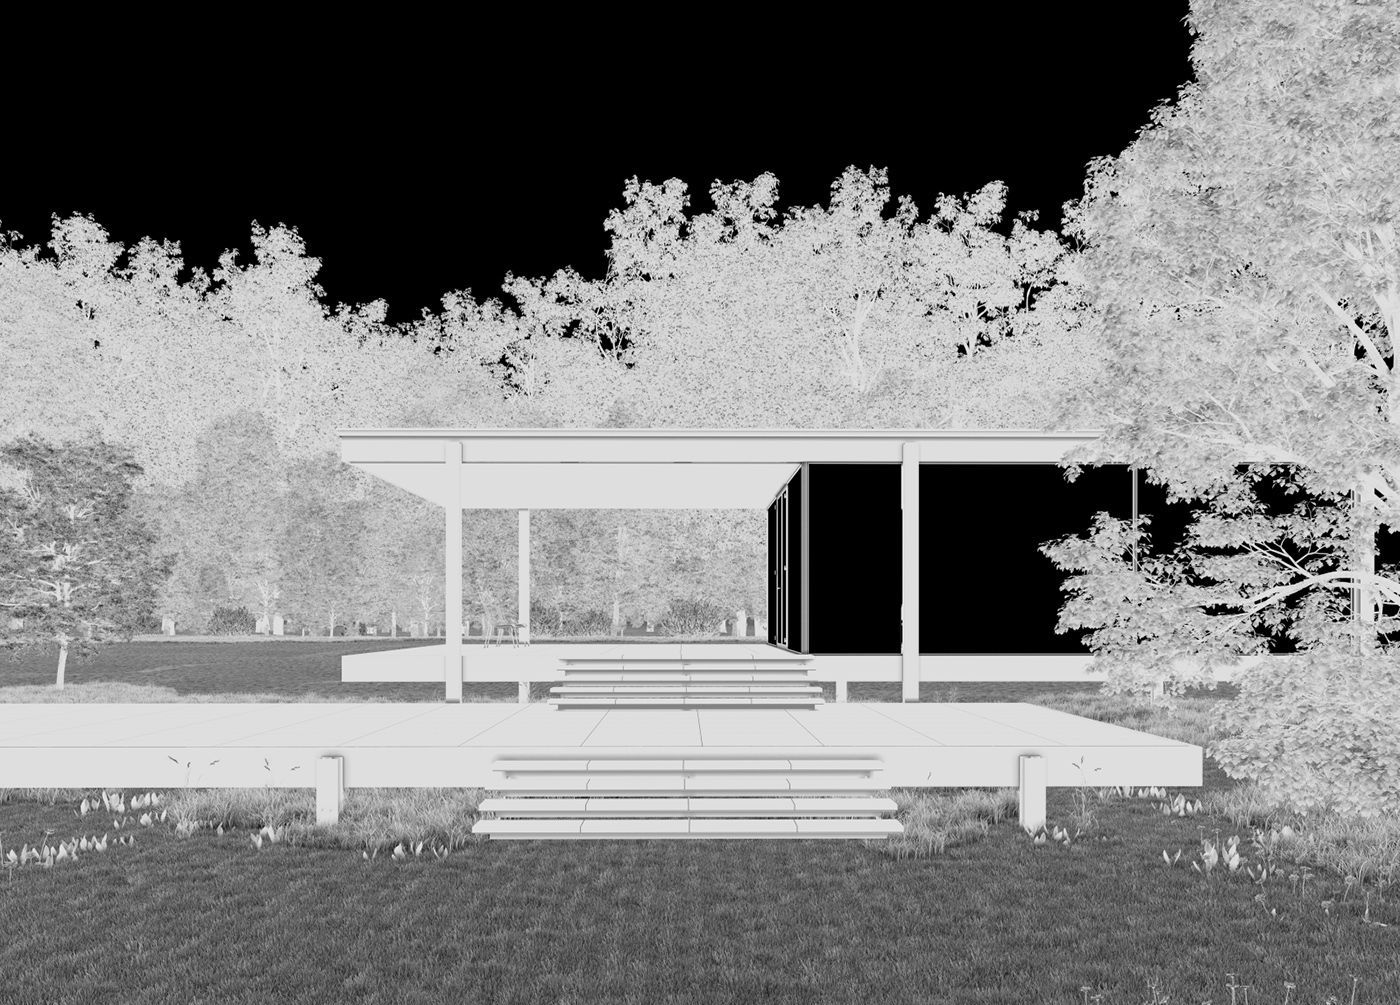
All channels are imported into the PS, the transparent portion is selected as the alpha channel, and then the main channels are superimposed in a linear dimming (adding) mode. The AO image is superimposed with positive film overlays to adjust the transparency. After the sky is smashed down, it is given a blur, and it is also superimposed with linear lightening to create a feeling of overflowing sunlight. The rest is a partial adjustment of the exposure and overall exposure fine-tuning, slightly adjusted to a little over-exposure, to show plenty of sunshine.

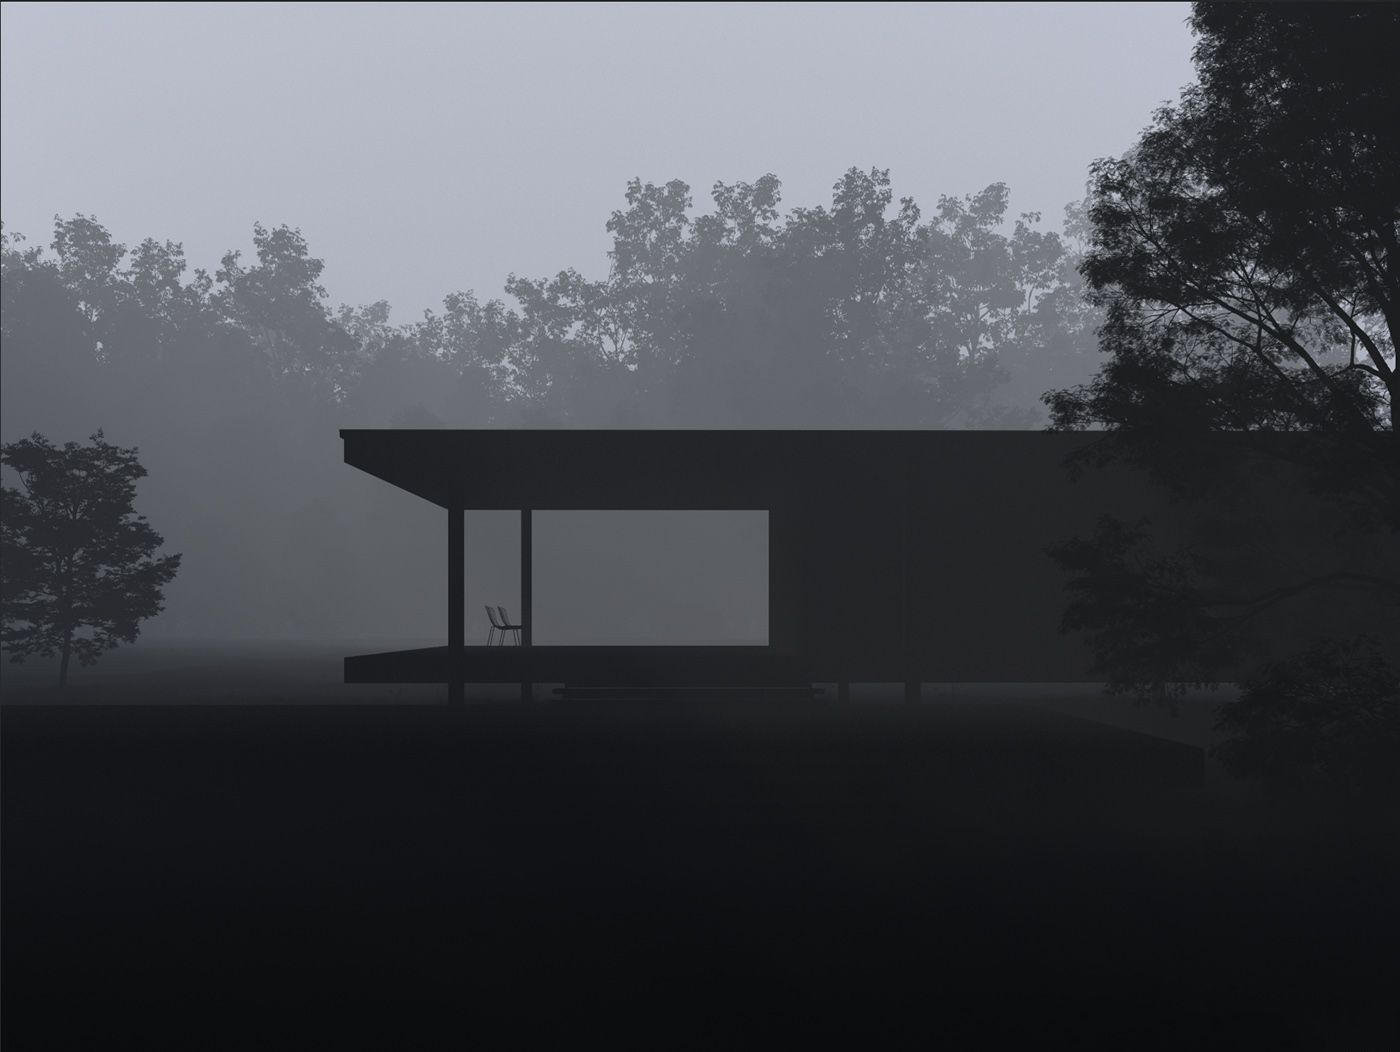
3 Extract the reflection channel separately, copy the glass part with the ID channel selection, and add a contrast tool to adjust the effect after superposition:
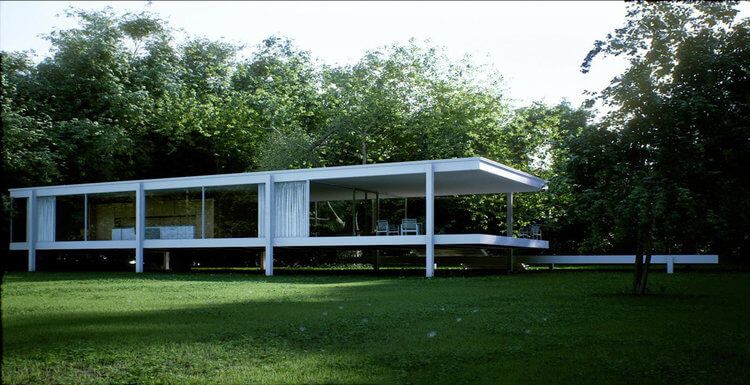
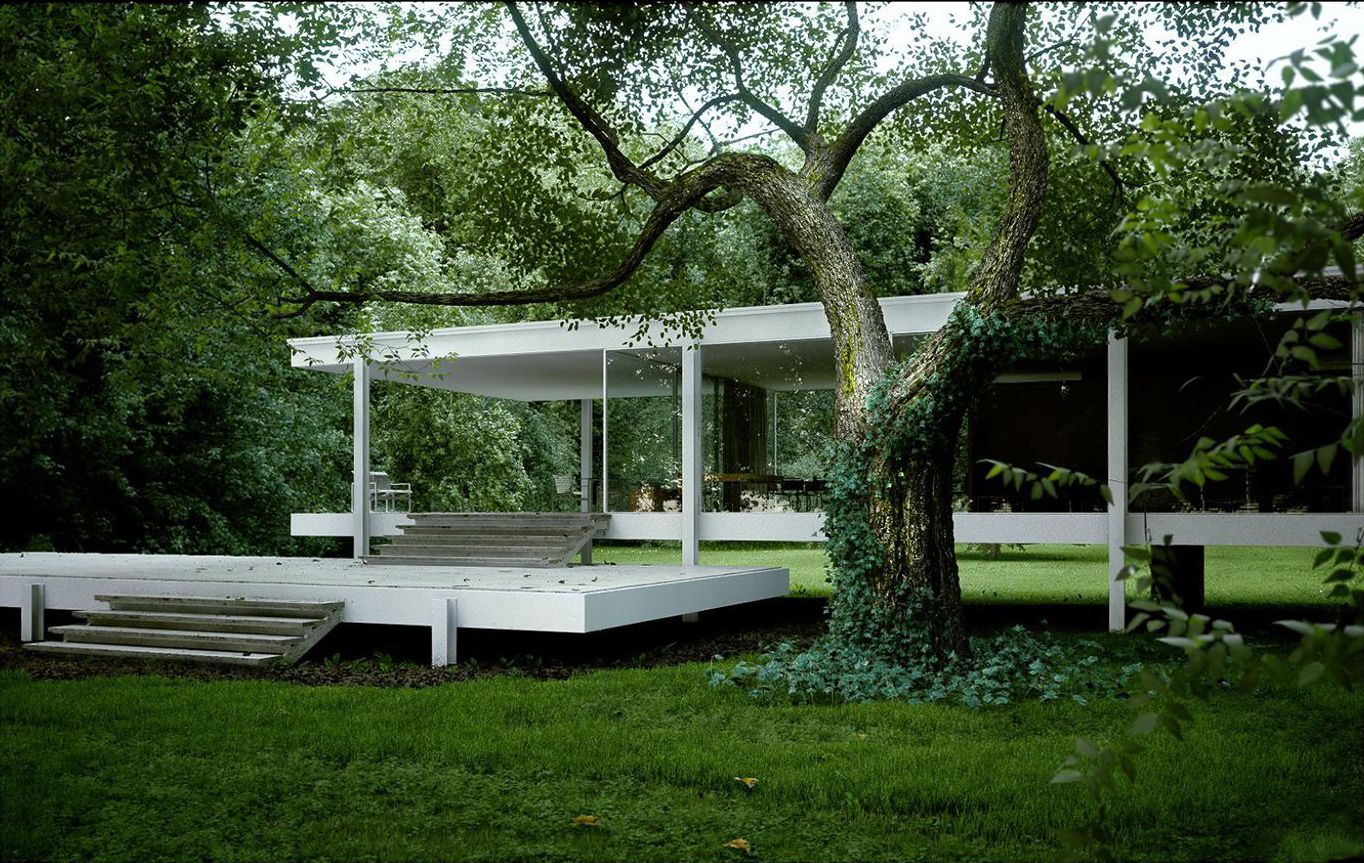
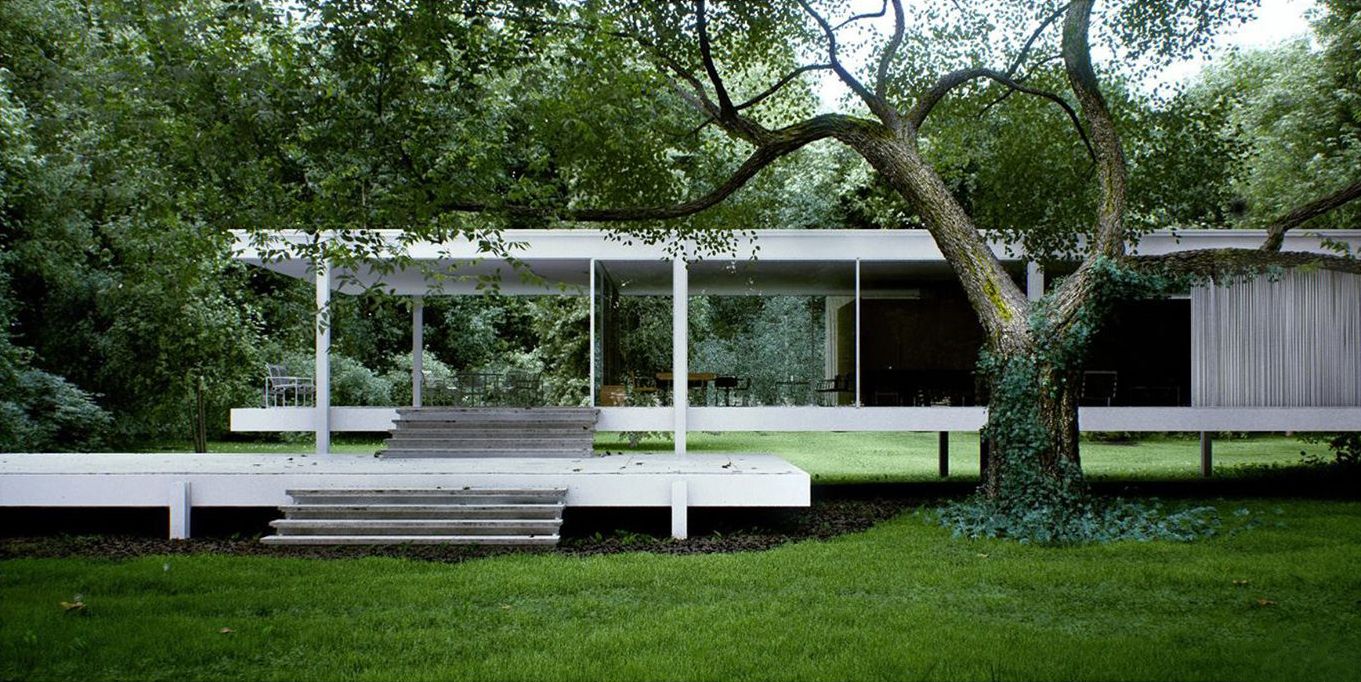
The final picture ~

Refer from Han Shilin

Welcome to join us

render farm free trial

Recommended reading


How to Render High-quality Images in Blender

2023-01-13


Top 9 Best And Free Blender Render Farms of 2024

2023-05-06


Revealing the Techniques Behind the Production of Jibaro "Love, Death & Robots", Which Took Two Years to Draw the Storyboard

2023-01-13


How to Render Large Scenes with Redshift in Cinema 4D

2022-06-09


Top 10 Free And Best Cloud Rendering Services in 2024

2023-09-26


Top 8 After Effects Render Farm Recommended of 2023

2023-02-02


How to Reduce Noise in Corona Renderer - Corona Denoising

2023-01-13


Arnold for Maya Tutorial: How to Render Wireframe

2023-01-13


Partners

Interested

How to Reduce Noise in Corona Renderer - Corona Denoising
Subtle high-frequency noise is normal for the Corona renderer, especially at the beginning of the rendering process, where bright noise and dark noise are unavoidable. To eliminate them, only increasing the number of photons, increasing the subdivision value of materials and lights, and spending a lot of time can be eliminated.So how to reduce noise in Corona renderer? One way is to increase the hardware speed, replace the CPU, increase the memory, etc., which is undoubtedly an increase in cost; another way, relying on software to improve the algorithm, cleverly eliminate noise, both noise reduction technology.The denoising feature was introduced in Corona 1.4, a feature that analyzes noise in 3D space and subtly reduces noise while not producing spots, maintaining sharp edges and texture details. This not only improves quality, but also reduces rendering time by 50% to 70%.How to Use Denoising Feature in Corana Render?As the best CPU &x26; GPU render farm service provider, Fox Renderfarm will tell you how to reduce noise in corona render step by step.Step 1. Enable denoising. You can enable denoising in "Render Settings - General Settings - Denoising".Denoising optionsDenoising ModeNoneOnly Remove FireliesFull DenoisingGather Data For Later For example, make a scene that uses Corona's own sky, sun and camera objects. The window object PORT seals the window outside, using Portal Matrial. Then, open the Render Settings panel and set the Denoising Mode to Full Denoising. Step 2. Start the VFB rendering window, click to render. This is a screenshot of PASSES TATAL = 4, there is a lot of noise in the scene. PASSES TATAL =25This is a screenshot of 25, and there is a lot less noise in the scene. My machine used 126 seconds, this speed depends on your CPU core and clock speed. The better the hardware, the faster the speed. Step 3. Click to pause the rendering and start the denoising program. Comparing the upper and lower two figures, the noise is removed a lot, but the scene is a bit black.Step 4. Go to the POST panel of the VFB window, adjust the exposure and highlight limit, and adjust the correct exposure. The current level of denoising is 0.65 by default.Manually adjust the noise reduction to a level of 1, to see if the noise reduction is more.The model material 16 points PASSES TATAL=10 . A lot of noise After noise reduction processing.Official DemoRendering ten minutes DOF, depth of field demonstration The denoising function is turned off, we can see a lot of noise in the photo.After the denoising function is turned on, no noise.Denoising radius test: Denoise radius: 1 Denoise amount: 1, the image is very clear, the details are many. Denoise radius: 4 Denoise amount: 1, The noise is reduced, the image becomes blurred, and the detail is reduced.Use the Corona renderer in C4D after opening the render settings panel -- enabling FULL DENOISING. If you use the VFB window to render, then when you manually stop, the denoising function will start automatically. If you use an interactive render window, then when you manually pause, the denoising program will not start.SummaryThis is all Fox Renderfarm's analysis of the problem of how to reduce noise in Corona render, hope you solve your problem successfully. Fox Renderfarm is a very powerful, safe and fast cloud rendering services, and you will never encounter such problem if you use Fox Renderfarm. Fortunately, Fox Renderfarm supports most popular 3D software, renderers and plugins incluindo Corona, and it offers a free $25 trial for new users who sign up, so just give it a try!
More
2023-01-13
Corona Renderer Tutorial: Depth of Field
For beginners of the Corona renderer, a lot of features need to be understood. As a leading cloud rendering service provider in the CG industry, Fox Renderfarm supports a variety of mainstream software and plug-ins, like 3ds Max, Maya, C4D, Blender, V-Ray, Redshift, Corona, etc. then this article introduces the depth of field in the Corona renderer, we hope to help you.What is DOF(Depth of Field)?When the camera's lens is sharply focused on an object, the same plane point of the vertical lens axis at the center of the lens can form a fairly clear image on the film or receiver, putting the front and back of the plane The distance of all the scenes is called the depth of field of the camera.&x3C;p class=‘img-source’>(The focus of the camera is on the flower and the bottle)The depth of field is related to the focal length of the lens. The lens with a long focal length has a small depth of field and a lens with a short focal length has a large depth of field. Secondly, the depth of field is related to the aperture, and the smaller the aperture (the larger the value, for example, the aperture of f16 is smaller than the aperture of f11), the greater the depth of field; the larger the aperture (the smaller the value, for example, the aperture of f2.8 is greater than f5.6) The depth of field is smaller. Secondly, the foreground is deeper than the depth of the back. That is to say, after precise focusing, the scene in the distance from the front of the focus can be clearly imaged, and the scene within a long distance behind the focus is clear.The 3D software built-in renderer or plug-in can simulate and implement the depth of field effect of the camera. The Corona renderer also enables depth of field rendering.How Does the Corona Renderer Set the Depth of Field?In the rendering settings, check DEPTH OF FIELD below, the default focus distance is 100, which is the initial setting.Establish an environment in the scene: sky, ground. And create a set of spheres, add a C4D camera. Change to Corona renderer and render. The DEPTH OF FIELD is activated here, but there is no depth of field DOF effect.&x3C;p class=‘img-source’>(No depth of field, clear from front to back)Launch the C4D camera and right click on it to add the Corona camera tag. This converts the C4D camera into a Corona physical camera.Select the C4D camera, select the "Object" panel - the target distance, use the recognizer, click on the clear object you want in the scene, and the distance will automatically calculate 1112.741CM.In the scene we can see the focal plane position of the camera.Click on the Corona’s camera label and the FOCUS DISTANCE will automatically match the distance of the C4D camera. Check OVERRIDE to override the render settings parameters. In other words, this check, the camera's parameters are subject to this.The OVERRIDE in the DOF of the Corona camera tag has no effect if it is not selected. Because the render settings panel is checked, the rendering settings are dominant. If this is checked, this setting is the main one.Test renderingTest DataAperture: Like photography, increasing the aperture value makes the DOF effect more subtle. Decreasing the aperture value (the aperture becomes larger and the depth of field becomes smaller) will make it more visible. Aperture value = 2Aperture value = 2 obvious DOF effectAperture value = 4Aperture value = 4 The aperture of the aperture becomes smaller, the depth of field becomes larger, the clear range becomes larger, and the DOF effect is not as obvious as above.Aperture value = 16Aperture value = 16 The aperture hole becomes small, and the depth of field changes greatly. The clear range is changed greatly, and the DOF effect is lost.The camera focal plane is placed at the end.The camera focal plane is placed in the middle.The focal plane of the camera is placed on the front.The size of the sensor also affects the appearance of the DoF effect. Note: In Cinema 4D, changing the sensor size keeps the focus static and automatically changes the effect. If you want to keep the same composite image in the image, be sure to reset the field of view after changing the Sensor Size.F-stop = 4, sensor width = 35mmF-stop = 4, sensor width = 100mmCorona's depth of field rendering is based on physical camera parameters. The depth of field rendering of the C4D's own renderer is analog and better controlled.Using the 3D renderer to render the depth of field is very slow. It is better to use layered rendering, render the depth channel, and then go to the PS and AE post-compositing DOF effect, you can control any position clearly, the speed is faster than the renderer rendering, or you can use a render farm, it is more efficient.Fox Renderfarm hopes it will be of some help to you. As you know, Fox Renderfarm is an excellent cloud rendering farm in the CG world, so if you need to find a render farm, why not try Fox Renderfarm, which is offering a free $25 trial for new users? Thanks for reading!
More
2022-06-09
Corona Renderer 7 for 3ds Max Released and for Cinema 4D Is Well Under Way!
Corona Renderer - Rendering is magic! The magic that will excite you this time is the Corona Renderer 7 for 3ds Max is released now! With Clearcoat and Sheen in the new Physical Material, easy and fast aerial perspective in the Corona Sky, faster rendering, and many more updates, this release will give you better results, all while making your 3D work easier and speedier!NEW FEATURES VIDEOA quick overview of some of the new features in Corona Renderer 7 for 3ds Max.00:04 - The new Physical Material00:08 - Physical Material, Clearcoat00:20 - Physical Material, Sheen, velvet appearance (from scene by Elena V Miller, https://evnvis.co.uk)00:24 - Physical Material, Sheen, satin appearance00:31 - Improved Fast Glass00:41 - Physical Material, Thin Glass with Rough Refraction00:50 - Physical Material, 35 built-in presets01:07 - Improvements to 2.5D Displacement01:18 - Turbidity, Altitude and Volume effects (PRG Clear Sky model)01:25 - Volume Effect ("aerial perspective" - PRG Clear Sky model)01:33 - Faster Rendering, example 101:36 - Faster Rendering, example 2 Opacity / Absorption (using free asset by Viz-People, https://www.3d-models.com/info/free-3d-models01:39 - Faster Rendering, example 301:44 - Faster Denoising01:48 - No artifacts in huge scenes (scenes far from the 3ds Max 0,0,0 origin)02:01 - Updated Material Library, Metals02:11 - Updated Material Library, Masonry02:19 - Updated Material Library, WoodsVisit the Corona Renderer blog for more details.BTW, Corona Renderer 7 for Cinema 4D is well under way – expect it soon!As the industry's leading cloud rendering service provider and Corona render farm, Fox Renderfarm supports Corona rendering!
More
2021-07-22
  • Foxrenderfarm

    Powerful Render Farm Service

  • TPN
  • TPN

    Business Consulting

    Global Agent Contact:Gordon Shaw

    Email: gordon@foxrenderfarm.com

    Marketing Contact: Rachel Chen

    Email: rachel@foxrenderfarm.com

    Connect with Us

Fackbook Customer Reviews