

What Is Texture Mapping? A Simple Texture Mapping Guide
Picture a plain gray cube on your screen that looks flat, dull, and lifeless at first glance. Now, add a wood, brick, or metal skin, and the cube can become an object that feels more real and useful. Hence, this simple change shows why many 3D projects need textures to add life and detail.
It's basically Texture Mapping that lets a 3D model wear a photo or pattern on its surface to show color, depth, and style. So if you want to learn or use Texture Mapping, adhere to this guide, which covers details on what it is and how it works.
Part 1. What is Texture Mapping?
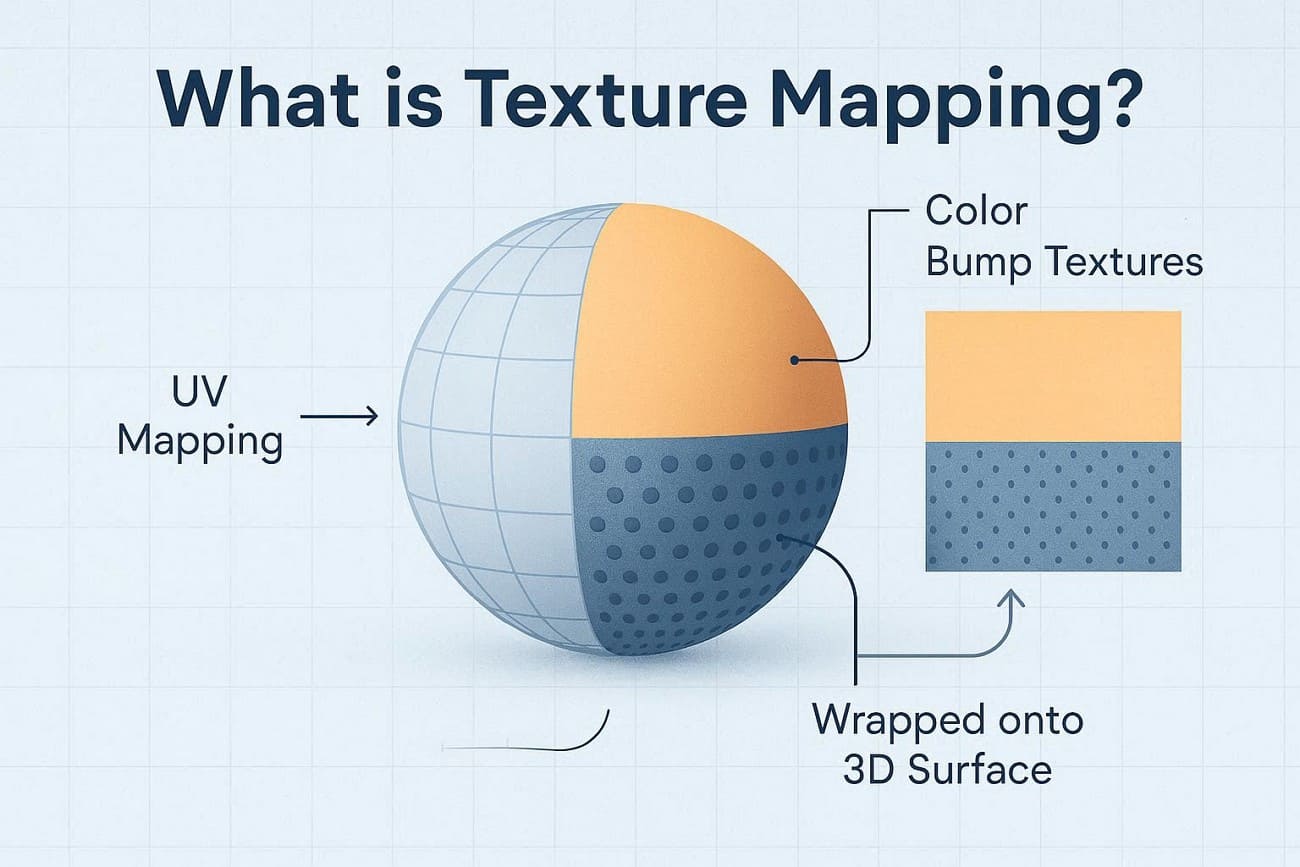
Texture Mapping is a method in computer graphics that puts a 2D image on a 3D object's surface. Hence, this image adds color, patterns, and surface details without more shape work. Instead of one flat color on each shape, the surface shows many small image dots from the texture. Thus, these small dots give fine detail and help simple models look more real and complete.
A simple cube can look like wood, stone, fabric, or metal with this simple method. Additionally, this helps games, films, and visual tools present more realistic, rich scenes without a heavy system load.
Part 2. How Texture Mapping Works?
According to Market.US, the global Texture Generation AI market is expected to grow from USD 1.84 billion in 2024 to USD 14.7 billion by 2034. This expansion represents a compound annual growth rate of approximately 23%. Since the texture maps method is projected to boom, you might seek to know more about how it works to determine if it's worth using.
1. Basic Workflow
The texture is created by the artist or program as a flat picture of pixels (texels), and it can be wood, brick, or fabric. Subsequently, the 3D model can be unwrapped, and points on the model are given 2D UV coordinates that correspond to the texture. Each triangle is drawn by the GPU using the same UVs on the face to locate a texture pixel on each pixel on the screen that it covers.
2. Sampling the Texture
For each screen pixel on the triangle, the UVs find one or more texels in the image. The texel color is used as the pixel color or combined with the light and material properties to get the final shaded look.
3. Perspective and Filtering
GPUs use perspective-correct interpolation to prevent the texture from stretching towards the camera. Whereas texture filtering, such as nearest, bilinear, trilinear, or anisotropic, blends nearby texels to smooth edges and reduce flicker when textures are small or viewed at angles.
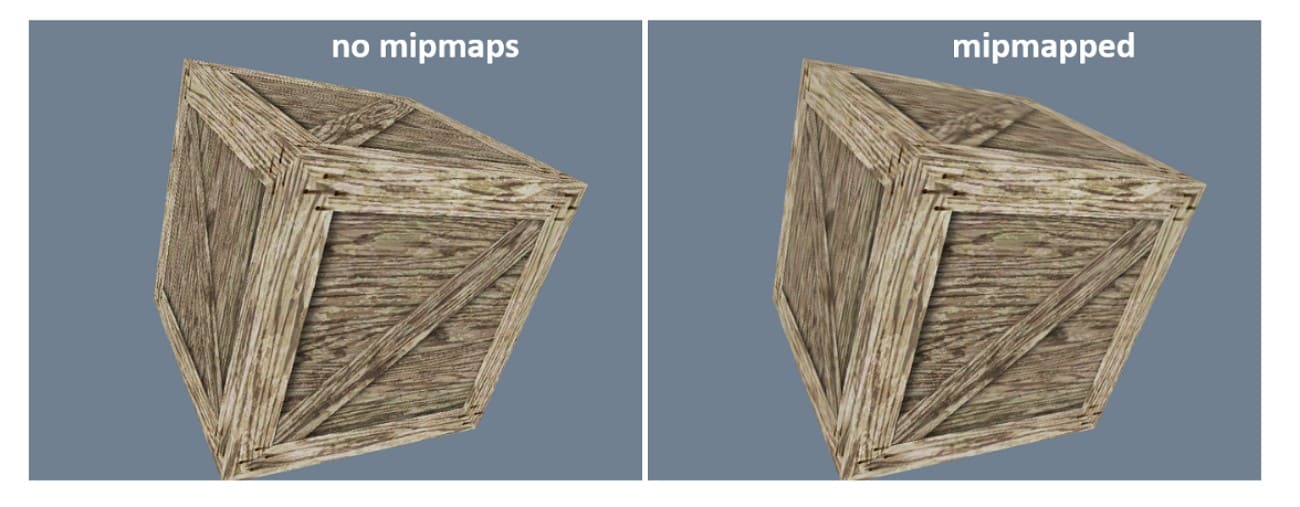
4. Mipmapping and Distance
A mipmap is a set of smaller versions of the same texture (for example, 512×512, 256×256, …, 1×1). The renderer picks the right mipmap based on the size of the texture on screen, to save performance and reduce flicker for far surfaces.

5. Coordinate Wrapping and Tiling
If UV coordinates go beyond 0-1, the system can clamp them to the edge or repeat the texture across the surface. Hence, this allows a small texture to cover large areas, such as floors or walls, without a large image, to save memory and bandwidth.
Part 3. Types of Texture Mapping Techniques
Market. US researchers also believe that AI texture generators can make textures in about 3 seconds, while older methods take over a minute. Hence, understanding these techniques helps creators efficiently choose the right mapping method for each project. To that end, some of the types of mapping texture are explained ahead for clarity:
1. Surface Detail Mapping
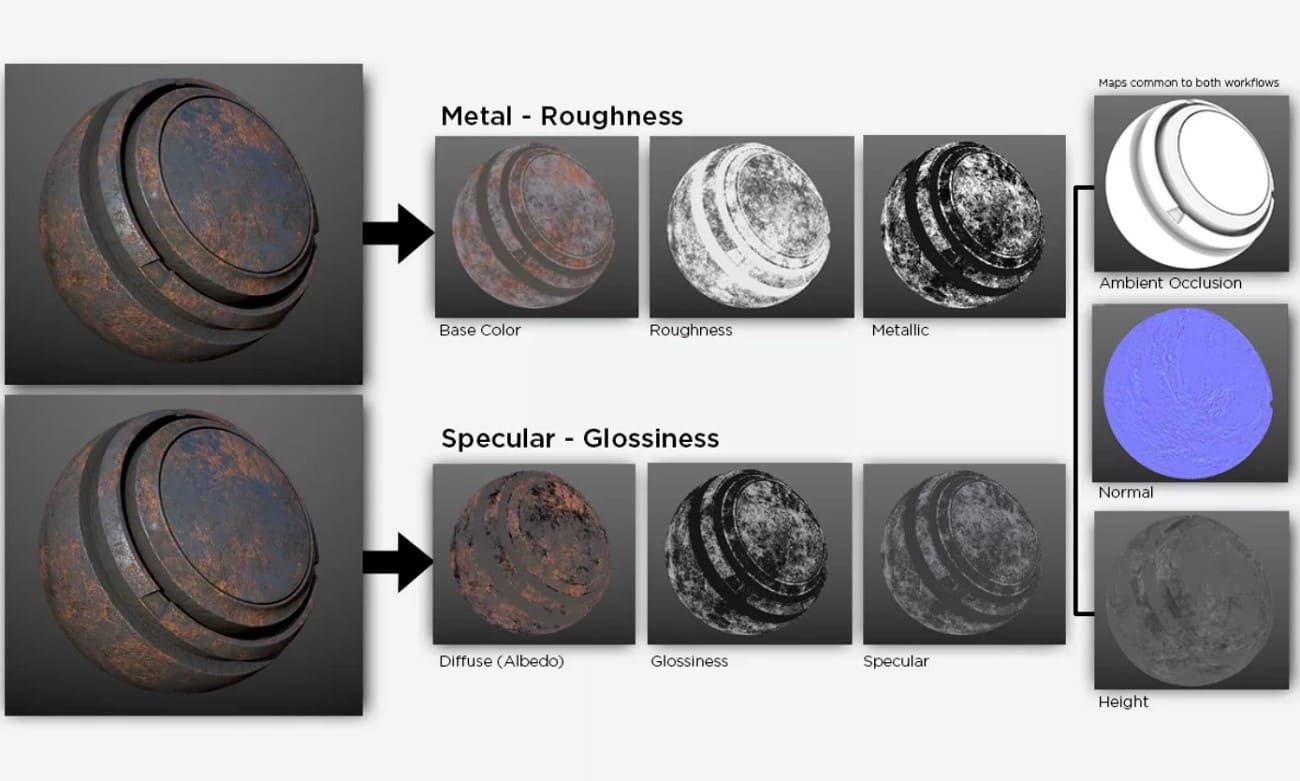
1. Diffuse (or Albedo) Mapping: This is the basic form that defines a surface's base color and pattern, such as wood grain on a table or the color of a brick wall.
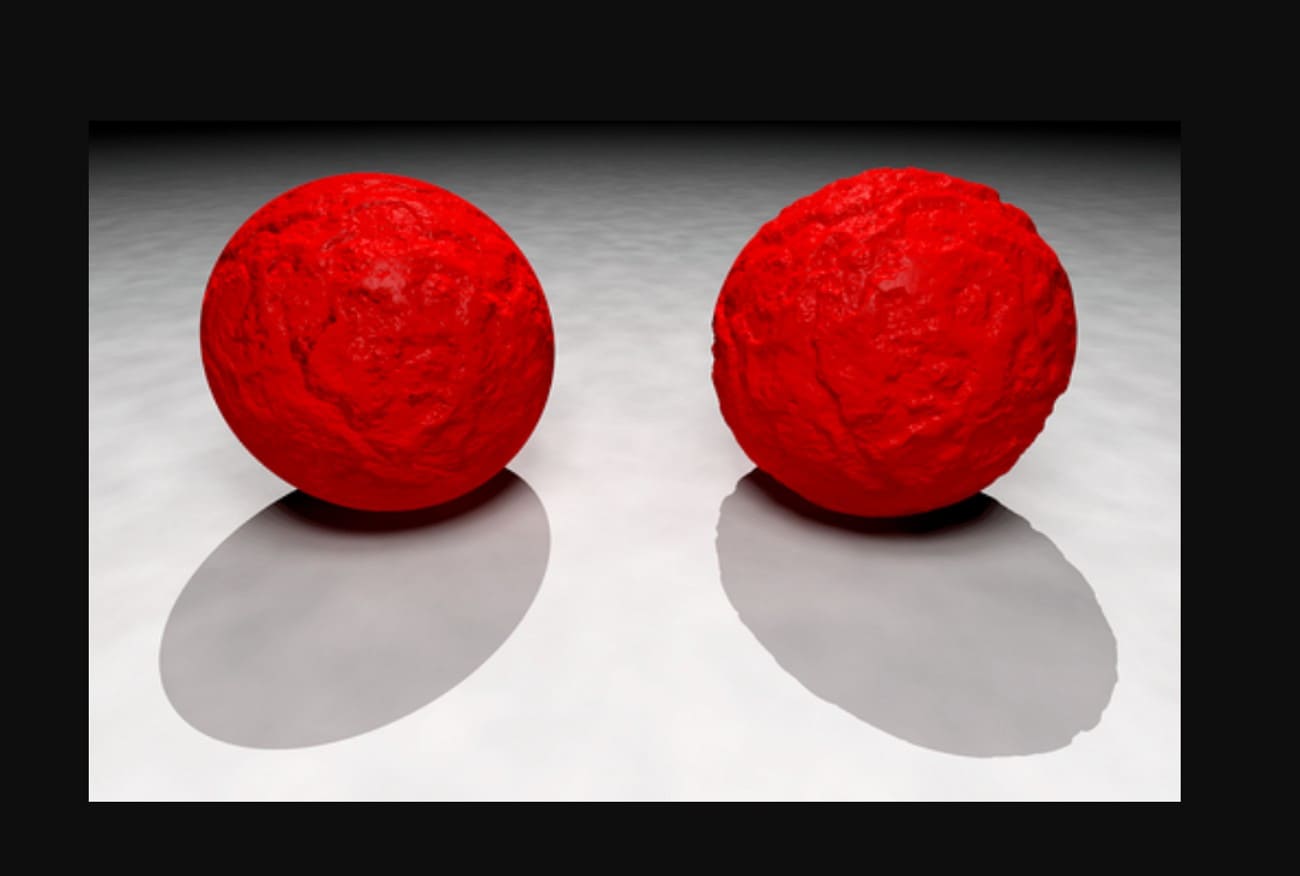
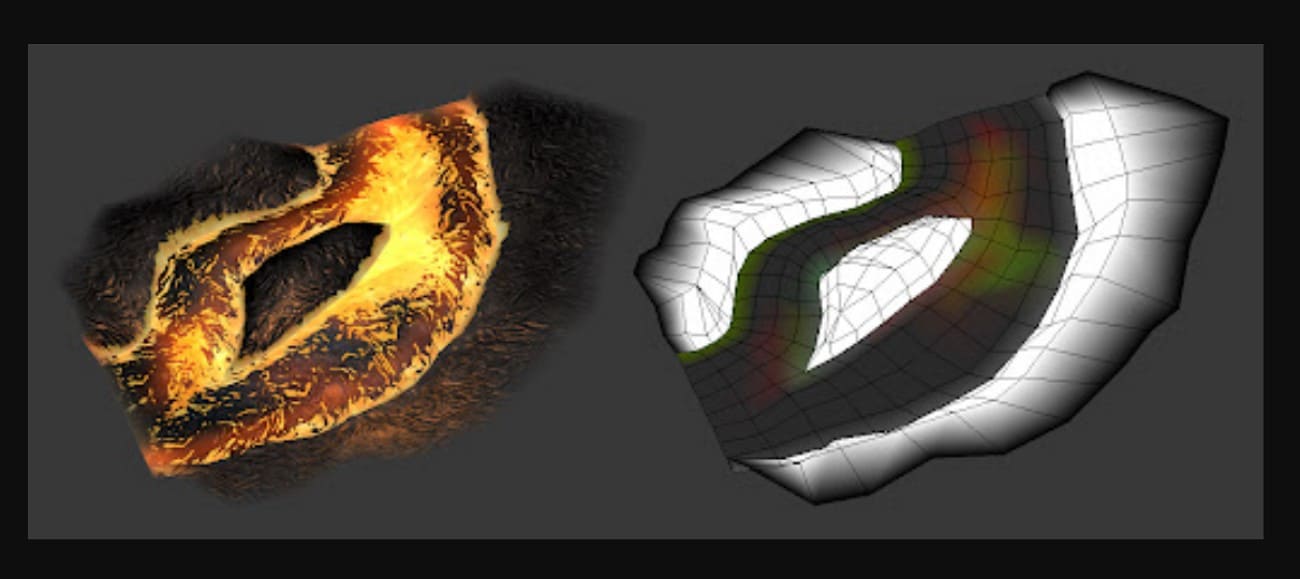
2. Bump Mapping: It is based on a grayscale image to approximate irregularities on a wall surface, e.g., scratches or pores. White areas indicate higher regions, while black areas represent lower regions. This mapping does not alter the object’s silhouette but only affects how incident light interacts with the surface.
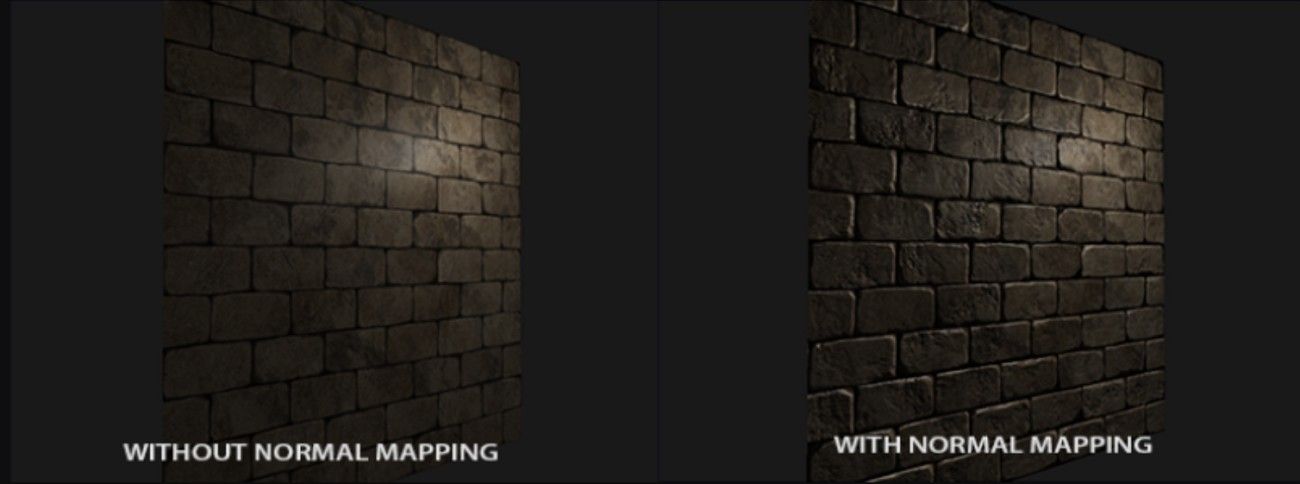
3. Normal Mapping: It is an advanced form of bump mapping that uses RGB values to store the direction each surface point faces, instead of simple height data. Hence, this creates a much more convincing illusion of depth.
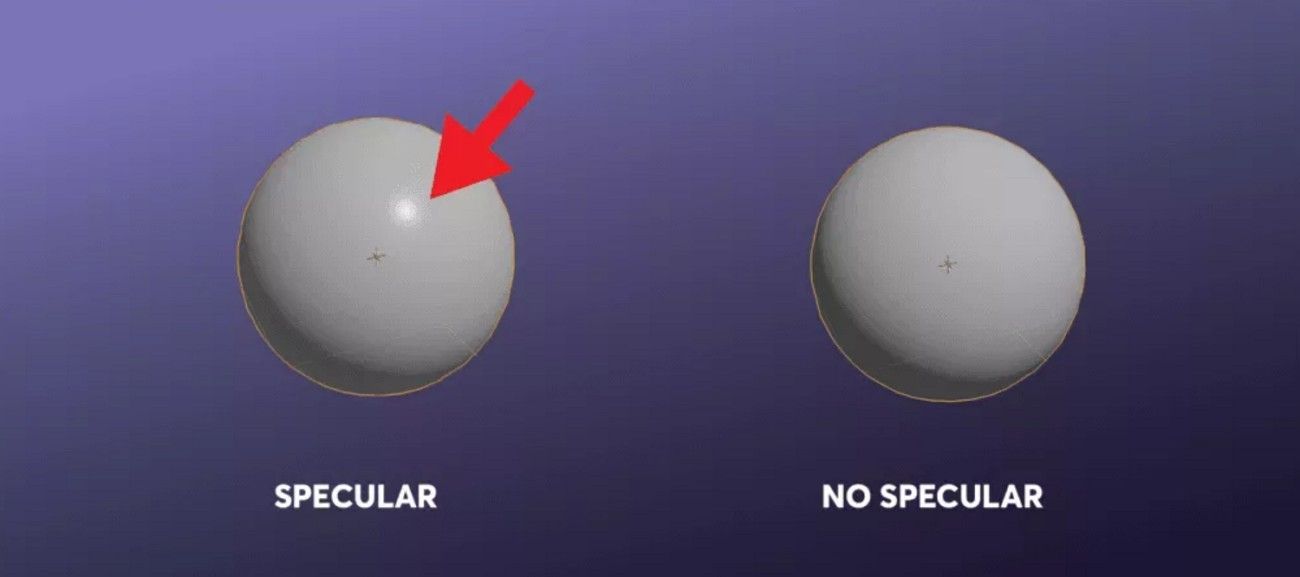
4. Specular Mapping: A grayscale map, which instructs the computer on what aspects of an object are shiny and what are dull. As an example, a muddy boot would have mud that is black (matte), and the leather would be gray or white (Shiny).
2. Geometric Mapping
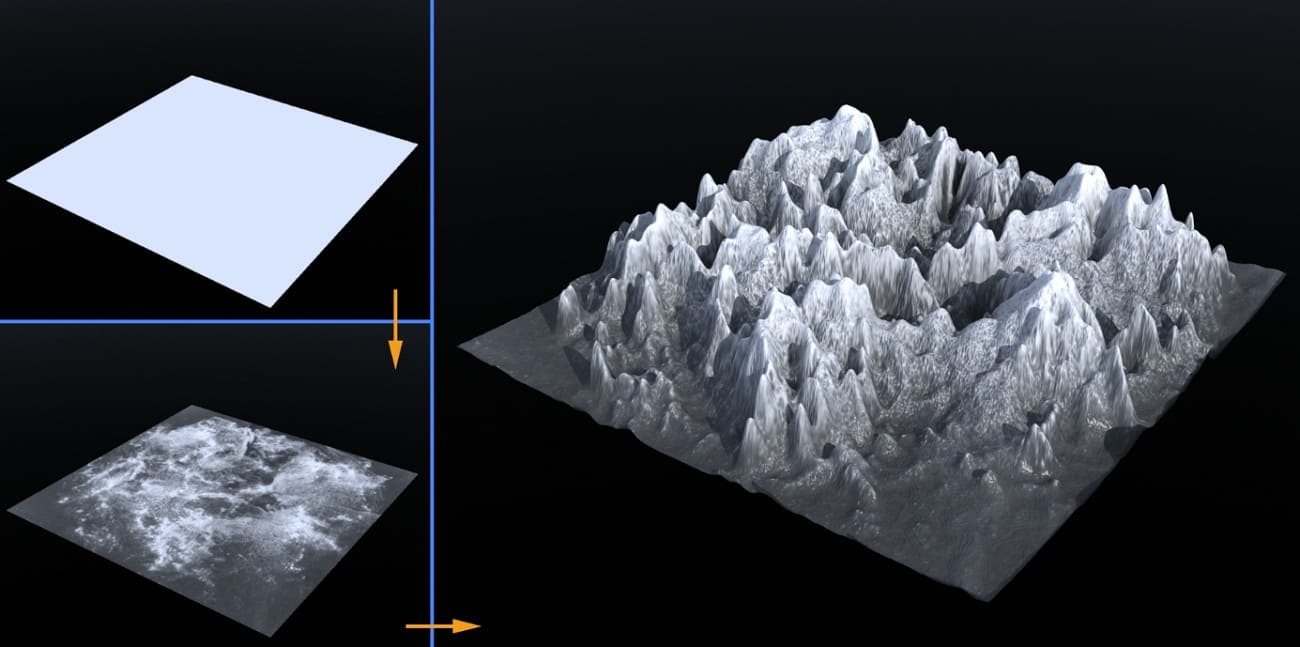
1. Displacement Mapping: This texture mapping technique physically displaces the vertices of a 3D model using a height map to create real surface depth. When you view a displacement-mapped brick wall sideways, you will find the bricks really protruding out.
2. Opacity (or Alpha) Mapping: It is used to make specific parts of a texture transparent. This allows 3D artists to create complex shapes like leaves, chain-link fences, or hair without modeling every individual strand.
3. Projection & Environment Mapping
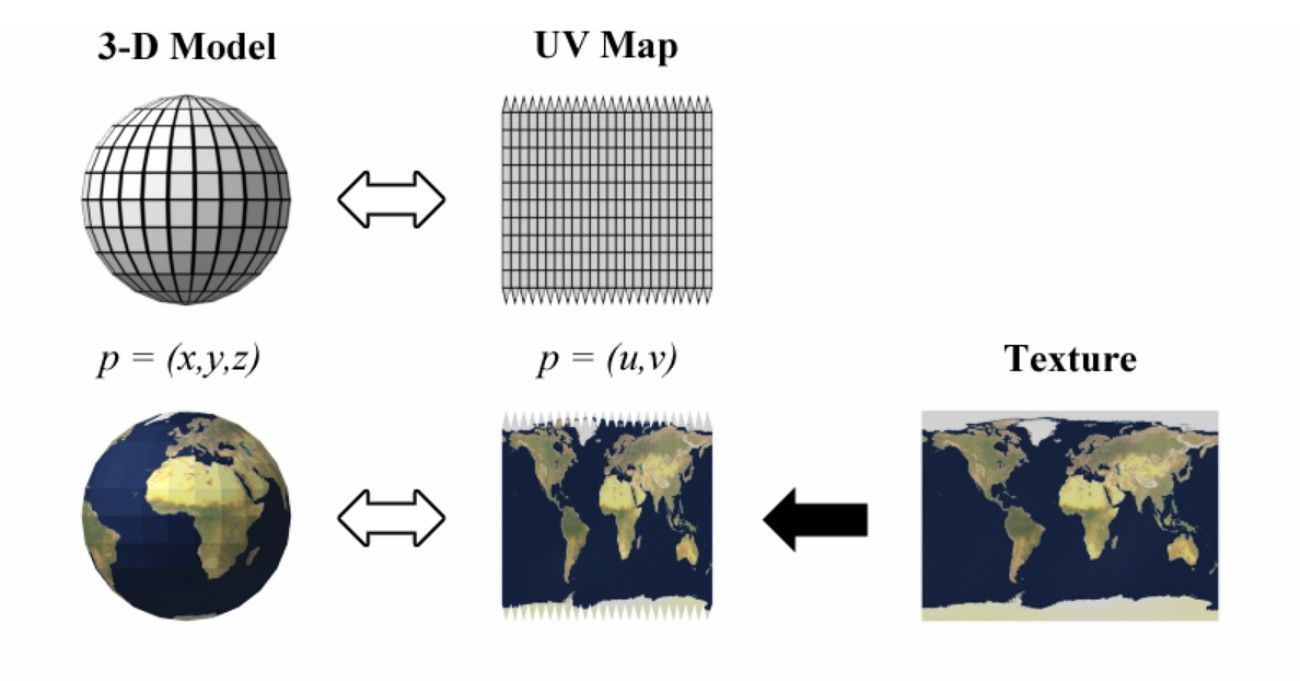
1. UV Mapping: This industry standard of map texture involves “unwrapping” a 3D model onto a 2D plane, like a chocolate bar wrapper. Hence, this is done so that a 2D image can be precisely painted onto it.
2. Environment (Reflection) Mapping: It simulates reflections, and the computer “Wraps” an image of the surrounding environment around an object to make it look like chrome or glass.
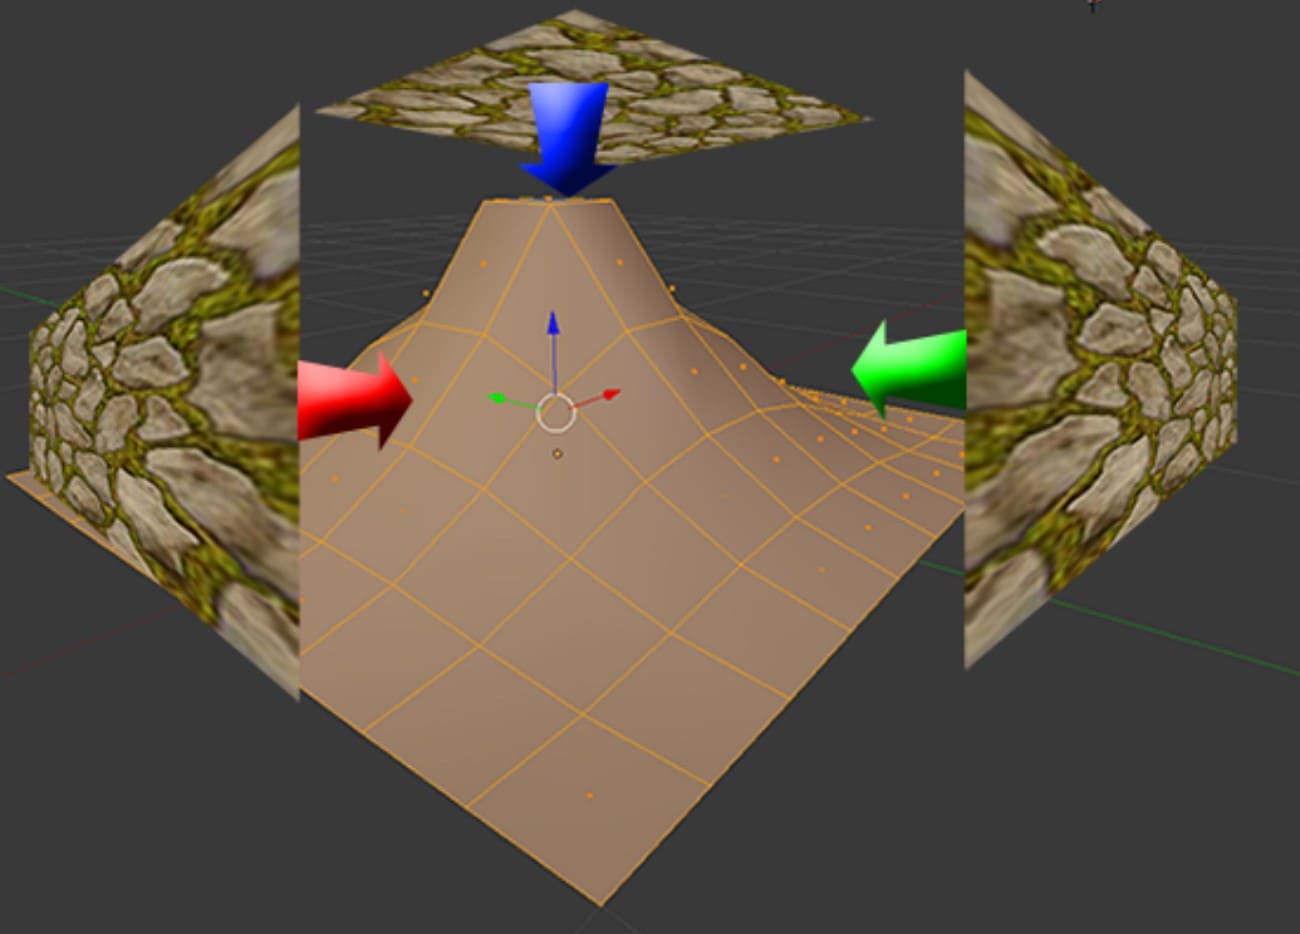
3. Tri-planar Mapping: This is a technique that is used to apply textures without UV wrapping. Thus, it projects the texture from three sides and blends them where they meet, which is great for natural environments like rocks and terrain.
Part 4. How to Apply Texture Mapping in Blender?
In Blender, texture mapping means unwrapping your model, adding a material, connecting an image texture, and adjusting it to fit the mesh. The steps vary slightly by version, but the process stays the same. So, to further know how you can make a texture map in Blender, review the listed steps in detail:
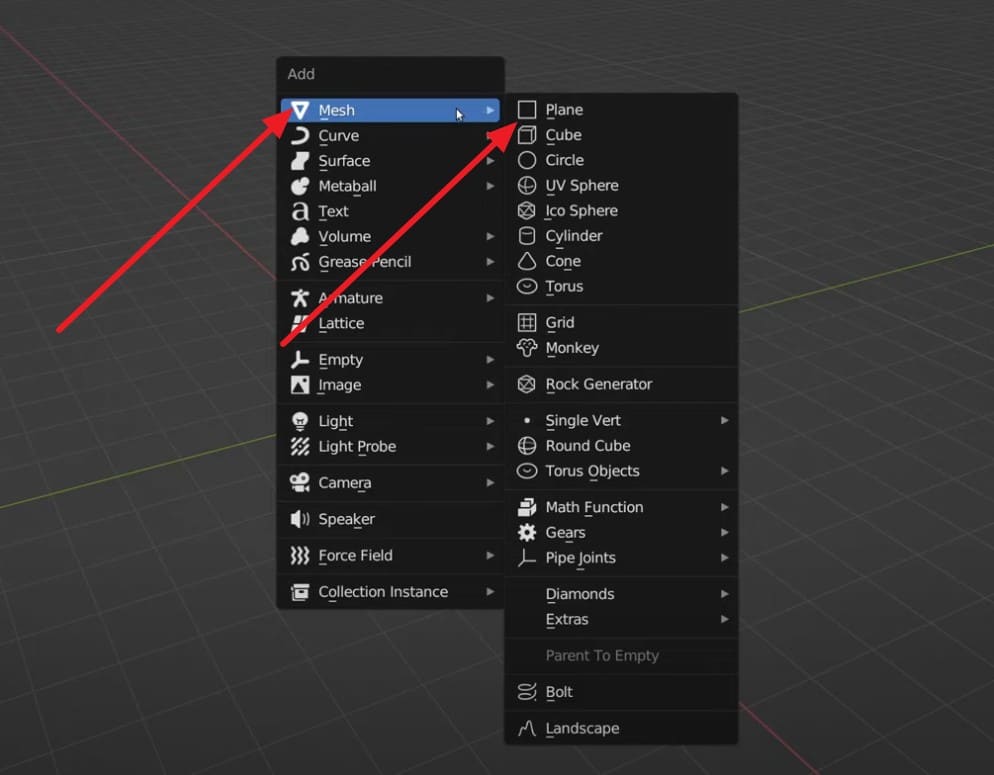
Step 1. Press “Shift + A” to access the “Add” menu and choose the “Mesh” and “Plane” option.
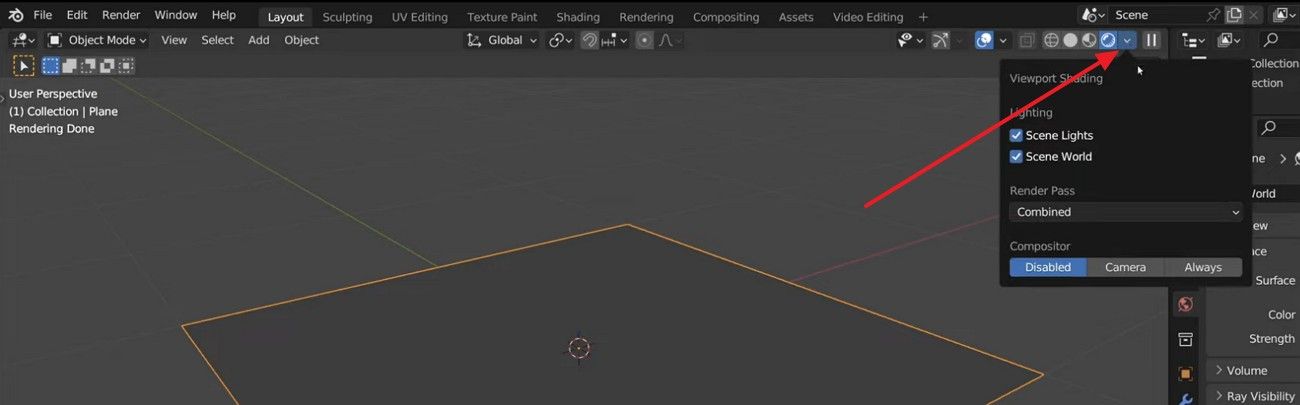
Step 2. In the rendered view, press the “Downward” icon in the top-right corner and choose the “Shading” option.
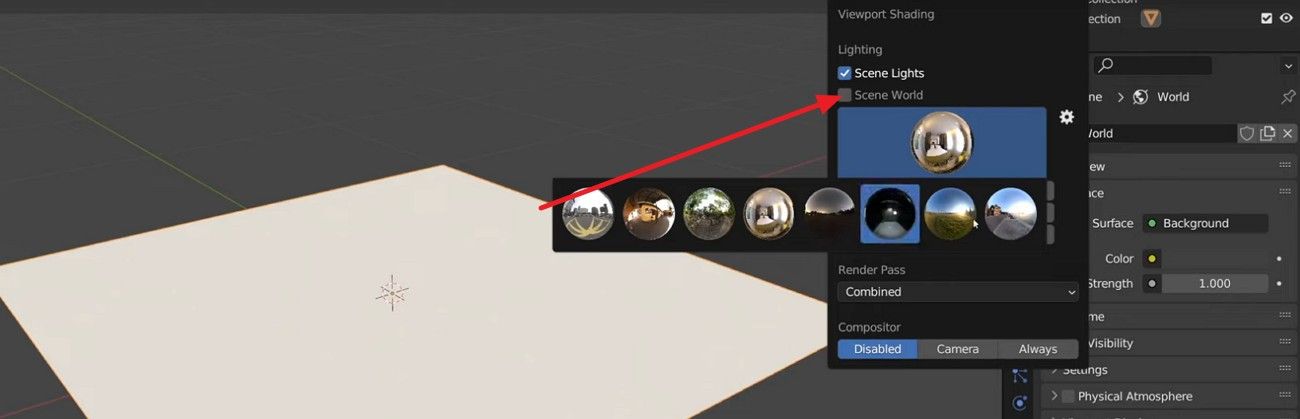
Step 3. After that, uncheck the “Scene World” option and choose the HDRIS within the listed options. Click on anyone and adjust the strength as per your preferences.
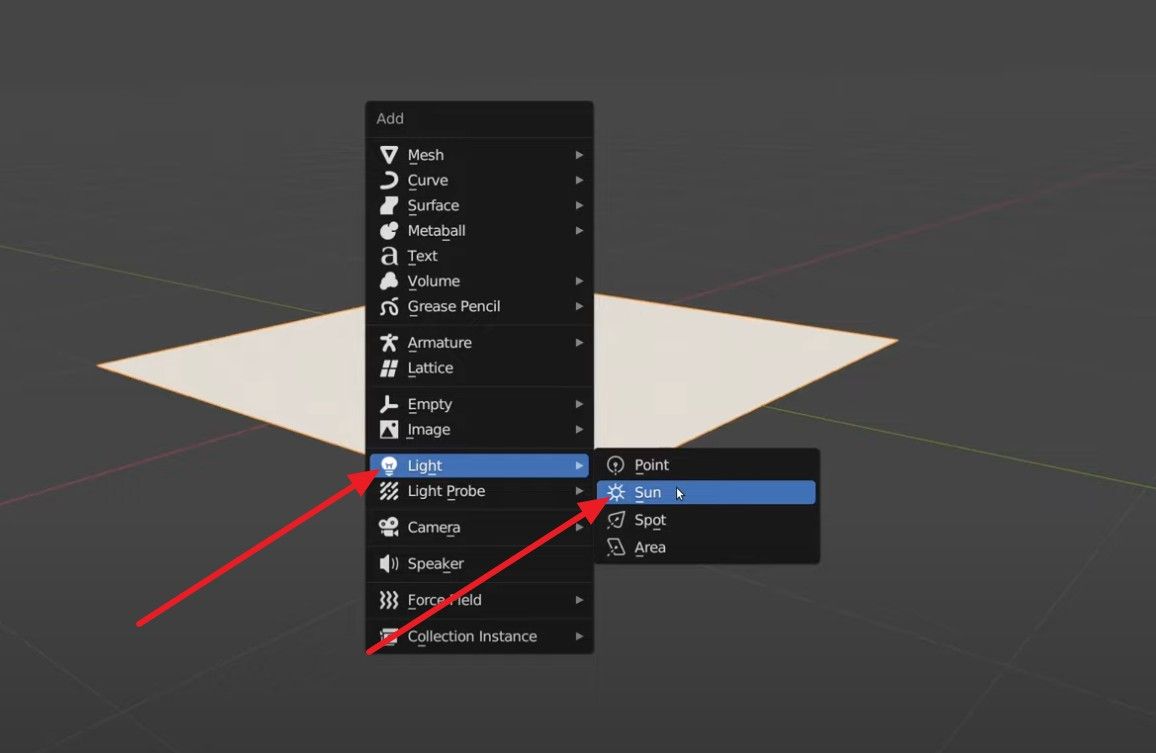
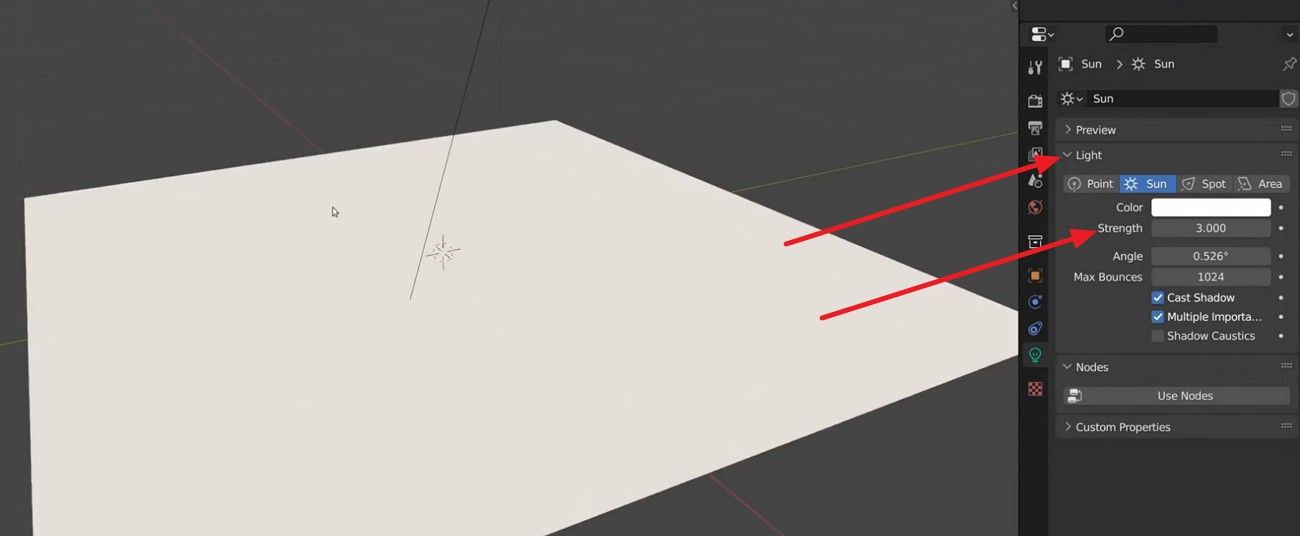
Step 4. Now, press “Shift + A” to choose “Light” and “Sun” options from the menu.
Step 5. Move and rotate it as you like, adjust the “Strength” in the “Light ” section, and preview it.
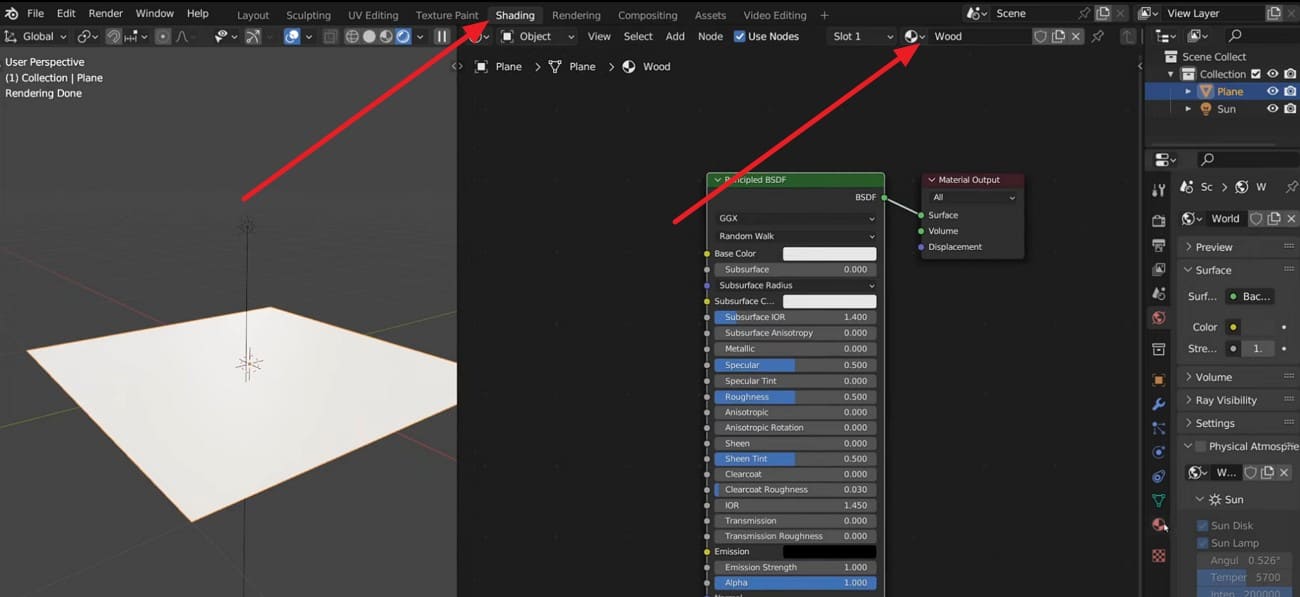
Step 6. Split the screen now by choosing the “Shading” and “3D Point View” tabs. In the Shading screen, rename the material to “Wood” and adjust settings such as “Sheen Tint” or “Roughness” from the given menu.
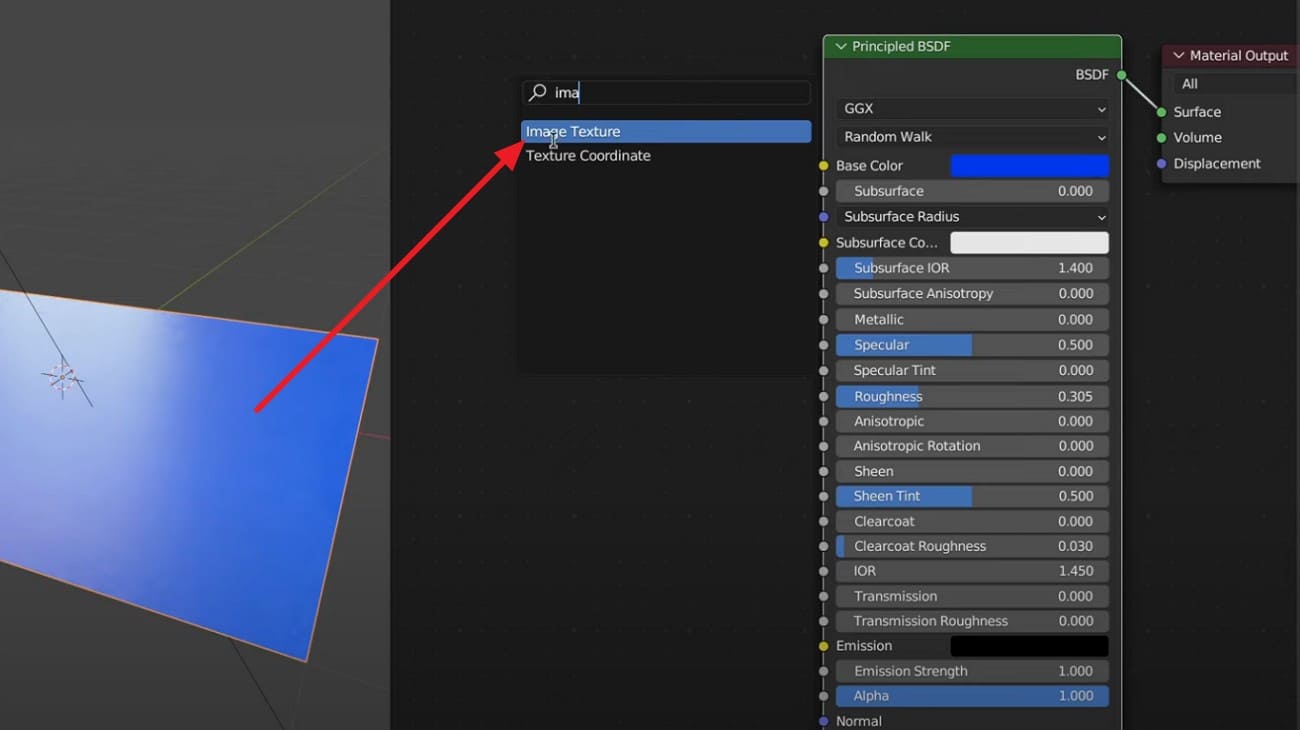
Step 7. To add Image Texture, press “Shift + A” and in the “Add” menu, search and drop the “Image Texture” node. In the node, press the “+ New” or “Open” option to add the material image, and connect the “Color” nodes to other settings to apply the texture/material.
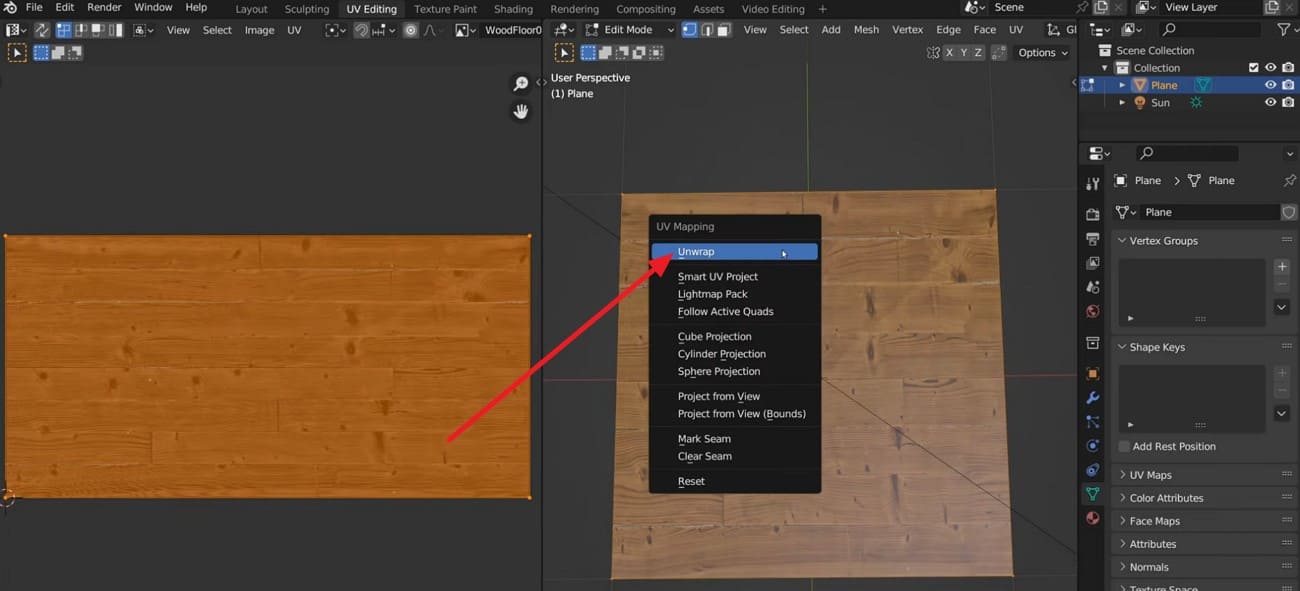
Step 8. Now, choose the “UV Editing” tab in the “3D Point View” screen and “Edit Mode” on the other screen. Select the edges, then right-click and choose the “Mark Seam” option. The edges will be highlighted in red, and switch back to Face Mode to select all the faces in the UV Editor window with A.
Then, right-click to choose the “Unwrap” option to unwrap using your seams. In the UV Editor, you can now see UV islands that you can scale, rotate, and move to fit your texture.
Part 5. How to Optimize a Texture Map?
Now that you know about the Blender 3D texture mapping process, learn how to lower memory use while keeping quality. Some key factors include resolution, compression, texture atlasing, UV efficiency, and the smart use of channels and mipmaps, as explained below:
1. Choose the Right Resolution
Use the lowest resolution that still looks good at the largest on-screen size, since many props do not need 4K textures. Additionally, halve the width and height to save space: For example, 1024×1024 can often be 512×512 with little visible loss, which saves a lot of VRAM.
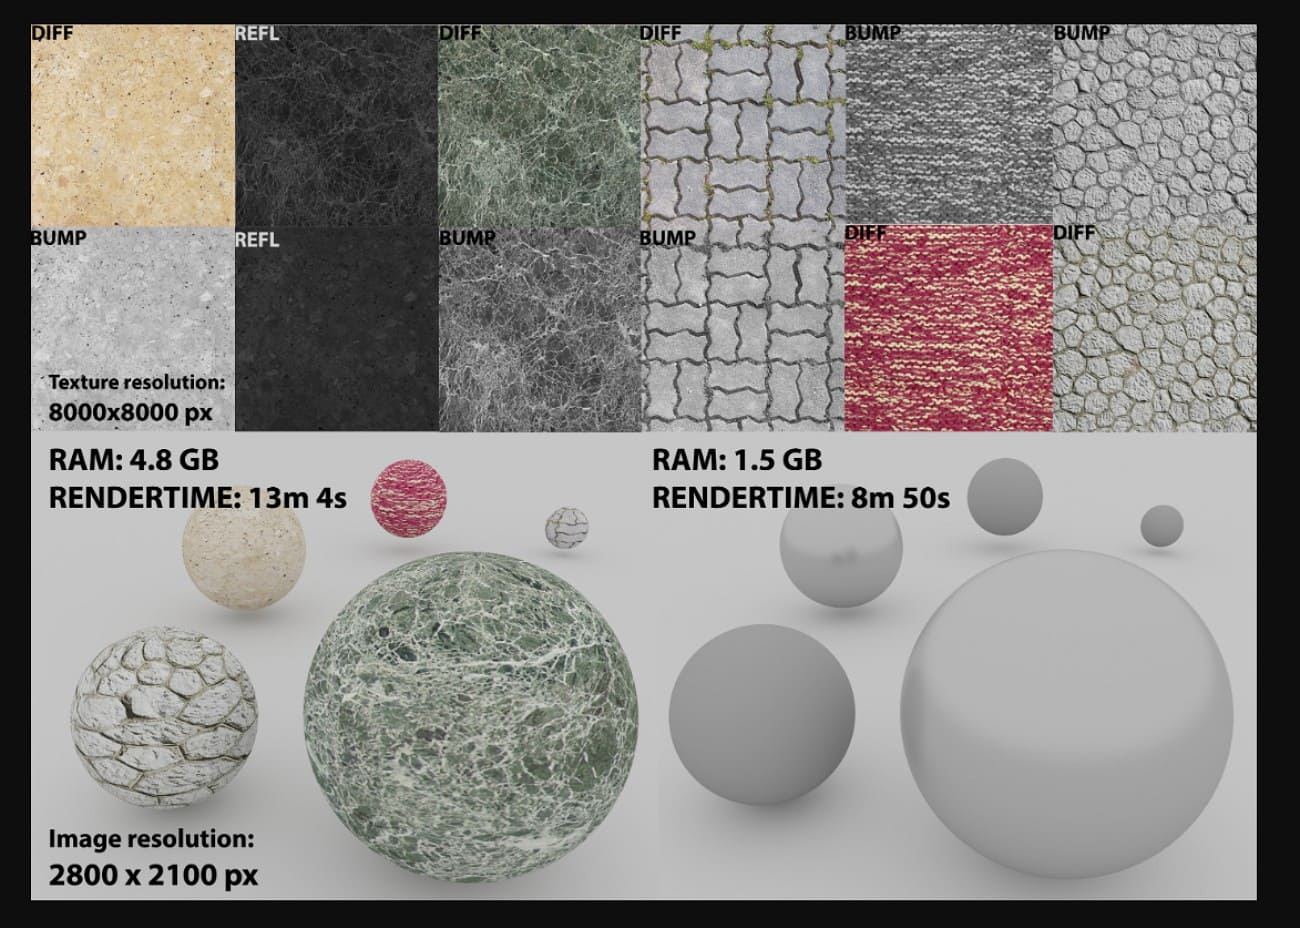
2. Use Texture Compression
Enable compression suited for your platform, like BC/DXT for PC/console, ASTC/ETC/PVRTC for mobile. Additionally, test the format and bit rates, knowing that compressed textures use less memory than adding extra geometry for details.
3. Pack Channels and Avoid Waste
Combine single-channel maps, like roughness, metallic, and AO, into the R/G/B channels of one texture. Moreover, don’t share unused channels; skip alpha if transparency isn't needed, as this reduces memory and bandwidth.
4. Use Texture Atlases and Shared Maps
Combine multiple small textures into one atlas to reduce draw calls and switches, which improves CPU and GPU efficiency. Additionally, reuse tiling materials, such as wood or concrete, across multiple objects, and pack multiple UVs into shared atlases for groups of assets.
5. Optimize UV Layouts
To further optimize the texture map, fill most of the 0-1 UV space so pixels do not go to waste. Not just that, scale the UV islands based on importance, like faces over soles of shoes. Additionally, add enough padding between islands to avoid mipmap bleeding, but avoid large empty areas.
6. Tune Mipmaps and Filtering
Enable mipmaps for textures seen at different distances, as this reduces aliasing and lowers memory bandwidth despite a small memory cost (~33%). Above all, use bilinear filtering and low anisotropies for good quality and performance, and reserve trilinear or high anisotropies for key assets.
7. Minimize Transparency and Overdraw
Finally, avoid large empty alpha areas, as transparent pixels still cost fill rate and can create overdraw. Moreover, trim the borders and separate alpha textures from non-alpha ones to save memory and bandwidth.
Part 6. FAQs About Texture Mapping
1. What is the difference between UV mapping and texture mapping?
UV mapping gives each 3D model point a 2D coordinate on the texture map. On the contrary, texture mapping applies a 2D image to a 3D model surface to show detail.
2. What texture resolution should I use?
Use the lowest resolution that still looks clear on the largest on‑screen size. Higher-resolution textures use more memory but do not always improve the visible quality of objects. Moreover, decide on-screen size, such as small props use 512-1024, medium 1024-2048, and heroes or close-up objects need 2048-4096.
3. How is texture mapping used in VFX?
Texture mapping adds realistic surface details to models in movies and visual effects scenes. It helps props, characters, and environments look real without extra geometry or complex shapes.
Conclusion
To sum up, this article has explained what texture mapping is and how it works. Not just that, it has also shown how UVs place 2D images on 3D models to add color, patterns, and surface detail without extra shapes.
While learning to apply the texture in Blender, using a render farm like Fox Renderfarm is recommended to render high-quality scenes quickly and efficiently. Fox Renderfarm provides scalable cloud-based GPU and CPU resources to handle complex textures and lighting efficiently.


