

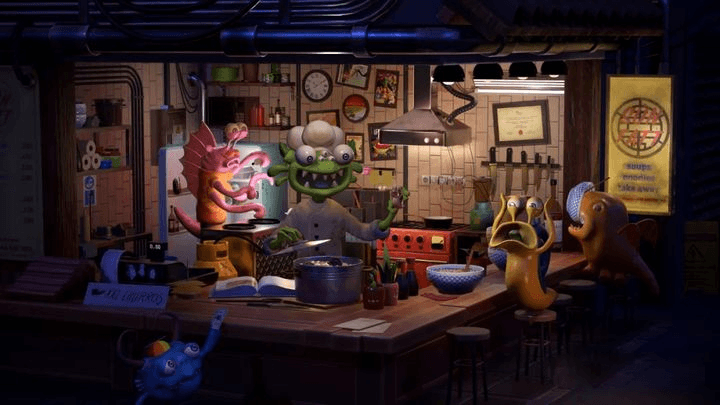
How to Make a Next-gen Cartoon Restaurant Scene in 3ds Max

Hey guys, we are students from a 3D Design school. It’s such a pleasure to share our creative process to make the cartoon restaurant in 3ds Max. We are a team with 6 members, and many of us are quite new to 3D art, so we hesitated a bit on the concept art we chose. At last, we chose this scene which is quite narrative, and the cartoon characters in it add quite a lot of spooky feeling to the scene with the fine lighting.
Below are how we made it from scratch and some difficulties and experiences we wanna share with you. The content is also organized by the best 3ds Max render farm, Fox Renderfarm.
Concept art & assets allocation
The key to a successful render is to properly analyze the concept art. Since we are a team of six, we need to figure out what models, UVs and materials can be widely used in order to organize assets effectively and efficiently later on. The other thing that needs special attention is the definition of all the material.
Making is scene is not like creating some small gadgets, the objects that can be publicly used is the priority. Only by paying more attention to the whole picture other than details at the beginning can we allocate the tasks well to maintain our final result and efficiency of creation. So the big picture can be divided into 4 groups: hard surface, house and the floor, characters, wooden gadgets and food. We allocate our jobs accordingly.
But hold on, if everyone just bluntly does their job immediately, a lot of trouble will be caused. We strongly recommend that one of the team members do the blocking first to give the whole team a clear sense of the structure and proportion. Though there is a uniform unit, you will still find it difficult to composite and match each part without blocking. So blocking is a necessary part to make everyone on the same page.
Blocking
The key to starting blocking is to find the right middle point of the picture which will hold up the whole picture and help locate other parts accordingly. After that, we can generate a box to speculate other parts’ locations. Take care of the proportion, since the right proportion in this part will save a lot of time later on.
So we recommend that ask someone who is more sensitive to proportion to take charge of the blocking process. Multiple checks and revisions are required after it is done. Then you can save a 3ds Max file and send it to other members to let them play their roles.

The purpose of making blocking is to assure the right proportion. No matter what you create, try to turn it into a basic polygon because it’s way easy to adjust the proportion of a simple polygon. Later adjustment of the objects won’t affect the proportion once you have it right in this part which saves a lot of time and effort.
Making mid-poly
In this part, we need to make the basic outline, even splines on the right amount of surfaces, so as to easily sculpt high-poly. Take your time and be careful about the right position of the points in this part. The splines are better to be looped so that it will be easier to aline in the high-poly process. And always keep in mind the proportion between single objects with the whole picture. The proportion needs constant refinement and progress. You can take the blocking file to make mid-polys referring to the concept art.
You can never strengthen the concept of managing assets too much in scene creation. The names and directories have to be unified. The right habit has a lot of benefits to the whole creative process.
Naming files: Messy files will bring you a lot of trouble. Everyone should name the textures and maps accordingly with the texture files for a convenient rendering process. And texture replacement will be easier, especially on large scene files, or your team leader may kill you. Small tip: you can use the name acronyms of team members when naming files if there are a lot of team members.
Making high-poly
Refining details is what you need to do in the high-poly process for a better final result. This process is time- and effort-consuming, so don’t panic, be precise and be patient. Another detail is that we won’t use high-poly directly for baking. So in this process, you need to consider which parts cannot to made as texture in the later baking process. It’s important to think ahead.


Besides the hard surfaces, the cute cartoon monsters are also made in Zbrush. We lay much emphasis on the unity of all the models, from their completeness to the sculpturing style. Thus, we had a lot of discussions in this process to keep them uniform. The leader should keep an on every members’ progress.


I used a 3D sphere to create the cartoon character. The outline of the monster is smooth, so I decided to sculpt it directly. I used Move to draw the basic outline and used clay pen to do the pose. If there is heavy distortion, I will use grids to arrange the lines. In the beginning, it’s better to make as few polys as possible to maintain the structure first. Then you can refine the details. For beginners, if you can add a sphere, do it. Because making a one-object model is too difficult for beginners. If you can stretch the structure in just one move, do it. Be bold, don’t drag it back and forth which can’t deliver you any good result, just wipe it and do it again. And always keep in mind to refer to the concept art. Additionally, separate the parts according to different textures for easier texturing.
Don’t stick to one software if there is some part you are just able to get the anticipated result. You can switch between 3ds Max and ZBrush.


Making low-poly
Making low-poly is the most important and also the most complicated process. It requires not only patience and carefulness but also the capability to arrange splines. To match the high-polys properly, we need to use TopoGun.
The advantage to keeping the uncollapsed hard surface high-poly is that low-poly can be made easily. Delete the subsurface and reduce faces, then you can make a perfect low-poly.


The composited low-poly
Here is a quick tool to make low-poly: ZRemesh. But if you have high requirements, TopoGun is still the better choice.
Making UVs
After the low-poly process, making UVs comes next. You need to separate the smooth group before making UVs, then find the broken part to cut it. The seams need to be well pampered. If the seams are too obvious or too scattered, many flaws will appear after texturing.
Here are 3 key points. First off, keep the precision uniform. All the objects need to be measured with the grids.
Every team member generates a 111 box to make a chessboard to measure the reference object. Then everyone can measure the objects with the chessboard.

We separate every component and put them on the chessboard to see the planning of texture to lay the UVs. It didn’t take long to make deconstruct, but laying it took a long time.


The integrated low-poly with UVs
Baking
To elevate the efficiency and effects of baking, we chose Marmoset Toolbag to do the baking. The brushing tool to check the normal lines is quite handy. However, the matching between high-poly and low-poly determines the final result of the baking.

Making Materials
When making materials, we need to decide the texture first. Once the texture and shading are correct, all the details will make sense. Firstly, I made some materials and created some layers groups to make the chosen area. Then make the bright and dark parts and scratches. Here you need to be careful of the relations of the scratches between each object, cause you will easily forget about the whole object when you indulge in the small parts too much. Team members need to communicate constantly in the process.
After finishing the material, sharpen all the objects on the top layers. To make all the details clearer, you can create a new layer with a sharpening filter, and convert the blending to overlay. And add a generator to the whole project -- light, which will make the visualization more uniform. The visual style is very cartoon, and we didn’t make the style too shabby to keep it clean and simple.


Rendering
We did rendering in Marmoset, which is quite good at interior lighting design. At first, we didn’t know how to set the lighting, and it turned out to be a very creepy small shop. After some advice and trials, we finally got it right.
The layers of lighting are quite important, the outside parallel light seemed to be the main light but actually auxiliary lights. As a result, the interior floodlights and spotlights are the main lightings. The strong contrast of the strength and hues can help the audience find the focus.
Lighting is essential to present the sense of space, with the transmission from cold and warm, and multiply lights in one area should be varied in their strengths. The core is the variation of lightings in the corners.
The third point is the understanding of the lighting strength. No exposure doesn’t mean all black. Using the details in the dark parts to manifest the light details is a very useful technique. Be careful when using the volumetric fog, the lighting system in Marmoset cannot be compared to that in UE. Using volumetric fog is a good way, but you should really keep an eye on it.

Summary
Above are the workflows we used. This experience is quite precious to us which makes us more united and lets us know each other more. Wish our sharing can help you and your team a bit in scenes production.


