

3D Animation Workflow Process: A Step-by-Step Guide to Production
Many animation projects run into delays when there is no clear plan from start to finish. A well-defined 3D animation workflow process helps organize each stage, from idea to final output, making production smoother and more efficient.
This guide breaks down the complete 3D animation workflow into simple, easy-to-follow steps. Whether you are a beginner or improving your skills, you’ll understand how each stage connects and how to build a more efficient animation pipeline.
Part 1. Overview of the 3D Animation Workflow Process
A 3D animation production workflow implies a clear plan that shows how a project moves from ideas to final animation. This plan helps teams stay organized and avoid confusion during production. Here, each task links to the next to keep the process smooth and controlled. As a result, this workflow plays a key role in production quality and speed. It reduces mistakes, saves time, and keeps all team members on the same page.
Common Problems in the 3D Animation Workflow Process
Before you learn about the detailed 3D animation workflow process, it's important to understand the hurdles users encounter. With cost being the central issue, it is reported that outsourcing studios face lower demand, with about 4% drop since 2021 and 13% drop since 2020. This change is linked to the COVID-19 impact, when the industry shifted from normal studio work to remote work.
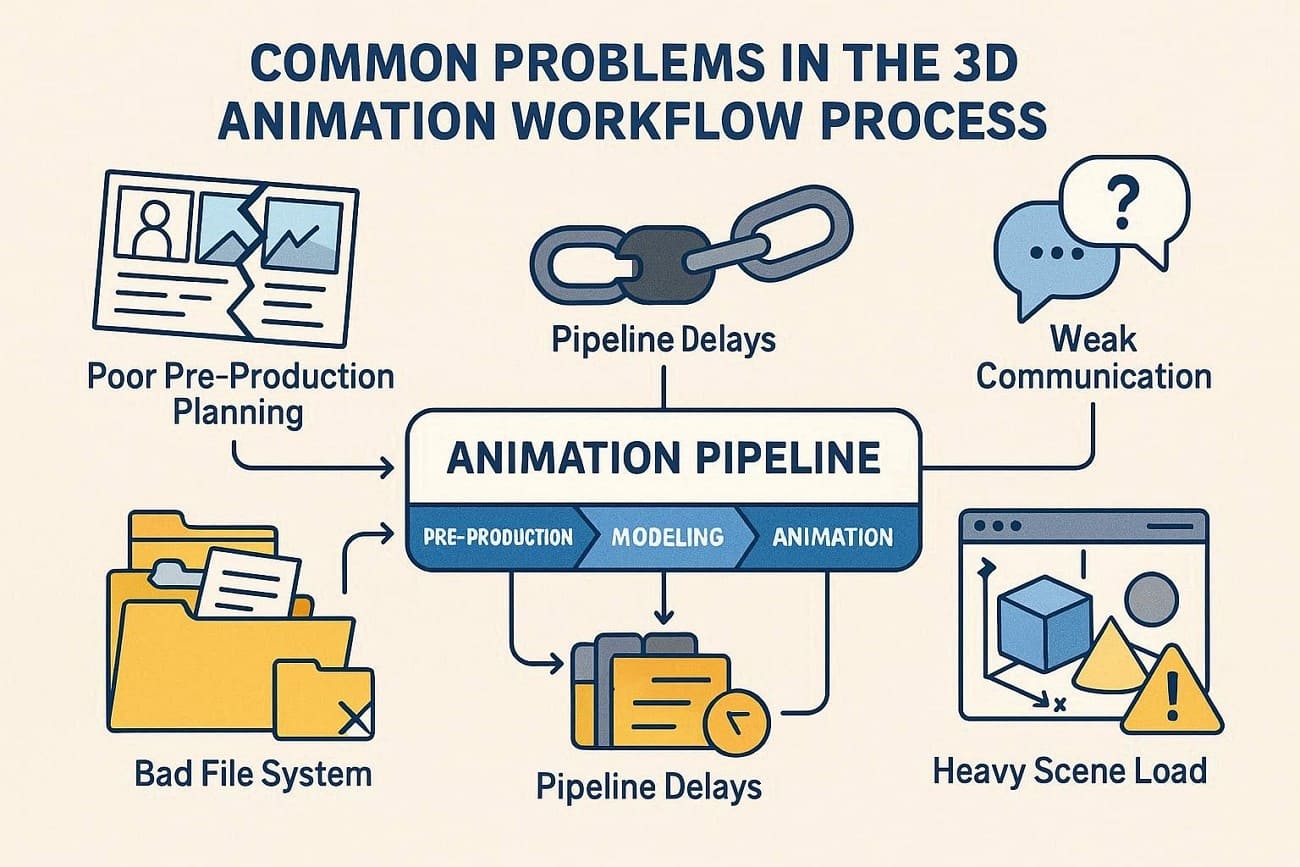
Additionally, it can start at around $1,000 per minute for junior freelancers and rise to $30,000 per second for top studios in 2026. So, along with cost, here are some other issues that can delay work and reduce final quality:
- Poor Pre-Production Plan: When story, style, and technical needs stay unclear at the start, teams face many changes later in production. This causes asset waste, repeated work, and extra effort in modeling, animation, and render stages.
- Bad File System: Lack of a proper naming system or folder setup leads to lost files and incorrect asset use in scenes. Additionally, artists often pick old versions or break scenes due to version mix-up and poor tracking.
- Pipeline Delay Points: When one stage slows, all later stages stop or face delays in the full workflow. Not just that, a bad rig, missing assets, or slow output forces teams to redo work and creates project backlog.
- Heavy Scene Load: Unoptimized models and high render settings make the preview and final render very slow and unstable. This reduces test runs and increases the risk of a crash or render failure near the deadline.
- Weak Communication: Unclear or late feedback creates confusion between the director and the production team during work. Consequently, it leads to wrong changes, repeated tasks, and longer revision cycles for final shots.
Part 2. Pre-Production in Animation Production Workflow
Instead of diving into the actual animation, laying the groundwork is equally important. In this stage of the animation workflow, every idea is refined and structured for a flawless production process:
Step 1. Concept Development
Start with brainstorming sessions to nail the core idea, target audience, and key message that drives emotional impact. Then, develop a one-page treatment that summarizes the plot, themes, and unique hooks of the concept. Plus, write a polished script with tight dialogue, scene descriptions, and pacing notes according to the vision.
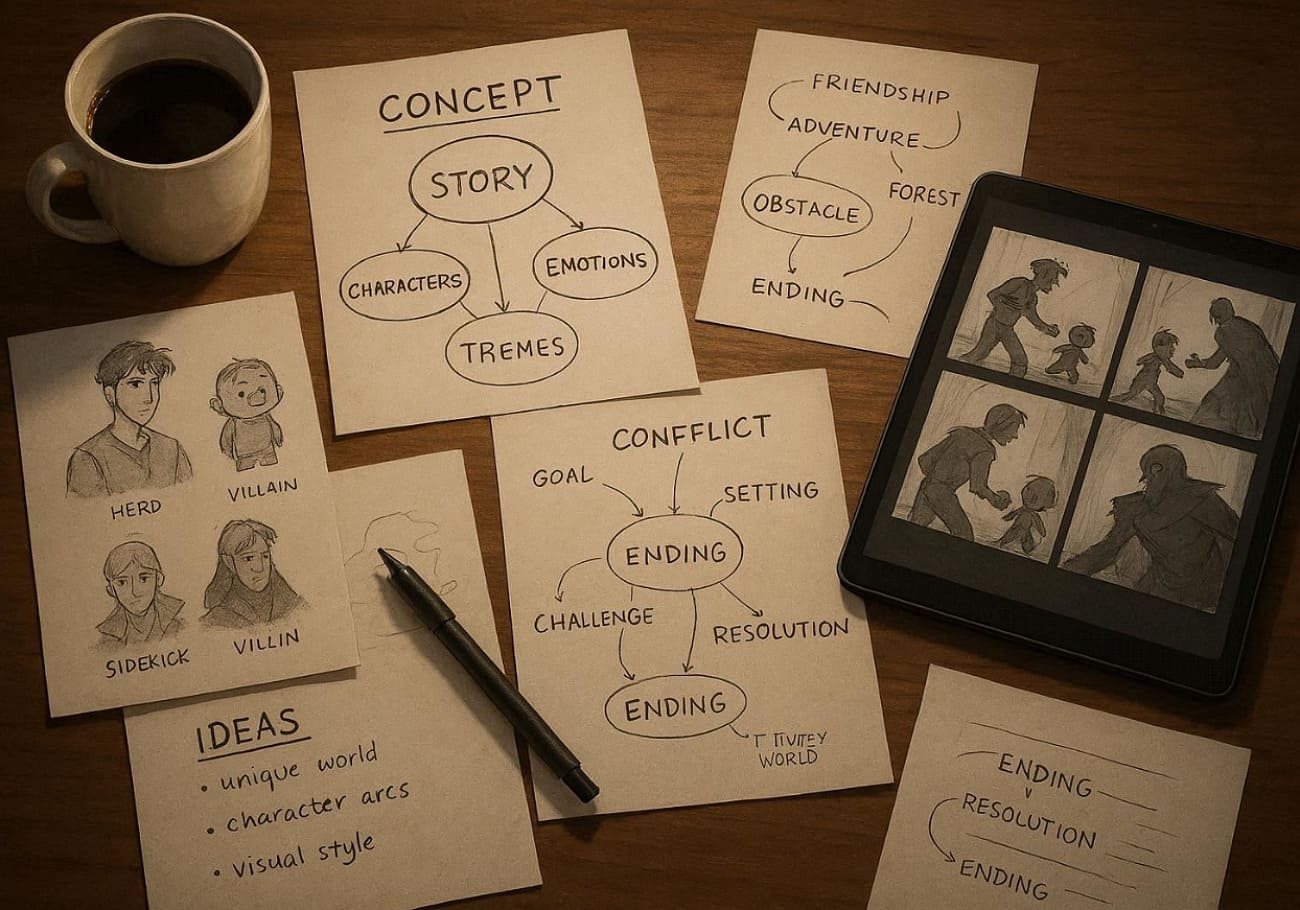
Step 2. Storyboarding
Now, translate the generated script into visual sequences using hand-drawn or digital panels that capture transitions and character positions. Include timing notes, dialogue cues, and basic motion indicators to act as the project’s visual blueprint. This step prevents production time, as 78% of studios use digital tools like Storyboarder or Boorder.
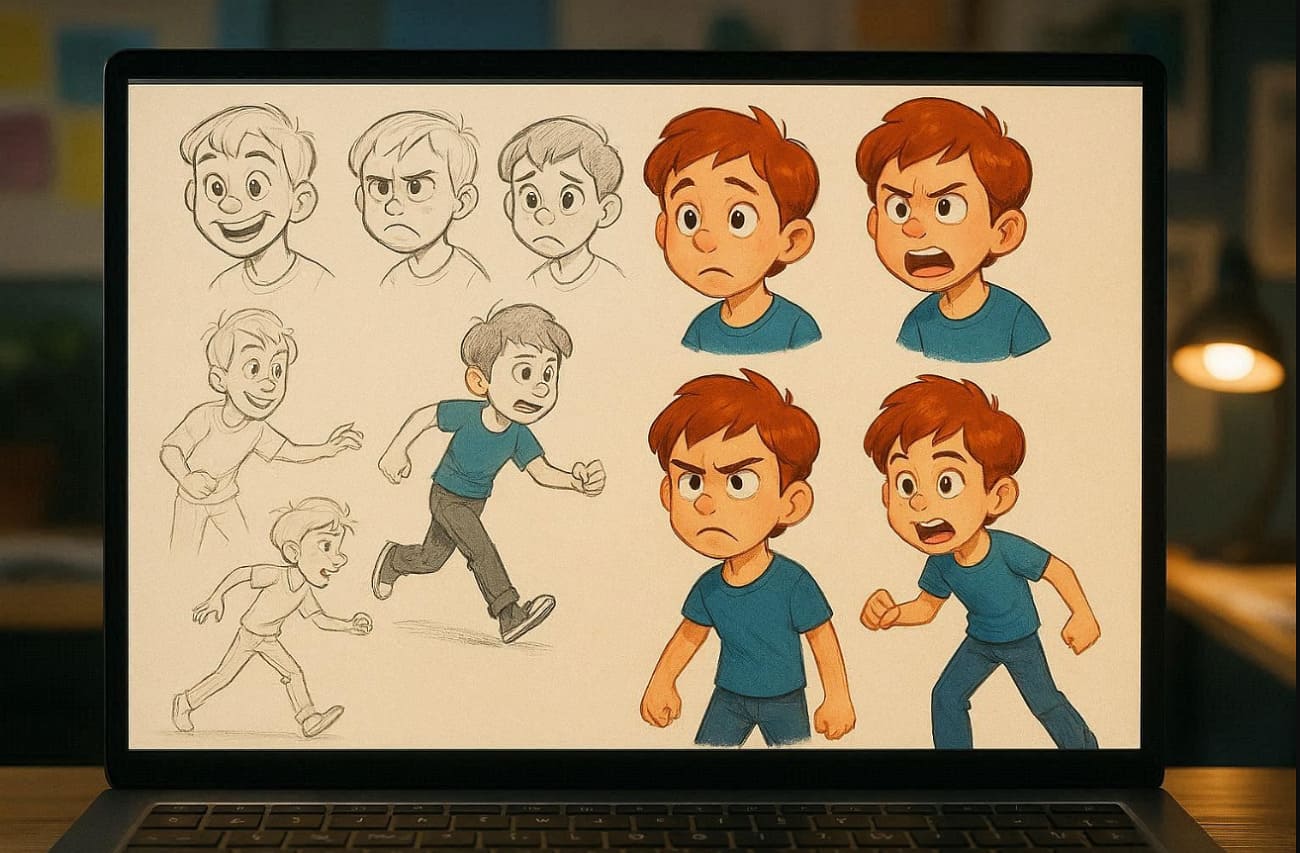
Step 3. Character Design
Craft a detailed concept art sheet showing characters from multiple angles, including expression, poses, and clothing variation. Also, design model sheets with turnaround views, rigging guides, and personality traits for animators during the animation production workflow. In addition, extend this design to props, vehicles, and creatures needing unique silhouettes.
Step 4. Environment and Asset Planning
Design backgrounds, props, and atmospheric elements that match the story world and support character sessions. Detailed environment planning reduces asset recreation by 35% across projects, with animation cutting edit changes by 40% in post-production. This phase further saves 15-25% on production rework by catching out issues early.
Step 5. Team and Budget Allocation
Assemble your core team, including a director, art director, or character designer; define clear roles and communication channels. Break down costs for software licenses, asset creation, and contingencies in the 3D animation workflow process preparation. A report states that pre-production budgeting delivers 3x ROI, supporting the U.S. animation industry by 5%.
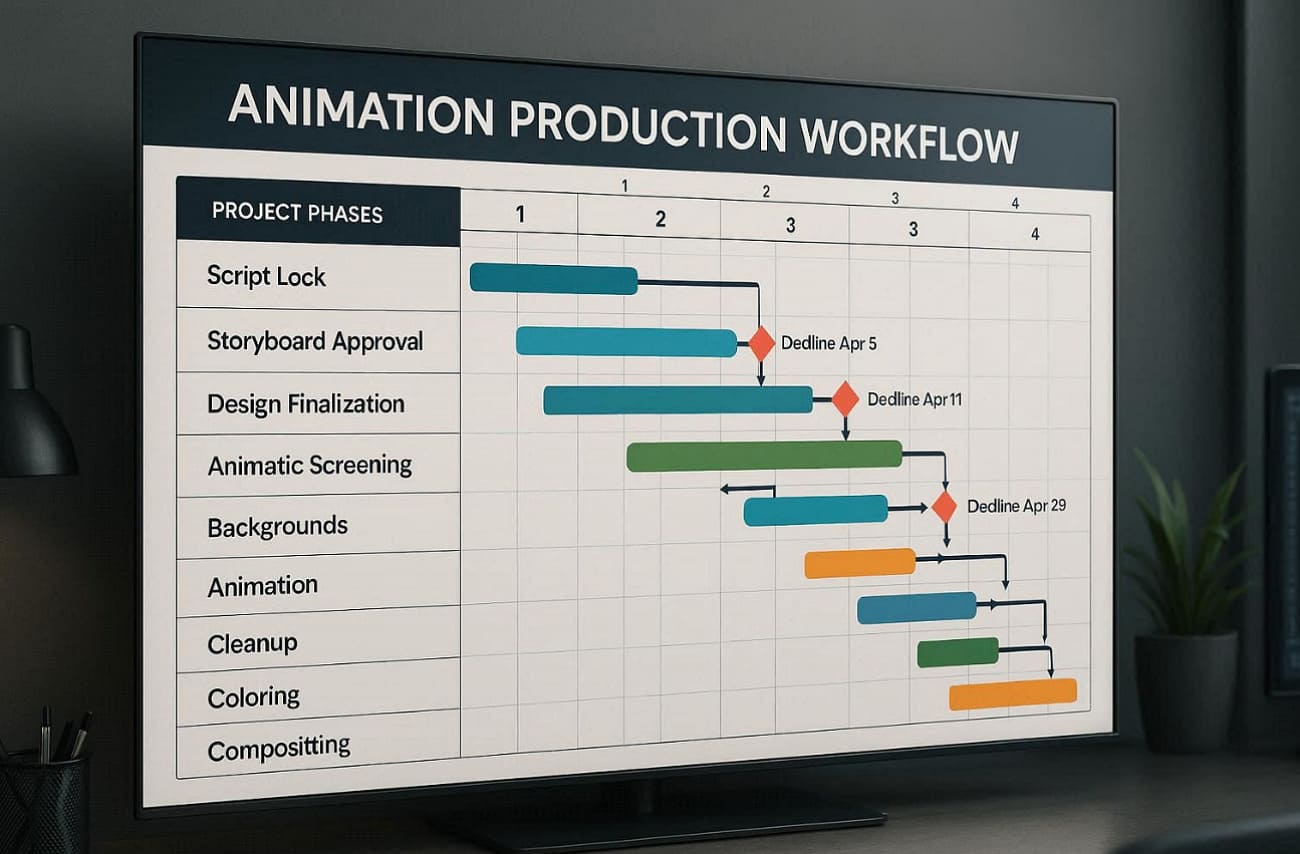
Step 6. Timeline and Milestone Settings
Map a detailed Gantt chart with deadlines for script lock, storyboard approvals, design finalization, and animatic screening. Build buffer time for revisions, client feedback loops, and keep projects on track. This phase typically takes 4-12 weeks, depending on the scope.
Part 3. Modeling Stage in 3D Animation Workflow Process
The modeling stage converts 2D concept art into detailed 3D digital objects using dedicated software. Here, the artist starts with basic meshes-cubes, spheres, or cylinders and subdivides them into rough characters, matching the reference.
Plus, detailed sculpting adds organic features like facial wrinkles, muscle definition, or terrain textures using a digital brush. Besides, UV unwrapping flattens surfaces into seamless 2D texture maps, followed by the creation of supporting assets such as modular moments. However, final quality checks fix geometry errors before FBX/OBJ export for rigging, forming the foundation of lifelike animation.
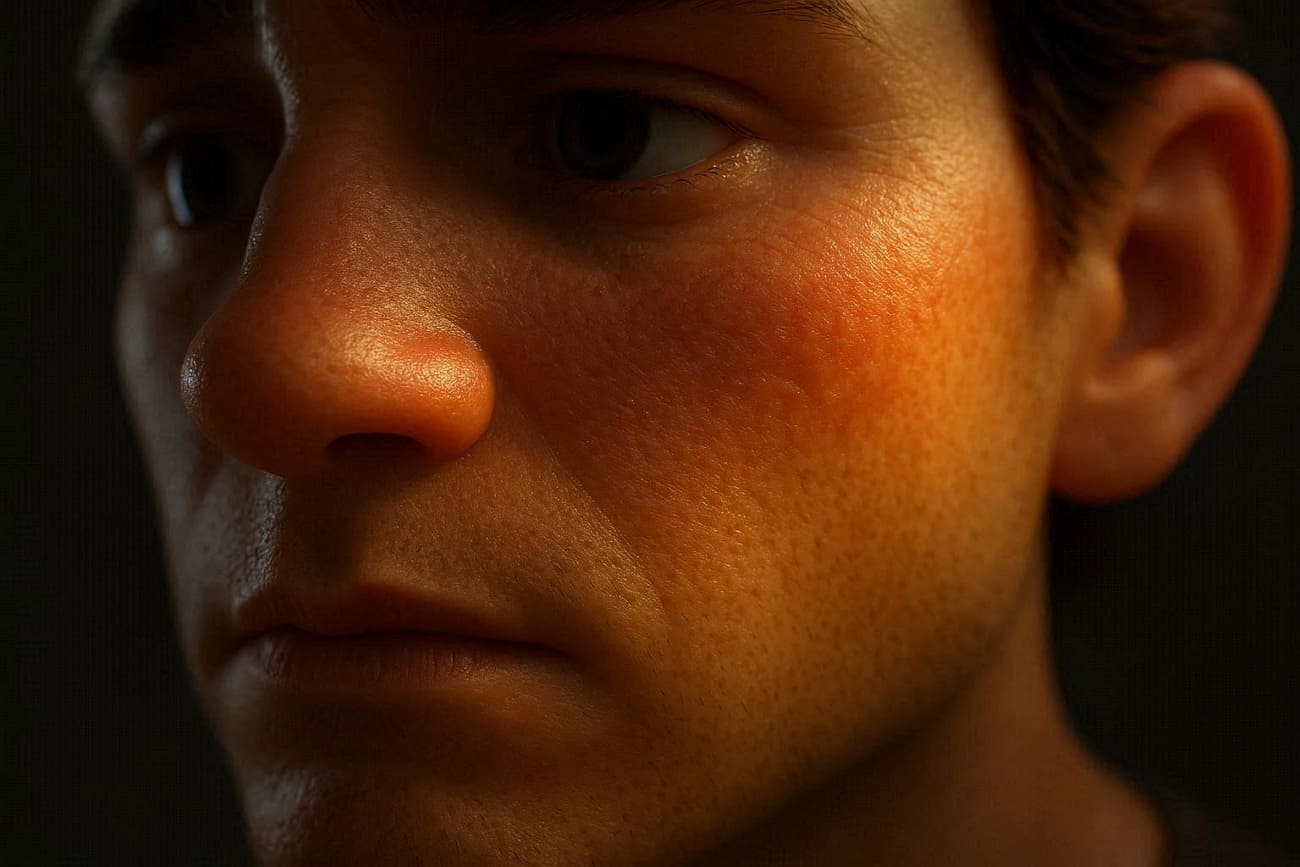
Part 4. Materials and Shading in Animation Production Workflow
Once the models are finalized, bring them to life with realistic surface textures. In this stage of the animation workflow, shading and materials are described as essential for achieving photorealism:
- Create Base Materials: Build fundamental shaders for objects such as skin, metal, and glass using node-based editors. Set basic color, roughness, and metallic values matching concept art to establish core appearance.
- Layer Texture Maps: Apply multiple texture maps; diffuse for color, normal for bumps, roughness for shine control, and specular for reflections. Paint or generate in tools to add surface details without extra polygons.
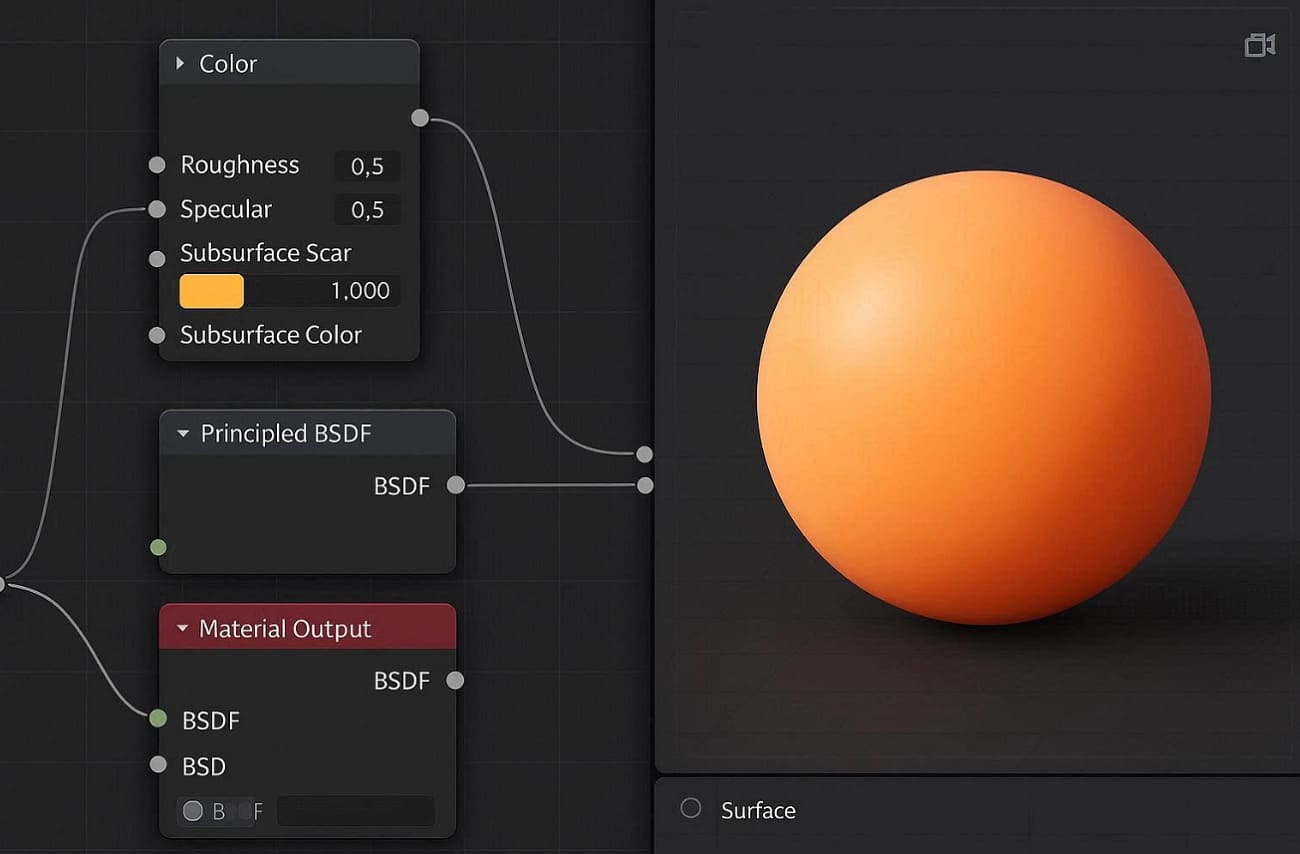
- Set Up PBR Workflow: You can also use Physically Based Rendering principles so materials react naturally to light. Connect maps to principled shaders to ensure energy conservation, realistic shadows, and color bleed across all lighting conditions.
- Add Procedural Textures: Generate infinite variations such as wood grain, scratches, and dirt using math-based nodes. These scale perfectly for any object size and save storage compared to hand-painted textures.
- Bake Lighting Information: Pre-compute shadows, ambient occlusion, and lightmaps onto textures for real-time engines. This technique delivers high-quality shading at game-friendly speeds-essential for interactive animations.
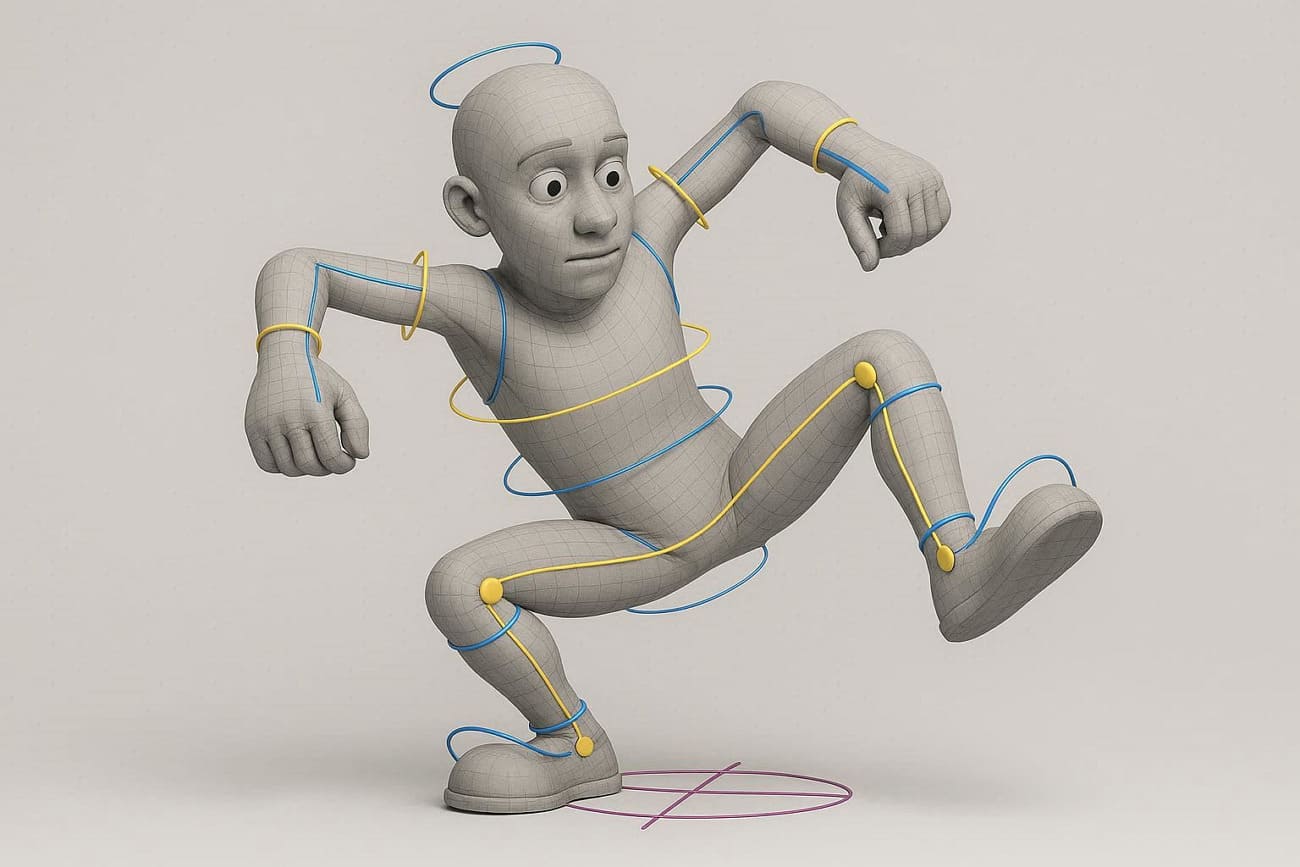
Part 5. Character Setup in 3D Animation Workflow
Character setup, also called rigging, prepares 3D models for animation by building digital skeletons and controls. After modeling, riggers place joints at key areas like shoulders, elbows, and fingers, then create skin weights to ensure smooth mesh deformation. Later, Inverse Kinetics (IK) systems let hands or feet stick to ground planes while FK controls handle stylized swings.
During the 3D animation workflow, hybrid setups give animators maximum flexibility for realistic walks and expressive faces.
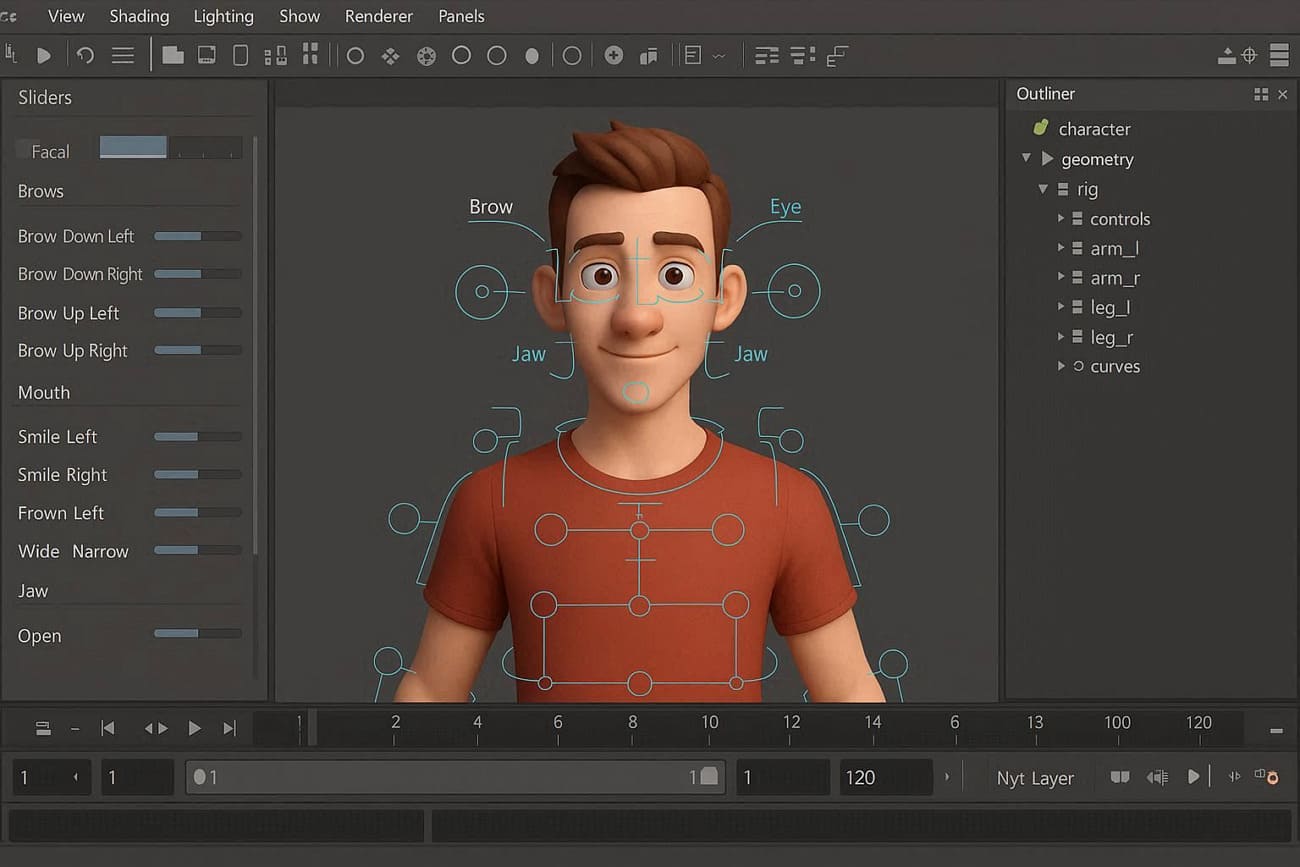
A report by Tripo states that automated rigging tools cut setup time by 40-50% for humanoid characters. In fact, 65% of pipelines now use procedural rigs in Blender, minimizing custom work by 30%. Custom facial rigs feature blend shapes for lip-sync phonemes, eye drafts, and micro-expressions, with transitions between sittings and flying poses. Besides, deformation tests verify the integration of the squash-and-stretch cloth simulation and collision handling.
Part 6. Final Stage in Animation Production Workflow - Post-Production
Post-production polishes raw animation into finished masterpieces ready for audiences worldwide. From color correction and compositing to sound design and special effects, this final stage will ensure every frame in the animation workflow:
1. Final Compositing
Combine all render passes, character beauty passes, particle simulations, and foreground elements into unified frames. Artists meticulously balance multi-layer color spaces, fine-tune exposure falloffs between elements, and apply rotoscoped holdouts for perfect integration. Plus, they incorporate atmospheric haze to achieve photorealistic depth and cinematic immersion that fools the eye across every frame.
2. Sound Design and Mixing
Import the complete animated sequence into professional digital audio workstations, then synchronize dialogue tracks with lip-sync markers. Plus, sync hyper-realistic Foley effects, precise footstep crunches on gravel, fabric rustles during gestures, and metal clinks from props. In addition, design dynamic music scores with adaptive stems that swell during emotional peaks, then mix all elements to broadcast-safe loudness standards.
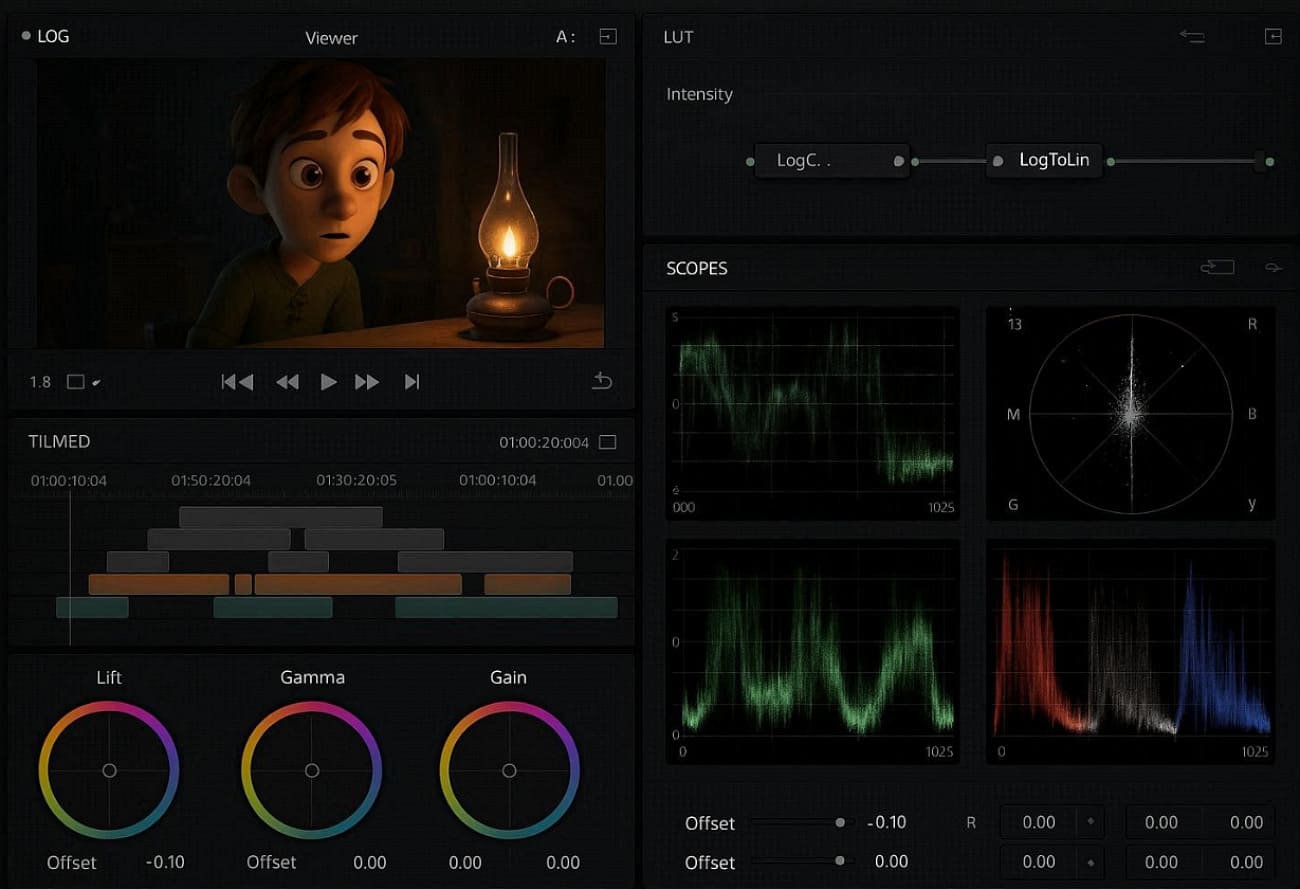
3. Color Grading
Load the composited timeline into programs, applying technical LUTs for log-to-linear conversion. At this stage of the 3D animation workflow, push warm golden-hour highlights bleeding into cool blue shadows for sunset sequences. Furthermore, prefer lift midtones for dreamy flashbacks and match skin tone continuity across lighting changes.
4. Visual Effects Polish
Refine particle systems for consistent density and lifelike dissipation, add organic lens artifacts like vignettes and file grains. Moreover, introduce controlled screen shake or whip pans via 3D camera trackers, and perfect motion blur matching across characters. Stabilize unintentional camera drift using planar trackers, repair flickering holdout mattes from crowd sims, and layers depth-of-field racks synchronized to the character.
5. Boosting 3D Rendering Workflow with Render Farms
For high-res frames or long animations, studios use cloud rendering services like Fox Renderfarm to speed up rendering with powerful CPU/GPU nodes and keep workstations free. This cloud-based render farm service uses NVIDIA RTX 3090/4090 GPUs, along with multiple Intel Xeon processor nodes. As a result, it handles heavy lighting, effects, and high-resolution frames that local PCs often cannot process.

In a 3D animation workflow, the render farm distributes frames across multiple computers, so work that takes days on a single PC can finish in hours. This fits final render work and helps artists test more versions in less time. In addition, this advanced AI render farm works well with tools like Blender, Maya, 3ds Max, and Cinema 4D, plugins, and APIs, which makes it easy to send shots directly from the production workflow.
Key Features
- Easy Pipeline Submit: Artists send shots directly from software through plugins, web tools, or API systems to Fox Renderfarm. This makes the render step part of the normal production flow, like publishing, version control, and the review process.
- Fast Storage System: Fox Renderfarm uses high-speed SSD storage for scenes, textures, caches, and output frames. Hence, this helps large projects load faster and avoid slow delays or crashes caused by large file sizes.
- Flexible Power Use: 3D animation studios can increase render power during deadlines and reduce it after the project finishes. So, this removes the need to buy and maintain expensive permanent hardware systems.
- 24/7 Auto System: The system runs continuously, with job tracking and auto-retry for failed frames. If one node fails, the system reruns the task, so the full project does not stop or delay.
- Team Review Access: All render outputs stay in one shared place for team review, dailies, and client feedback. This helps a faster approval cycle and clear communication between artists and supervisors.
FAQs about 3D Animation Workflow
Q1. What are the main stages in an animation workflow?
In a 3D animation workflow, the main stages include pre-production (storyboarding, scripting), production (modeling or animation), and post-production (editing and rendering).
Q2. How long does an animation workflow take?
The duration of an animation workflow depends on the project's complexity, length, and style. It can range from a few days for simple animation to several months for high-quality 3D production.
Q3. How can I speed up my animation workflow?
You can improve your animation workflow by using templates, animation tools, and cloud rendering services like Fox Renderfarm to reduce rendering time.
Conclusion
In conclusion, a well-structured 3D animation workflow process is essential for turning ideas into high-quality visual results. From pre-production planning to modeling, shading, rendering, and post-production, each stage plays a key role on the entire animation pipeline.
As projects become more complex, the rendering stage often becomes a bottleneck. Using a cloud rendering solution like Fox Renderfarm can help speed up final output. The render farm can handle heavy scenes without relying on local hardware, making the entire workflow more efficient and scalable.


