Creating A Game Character “Yae Sakurain” In ZBrush And Maya

Yae Sakurain

In this article, Fox Renderfarm, the best render farm and cloud rendering services provider in the CG industry, will share with you a Maya tutorial about how to create a game character “Yae Sakurain” in ZBrush And Maya. This tutorial is written by 3d Artist Sakura.

This style is to use three-dimensional methods to achieve the artistic expression of two-dimensional visual style. So I chose the character Yae Sakurain in the game "Honkai Impact 3'. This is a challenge for me. This article is from looking for references in the early stage to the final model making.

This article will not describe too much technical skills, but hope to share the production process and some ideas from a design perspective.

Software used:

  • PureRef: Reference collation
  • Zbrush: Characters & costumes
  • Maya: Topology & UV
  • Xgen: Grooming
  • Mari: skin map
  • Substance Painter: texture map of other parts
  • Arnold: lighting material rendering

Inspiration

When I saw the design of the character Yae Sakura in the "Honkai Impact 3'', I was attracted by its design, personality and expressiveness. Its facial features and ears are a bit like a bunny girl, as well as color matching and body proportions.

Honkai Impact 3

Honkai Impact 3

Honkai Impact 3

Reference

The difference between reference and inspiration is that reference is based on having inspiration as a general direction guide, and then adding more. Collecting references helps guide oneself to find the right direction, and at the same time it is not easy to go wrong in the production process.

It is a more realistic style. At the same time, I also found a lot of references for Japanese kimonos and skirts, head styling, expressions, hair, etc.

The character requires a lot of refinement of key features to better show their ideas. This personal project took a lot more time to find references than my other projects.

Creating A Game Character “Yae Sakurain” In ZBrush And Maya

Modeling

Large stage and detailed stage

In the large-scale stage, I first built a basic structure in Maya. I like to start with the whole and grasp the overall proportional relationship to a certain extent. It can be seen that this role belongs to NPR. The characteristics of NPR mainly focus on styling design, large scale relationship and color, and the treatment of light and shadow.

If you do this directly, the direction is incorrect. And the structure on the model will be too flat. Especially using the PBR process, there is no cartoon material effect, such a model does not have enough features.

Creating A Game Character “Yae Sakurain” In ZBrush And Maya

Creating A Game Character “Yae Sakurain” In ZBrush And Maya

So through the combination of these references, a rough proportion is formed in the mind and built in the software. In this way, we can slowly enter the detail stage with a holistic way of thinking, without chaos. Of course, you can find some models to fight together and adjust the shape to save some time. Various methods can be tried.

Creating A Game Character “Yae Sakurain” In ZBrush And Maya

In the detail stage, I will try my best to express the different characteristics of the model, and then the model can show some sense of hierarchy at this stage. This can predict some effects after the texture map is applied. But it does not mean that the model is finalized at this stage. After all, although this has a reference to the original painting, it is a secondary creation on this basis.

So if the texture map is not suitable, it will return to the model stage for adjustment. After the appearance is determined, the detail stage is also very important. In many cases, the comparison and level changes between models are presented by the characteristics of different shapes.

For example, the folds of the kimono, the embroidered patterns on the top, the shape of the skirt, the changes in the fold structure on the top, and how many different model structures are on the mask, sword, and rope. Observe the above features, analyze and disassemble them and make them all, if they are not good, you can delete them.

Creating A Game Character “Yae Sakurain” In ZBrush And Maya

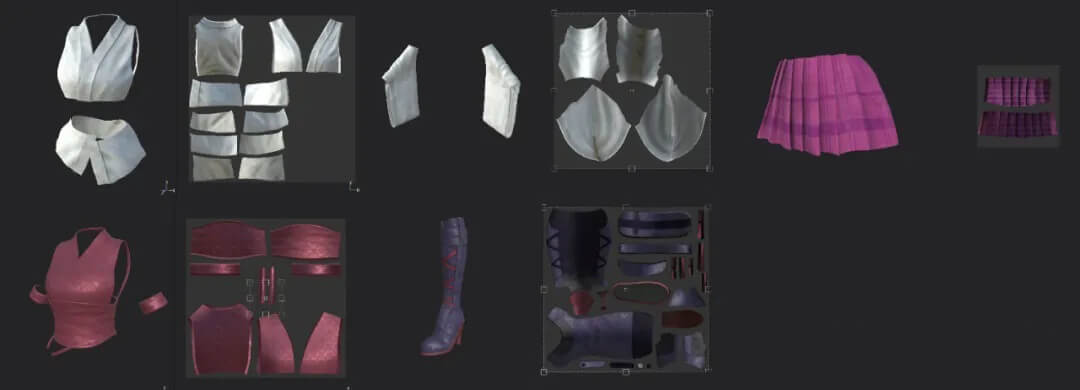
For this project, I used Zbrush mainly to deal with some fabric and shoe models. Clothes and shoes do not need to be worn, but they are not completely unused. So some folds were added to make the model look authentic.

I didn't use Marvelous Designer for the clothes, because those things are not complicated, and almost all of them are made directly using ZBrush.

Creating A Game Character “Yae Sakurain” In ZBrush And Maya

After completing the topology in Maya, occasionally I will return to zbrush to adjust if I am unsatisfied, and repeatedly modify it back and forth. At the same time, in order to get more structural levels and details on the model, and to make some rhythmic distinctions between different models, the subdivision of the cloth is still given enough surface.

Primary and secondary and rhythm changes. This part needs to be finalized at the model stage. Regardless of whether it is clothing or props, I have made trade-offs as much as possible in the details of the relationship with the characters. After all, it can't be details, or no details. There will be a lack of rhythmic changes in the expressiveness of the entire styling. I used the appearance changes of clothing and skirts to break the overly flat outline of the entire model, and at the same time used props to reinforce this.

Creating A Game Character “Yae Sakurain” In ZBrush And Maya

Texturing

Mari and Substance Painter are used in the texture part. I first finished making the skin. Then the most important part begins, the production and color matching of other parts, as well as the material details. Of course it was done separately, for the same reason.

For the texture mapping of the components, observe the real photos made by others or analyze the logical hierarchical relationship between them. It can be done layer by layer, the important thing is to observe and disassemble and analyze. For example, have you tried to show some texture particles, dirt, thread ends, and high light reflections on the clothing?

In fact, to some extent, we need to have a certain understanding of the properties of the shader, whether you know how to use basecolor, metallic, roughness, normal, and sss textures. How do they affect each other? Basic knowledge is important.

Creating A Game Character “Yae Sakurain” In ZBrush And Maya

One of the more important reasons that problems exist is that there are too many details, and there is no planning in the early stages, resulting in details everywhere. One difficulty with this character is that the costumes are white. White is a color that is harder to produce effects. If you don't do it, the texture map of the entire costume will appear very thin, and doing too much will steal the attention of the character.

In the end, I chose to add some different types of embroidery effects to the white clothing, especially the cherry blossom pattern on the large sleeves, to ensure that it conforms to the cultural background. It’s easier to say, but I don’t know how many times I have tried repeatedly when I did it. The color matching is relatively good. The design of Yae Sakura has helped you to adjust the color matching in place, mainly controlling some parameters such as saturation.

Creating A Game Character “Yae Sakurain” In ZBrush And Maya

Grooming and lighting

After finishing most of the texture maps, I will try to set up a set of basic light sources in the scene, mainly for auxiliary hair test rendering.

These two are the core references:

Honkai Impact 3

Creating A Game Character “Yae Sakurain” In ZBrush And Maya

Based on these two references, I found some other references. The final references are as below.

Creating A Game Character “Yae Sakurain” In ZBrush And Maya

First, solve the large structure and the direction of the hair with the larger main body. Then add some fine splits based on the big trend, and finally add some broken hairs and so on.

Creating A Game Character “Yae Sakurain” In ZBrush And Maya

It can be seen that the hairstyle and lighting still affect the facial emotion expression of the characters very much. Take a closer look at each of them.

Creating A Game Character “Yae Sakurain” In ZBrush And Maya

I try to grasp the characteristics of the role of Yae Sakura, such as the feature of her hair spreading to the ends, and the hierarchical relationship between bangs and temples. And the spread of the long hair rests behind the open styling. Because I didn't want this character to be too cartoonish, I looked for some realistic style references.

Creating A Game Character “Yae Sakurain” In ZBrush And Maya

Lighting rendering, first of all, I wanted to make it in the style of the first picture. After I have a foundation, I hope to express the feeling of sunlight on the hair and body in the fourth picture. At the same time, because there is a stronger light source in the scene, the overall light will be brighter. I found the second picture and the third picture to supplement. Of course, there are still many pictures to support. In order to better refine the views of this article, I have selected these four representative references.

Creating A Game Character “Yae Sakurain” In ZBrush And Maya

Yae Sakurain

Summary

The conceptual design and reference diagrams before making are very important. Basic software technical knowledge and design theories can help you improve your work. Details, proportions and composition are very important for perfect results. If you are looking for a cloud rendering service, why not try the fast and TPN-accredited cloud render farm, Fox Renderfarm, who offers a free $25 trial? Thanks for reading!

Welcome to join us

render farm free trial

Recommended reading


How to Render High-quality Images in Blender

2023-01-13


Top 9 Best And Free Blender Render Farms of 2024

2023-05-06


Revealing the Techniques Behind the Production of Jibaro "Love, Death & Robots", Which Took Two Years to Draw the Storyboard

2023-01-13


How to Render Large Scenes with Redshift in Cinema 4D

2022-06-09


Top 10 Free And Best Cloud Rendering Services in 2024

2023-09-26


Top 8 After Effects Render Farm Recommended of 2023

2023-02-02


How to Reduce Noise in Corona Renderer - Corona Denoising

2023-01-13


Arnold for Maya Tutorial: How to Render Wireframe

2023-01-13


Partners

Interested

Any Free Render Farm for Cinema 4d, Maya, 3ds Max?
I think you always search for a free render farm for Cinema 4d, Maya, 3ds Max, but you will find that a completely free render farm does not exist, to be honest, most of the platforms needs to charge due to the reasons below.1. Hardware costThe bigger the render farm network, the quicker the rendering speed. According to the top render farm companies such as FoxRenderfarm, they have over 30,000 physical servers, you can calculate the hardware cost.2. Maintaining CostNeed to rent a room in the data centre to place all of the rendering nodes. It would also be a large expense every year.3. Human Resource CostNeed a lot of specialists in customer service, technical support, research &x26; development, marketing.However, you can find out which render farm is the cheaper one, at the same time, you can get a free trial from the render farm. I would like to introduce Fox Renderfarm, the best cloud rendering service in the world. It has high compatibility, supports most mainstream software and plugins, including 3ds Max, Maya, Arnold, V-Ray, Redshift etc.Fox Renderfarm is a leading cloud rendering service provider in the industry. Since the operation in 2011, Fox Renderfarm has earned a good reputation for its quality performance, great customer service, and flexible pricing scheme. With over 20 years of experience, the pioneering core team served more than 200,000 users and top leading visual effects companies and animation studios from over 50 countries or regions, clients including multiple awards and Oscar winners.Web-based Cloud Rendering PlatformThe picture is the web-based interface of the platform,1. The upper right corner is message, guide, setting and account info;2. The left is rendering steps;3. The middle is the dashboard of render info.Desktop ClientThe picture is the desktop client interfaceReady for Windows and Linux users;Drag-and-drop batch submission;Submit your jobs inside your 3D software.**Ready For Windows*Supported Software:Maya 2015 64bit+ / 3ds Max 2014 64bit+Fox Renderfarm's Data Center is powered by 100% green, renewable energy:Hydro Wind turbinesPUE 1.2The users of Fox Renderfarm are making a big contribution to reducing greenhouse gas emissions and protecting our environment.If you want to learn more about Fox Renderfarm, we offer a US$25 free trial to new users, welcome to take an experience. Enjoy your cloud rendering journey with Fox Renderfarm!
More
2023-10-18
How to use Maya Render Farm or Render Maya with Cloud Rendering?
As a professional 3D software, Maya's powerful features make it a popular software for large production companies. Many of the beautiful shots we see are actually made with Maya, and when it comes to Maya creation, rendering is also inevitable. Rendering is the last part of making a 3D model come to life. It is actually a process of shading and texturing the objects and illuminating the scene. Rendering is definitely a challenge, especially for large projects where rendering takes a lot of time and machines, so is there anything you can do to speed up Maya rendering?Some companies and studios, in order to deliver their projects before the deadline, will choose powerful render farms to help rendering, such as Fox Renderfarm. So now, as a Maya render farm, Fox Renderfarm will show you how to do Maya rendering on the excellent cloud rendering platform.a. Desktop Client Submit Tutorial for Maya Cloud Rendering1. First you need to sign up to get a account of Fox Renderfarm rendering platform (Note: new users can get a free $25 trial coupon for signing up).Next, start the desktop client, select the platform to log in, and enter the main interface.2. Drag the maya file to the job area in the client to trigger the submission and start the scene analysis.3. Select your software version and hardware configuration corresponding to the file, and click "Next" to enter the analysis page.4. When the analysis is done, click “Next” (Note: corresponding prompt will appear in case of any error in the analysis results or warning thereof), then click “Ignore and continue” to set render parameters.5. Click “Submit” to start the uploading. The rendering is automatically started upon the completion of submission.b. Web Submit Tutorial for Maya Cloud Rendering1. Some preparations for Maya rendering in web.1.1 Register to get an account. In the case of web login, please visit web login for details.1.2 In the case of web transfer, please visit web-upload for details.1.3 Compare the local and could asset directories.2. Maya web submission process (submit > analyze > render > download).2.1 Click “Submit” button on the left, select the software for submission > set a project path (Note: select a project path to map the local Maya project path) > select the document for rendering, after that, click “Continue”.2.2 Select software version and hardware configuration corresponding to the file (Note: selection of the rendering system), then click "Go Analysis", and wait patiently for the analysis to complete.2.3 Click the job with “Analysis done”, set render parameters and then submit it for rendering (Note: the rendering actually just starts now).2.4 On the rendering page, click the job > export the file > download.That's all about how to accelerate Maya rendering on a cloud rendering platform. After reading this, don't you think it is very simple and easy to use? By using a Maya render farm, you can render high-quality images in as little time as possible in order to meet the final production deadline, making it the perfect choice for most CG artists. Well, if you also have a Maya project to render, the Maya render farm can definitely be of great help to you!
More
2023-05-06
How to Set Up a Maya Render Farm
Maya is an excellent 3D production software owned by Autodesk. It is very famous in the animation design industry and belongs to the top design and production software. Especially in animation production, game characters, film special effects. For example, Blue Sky's animated movie Spies in Disguise in 2019 and Netflix's science fiction series Lost in Space. The issue of rendering is inevitably involved in animated film production. I believe that many people are worried about the rendering time is too long and the delivery time is too tight, but using the render farm is a good choice, so how to set up a Maya render farm?Spies in DisguiseLost in SpaceHow to build a Maya render farm? First of all, there are many issues to consider when setting up a render farm, such as the number of machines, the configuration of the machines, the network, labor, software, purchase of Maya's license, time cost, security, and your budget. You can refer to the following article: Is Building Your Own Render Farm The Best Option?If the project budget is tight, and you don't want to spend too much time on setting up and managing the render farm, you can consider using a commercial Maya render farm. After all, it can be used anytime, anywhere, and there is no project or the project has not reached the rendering progress when you don’t need to vacate your resources or ask someone to maintain it. Especially in the process of using your local render farm, if you encounter unexpected problems, you can also get the assistance of professional technicians. You don't have to spend time researching the problem yourself until you find a solution. During this period, if you are in a commercial Maya render farm, Some projects are estimated that you have finished rendering.The Top Benefits of Online Render FarmsOf course, choosing a commercial render farm also requires choosing a large and well-known professional online render farm, which guarantees safety. In addition to security, the number of machines and the quality of service can be provided very well. For example, the TPN-Accredited cloud render farm, Fox Renderfarm, in addition to providing massive rendering nodes, 24/7 services, there are professional TD personnel to solve technical problems for you at any time. At the same time, Fox Renderfarm is the rare render farm in the CG industry that supports both CPU and GPU rendering. Various mainstream software, renderers, and plug-ins are supported, as well as personalized customization services. Fox Renderfarm provides multiple submission methods for users to choose from. In addition to web page upload, rendering, monitor, and download, offline software applications can also be used for asset uploading, rendering, monitoring, and downloading. It's very easy to use and it only takes a few steps.If you are still hesitating to build local Maya render farm or use a commercial render farm, why not directly get a free trial of $25 on Fox Renderfarm, which can be used as a real experience reference.
More
2023-05-06
  • Foxrenderfarm

    Powerful Render Farm Service

  • TPN
  • TPN

    Business Consulting

    Global Agent Contact:Gordon Shaw

    Email: gordon@foxrenderfarm.com

    Marketing Contact: Rachel Chen

    Email: rachel@foxrenderfarm.com

    Connect with Us

Fackbook Customer Reviews