Using 3ds Max to Copy a Legendary Hemok of Apex Legends Production Tutorials (3)

Using 3ds Max to Copy a Legendary Hemok of Apex Legends Production Tutorials -18

Fox Renderfarm, the best cloud render farm in the CG industry, still share with you the tutorial about using 3ds Max to copy a legendary Hemok of Apex Legends production tutorial from 3d artist Michael.

Texturing

After all the MSP baking is over, you can start texture production. I will take some of them as an example of how to make textures.

I use part of the metal structure as an example, all materials are actually the same. First, the most important thing is the basic texture. The color selection in this step is very important because all the subsequent effects will be superimposed on the basic texture. The correctness of the basic texture color tendency can almost determine the overall color of the model.

Using 3ds Max to Copy a Legendary Hemok of Apex Legends Production Tutorials -8

Next, I use the metal edge generator for bright colors and the dirt generator for dark colors. I only need to control the range and color to enhance the light and dark parts of the model.

The next step is to add some color changes to the model so that the colors are no longer monotonous. Because it is metal, rust, scratches and other effects can be added to strengthen the metal texture in the process. It should be noted here that these dirty and old need to be adjusted. If necessary, you can add a drawing layer to manually control the range.

To add roughness changes to the model. Because after the firearm is used for a long time, there will definitely be signs of friction, handprints, etc., rust and scratches, etc. I need to make some changes to prevent the surface of the model from being too smooth, and that model will look fake.

The last step is to add the patterns and decorations of the weapon body. I imported the pictures made in Photoshop into Substance painter. After adding the layers, I use the mapping function to draw them. The light effect can open the emission channel. The height effect can open the height channel.

It can be said that the main method I use is basic material + bright and dark colors (to highlight the volume of light and dark) + color changes (increase color diversity) + roughness changes (to make objects more life-like, more real) + mottled, dirty, scratched the details such as marks, rusts, breakages, etc. It is easier to find and modify different structures by distinguishing groups and naming them.

Using 3ds Max to Copy a Legendary Hemok of Apex Legends Production Tutorials -18

There is a little trick, when making the effect, pay attention to choosing Tri-planar Projection as much as possible, because the default UV Selection is based on the UV texture we made to superimpose the effect and show it on the model The effect is sometimes not very good, and the three-sided mapping is based on the model to superimpose the effect, which is more accurate.

Using 3ds Max to Copy a Legendary Hemok of Apex Legends Production Tutorials -19

Rendering

After finishing the texture map, you can export the texture map for rendering. There are many options for lighting production. I used the most common method: main light + auxiliary light + contour light. In addition, I chose to follow the light direction of the original painting. After observation, I found that the original painting used a total of six different lights. For my model, I chose five lights, namely main light, auxiliary light, contour light, top light, and bottom light. The main light direction mainly adopts warm light, and the auxiliary light mainly adopts cold light, creating a kind of conflict between cold and warm. For the visual effect, the auxiliary light must not be stronger than the main light.

It should be noted that if you are not good at lighting or lack some experience, it is best to learn from other people's lighting effects. In addition, the auxiliary light sources other than the main light must remember to turn off the shadows to prevent the shadows from affecting each other. The next step is to set up the rendering.

Using 3ds Max to Copy a Legendary Hemok of Apex Legends Production Tutorials -7

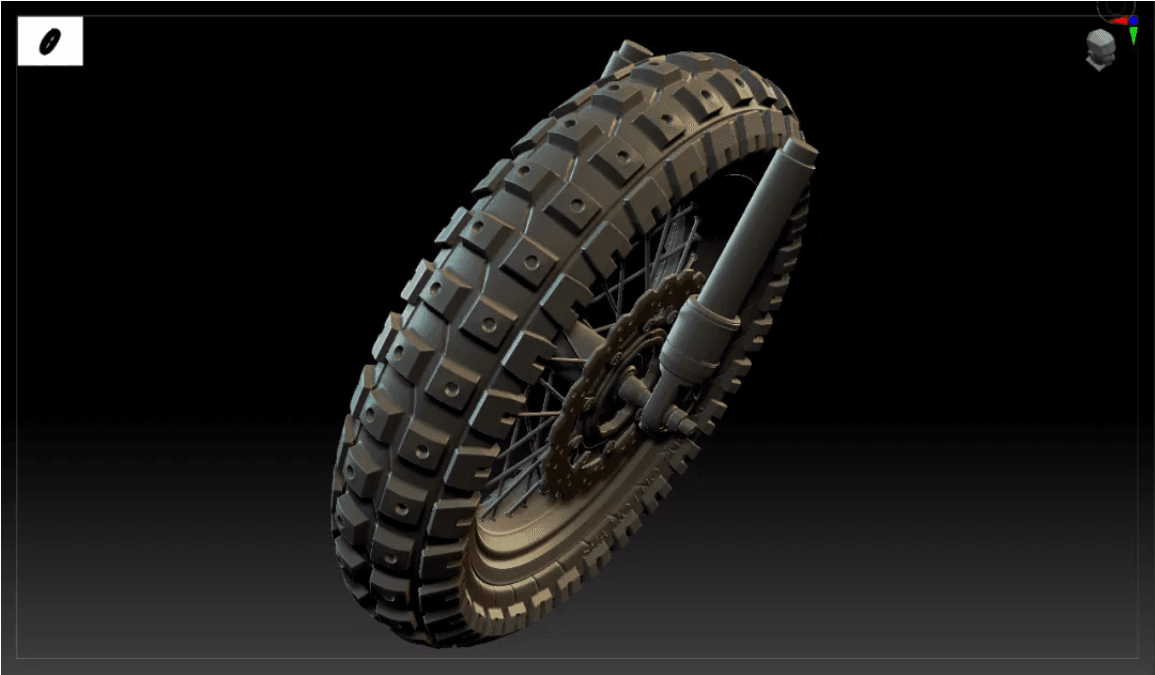
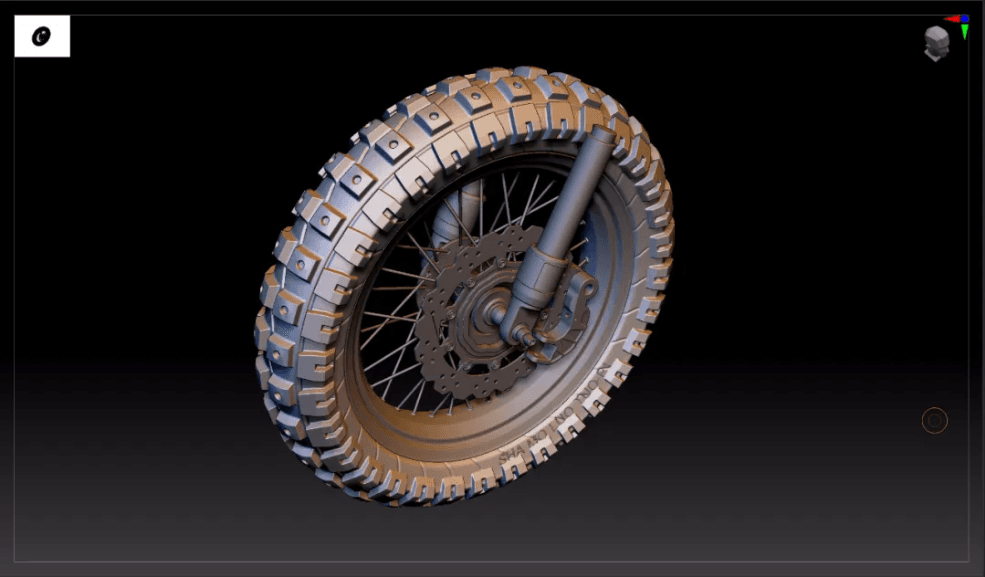
This is the final effect:

Using 3ds Max to Copy a Legendary Hemok of Apex Legends Production Tutorials -1

Fox Renderfarm hopes it will be of some help to you. As you know, Fox Renderfarm is an excellent cloud rendering farm in the CG world, so if you need to find a render farm, why not try Fox Renderfarm, which is offering a free $25 trial for new users? Thanks for reading!

Welcome to join us

render farm free trial

Recommended reading


How to Render High-quality Images in Blender

2023-01-13


Top 9 Best And Free Blender Render Farms of 2024

2023-05-06


Revealing the Techniques Behind the Production of Jibaro "Love, Death & Robots", Which Took Two Years to Draw the Storyboard

2023-01-13


How to Render Large Scenes with Redshift in Cinema 4D

2022-06-09


Top 10 Free And Best Cloud Rendering Services in 2024

2023-09-26


Top 8 After Effects Render Farm Recommended of 2023

2023-02-02


How to Reduce Noise in Corona Renderer - Corona Denoising

2023-01-13


Arnold for Maya Tutorial: How to Render Wireframe

2023-01-13


Partners

Interested

3ds Max Cloud Rendering Tutorials and Render Farm Recommendations
3ds Max is a 3D professional modeling software, animation and rendering application builder, formerly 3D Studio and 3D Studio Max, used to create 3D animations, models, interactive games and visual effects for the entertainment industry. 3Ds Max plays a big role in designing the 2D cross-sectional shapes of 3D models. It can bring characters to life by using a special feature called inverse kinematics that can connect the different components of a character together. So whether you are an architect, a product designer or an illustrator, using 3ds Max to create your projects is a good choice for you. The 3D models are usually converted to CGI through a rendering process.We see a lot of beautiful results after the project is rendered. But rendering in 3ds Max can sometimes take a long time and it doesn't have much to do with your system itself when it comes to rendering. Long rendering times can be affected by many factors, so for creators who use 3ds Max as their primary tool, speeding up 3ds Max rendering times is a huge relief.3ds Max cloud rendering is a useful way to speed up rendering. Many people have only heard of cloud rendering but don't know what it is or how to do it. In fact, cloud rendering, a cloud service that relies on cloud computing, can also be called an online render farm. Fox Renderfarm is a powerful 3ds Max cloud rendering farm, with tens of thousands of rendering machines supporting CPU and GPU rendering, serving over 200,000 users around the world. The following is the tutorials of 3ds Max cloud rendering at Fox Renderfarm.Tutorials for Using 3ds Max Cloud Rendering3ds Max Cloud Rendering Web Submit TutorialStep 1. Preparations for 3ds Max web submission:1.1 Register to get an account with $25 free trial. In the case of web login, please visit web login for details.1.2 In the case of web transfer, please visit web-upload for details.1.3 Compare the local and could asset directories.Step 2. 3ds Max web submission process (4 steps: submit > analyze > render > download).2.1 Click the “Submit” button on the left, select the software for submission > set a project path (Note: this project path contains all the materials used for the Max file) > select the document for rendering, then click “Continue”.2.2 Select software version and hardware configuration corresponding to the file (Note: selection of the rendering system), click "Go Analysis", and wait patiently for the analysis to complete.2.3 Click the job with “Analysis Done”, set render parameters and then submit it for rendering (Note: the actual rendering starts only at this job)2.4 On the rendering page, click the job > export the file > download.3ds Max Cloud Rendering Desktop Client Submit TutorialStep 1. Start the desktop client, select the platform to log in, and enter the main interface.Step 2. Drag the max file to the job area in the client, thus to trigger the submission and start the scene analysis.Step 3. Select software version and hardware configuration corresponding to the file, and click "Next" to enter the analysis page.Step 4. Click “Next” when the analysis is done (Note: corresponding prompt will appear in case of any error in the analysis results or warning thereof) and set render parameter setting (including: common settings and Vray settings).4.1. Common setting:4.2. Vray settings:Step 5. Click “Submit” to start the uploading. The rendering is automatically started upon the completion of submission, and hence the submission job is successful.That is all about tutorial of 3ds Max cloud rendering. If you have anything else you don't understand, you can consult the customer service or your account manager, but remember to sign up to get an account, and the benefit for new users is a $25 free rendering voucher. If you are a student or educator, you can get a bigger discount, check out our GoCloud Program. Fox Renderfarm is always committed to providing better and more affordable cloud rendering services for everyone in the CG industry!
More
2023-05-06
How to Make High-precision Models For Motorcycle Tire Patterns And Wheels  in 3ds Max and Zbrush(1)
How to Make High-precision Models For Motorcycle Tire Patterns And Wheels in 3ds Max and Zbrush(1)
In this tutorial, Fox Renderfarm, your TPN-Accredited cloud rendering service provider and render farm, will bring a set of vehicle model making skills. This article mainly explains how to use 3ds Max and Zbrush to make high-precision models for motorcycle tire patterns and wheels to help you improve the quality and efficiency of the vehicle model.High Poly EffectThe overall process of the case:This case is a series of motorcycle production tutorials. In this tutorial, only the high poly parts of the tires and wheels are included.The outline of this tutorial is as follows:Outlinepreliminary preparation in 3ds Max and mid poly manufacturing of tireIntroduction and installation of the plug-in Radial SymmetryProduction of tire patterns and brake padsBoolean operation tire pattern in ZbrushProduction processPreparationCollect reference pictures;Create a 1:1 background board of reference picture in 3ds Max, and put the center point of the tire on the origin (0.0.0), which is convenient for model symmetry;Start to build the mid poly of the tire base. The production starts from the basic ring, adjust the inner and outer radius of the ring and the appropriate number of segments (Segments: 36, Sides16);Process decomposition:Trous \ Edit poly \ Symmetry \ Edit poly card line \ Turbo smooth 2The final effect3ds Max Plug-in, Radial SymmetryIntroduction: Radial Symmetry is a 3ds MAX modifier plug-in, which can do circular symmetry replication effect, make circular model symmetry, and the quantity adjustment is very convenient;Installation instructions:(A) Close 3ds MAX(B) Copy the corresponding version of RadialSymmetry.dlm to the plug-in folder of 3ds Max. The default example is C:\Program Files\Autodesk\3ds Max xxxx\plugins(C) Open 3ds MAX, you can see Radial Symmetry in the modifier listFunctions:(A) Radial Axis: XYZ rotation axis, this function is very important, most of the effects are adjusted here;(B) Radial Count: Number of copies(C) Smooth Seams: smooth seams(D) Quad Seams: Four-sided seams, less used(E) Mirror: double mirrorProduction of tire patterns, wheels and brake padsA. Tire 1 patternUse the topology tool to draw the pattern model, pick the tire high poly , use the Strips tool to draw the model based on the surface; the pattern is based on the reference picture;Draw pattern graphics \ shell \ pull \ symmetry \ turbo smooth \ ring symmetry;Circular symmetry: z-axis direction, Radial count: 10 pieces.B. Tire 2 patternExtract two models from the tire model and edit to the shape above;Add shell\ Edit polygon, add grooves and holes \ symmetry \ Turbo smooth \ Circular symmetry (replicate 32 times)Circular symmetry: z-axis direction, Radial count: 32 piecesZbrush effectNote: At this step, the model has not been finalized, and it needs to be imported into Zbrush for details adjustment. It is necessary to merge the pattern and the tire into one model, and the edges do a soft transition to make the model appear more realistic;
More
2022-07-01
How to Make High-precision Models For Motorcycle Tire Patterns And Wheels  in 3ds Max and Zbrush(2)
How to Make High-precision Models For Motorcycle Tire Patterns And Wheels in 3ds Max and Zbrush(2)
In this tutorial, Fox Renderfarm, your TPN-Accredited cloud rendering service provider and renderfarm, will still bring a set of vehicle model making skills.C. Wheel productionThe production of the wheel: firstly outline the cross-sectional structure;Add a lathe, an angle of 360, a number of segments of 60, and click on a subset to adjust the radius of the wheel;Add symmetry to bilateral symmetry \Edit poly card line\ Turbo smoothingD. Brake padsThe idea of making brake pads: use 2D graphics (star and round) and use 2D Boolean tools to adjust the graphics;Process: large-scale adjustments \ add circular hole \ circular copy \ extrusion thicknessThe final extrusion effect: before importing Zbrush, the model needs to be converted to poly, so that the model will not appear broken;E. Spoke structureUse the spline to make a spoke, and replicate it according to the reference picture;Select the spline to display the solid model: add Edit poly\ and turn to polyThe final effect in 3ds Max.Boolean operation pattern and drawing in ZbrushThe whole model is imported into Zbrush in the form of obj or GoZ;Create a tire folder; select the sub tool under split \ split by group; select the difference pattern; open the preview of Boolean rendering;After the preview effect goes well, select the gear icon of the tire folder, the Boolean operation folder, and generate a new Boolean model;Dynamesh: the resolution can be set to 1024 or 1280, the higher the resolution, the finer the model;Mask: According to the characteristics, the mask will be generated according to the edge of the group, the mask will be expanded once and blurred once;Inversely select the mask and select the lower polishing command. The value should be 2-3. If you want the edge to be softer, you can polish twice.Add pattern details; select the groove brush; click x key to turn on symmetry; turn on the R ring symmetry value to 10; increase pattern details;The final effect of the first pattern;The operations of the second pattern are the same as above.Note: the Boolean operation needs to select a collection and merge the model into a whole. The next steps are to dynamesh, polish, use the groove brush to increase the pattern details;The final effect of the tire
More
2022-07-01
  • Foxrenderfarm

    Powerful Render Farm Service

  • TPN
  • TPN

    Business Consulting

    Global Agent Contact:Gordon Shaw

    Email: gordon@foxrenderfarm.com

    Marketing Contact: Rachel Chen

    Email: rachel@foxrenderfarm.com

    Connect with Us

Fackbook Customer Reviews