Top 9 Best And Free Blender Render Farms of 2025
2023-05-06


Top 5 V-Ray Render Farms in 2025
V-Ray Render Farm
Chaos' V-Ray is a powerful rendering engine widely used in the computer graphics industry. It provides high-quality and realistic rendering for various 3D software applications such as 3ds Max, Maya, Cinema 4D, and more. V-Ray offers advanced lighting and material options, global illumination effects, and efficient rendering algorithms, allowing artists to create stunning visuals for their project
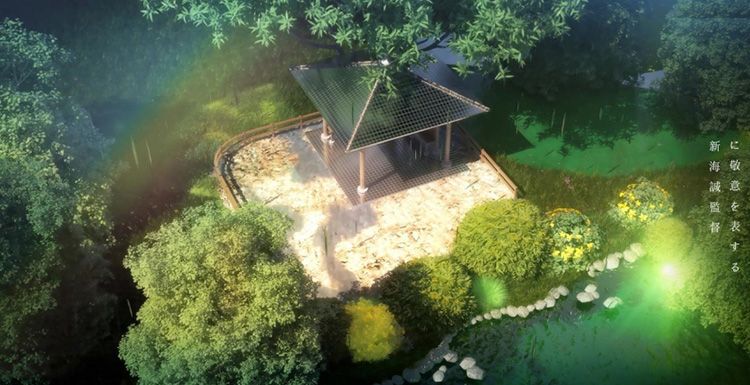
Creation Analysis: Using 3D to Make 2D Style Scene(1)
V-Ray for 3ds Max
The best cloud rendering services provider and 3ds Max render farm, Fox Renderfarm will share with you a tutorial of using 3D to make 2D style scene.In this case, we show the use of 3ds Max to create 2D animated movie-style scenes and will focus on explaining the Makoto Shinkai-style picture performance. From his animation works, we can feel a strong personal style, exquisite light, and shadow app

V-Ray 3.4 For Sketchup To Make A Work "Container Cabin"
V-Ray Rendering
The best cloud rendering services provider and GPU &x26; CPU render farm, Fox Renderfarm, will share with you a 3D tutorial of making container cabin with V-Ray 3.4 for SketchUp.A rendering exercise using V-Ray 3.4 for SketchUp, which uses the public model of the 3D Warehouse. The software used including SketchUp, V-Ray, Photoshop.1. PreparationAn existing model is used here, and the model is deri
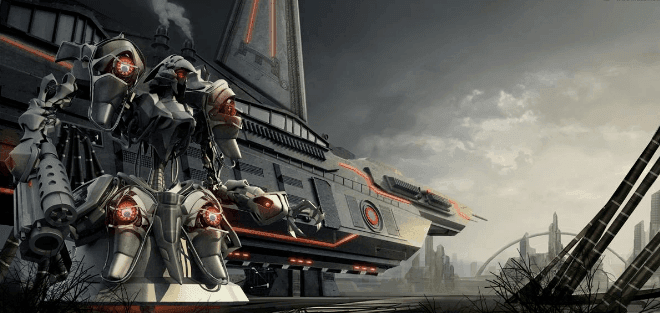
3ds Max Tutorials: Making a Sci-fi Scene in 3ds Max (1)
V-Ray for 3ds Max
Your powerful CPU &x26; GPU cloud rendering services and TPN-Accredited cloud render farm, Fox Renderfarm still shares with you the 3ds Max tutorial. In this tutorial, I conceived a sci-fi style scene, and named it "Fortress".IntroductionBefore I started production, I just made a preliminary idea. Because I didn't have too much time to create, I didn't draw a conceptual drawing. I just made a mode

3ds Max Tutorials: Making a Sci-fi Scene in 3ds Max (2)
V-Ray for 3ds Max
Continue the 3ds Max Tutorials: Making a Sci-fi Scene in 3ds Max (1), the fastest GPU and CPU cloud rendering services provider and TPN-Accredited render farm, Fox Renderfarm still share with you the part of texturing and rendering in making a Sci-fi scene.TexturingMaking textures is the most interesting part of the work, but realistic textures are also the most difficult to make. Understanding th

Tutorial: V-Ray for 3ds Max Making Forest Park Restaurant
V-Ray for 3ds Max
As the leading cloud rendering services provider, Fox Renderfarm is here to tell you how to make forest park restaurant using V-ray for 3ds Max.The case study presented to you this time is based on a person's conceptual design - a restaurant that is intended to be built next to a waterfall and surrounded by vegetation. From design to final performance, it is all done by one person. The overall pro

The Guide of V-Ray Rendering Manual Model (1)
V-Ray Rendering
Let's take a look at the effect of rendering a picture below, which looks very much like a photo of a hand model. How to achieve this kind of effect like a manual model is actually very simple, because the V-Ray artificial light source comes with such a huge "fake" incomparable property that can render your model. You will find that you are uncontrollably rendering your building into a hand model,

V-Ray For Sketchup To Make A Rendering Imitate The Penda Style
v-ray for sketchup
This is a rendering that imitates the Penda style and is the first attempt to simulate a manual model with rendering. The style of Penda has always been very much liked and yearned by me. It is elegant and readable.The following reference picture shows an indoor project from Penda.The software used is SketchUp, V-Ray, Photoshop.Step 1: Create a modelFirstly, look at the material of the reference m

How To Make a Green Bamboo Leaf Forest Cabin With 3ds Max And V-Ray
V-Ray for 3ds Max
This article is organized from Fox Renderfarm, the world's leading render farm. It mainly teaches how to use existing models to make green bamboo leaf cabins. The main software used is 3ds Max, **V**-**Ray**, Photoshop, etc.. After opening the model, first check and organize the model. After the group is set up, the angle is selected. After repeated comparisons, the following angles are selected: Next,
The Guide of V-Ray Rendering Manual Model (2)
V-Ray Rendering
If you have a higher pursuit of rendering, you need to pay attention to two aspects (lights and lenses), let's start with the light. It's important to note that we don't have a complete set of lighting parameters for you. Each scene is completely different. If you want to get some kind of once-and-for-all parameters, you can't do it! In each of the following examples, we have debugged the number,

The Guide of V-Ray Rendering Manual Model (3)
V-Ray Rendering
In the Guide of **V**-**Ray** **Rendering** Manual Model (2), when you work hard on the lights and the lens, you suddenly find that the lack of details is a big problem. Finally, let's talk about the details of the drawings. About the details, one to point out is that if you still ha**v**e the passion for learning and the desire to know, you should do it in 3d MAX and MAYA, or e**v**en ZBrush and Houdini. Try to use