When modeling or animating, a 3D Cursor in Blender might seem like a small point, but it can make a huge impact on how smoothly and precisely you work. Basically, it acts as a smart helper that guides you to place things exactly where you want them. However, many beginners might overall look at its usage, which leads to unnecessary struggles with alignment.
Due to this, learning about this point and its functionality becomes necessary to ensure a smooth workflow. For that, this article offers you a complete guide on how to use this tool while highlighting how to move it in various software. So, review the guide and explore an innovative tool by the end of this guide that will help you in rendering while using the 3D Cursor.
Part 1. What is the 3D Cursor in Blender?
As stated, a 3D cursor is a small point in space with position and rotation capabilities that may be utilized for a variety of modeling and animation applications. This point can be positioned in 3 ways, including direct placement with the mouse, in the sidebar, or in snapping. In "Direct Placement with Mouse," you can position the 3D cursor with orientation choices by using the Cursor tool or by pressing Shift + Right-Click.
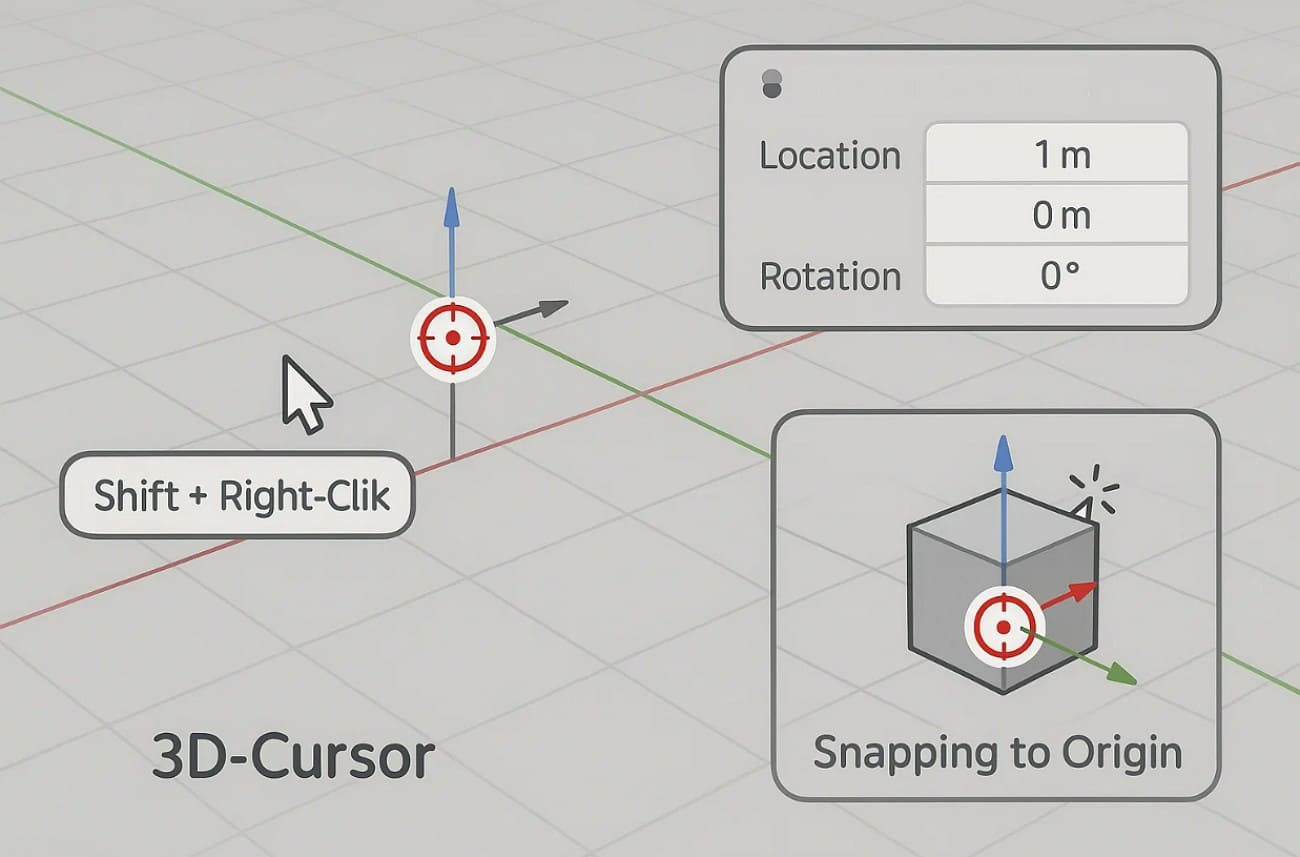
In terms of "Sidebar" can be positioned by adjusting the respective values of "Location" and "Rotation” in the sidebar. However, “Snapping" lets you move the Blender 3D cursor to the origin of the selected object.
Part 2. How to Use the 3D Cursor in Blender
While getting an overview of the 3D Cursor, animators might seek to learn how Blender moves the 3D Cursor accurately for better control in animation and modeling tasks. Hence, to know that, adhere to the given details, highlighting how this point is moved and through which shortcuts:
3D Cursor Shortcuts
Prior to determining its movement, here are some shortcuts that animators use to position the 3S Cursor:
|
Action |
Shortcut |
Description |
|
Place 3D Cursor |
Shift + Right-Click |
Places the 3D Cursor at the clicked location in the viewport. |
|
Use Cursor Tool (Toolbar) |
LMB (Left-Click) |
With the Cursor Tool active, left-click to position the 3D Cursor. |
|
Reset Cursor to World Origin |
Shift + C |
Centers the 3D Cursor at (0, 0, 0) and resets the view. |
|
Cursor to Selected |
Shift + S → Select |
Moves the 3D Cursor to the center of the currently selected object(s). |
|
Cursor to Grid |
Shift + S → Grid |
Snaps the 3D Cursor to the nearest grid point. |
|
Cursor to Active |
Shift + S → Active |
Places the 3D Cursor at the location of the active (last selected) object.
|
Move 3D Cursor
To fully control object placement and editing flow, here is how to move the 3D Cursor in Blender:
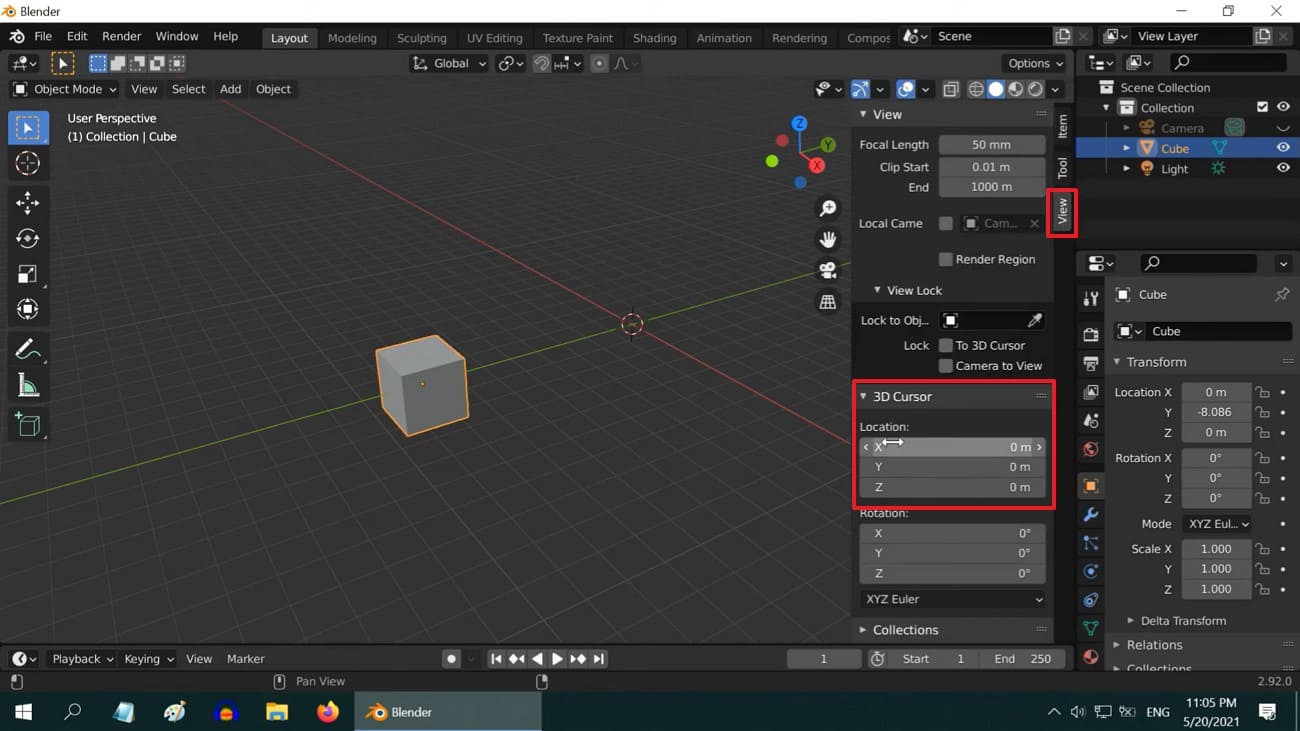
1. How to Move the 3D Cursor in Blender?
Enter the "View" tab from the toolbox and head to the "3D Cursor" menu, where you have to enter the coordinates like X, Y, and Z to position the Cursor.
2. How to Move the 3D Cursor to World Origin?
For that, start by pressing the "Shift + S" key simultaneously and choose the "Cursor to World Origin" option to place it in the center of the scene. If not, choose the "Object" menu and select the "Cursor to World Origin" option under the "Subject" option.
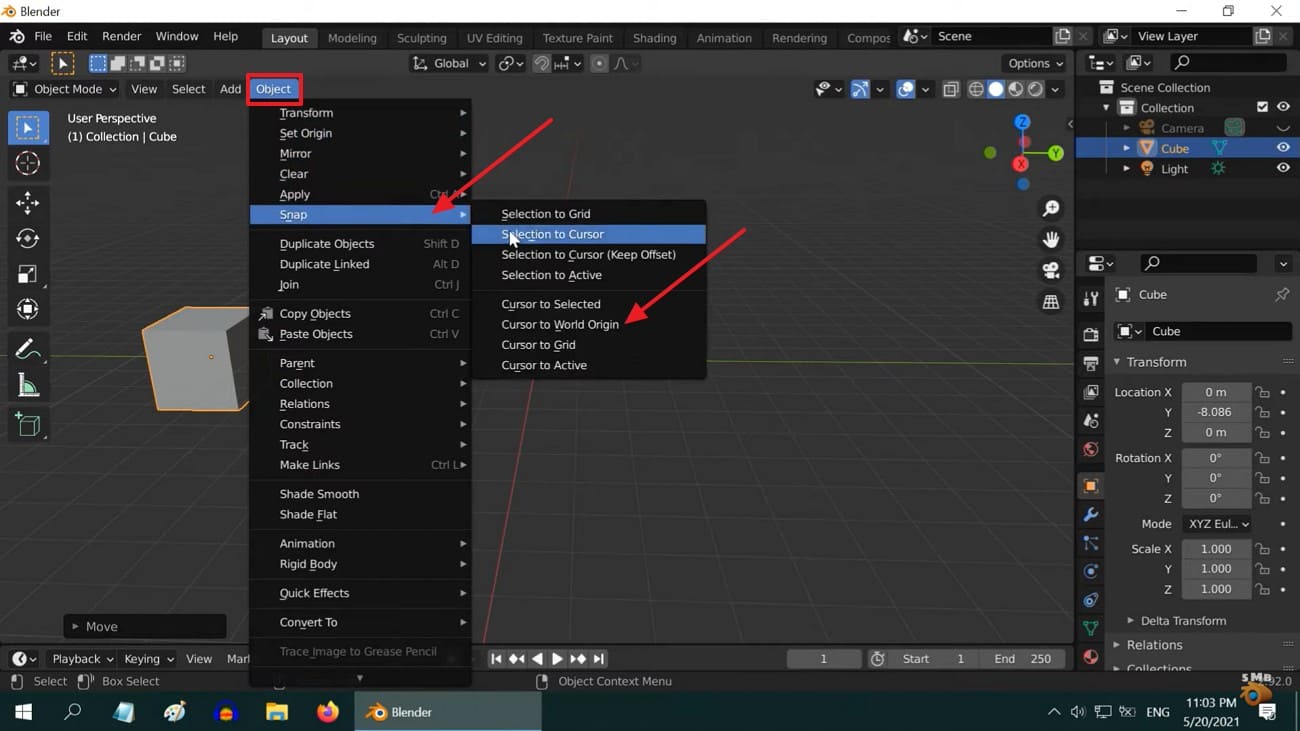
3. How to Move the 3D Cursor to Selection?
To place the 3D Cursor at the center of the current selection, press Shift + S and choose “Cursor to Selected” from the “Snap” pie menu.

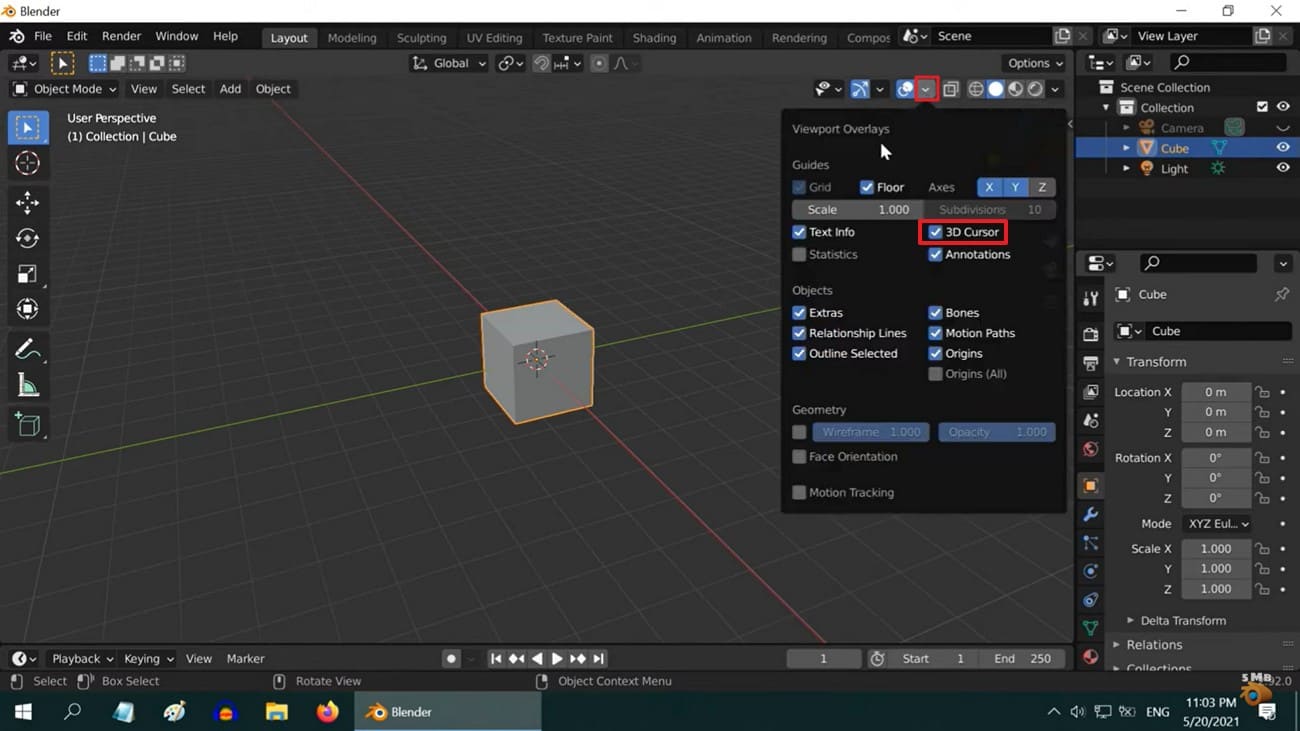
Hide the 3D Cursor
After you move the 3D Cursor Blender, there are times when you seek to hide it, mainly when it visually causes a distraction in modeling and animation. Hence, here is how you can hide it from the viewport to focus on your projects:
Instructions: Stretch the drop-down menu for “Viewport Overlays” and uncheck the “3D Cursor” option from the list.
Pro Tip for Blender Artists: Improve 3D Animation Rendering Efficiency
Once you have set the Cursor to the origin of Blender, you might face slow speed due to complex animation, affecting your workflow badly. Thus, in such a case, you need a cloud rendering service like Fox Renderfarm that offers you CPU and GPU support to reduce rendering time significantly. Not just that, this rendering service detects the IT environment and matches the cloud infrastructure service automatically for efficient resource allocation.

Unlike other solutions, this render farm also comes with an SSD storage solution that eliminates I/O bottlenecks to ensure faster data access. Along with these traits, it comes with thousands of rendering nodes that allow for parallel processing, making it ideal for handling complex animation. Once done with animation or modeling, Raysync's high-speed transmission will enable you to upload and download large project files quickly and securely.
Key Features
- API Integration Available: Let animators make use of pipeline integration via API to automate rendering tasks and manage projects programmatically. It also enables them to connect Fox Renderfarm with their existing production workflows seamlessly.
- Multiplatform OS Support: Unlike other rendering services that have limited OS support, Renderfarm can be easily accessed on Windows, Mac, and Linux with 99.99% uptime. This makes it a highly reliable and versatile choice for studios and individual artists working across different platforms.
- TPN-Accredited Vendor: The Motion Picture Association oversees the Trusted Partner Network, of which Fox Renderfarm is a member. This means that this service ensures industry-standard security and trusted third-party content protection for animation and VFX projects.
- NDA Available: For users concerned about data security, a Non-disclosure agreement is available to secure the user’s rights and information. Leveraging this feature, it becomes the ideal choice for those who seek legal and dependable options.
- Software Support: It works well with tools like Blender, Maya, V-Ray, and RenderMan, so you don’t need to switch software to render. It supports most animation tools professionals use, which makes it easy to continue your work without issues.
Part 3. Common Pitfalls and Troubleshooting for Blender 3D Cursor
Even though an animator learns how to set the 3D Cursor to the origin, there is a high chance that they face some common Cursor issues. This either affects their productivity or leads to misaligned objects, which can be resolved after reviewing the problems and the solutions given below:
- Accidentally Moving the 3D Cursor: By pressing the Shift and right click on the mouse, the Cursor can easily move from designated places. Hence, disable accidental input using custom keymaps or lock the cursor location in the Sidebar by following this path: "Go to View > View Lock > Lock to 3D Cursor."
- Incorrect Object Placement: If the Cursor is in an off-screen position, you might be able to place new objects accurately. So, reset it in the default position with coordinates like 0,0,0 by pressing the “Shift + C” shortcut.
- Cursor Not Snapping Accurately: When the animator snaps by hitting “Shift + S,” the snapping may feel off due to view angle or mesh origin issues. To cater to this, choose the subject > View > Perspective/Orthographic to pick Numpad 1/3/7.
- 3D Cursor Not Visible: While animating, the 3D Cursor sometimes might vanish from view, affecting the whole process. To make it visible, head to the ViewPort menu and ensure "3D Cursor" is enabled there.
- Wrong Rotation Alignment: If the orientation is not set accurately, there is a chance that the Cursor will not rotate objects as it is supposed to. So, head to Toolbar > View menu > and review “Location” and “Rotation” settings.
Conclusion
In a nutshell, the 3D Cursor holds significant importance in animation and modeling, which makes users wonder how to move the 3D Cursor in Blender. Thus, this guide has uncovered these queries while resolving the possible issues users might face with 3D Cursor.
Moreover, for an efficient and smooth workflow, a cloud rendering service like Fox Renderfarm is suggested since it comes with API, CPU, and GPU support.