3D Tutorial of Making 'God Statue Corridor' Scene

In this article, Fox Renderfarm, the CG industry's leading cloud rendering service provider and render farm, will bring you a tutorial on making 'God Statue Corridor' scene created by a team of students of 3D games models.
Analyzing Original Painting & Making the Basic Models
First we analyzed the original painting, here we determined the length and width by checking the size of the original painting, and found the relationship between the location of the objects in Photoshop. Then we used the viewport protection frame and camera tools in 3ds Max to continuously refine the rough model's general shape, and used simple geometry to determine the model's location and size.

Making Mid-poly Models
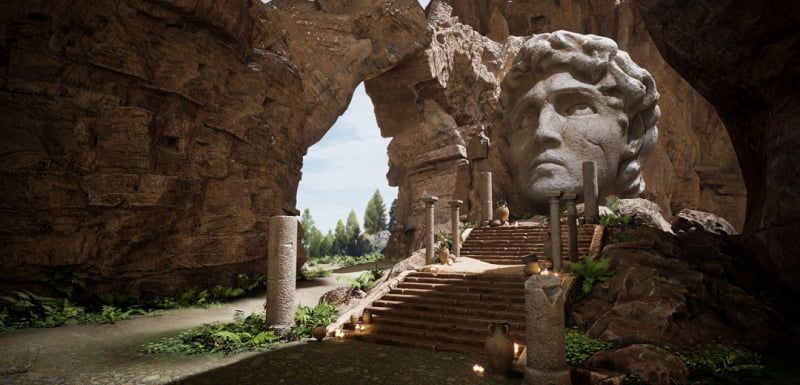
After determining the large scale of the scene, we split the scene into various parts according to the size and complexity of the model. We divided the whole scene into four parts: the main statue, the ground and steps, the side walls and reliefs, and the column and beam patterns, after which we started working.
God statue part: This part was the biggest difficulty for us who had almost no experience in ZBrush. As the visual center of the whole scene, we felt that it was important to ensure the integrity and coordination of the god statue and the base. Therefore, although the workload of the posterior high-poly model sculpting is heavy, we still decided to let the same person be responsible for the whole part of the god statue.
Ground part: This part was a large area, but the models of bricks, steps and fire pits could be reused a lot. As long as the carving and material of the stone bricks were perfected,we could get a good result in the end.
Side walls part: In this part, the wall was made in the same way as the floor, but with some additional figurines and Buddha head decorations. In the discussion and analysis, we found that these decorations were also important for the display effect in the post-rendering, so this part also became the focus of production.
Column and beam part: The column is not a small part of the scene, it mainly shows the pattern and reliefs on the column surface. The modeling of this part was not very difficult, but we put a lot of effort on the material production and volume performance in the later stage.

In the process of making the mid-poly model, we needed to perfect the details of the model and control the scale. We also put a lot of effort into the wiring, which facilitated the addition of lines and sculpting of the high-poly model later. Since this was a multi-person co-production, so in order to ensure that the scene would not lose its integrity, we integrated all the models after we finished our job every day and checked them to ensure that the overall scale size would not be wrong.
Making High-poly Models
Since we had almost no experience with ZBrush sculpting before, we were very apprehensive when we started to sculpt the high-poly model. But to our surprise, the production process was very smooth and the final result of the sculpting of high-poly model was good.


During the process, we had a lot of experience sharing about sculpting, discussing mainly the categories of different types of structures, such as brick type and statue type. The purpose was to ensure the same or similar structures were carved with roughly the same accuracy and to ensure the coordination of all parts of the scene. At the same time, for some details of sculpting, such as cracks, breaks, bumps and undulations, we exchanged and shared some experiences on the use of brushes, and learned from each other's brilliant spots to improve our personal responsible parts.
Making Low-poly Models
In this part, the complex structure was mainly topologized using TopoGun.

We quickly got the low-poly model of the model with simple structures by matching the high-poly and low-poly models. For complex models such as statues and Buddha's head, we got the low-poly model by manual topology. This process was relatively simple and required patience and control of the smoothness of wiring.
Making the Materials
In addition to making the texture of different materials, we also wanted to strengthen the sense of volume of the model. Moreover, since the materials were made by four people, each person made the same material in a different way, then the final performance would be deviated, resulting in an abrupt and uncoordinated effect of the scene. So in order to ensure the uniformity of the material performance, we increased the frequency of checking during the production process. We mainly standardized the inherent color, roughness, and metallicity of similar materials, as well as sharing our experience with each other on some details, such as the selection of miscellaneous colors for rocks.


We strengthened the light and dark parts, enhanced the volume and top-bottom relationship of the model, and adjusted its roughness to make the model material more harmonious and natural. After that, we painted the texture and details of the material to make the story of the model as perfect as possible.
Rendering
We used Marmoset Toolbag for the final rendering, restoring the atmosphere of the scene by adding warm and cold lighting, setting the fog, and enhancing the performance of the visual center. Also, the highlights and the firelight spreading to the surrounding area should be performed naturally.

Finally, the organization of the files should be carried out with strict specifications, from the naming of the files to the organization of the models. During our cooperation, the unified file naming and cleanly sorted model files significantly improved the work efficiency.
Final result:

The above is the tutorial and sharing of the process of making this God statue scene.
Source: ZCOOL
Recommended reading
Top 9 Best And Free Blender Render Farms of 2025
2024-12-30
Revealing the Techniques Behind the Production of Jibaro "Love, Death & Robots", Which Took Two Years to Draw the Storyboard
2025-02-10
Top 10 Free And Best Cloud Rendering Services in 2025
2025-03-03
Top 8 After Effects Render Farm Recommended of 2025
2025-02-10
Top 5 Best and Free 3d Rendering Software 2025
2025-02-10
Shocked! The Secret Behind Using 3D to Make 2D Animation was Revealed!
2025-02-10
How to Render High-quality Images in Blender
2024-12-04
Easy Cel Shading Tutorial for Cartoon in Blender Within 2 Minutes
2025-02-10
Partners
Previous: 3D Tutorial of Next-generation Scene "Magic Book Room"
Next: 3D Tutorial: "Water Temple" Scene Production
Interested


