The Ruins of David Made With 3ds Max & ZBrush

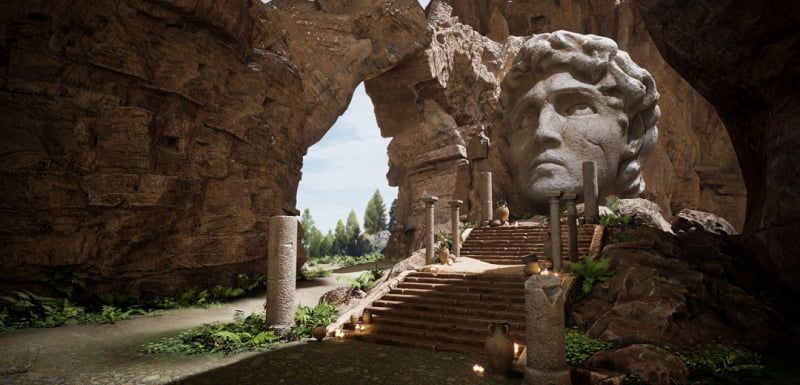
In this article, Fox Renderfarm, a leading cloud rendering service provider and render farm in the CG industry, will share with you a 3D scene called "The Ruins of David" that was collaboratively created by a student team over a span of 4 weeks with the PBR process.
Final result:


Observing and Analyzing Concept Art & Asset Allocation
Our reference was inspired by the work of a skilled artist we found online. It was our first attempt to collaboratively create a PBR scene from start to finish as a team. Throughout the process, we were constantly exploring and learning, but fortunately, we managed to complete the project in the end.
For our scene, sculpting played a major role. We followed a production workflow that involved using 3ds Max for rough modeling, ZBrush for high-resolution sculpting, and then Topogun for creating low-polygon topology. During the high-resolution phase, we utilized KeyShot for rendering. Afterwards, we used Substance Painter, Photoshop, and Pixplant for texture and material creation. Finally, we rendered and outputted the scene using Unreal Engine 5.
To ensure collaborative work while maintaining overall proportion unity, we initially need to establish the rough shape proportions and object placement based on the concept art. Afterward, we assigned tasks and divided the entire scene into five parts: the head of David, the distant mountains, the stairs and platform, the pillars and ornaments, and the background mountains with nearby rocks along with the obscured mountains in the foreground.

Asset allocation chart

Large-scale scene construction
Making Mid-poly Model
In this scene, the only parts that required mid-poly modeling were the stone pillars, steps, and other small objects. For the rest of the scene, we mainly used a box or sphere shape and directly imported them into ZBrush for sculpting.

Mid-poly model of small objects
Making High-poly Model
Compared to the leisurely mid-poly modeling stage, the high-poly modeling phase is much more lengthy and complex. Approximately 90% of the entire scene required using ZBrush for high-resolution sculpting. Since most objects during the mid-poly modeling stage were very rough, we not only had to shape them but also focus on capturing intricate details. We conducted extensive research and decided to focus on creating a desert and wind-eroded terrain. The majority of the artificial objects in the scene were made of sandstone. During the sculpting process, we had to ensure the integrity of the main structure while considering the effects of wind erosion on the material surface, such as which structures would be eroded and which ones would be preserved. We went through many trial-and-error stages. Initially, we struggled with rigidly replicating the structures, but with guidance from our instructor, we eventually found the correct approach. By closely observing real mountains and wind-eroded statues, we finally achieved the desired aesthetic.

Sculpting of Mountain Stones

Sculpting of pillars and small objects

Sculpting on the side of the stone
When creating the sculpture of David, as it was our first time sculpting a human figure, we had to make countless modifications just to get the lips right. One moment, it would resemble a rugged, masculine face, and the next moment, it would transform into a delicate, feminine one. It must be said that facial sculpting for the character was indeed one of the challenges in this scene. Even the slightest change could disrupt the overall proportions. There were moments when I looked at the ugly face I sculpted and felt like giving up. Fortunately, with guidance from our instructor and numerous revisions, we were able to somewhat capture the essence of Michelangelo's David.

Sculpting of the Statue of David

Failed version
Of course, there were many other challenges besides these. The making of the candles was also a headache. We struggled for a long time to recreate the true essence, so we decided to simply buy two large candles. We burned them day and night until they finally took on the appearance we desired.

Candles dedicated to the arts

Sculpting of candles
Making Low-poly Model
If the previous process was more like creation, then making the low-poly models is more like streamlining and finalizing the previous work. We used two methods to create low-poly models. One method involved using ZBrush's automatic retopology tools to generate the low-poly models, and then organizing the topology in 3ds Max through subtraction. The second method, used for objects like heads and candles, involved using Topogun for retopology. This method required patience and attention to detail. We needed to ensure simplicity, comply with proper topology standards, and also preserve the silhouette contours and main structures as much as possible.

Low-poly of Statue of David
After the topology phase, we moved on to the stage of UV unwrapping and baking normal maps. UV unwrapping may seem like an ordinary process, but it actually has a significant impact on the final result. If not done properly, it may even require rework in the later stages. To ensure consistent UV size, we adopted a pixel density of 256 pixels per cubic meter (256/m³) for our production.
After the UV layout was completed, the next step was baking. We needed to match the high-poly and low-poly models as closely as possible in 3ds Max, ensuring minimal gaps or low matching accuracy. Afterwards, we exported the models to Substance Painter for baking the normal maps and ambient occlusion (AO). However, due to our limited experience, we often encountered rainbow artifacts, which required numerous iterations of rework. In some cases where certain issues were difficult to resolve, we directly hand-painted the normals using Photoshop to solve the problem.
For different materials, we adopted a method of using material balls to differentiate them. It is crucial to have standardized naming conventions for the material balls, as any lack of consistency in naming can lead to significant difficulties during the later stages of production.
Making Materials
We put a lot of effort into sculpting the details, while the material aspect was relatively easier. We adopted the standard PBR (Physically Based Rendering) workflow for material creation. We focused on establishing the overall volume first and then added specific details such as weathering and cracks. Unlike individual material creation, the team's material production required coordination among members to achieve a unified artistic style and texture. Objects with the same material were assigned identical generators and material balls to maintain consistency in the art style, while incorporating different details to avoid excessive repetition.
To avoid significant discrepancies between different team members' work, we would apply similar materials to the engine and observe the overall effect. This allowed us to determine how to modify the materials to ensure a consistent and cohesive final result.
Rendering
From the beginning of the production, we planned to do the final rendering in UE5 (Unreal Engine 5). In order to achieve this goal, we worked overtime and studied UE5 for more than a week. During this stage, we faced considerable difficulties and had to explore and learn as we progressed. We were challenged by various nodes and encountered obstacles along the way. Thankfully, we managed to resolve most of the issues in the end.

Making of terrain material balls
Candle making was also a challenging aspect. In order to achieve the effect of flickering flames and dynamic firelight, we chose to use the Niagara particle system for the candle. We worked overtime for several days specifically to study and develop this relatively fundamental effect for the candle's flame.

Fire particle effects

Rendering
Conclusion
The above is our experience and insights into the entire production process. Together, we faced many unprecedented challenges and encountered new software and knowledge. However, with the collective efforts of all team members, we successfully overcome those obstacles. We would like to express our gratitude and appreciation to everyone for their hard work and dedication!
Fox Renderfarm is a 3ds Max cloud rendering service provider and 3ds Max render farm dedicated to bringing more useful tutorials to our 3ds Max users. We are offering a free $25 render trial to all new users, get rendering to free up your computer now.
Source: Thepoly
Recommended reading
Top 9 Best And Free Blender Render Farms of 2025
2024-12-30
Revealing the Techniques Behind the Production of Jibaro "Love, Death & Robots", Which Took Two Years to Draw the Storyboard
2025-02-10
Top 10 Free And Best Cloud Rendering Services in 2025
2025-03-03
Top 8 After Effects Render Farm Recommended of 2025
2025-02-10
Top 5 Best and Free 3d Rendering Software 2025
2025-02-10
Shocked! The Secret Behind Using 3D to Make 2D Animation was Revealed!
2025-02-10
How to Render High-quality Images in Blender
2024-12-04
Easy Cel Shading Tutorial for Cartoon in Blender Within 2 Minutes
2025-02-10
Partners
Previous: The Key Differences Between Cloud Rendering and Local Rendering: Which is Right for You?
Next: Top 5 V-Ray Render Farms in 2025
Interested


