3ds Max Tutorials of “God of War 86"(1)

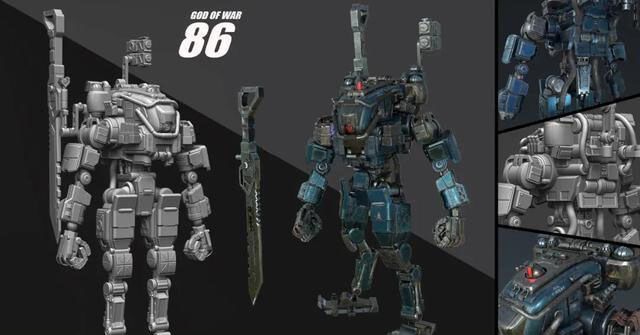
The fastest GPU & CPU cloud rendering services provider and render farm, Fox Renderfarm still share with you 3ds Max tutorials. This project is made by the 3D artist, Yuliang Zhou. He made the "God of War 86" in 3ds Max, Substance Painter, Photoshop, and others. In this tutorial, he will introduce his workflow.
Introduction
In this tutorial, I will share the production process of one of my works "God of War 86" finished within 3 weeks. To complete a mecha within 3 weeks, it is a big challenge. Thanks for the help of my friend Xiao Zuo. I will also share the whole production process and some techniques used, including modelling, texturing lookdev, and lighting.

Concept/References
When choosing a concept, it needs to make some preparations in advance. When I saw the figure of the 86 Mecha Ares, I was like making a 3D model of it. The production of this model is not difficult, but it has a lot of small parts that take time to produce. And the difficulty lies in whether the overall proportions can be the same as the original image.

I really like to add some of my own ideas when making models to enrich the work, so I will also find some reference pictures of other mechas on the Internet before starting to make them.

Blocking
Once the concept is clarified, we can start to make the model. The first step is to use the blocking of the basic shape BOX to make the appearance. In this process, we must ensure that the basic shape is the same as the appearance of the reference. It does not need to be smoothed. We can make the foundation body in all places first. When the foundation body is done, open all the parts, and then make the details for each position. Do not start with small parts in a certain part from the beginning.

I added some details to the model, such as the anti-collision bar of the head guard, pipes, wires, and some small parts to make the mecha more realistic. Hence, it is really important to find references! Next, I will briefly explain the process of a part when I make a mid-poly model. Here I have selected the main body of the head.

We can see the basic shape of the head, the part of the red frame is a cuboid with a smaller front part. The green line is where the model is recessed. It takes time to make a slightly complicated structure like this. Once we have ideas, it will be relatively simple for us to start production. After adjusting the points and adding lines, we get the following model,

Next, let’s look at the yellow circle again. It is obvious that there is a model similar to a lighting lamp stuck in the brain in the yellow circle. At first, I thought that just make a lighting lamp and insert it directly. But after I tried it, I can obviously see that there will be many connection problems in the interspersed place, and it will obviously feel fake when making the material. I will release the comparison chart below,


It can be clearly seen from the above two pictures that the method of using Boolean to create a pit in the first picture is obviously more realistic and reasonable than the direct interspersed in the second picture. In contrast, there will be a little difficulty in the card line.
Part 2 and Part 3 will be continued soon.
Recommended reading
Top 9 Best And Free Blender Render Farms of 2025
2024-12-30
Revealing the Techniques Behind the Production of Jibaro "Love, Death & Robots", Which Took Two Years to Draw the Storyboard
2025-02-10
Top 10 Free And Best Cloud Rendering Services in 2025
2025-03-03
Top 8 After Effects Render Farm Recommended of 2025
2025-02-10
Top 5 Best and Free 3d Rendering Software 2025
2025-02-10
Shocked! The Secret Behind Using 3D to Make 2D Animation was Revealed!
2025-02-10
How to Render High-quality Images in Blender
2024-12-04
Easy Cel Shading Tutorial for Cartoon in Blender Within 2 Minutes
2025-02-10
Partners
Previous: 3ds Max Tutorials of “God of War 86''(2)
Next: Making a Japanese-style Scene in 3ds Max(2)
Interested


