3ds Max Tutorials of “God of War 86''(2)
Continue the 3ds Max Tutorials of “God of War 86”(1), the fastest GPU and CPU cloud rendering services provider and render farm, Fox Renderfarm still share with you how to create "God of War 86" in 3ds Max.
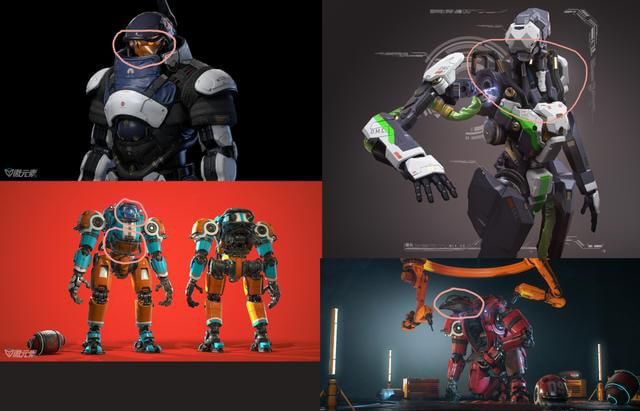
Next, I will explain how I added some details by referring to the picture. First, analyze the original painting. we can clearly see that in terms of the accuracy of the original painting’s model, it can only be regarded as a hand-held mecha. Many of the mecha details have not been made. The following is an analysis of the reference I found.
References,

We can see that the heads of these mechas all have a bumper similar to the head protection. So we can consider adding this detail to the head position when making the head.

In order to consider the rationality, I added a model similar to a retainer at the end of the protective bar and added some similar protective sleeves to reduce impact in the middle. Next, we continue to analyze the references.


On these mechas, there are obviously similar wires and small pipes interspersed on the model. This is what we want because these will make the mechas more accurate. So when I make these details, I also have to consider whether I was reasonable or not.


By constantly adding details, the mecha model is made to look a little more refined, and the presence of those parts looks real and reasonable.
High Polygon
I use the traditional way of making hard surface models and the Chamfer plug-in. The higher version of 3ds Max comes with a Chamfer plug-in, which will cut corners and card lines based on the distinction of smooth groups, which is very useful for hard surfaces making. This is a screenshot according to Chamfer:

It should be noted that in the From Smoothing option, we need to check the third Unsmoothed Edges option. In the Tension option, we also need to call up our desired edge between 1 and 0 according to the effect.
One more thing to note is that before using Chamfer, the smooth groups must be distinguished. All surfaces do not need to be connected to a quadrilateral, but there will be no problems if the lines are connected to a flat surface.
It can be seen that the effect of using Chamfer is very good, saving us a lot of working time, and improving work efficiency very well!


Low Polygon
Low Polygon production is actually a very simple step. It just needs to copy a set of High Polygon models to reduce the lines on the model without affecting the appearance. Since this is personal work, there is no need to be too strict on the number of faces, and it can be relaxed appropriately.
Low Polygon

The part 3 will be continued soon.
Recommended reading
Top 9 Best And Free Blender Render Farms of 2025
2024-12-30
Revealing the Techniques Behind the Production of Jibaro "Love, Death & Robots", Which Took Two Years to Draw the Storyboard
2025-02-10
Top 10 Free And Best Cloud Rendering Services in 2025
2025-03-03
Top 8 After Effects Render Farm Recommended of 2025
2025-02-10
Top 5 Best and Free 3d Rendering Software 2025
2025-02-10
Shocked! The Secret Behind Using 3D to Make 2D Animation was Revealed!
2025-02-10
How to Render High-quality Images in Blender
2024-12-04
Easy Cel Shading Tutorial for Cartoon in Blender Within 2 Minutes
2025-02-10
Partners
Previous: Blender Tutorials: Production Process of 3D Artwork Crazy Fans(1)
Next: 3ds Max Tutorials of “God of War 86"(1)
Interested


