C4D Tutorial: To Making A Cool Service Robot

I suddenly had an idea to make a robot with C4D. But this is just a rough idea, I need to find some reference pictures. But in the beginning, I don't have to worry about making it first. The idea is very important. I want to do what I want first, what does the robot look like? What is its purpose?
What I want to do is a service robot, which has a very cute shape. So I plan to use rounded corners to construct the overall shape. So I am looking for a reference picture on this basis.

Initial sketch
After looking for a lot of reference pictures, I already have a rough sketch in my mind. I draw down the sketch, and this sketch is used in the process of making the model.

Probably, you can enrich the details on this basis.
C4D production
You can import the sketch into C4D in JPG format and then create a robot model based on the sketch. I first created the body of the cylinder making a robot and then added some details to the body.

The production of the lamp in the middle of the body is relatively simple. I recreated a cylinder and turned it into a subdivision, adding details to make the body's lights. Then, according to the same production method, the place where the robot shoulders move and the body link are made with a sphere.

The shoulders are also made with new spheres, then add subdivisions and details, and the arm is made in the same way. The details that need to be paid attention to are made in particular, especially the spacing of the slits that must be squeezed in.

The part of the finger is very simple. I remove the faces on both sides of the cylinder, then squeeze all the faces out of thickness and then copy an adjustment direction and node. After the three knuckles are finished, a new sphere is added to the middle part to make the joint.

Next, make a device on the arm, you can create a new cube, drag the node to modify the overall shape. The two raised parts on the device are randomly added, which can be played at will. Copy one arm after one arm is done.

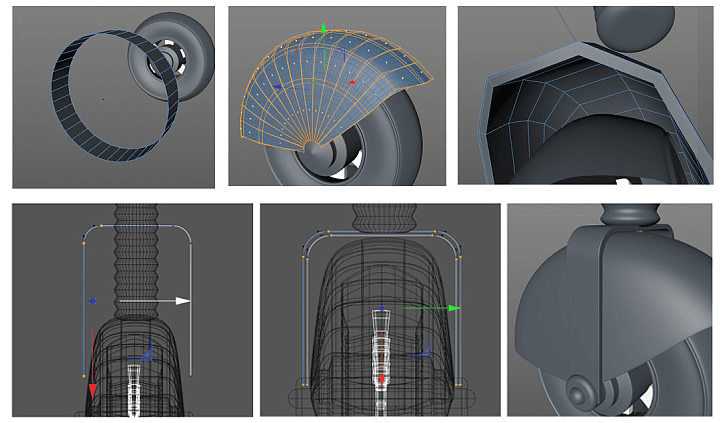
Now the part that makes the robot to connect the waist is made in a very simple way. However, there is a buffer bearing in the place where the wheel is linked. This size can be grasped by itself. The wheel is made using a disc and then made according to a realistic tire model.

Making a wheel cover is very simple.

The model of the robot head is very simple, that is, the semicircular sphere plus the C4D's own sphere is used as the eye, and then the tire and the previous part are spliced.

Now that the robot is missing something, I want it to be placed on the plate with one hand and a towel. And there is one less thing in the place where the hands and arms are connected. Just add it up now.


Post-production adjustment
Be sure to adjust later in the rendering. The robot uses C4D's default renderer to make the final rendering results, and then adjusts the effects of light and shadow in a later way.

Recommended reading
Top 9 Best And Free Blender Render Farms of 2025
2024-12-30
Revealing the Techniques Behind the Production of Jibaro "Love, Death & Robots", Which Took Two Years to Draw the Storyboard
2025-02-10
Top 10 Free And Best Cloud Rendering Services in 2025
2025-03-03
Top 8 After Effects Render Farm Recommended of 2025
2025-02-10
Top 5 Best and Free 3d Rendering Software 2025
2025-02-10
Shocked! The Secret Behind Using 3D to Make 2D Animation was Revealed!
2025-02-10
How to Render High-quality Images in Blender
2024-12-04
Easy Cel Shading Tutorial for Cartoon in Blender Within 2 Minutes
2025-02-10
Partners
Previous: 3D Sci-Fi Challenge
Next: Minuscule 2 Mandibles From Far Away Will Be On-Screen In China On August 23
Interested


