Blender Retopology Guide: Clean Mesh for Better Rendering
High-poly 3D models can quickly become difficult to animate, edit, and render efficiently in Blender. After detailed sculpting, many artists end up with dense meshes that slow down workflows and create problems during animation or rendering.
This is where Blender retopology becomes essential. Retopology helps convert complex geometry into clean, optimized meshes that are easier to animate, texture, and render. In this guide, you’ll learn how Blender retopology works and how to build cleaner, render-ready 3D models with a more efficient workflow.
Part 1. What Is Retopology in Blender?
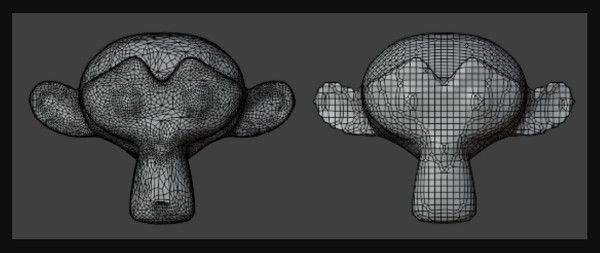
Blender retopology is a process of simplifying a complex, high-polygon model into a clean and organized mesh. When you create a detailed sculpture in Blender, let's say a character face, the model is composed of millions of disorganized polygons. While this looks great, it is too heavy to animate or render, and retopology is the act of drawing a new polygon surface over the sculpt to make it functional.
Core Retopology Tools in Blender
Since this technique can improve animation, reduce polycount, and fix chaotic topology, here are some tools used in Blender retopology:
- The Snapping Tool (Face Project): This is the foundation of manual retopology; here, enable the “Magnet” icon and set the snapping mode to “Face Project.” After that, any vertex you move or extrude will automatically stick to the surface of your high-poly model.
- The Shrinkwrap Modifier: While snapping handles the placement of vertices, the Shrinkwrap Modifier acts as a safety net. It mathematically forces your new mesh to wrap around the target object like a tight layer of plastic. Ideally, it is used in combination with an “Offset” value to prevent the new mesh from clipping inside the sculpt.
- BSurface Add-on (Extension): BSurface allows you to draw strokes with the “Annotate” tool and instantly run them into a mesh surface. As a result, it is easy to create polygonal strips around cylindrical shapes such as arms, legs, or fingers.
- Poly Build Tool: Mainly found in the left-hand toolbar in the “Edit” mode, the Poly Build tool lets you click and drag edges to create new faces instantly. It's the artistic way of Blender retopo, and it feels like drawing the mesh piece by piece.
- Loop Cut and Slide (Ctrl + R): Essential for maintaining good edge flow, Loop Cut lets you add resolution only where needed, such as extra loops around the eye. Thus, this ensures the model can deform correctly during the animation.
- Auto-Retopology: QuadriFlow and Voxel Remesh: If you are in a rush and don’t need perfect edge flow for animation, Blender’s Remesh tab in the “Object Data Properties” provides automated solutions. There, “Voxel Remesh” is best for combining shapes during sculpting, and “QuadriFlow” automatically creates a clean quad-based mesh. Even though it's not best for characters, it's an ideal time saver for static props.
Why Retopology Is Important in 3D Work?
Prior to learning how to retopo in Blender, know that retopology bridges the gap between a raw sculpt and a functional, professional asset. Besides that, the following 5 reasons highlight why this reconstructing method can be helpful in any 3D work:
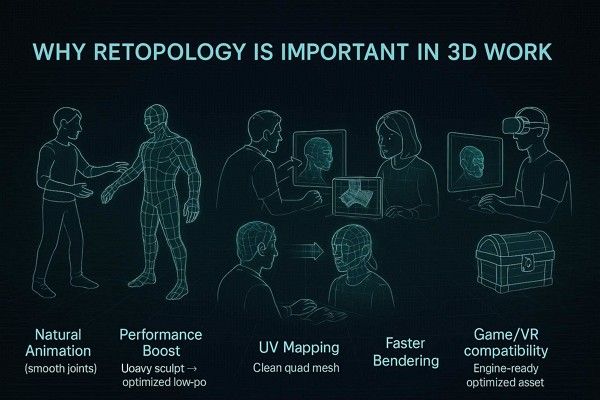
- Natural Animation and Deformation: Clean retopology creates organized edge loops around joints, such as eyes and knees. This allows your 3D characters to bend and stretch realistically without ugly mesh glitches or pinching during movement.
- Performance Optimization: Sculpted models often have millions of polygons, which can cause software lag or crashes. Thus, retopology simplifies the geometry into a low-poly version to ensure your computer stays fast and responsive while you work.
- Clean UV Unwrapping and Texturing: Applying textures to a messy sculpt is nearly impossible, and a retopologized mesh provides structured, four-sided faces. Hence, they are easy to flatten into organized UV maps, resulting in much higher-quality painting and material details.
- Efficient Rendering and Baking: Fewer polygons mean faster processing, and retopology allows you to reconstruct tiny high-poly details into a smooth mesh. Since this is done using normal maps, it gives you a cinematic look while drastically reducing the time spent waiting for the render to finish.
- Compatibility with Game Engines: Modern game engines require optimized models to maintain high frame rates. This is where retopology ensures your 3D assets meet strictly polygon budgets, making them ready for real-time interaction in virtual reality or video game environments.
Part 2. 5 Common Cases Where Retopology Is Needed
While leveraging 3D retopology services in 3D workflows, it ensures that models are functional and efficient. As an artist and animator, if you are eager to know where you can use the retopology reconstruction technique, here are 5 major use cases:
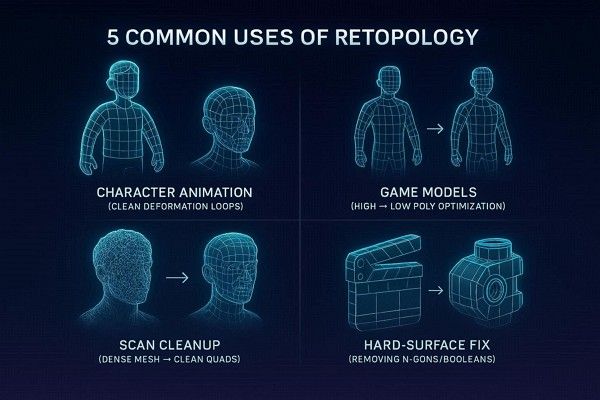
- Character Animation and Rigging: When you sculpt a hero character that needs clear edge loops around the mouth and eye, retopology steps in. This allows for natural skin deformation and smooth movement without mesh glitches.
- High-to-Low Poly Baking for Games: Artists must retopologize high-frequency sculpts to meet strict draw-call and triangle-count budgets for real-time engines. Thus, retopology ensures clean tangent-space normal-map baking without projection artifacts or skewed shading.
- Cleanup of Photogrammetry and 3D Scans: Raw scans produce dense triangular meshes that are impossible to UV-unwrap or edit manually. To enable clean displacement maps and professional integration, retopology converts this noise into organized subdivision-ready quads.
- Improving Hard Surface Models: Boolean operations on mechanical parts often create N-gons that cause pinching in the MatCap view. Thus, this technique restores a manifold, all-quad structure to ensure the Subdivision Surface modifier generates smooth, artifact-free curvatures.
- Efficient Rendering for VFX: Optimized topology minimizes BVH build times and memory usage during ray tracing. This is essential for processing massive cinematic scenes and complex simulations without crashing the render engine.
Part 3. Step‑by‑Step Retopology Workflow in Blender
From using the Blender retopo add-on to other tools, the retopology in Blender follows a specific sequence of preparing the poly model. Later, you can set up the environment and the new geometry, as mentioned in the given detailed workflow:
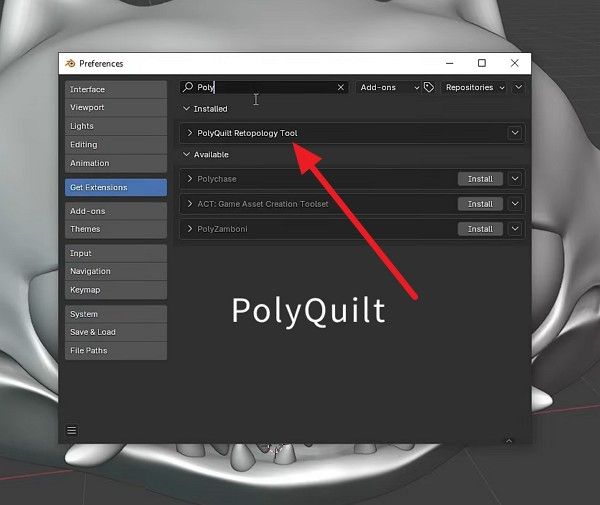
Step 1. For manual retopology with the PolyQuilt tool, go to the “Edit > Preferences > Extensions” and search for “PolyQuilt” to install and enable it.
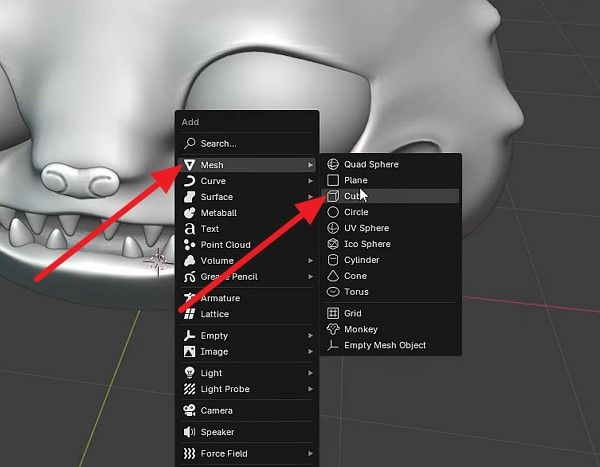
Step 2. After that, right-click anywhere and choose the “Mesh” option, and add the “Plane” object.
Step 3. Now, switch to the “Edit” mode, select the single face, and press the “X” key to delete it. At this point, enable the settings such as “Retopology” in the Shading section and “X-Symmetry.”

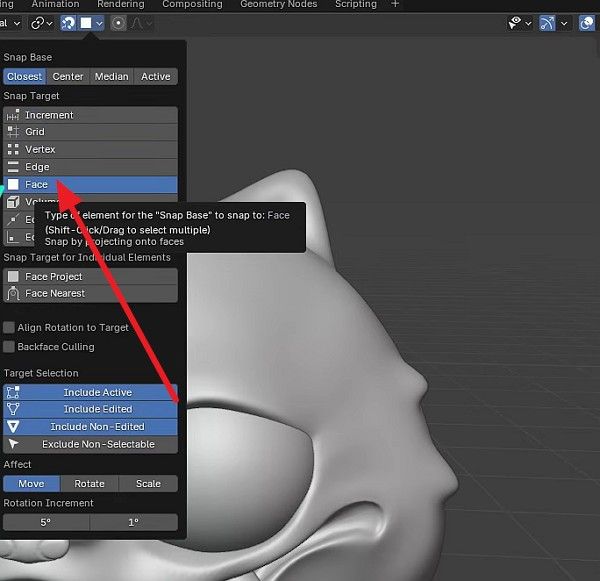
Step 4. Now, stretch the menu to snap, and turn on the “Face” option in the list.
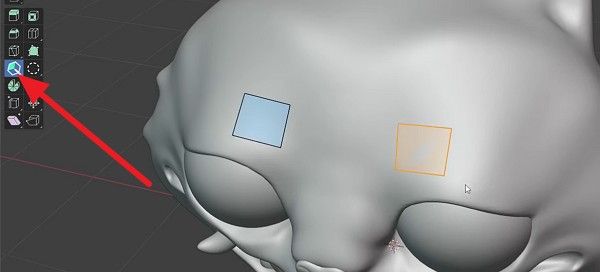
Step 5. Go to the left-side toolbar, select the “PolyQuilt” tool icon, and click the four points to create your first quad; it will shape to the sculpt surface. Hover over an edge and drag the arrow to create a new face and move the vertices close to each other to auto-merge them. Now, hold the “Shift” key while using the tool to activate the “Relax Brush” and smooth out messy edge loops.
Part 4. Retopology to Rendering: Complete Workflow
Moving from a messy raw sculpt to a production-ready image requires a disciplined technical pipeline. Thus, this Blender auto retopo workflow ensures that your vision is transformed into a file that is light enough to handle complex lighting and animation. Follow the given steps and learn how to handle high-poly data efficiently before the baking and rendering process:
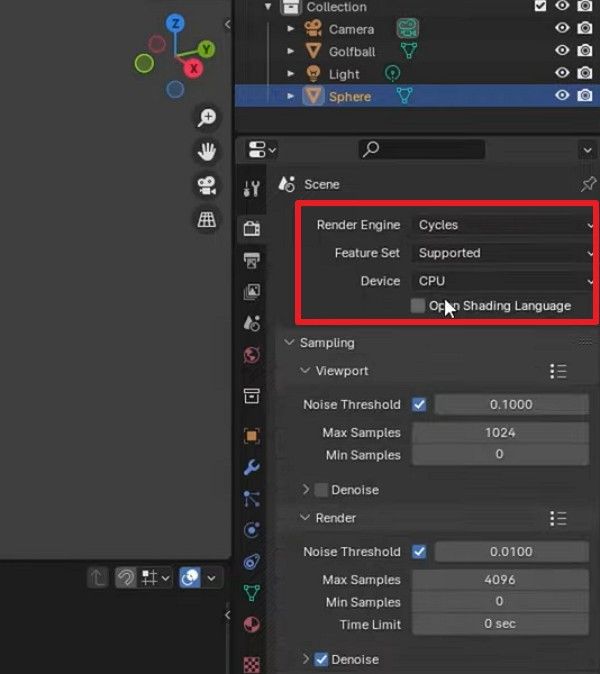
Step 1. Open the “Render Properties” and change the “Render Engine” from Eevee to Cycles, and set the device to “GPU Compute” for fast processing speed.
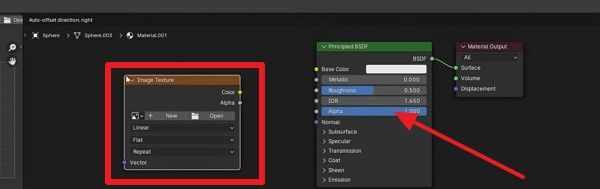
Step 2. In the Shading tab, add the “Image Texture” node and name it Normal Map while setting your desired resolution and disabling “Alpha.”
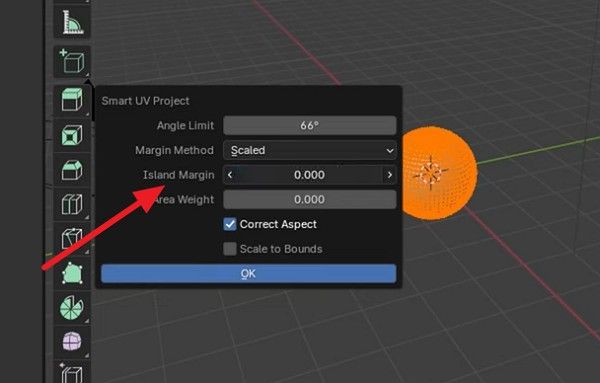
Step 3. Ensure your low-poly model is unwrapped, and right-click to access the “Smart UV Project” with an Island Margin of “0.05” to prevent overlapping.
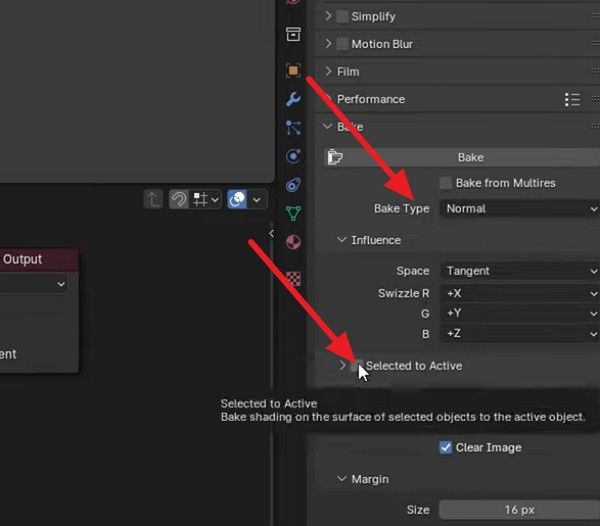
Step 4. Keep the new Image Texture node selected and do not plug it into anything yet. Choose the high-poly model first, then press “Ctrl” and select the low-poly model last. After that, set the bake settings under the “Bake” section and choose parameters like “Bake Type” to “Normal” and enable “Selected to Active.”
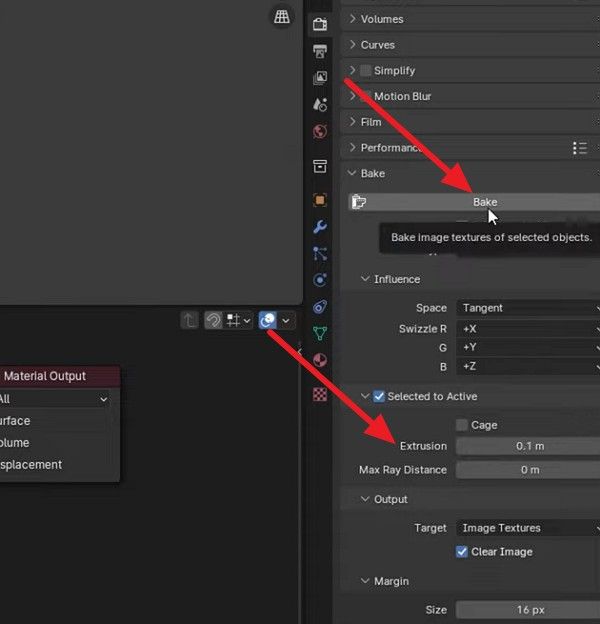
Step 5. Within the same window, set “Extrusion” to 0.1 and adjust “Samples” to balance speed and quality. Finally, press the “Bake” button and save the generated image so it isn’t lost.
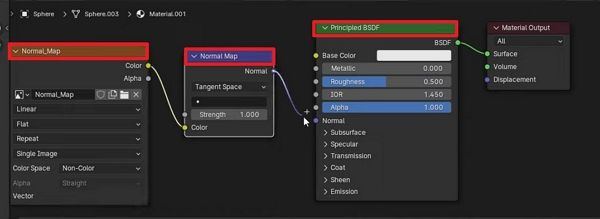
Step 6. Now, change the Image Texture’s Color Space to “Non-Color” and plug it into a “Normal Map” node. Then connect that node to the “Normal Input” of your Principled BSDF. This process will reduce the geometry from 1.4 million vertices to just 2,000 while keeping the visual detail.
For large-scale scenes or high-resolution animations, cloud rendering can further improve workflow efficiency. A render farm like Fox Renderfarm helps process complex rendering tasks in parallel, reducing render times and freeing up your local system for continued production work.
Part 5: 5 Practical Tips for Better Retopology and Rendering
While using manual or auto retopology in Blender, achieving professional results requires more than just drawing lines. To balance the technical precision with the rendering efficiency, here are the 5 practical tips to elevate your workflow:
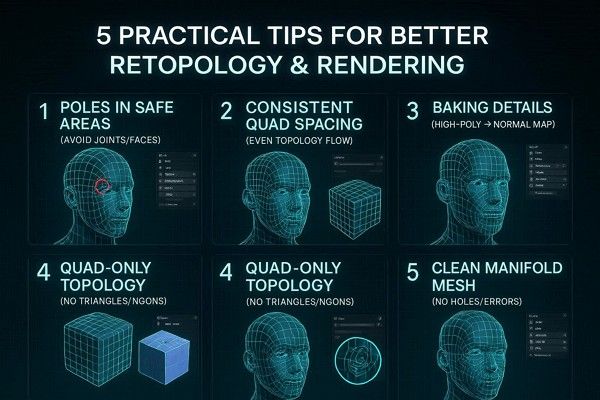
- Place Poles in Static Areas: Avoid placing complex junctions where multiple edges meet on moving parts, such as joints or lips. This prevents the mesh from pinching or looking broken when your character speaks or bends.
- Keep Polygon Sizes Consistent: Try to make your four-sided faces roughly the same size across the entire model surface. Even spacing ensures that textures don't stretch and that light reflects smoothly across the object without jumps.
- Use Bakes to Save Detail: Draw a simple mesh over your complex sculpt and bake the fine details onto a flat texture map. This gives you a high-quality look while keeping the file light and easy for your computer to handle.
- Stick to Four-Sided Quads: Always use four-sided polygons instead of triangles or polygons with many sides. Quads are much easier for the computer to calculate, leading to faster render times and fewer visual glitches.
- Check for Manifold Geometry: Ensure your mesh is tight with no holes or internal faces that shouldn't exist. This prevents light from leaking through gaps and ensures that your model behaves correctly in physics simulations.
FAQs about Blender Retopology
1. When should I choose manual over auto-retopology?
Use manual retopology for hero characters that require expressive facial animation or complex joint bending. However, automatic tools like Quad Remesher are best suited for static environment props, background assets, or hard-surface objects where perfect edge flow is less critical than speed.
2. Can I skip retopology for static background props?
Technically, yes, but it is not recommended for professional pipelines. High-poly raw meshes can slow down your viewport and significantly increase BVH build times during rendering. Even a quick decimation or auto-retopo makes the scene much more manageable.
3. Does retopology affect the quality of my textures?
Yes, clean topology allows for logical UV unwrapping, which prevents texture stretching and visible seams. If your topology is messy, your textures will appear distorted in areas where polygons bunch up or twist.
Conclusion
Mastering retopology helps transform dense sculpts into clean, production-ready assets that are easier to animate, texture, and render. With proper edge flow and optimized topology, you can improve both workflow efficiency and rendering performance in Blender.
However, large scenes and high-resolution animations can still place heavy demands on local hardware during final rendering. In these situations, cloud render farm like Fox Renderfarm can help handle complex rendering workloads more efficiently and reduce overall production time.