Beginner Guide: How to Render an Animation in Blender Easily
Many beginners struggle when their Blender animation does not render into a smooth final video. Frames may appear broken, laggy, or low quality, often due to incorrect render settings or workflow setup. This is why learning how to render an animation in Blender is an essential skill for any 3D creator.
Rendering is the process of turning your scenes, lighting, and motion into a complete video output. With the right settings and a clear workflow, it becomes much easier to produce smooth and high-quality results. In this beginner guide, you will learn how to render animations in Blender step by step in a simple and practical way.

Part 1. How to Render in Blender: Animation and Final Output Guide
A well-prepared scene not only saves time but also ensures your final visuals look professional. To become an adept Blender animator, you’ll need to acquaint yourself with several settings, like Frames and Drivers. So, master how to do a proper scene setup before you render in Blender, turning animation into high-quality output:
Scene Setup Before You Render Animation in Blender
For precise rendering, take some time and prepare your scene accordingly to save you from errors or slowdowns:
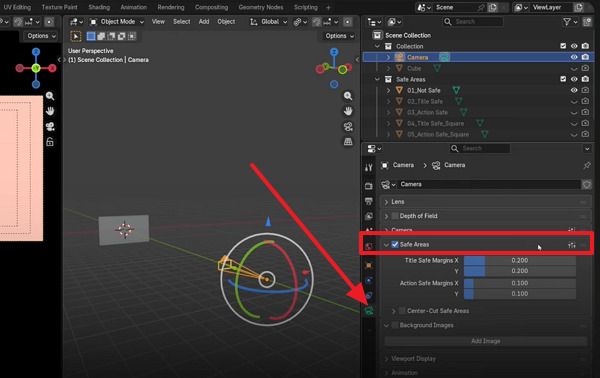
Step 1. At first, access the "Camera" option, go to the Properties Editor, and choose the "Data" icon at the bottom. Now, open the "Safe Areas" option and ensure that Title Safe Margin is "10%" and Action Safe Margin is "7%.”
Step 2. After this, scroll down to “Viewport Display” and open “Composition Guides,” then tick the “Third” option to add grid lines.

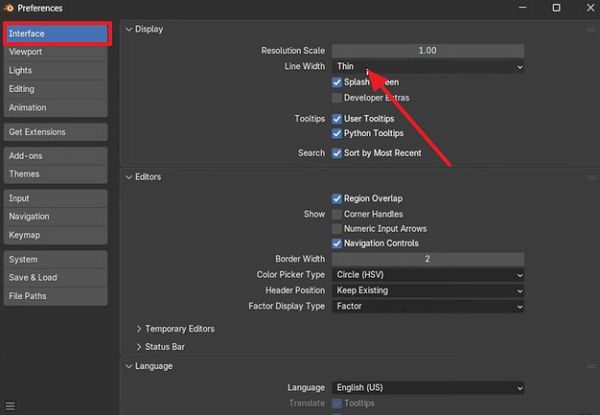
Step 3. Go to the “Edit” tab at the top toolbar, choose the “Preferences” option, and access the “Interface” section. Now, expand the options for “Line With” and select the “Thick or Thin” option as per your need for the grid lines.
Step 4. Scroll down and select the “Memory & Limits” option to maximize the number of “Undo Steps.” Next, click the bottom-left corner and select the “Auto-Save Preferences” option to save the changes.

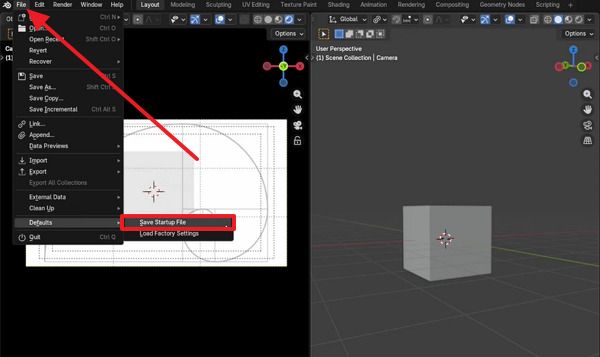
Step 5. In the end, navigate to the “File” tab and hover over the “Default” option to choose the “Save Startup File” option. Doing so, every time you open a new scene, you’ll have your standard settings applied automatically to it.
Part 2. Choosing the Right Render Engine in Blender
The selection between Cycles and Eevee is mainly about balancing realism and speed. It's found that Eevee outperforms Cycles in rendering speed, while Cycles still leads in overall image quality. However, to learn how to render animation in Blender, you’ll need to choose the right one to achieve the visual outcome you’re aiming for.
Cycles vs Eevee: Which Render Engine to Use
Draw your attention to the comparison and understand the core difference between render engines to maintain visual quality during animation:
|
Key Considerations |
Cycle |
Eevee |
|
Render Type |
Path-tracing (physically based) |
Real-time rasterization (game-engine style) |
|
Main Strength |
High realism, accurate lighting, and shadows |
Very fast renders, instant feedback. |
|
Average Speed |
Slower per frame |
Often 2-3× to 4× + faster on same scene |
|
Hardware Needs |
Strong GPU/CPU, more VRAM is helpful |
Runs well on modest GPUs for most projects. |
|
Lighting Accuracy |
Very High (global illumination caustics) |
Good but approximated; some effects limited |
|
Noise and Denoising |
Can be noisy; uses powerful denoisers |
Usually cleaner by default, less noise‑focused |
|
Material Compatibility |
Complete PBR, advanced nodes fully supported |
Shares many nodes, but some effects differ/limited |
If you have to pick one winner, Cycles wins because it delivers physically accurate lighting and high-quality images that hold up in close-ups. However, Eevee is still extremely valuable as a “speed champion” for previews and real-time projects. Where most pipelines use Eevee for fast look-development, Cycles delivers the final quality when it matters most.
Part 3. Best Output Settings for Blender Animation Rendering
For Blender animation, “best” output settings mean a balance of safety, quality, and file size. This approach protects you from crashes and lets you fix only the bad frames, rather than re-rendering the entire movie. After you render in Blender, follow the provided output settings to ensure a smooth and reliable workflow.
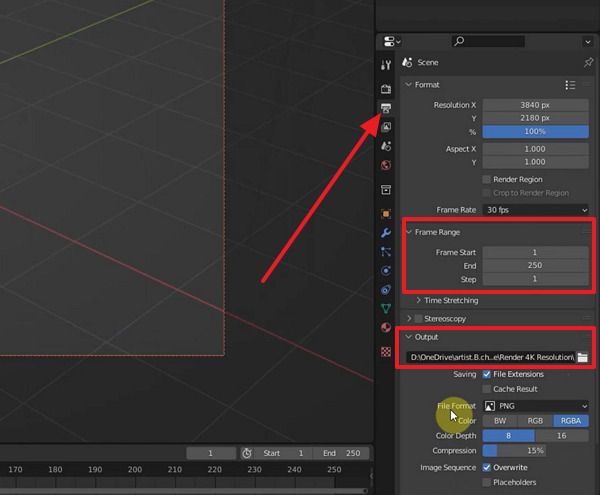
Step 1. Initially, access the “Output Properties” icon, expand the “Frame Range” menu, and adjust it accordingly. Once done, extend the “Output” section and press the “File” icon and choose a location to save the final animation file.
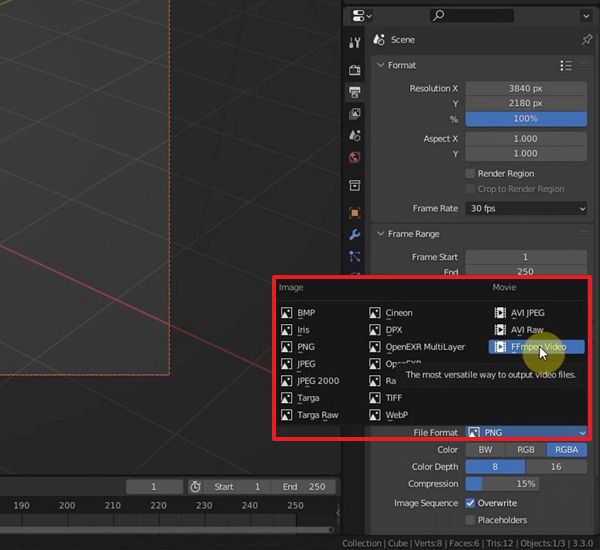
Step 2. Proceed and expand the “File Format” options to choose one for Image or Movie.
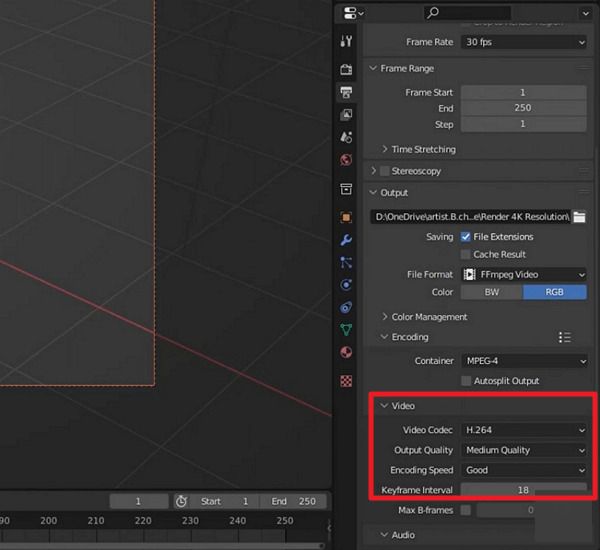
Step 3. From the Video section, specify settings for “Video Codec,” “Output Quality,” “Encoding Speed,” and “Keyframe Interval” as needed.
Part 4. Step-by-Step: How to Render an Animation in Blender
In order to learn how to render an animation in Blender, you'll have to start from scene settings, to output settings, and then finally render. Many tutorials, in this context, recommend a "frame sequence workflow"; render each image as a separate image and combine those into a video. For more clarity, follow the guidelines below and experience a smooth, professional rendering process:
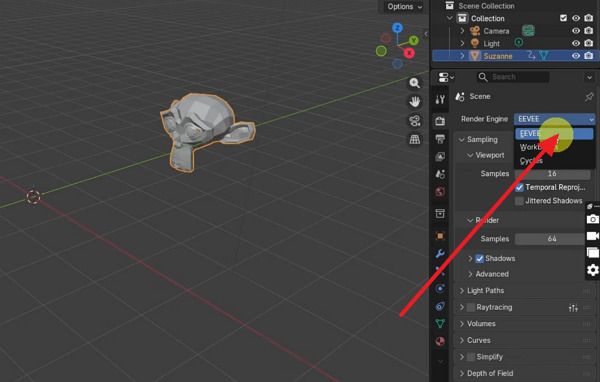
Step 1. From the Properties panel in Blender, press the “Render” icon and choose Render Engine as “Eevee” from the options.
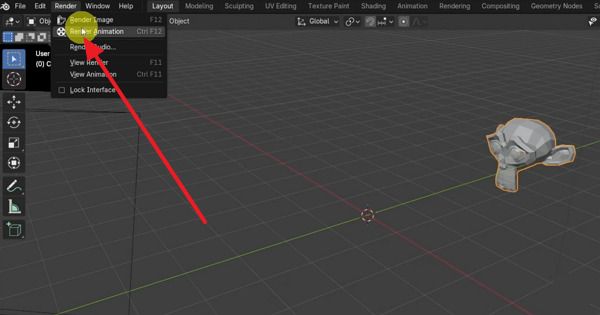
Step 2. Adjust the output settings, then navigate to the Render tab in the top toolbar. Now, choose the “Render Animation” option from the menu to allow Blender to start rendering.
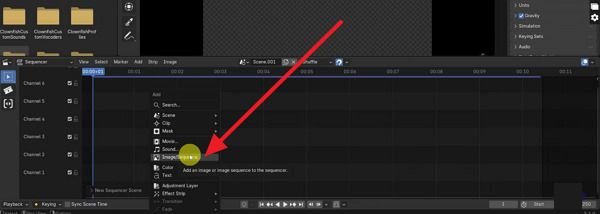
Step 3. Doing so, Blender will render each frame as a separate image. To render those images into a video, press the “+” icon in the top right, choose Video Editing, and select “Video Editing” again.

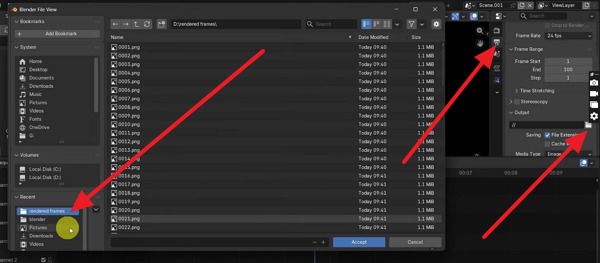
Step 4. Move forward, add a new sequence, and right-click on the space to choose the “Image/Sequence” option. After this, select all the frames in the folder to create an animation from them.
Step 5. Lastly, click the “Output Properties” icon and select the Folder icon to choose the output animation save location. Now, press the folder where you want to save, and ensure that other output properties, including Resolution, are set as previously.
Part 5. How to Render Animation in Blender Faster – Pro Tips
To speed up your Blender workflow and improve render performance, it’s important to understand the key factors that affect rendering, including GPU usage, lighting complexity, geometry, and engine settings.
Use GPU and Optimize Render Settings
In Blender, always enable GPU rendering if your graphics card supports it. Switching from CPU to GPU can significantly reduce render times. You can also reduce sample counts and adjust noise thresholds to balance quality and speed.
Optimize Lighting and Render Complexity
Features like caustics, high bounce settings, and complex light paths can greatly increase render time. Disabling unnecessary caustics, lowering light bounces, and using denoising can help improve efficiency without losing too much visual quality.
Reduce Geometry and Texture Load
High-poly models and large textures slow down rendering. Use tools like Decimate Modifier to reduce polygon count and limit texture resolution for distant objects to improve performance.
Choose the Right Render Engine for Animation
Eevee is ideal for fast previews and animation tests, while Cycles is better for final high-quality output. Enabling Persistent Data in both engines can help reuse calculations between frames and improve rendering speed.
When Local Rendering Is Still Not Enough
Even after optimization, long animation sequences can still take hours or even days to render on a single machine. This becomes a bottleneck in production workflows, especially when working on complex scenes or tight deadlines.
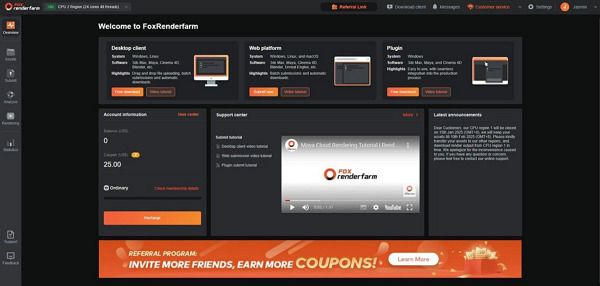
In these cases, cloud rendering becomes a practical solution. A render farm like Fox Renderfarm allows you to offload animation frames to a distributed system, where thousands of CPU and GPU nodes process frames in parallel, significantly reducing total render time.
It also provides a dedicated Blender workflow, helping you prepare, upload, and manage projects more efficiently. With support for both Eevee and Cycles, it fits smoothly into different production needs, from fast previews to final-quality renders.
Frequently Asked Questions
1. Why does my rendered video look different from the preview?
Preview uses low settings, so the results look simple, while the final render uses full-quality output settings. So, check render settings carefully and match preview quality to the final output for accurate results.
2. How many frames should I use for animation?
Usually, 24 or 30 frames per second gives smooth motion for most animation projects. Therefore, the total number of frames depends on the animation length, so plan timing before the start of project work.
3. Can I render animation on a low-end PC?
Yes, but render time remains very long, and the system may slow down during heavy scene-processing tasks. So, reduce the resolution and samples, or use Fox Renderfarm for faster cloud-based rendering support.
4. How do I check the animation before the final render?
Use preview playback in the viewport to view motion and catch mistakes before the final output render. Therefore, test small sections first, so errors stay fixed early and the final render stays smooth.
Conclusion
Rendering an animation in Blender is an essential skill for beginners who want to turn simple scenes into smooth and high-quality videos. With the right render settings, lighting optimization, and workflow adjustments, you can significantly improve both speed and output quality.
However, even with optimized settings, complex animations with high-resolution frames and detailed lighting can still require long render times on a single machine. This often becomes a bottleneck in production, especially when working with tight deadlines or large-scale projects.
In these cases, render farm offers a more efficient solution. Fox Renderfarm helps handle heavy Blender animation workloads by distributing frames across multiple high-performance CPU and GPU nodes, improving both speed and stability. It provides a reliable way to complete rendering tasks faster without overloading your local system.