ZBrush Tutorial: A Sharing of 3D Stylized Cheongsam Women

A Sharing of 3D Stylized Cheongsam Women coevr

In this article, Fox Renderfarm, the best cloud rendering provider and render farm, will share with you Pierson Pang's works of stylized cheongsam girl and approximate production process and experience.

Pierson Pang is a 3D character designer who has participated in many AAA realistic and stylized projects in Europe and America, specializing in European and American cartoons and realism.

A Sharing of 3D Stylized Cheongsam Women 1

© Pierson Pang

He mainly uses the software ZBrush and Blender. Use the sculpting software ZBrush with the emerging set of modeling to render in Blender, can maximize the production efficiency.

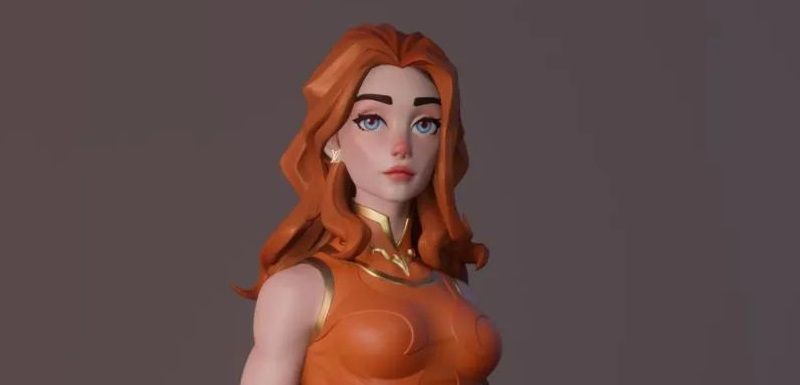
First look at the final result:

A Sharing of 3D Stylized Cheongsam Women 2

© Pierson Pang

A Sharing of 3D Stylized Cheongsam Women 3

© Pierson Pang

A Sharing of 3D Stylized Cheongsam Women 4

© Pierson Pang

1. Ideas and Reference Collection

Pierson initially wanted to do an exercise in generalizing the female body. He combined Chinese femininity and chose the cheongsam for the costume. But at the same time, he wanted to maximize the female form, so made a little change to the cheongsam's shape. Because there was no specific original drawing, he looked for some reference drawings that fit the image in his mind before making it.

He looked for exaggerated anatomical drawings of the form as well as fashion show type for reference, which determined the final direction of the character's temperament. Although there are often improvised ideas in future productions, they are within the larger framework. That's why accurate reference is important, as it guides the right production direction.

A Sharing of 3D Stylized Cheongsam Women 5

© Pierson Pang

2. Making the Model

Compared with realistic characters, the model of stylized characters requires more general refinement and exaggeration of human silhouette structure and muscle anatomy, and focuses on the overall relationship of sparseness, rhythm and hierarchy of the character. And the stylized character will first discard the irrelevant details.

A little advice for beginners:

If you want to exercise sensitivity to body type, then you can do a lot of body type generalization exercises at first, including various body types (fat, thin, women of various body proportions).

Like the following figure: this combination of deformation through the simplest of spheres will maximize the removal of details, thus focusing all attention on the characteristics of the shape itself. Strengthening this exercise will quickly improve one's ability to capture the shape. The same applies to the character's face, which will be more delicate and faint compared to the larger forms.

A Sharing of 3D Stylized Cheongsam Women 6

© Pierson Pang

Back to the cheongsam girl, Pierson did volumetric generalization on the body shape (elbow joint, knee joint, interpolation generalization between each muscle), emphasizing the contrast between the block structure and the curves of the legs and upper arms.

In the profile form, the fullness and curves of the arms and thighs need to be noted.

For blocky hair, you need to pay attention to its rhythmic contrast such as sparse and dense layers. The volume structure of the face is mixed with softness and hardness, so it needs to be interspersed to deal with it. Regarding facial treatment, there are various styles of cartoonish block treatment depending on the project.

Pierson's way is a combination of soft and blocky interspersed treatment, meaning that there is a sense of breathing. In fact, this sense of breathing is throughout the body in his work. How to grasp the overall rhythm? How to choose the detailed contrast of the specific partial rhythm under the overall rhythm is needed to be carefully examined.

A Sharing of 3D Stylized Cheongsam Women 7

© Pierson Pang

After the model is almost done, you can directly use ZBrush to paint the vertex color to observe the character effect.

Pierson has always felt that the white model does not represent the end of the high modeling stage. The top color is needed to judge the character's temperament, and painting the top color usually requires learning more about women's makeup. The choice of eye shadow type, the choice of lipstick number, what kind of character positioning and temperament they correspond to, are all very sophisticated and also exercise aesthetics. So you can observe more during your day. The aesthetics of a character's final effect is very important. The software and method skills are all auxiliary. The level of completion of the vertex color can be based on your own preferences, as long as you can roughly express the feeling of the character on the line, or to handle finely, as a base for post mapping.

In ZBrush, you can use the skin material ball to observe the effect, as follows:

A Sharing of 3D Stylized Cheongsam Women 8

© Pierson Pang

After the Tpose effect is determined, use ZBrush's Transpose Master to give the character a pose, but many people prefer to use DAZ to make it because it is more convenient. Transpose Master is more difficult to pose with, but can exercise dynamic anatomical ability.

A Sharing of 3D Stylized Cheongsam Women 9

© Pierson Pang

Pierson usually does not put too much effort into the practice of low-poly modeling and the process behind it, as long as it can express the effect he wants to achieve. Pierson used to paint the vertex color with ZBrush and import it into Blender to render the picture by using the vertex color with the material ball. Of course, it is also possible to draw mapping in a more detailed way to adjust the effect in Blender.

3. Blender Render

About the renderer, he earlier used Keyshort, V-Ray and such renderers, as well as Arnold, which is used by many people to do realistic rendering. Blender is a free software with less complex material and lighting properties compared to Arnold, including WYSIWYG rendering speed and render quality, which are friendly to stylized characters.

Blender has two rendering methods: eevee and cycles.

Eevee is Blender's real-time rendering engine, implemented using OpenGL technology to focus on speed and interactivity while achieving the goal of rendering PBR materials. Eevee can be used interactively in 3D viewports and can also generate high-quality rendering.

Eevee uses the same shader nodes as cycles, making it easy to render existing scenes. For cycles users, you can use eevee to preview material effects before using cycles to render the final image to improve efficiency.

Unlike cycles, eevee is not a ray tracing engine. It uses multiple algorithms via rasterization to estimate how the light acts with the object's material, while cycles is based on physical ray tracing to calculate the bounce of each ray. Although eevee is designed to use PBR shading materials, it is not perfect. Cycles renderer provides physically more accurate rendering, while Eevee uses rasterized rendering so it has significant limitations.

Each of these two rendering methods has its own features and can be chosen according to your character rendering needs.

You can read the official tutorials for details: https://docs.blender.org/manual/en/3.3/render/lights/light_object.html#renderer-settings

There are also many Blender tutorials on YouTube, such as: https://www.youtube.com/c/DannyMac3d

You can check out more works of Pierson Pang at at his Artstation: https://www.artstation.com/piersonpang

Fox Renderfarm hopes it will be of some help to you. We are an excellent cloud rendering services provider in the CG world, so if you need to find a Blender render farm, why not try Fox Renderfarm, which is offering a free $25 trial for new users? Thanks for reading!

By Thepoly

Welcome to join us

render farm free trial

Recommended reading


Top 9 Best And Free Blender Render Farms of 2024

2023-05-06


Revealing the Techniques Behind the Production of Jibaro "Love, Death & Robots", Which Took Two Years to Draw the Storyboard

2023-01-13


Top 10 Free And Best Cloud Rendering Services in 2024

2023-09-26


Top 8 After Effects Render Farm Recommended of 2023

2023-02-02


Shocked! The Secret Behind Using 3D to Make 2D Animation was Revealed!

2022-05-11


How to Render High-quality Images in Blender

2023-01-13


Easy Cel Shading Tutorial for Cartoon in Blender Within 2 Minutes

2022-07-01


8 Best And Free Blender Cloud Rendering Services in 2023

2023-02-02


Partners

Interested

The Ruins of David Made With 3ds Max & ZBrush
In this article, Fox Renderfarm, a leading cloud rendering service provider and render farm in the CG industry, will share with you a 3D scene called "The Ruins of David" that was collaboratively created by a student team over a span of 4 weeks with the PBR process.Final result:Observing and Analyzing Concept Art &x26; Asset AllocationOur reference was inspired by the work of a skilled artist we found online. It was our first attempt to collaboratively create a PBR scene from start to finish as a team. Throughout the process, we were constantly exploring and learning, but fortunately, we managed to complete the project in the end.For our scene, sculpting played a major role. We followed a production workflow that involved using 3ds Max for rough modeling, ZBrush for high-resolution sculpting, and then Topogun for creating low-polygon topology. During the high-resolution phase, we utilized KeyShot for rendering. Afterwards, we used Substance Painter, Photoshop, and Pixplant for texture and material creation. Finally, we rendered and outputted the scene using Unreal Engine 5.To ensure collaborative work while maintaining overall proportion unity, we initially need to establish the rough shape proportions and object placement based on the concept art. Afterward, we assigned tasks and divided the entire scene into five parts: the head of David, the distant mountains, the stairs and platform, the pillars and ornaments, and the background mountains with nearby rocks along with the obscured mountains in the foreground.Asset allocation chartLarge-scale scene constructionMaking Mid-poly ModelIn this scene, the only parts that required mid-poly modeling were the stone pillars, steps, and other small objects. For the rest of the scene, we mainly used a box or sphere shape and directly imported them into ZBrush for sculpting.Mid-poly model of small objectsMaking High-poly ModelCompared to the leisurely mid-poly modeling stage, the high-poly modeling phase is much more lengthy and complex. Approximately 90% of the entire scene required using ZBrush for high-resolution sculpting. Since most objects during the mid-poly modeling stage were very rough, we not only had to shape them but also focus on capturing intricate details. We conducted extensive research and decided to focus on creating a desert and wind-eroded terrain. The majority of the artificial objects in the scene were made of sandstone. During the sculpting process, we had to ensure the integrity of the main structure while considering the effects of wind erosion on the material surface, such as which structures would be eroded and which ones would be preserved. We went through many trial-and-error stages. Initially, we struggled with rigidly replicating the structures, but with guidance from our instructor, we eventually found the correct approach. By closely observing real mountains and wind-eroded statues, we finally achieved the desired aesthetic.Sculpting of Mountain StonesSculpting of pillars and small objectsSculpting on the side of the stoneWhen creating the sculpture of David, as it was our first time sculpting a human figure, we had to make countless modifications just to get the lips right. One moment, it would resemble a rugged, masculine face, and the next moment, it would transform into a delicate, feminine one. It must be said that facial sculpting for the character was indeed one of the challenges in this scene. Even the slightest change could disrupt the overall proportions. There were moments when I looked at the ugly face I sculpted and felt like giving up. Fortunately, with guidance from our instructor and numerous revisions, we were able to somewhat capture the essence of Michelangelo's David.Sculpting of the Statue of DavidFailed versionOf course, there were many other challenges besides these. The making of the candles was also a headache. We struggled for a long time to recreate the true essence, so we decided to simply buy two large candles. We burned them day and night until they finally took on the appearance we desired.Candles dedicated to the artsSculpting of candlesMaking Low-poly ModelIf the previous process was more like creation, then making the low-poly models is more like streamlining and finalizing the previous work. We used two methods to create low-poly models. One method involved using ZBrush's automatic retopology tools to generate the low-poly models, and then organizing the topology in 3ds Max through subtraction. The second method, used for objects like heads and candles, involved using Topogun for retopology. This method required patience and attention to detail. We needed to ensure simplicity, comply with proper topology standards, and also preserve the silhouette contours and main structures as much as possible.Low-poly of Statue of DavidAfter the topology phase, we moved on to the stage of UV unwrapping and baking normal maps. UV unwrapping may seem like an ordinary process, but it actually has a significant impact on the final result. If not done properly, it may even require rework in the later stages. To ensure consistent UV size, we adopted a pixel density of 256 pixels per cubic meter (256/m³) for our production.After the UV layout was completed, the next step was baking. We needed to match the high-poly and low-poly models as closely as possible in 3ds Max, ensuring minimal gaps or low matching accuracy. Afterwards, we exported the models to Substance Painter for baking the normal maps and ambient occlusion (AO). However, due to our limited experience, we often encountered rainbow artifacts, which required numerous iterations of rework. In some cases where certain issues were difficult to resolve, we directly hand-painted the normals using Photoshop to solve the problem.For different materials, we adopted a method of using material balls to differentiate them. It is crucial to have standardized naming conventions for the material balls, as any lack of consistency in naming can lead to significant difficulties during the later stages of production.Making MaterialsWe put a lot of effort into sculpting the details, while the material aspect was relatively easier. We adopted the standard PBR (Physically Based Rendering) workflow for material creation. We focused on establishing the overall volume first and then added specific details such as weathering and cracks. Unlike individual material creation, the team's material production required coordination among members to achieve a unified artistic style and texture. Objects with the same material were assigned identical generators and material balls to maintain consistency in the art style, while incorporating different details to avoid excessive repetition.To avoid significant discrepancies between different team members' work, we would apply similar materials to the engine and observe the overall effect. This allowed us to determine how to modify the materials to ensure a consistent and cohesive final result.RenderingFrom the beginning of the production, we planned to do the final rendering in UE5 (Unreal Engine 5). In order to achieve this goal, we worked overtime and studied UE5 for more than a week. During this stage, we faced considerable difficulties and had to explore and learn as we progressed. We were challenged by various nodes and encountered obstacles along the way. Thankfully, we managed to resolve most of the issues in the end.Making of terrain material ballsCandle making was also a challenging aspect. In order to achieve the effect of flickering flames and dynamic firelight, we chose to use the Niagara particle system for the candle. We worked overtime for several days specifically to study and develop this relatively fundamental effect for the candle's flame.Fire particle effectsRenderingConclusionThe above is our experience and insights into the entire production process. Together, we faced many unprecedented challenges and encountered new software and knowledge. However, with the collective efforts of all team members, we successfully overcome those obstacles. We would like to express our gratitude and appreciation to everyone for their hard work and dedication!Fox Renderfarm is a 3ds Max cloud rendering service provider and 3ds Max render farm dedicated to bringing more useful tutorials to our 3ds Max users. We are offering a free $25 render trial to all new users, get rendering to free up your computer now.Source: Thepoly
More
2023-08-10
Learn How to Make a Henry Cavill Superman in 3D
If you're a 3D learner and love the Superman movie, it's time to make a 3D Superman just for you. Now, follow the industry's best cloud rendering service provider and render farm, Fox Renderfarm, to see how CG artist H cheng made his Superman.Final results of 3D Henry Cavill Superman:The tools used in making 3D Henry Cavill superman are as follows:High-poly: ZBrush, Marvelous DesignerTopology: Wrap4D, MayaMapping: Mari, Substance PainterHair: XGenRendering: Arnold/UECollection of MaterialsBefore we start, we need to decide the theme and collect the required reference material. I chose Henry Cavill as Superman model for this project. Then we can try to collect as many photos of his stylized look shown in the movie as reference.Next, in the portrait making process, we can find some multi-angle life photos or portraits of Henry Cavill, which is convenient for us to observe the structure and capture the shape.Model SculptingIn the modeling process, we need to set the size and proportion of the realistic character model at the beginning. Having a realistic scale for reference will help us in the subsequent detailed production, as well as hair and material production.When working on realistic character or orc-like projects, solid anatomical knowledge and sculpting skills are essential. These factors fundamentally determine the depth and quality of our models. Therefore, it is necessary to practice sketching regularly. For example, I also do similar sketching exercises in my daily routine, trying to control each sketch exercise within half an hour with a specific purpose. During the practice, I can use the built-in slice tool in ZBrush as a basic framework. Its size is based on realistic human head proportions, which allows us to practice skull or muscle anatomy. The exercise is shown in the image below:Once we have acquired a certain level of foundational skills and a wealth of theoretical knowledge, we can use our understanding of anatomy to engage in sculpting exercises for designing orc-like characters.With a solid foundation and extensive knowledge of anatomy, when working on character designs like this, we can analyze the anatomical structures of the human, animal, or orc-like creature in a rational manner during sculpting. Mastering the anatomy of the head, body, or other forms allows us to analyze and refine the design in a logical way. For example, in the case of this orc head model, as shown in the image below:There is actually no difference in terms of muscle structure between his face and a realistic human. We analyze it rationally because it has a different skeletal structure from a human's, and its facial features have distinct shapes, resulting in noticeable differences in the muscle structure. However, under the overall skeletal framework, their muscle anatomy is the same. It's like the same piece of clothing hanging on different hangers, forming different folds, but fundamentally, its essence remains unchanged. Therefore, the formation of the fold shapes follows certain patterns that can be observed. This requires us to have a solid theoretical foundation to support our analysis.We achieve large-scale detailed sculpting using ZBrush, making effective use of scan-based mesh retopology techniques. For quick mesh symmetry, we directly utilize R3DS Wrap. R3DS Wrap is a professional-grade 3D topology tool software that has revolutionized the way we handle 3D scan data. When working with human scans or similar subjects, existing basemeshes can be loosely matched to each scan. It also provides a set of highly useful scan processing tools such as decimation, mesh filtering, and texture projection. Thanks to its node graph architecture, once a single scan is processed, the same approach can be applied to an unlimited number of other scans.Mapping of CharacterAfter completing the high-resolution sculpting of the body, we use Mari to start creating the skin texture channels. The overall workflow is quite simple, and I'll briefly describe it.For color painting, we utilize XYZ scan materials and wrap them using the ZWrap plugin, which serves as a realistic texture base. Then, in Mari, we make adjustments and add details to the projected textures. We overlay multiple color biases on the color map to achieve a rich color effect. Since gorillas have black skin, the details we paint or obtain from XYZ materials may not be clearly visible. Therefore, we add a layer of lighter color contrast to enhance some details.When creating roughness and specular maps, we need to pay attention to the variations in highlight levels and roughness intensity. The highlight map can be created by inverting the colors of the roughness map and then making adjustments accordingly. For the complete set of skin texture maps, I have created the color, specular, roughness, and SSS (Subsurface Scattering) strength and color maps.Production of ClothingFor clothing production, I primarily rely on Marvelous Designer for fabric simulation and utilize ZBrush for quick sculpting and refinement.Marvelous Designer has become widely used in CG art production. Therefore, it is essential for us to learn and master the basic usage of this software.I am not particularly skilled in using Marvelous Designer myself. I am only familiar with its main function of fabric simulation, which assists in model creation. To create realistic clothing patterns, it is necessary to have a basic understanding of garment cutting theory, especially for formal or workwear attire. Details such as waist openings or cuff offsets can affect the final result of fabric simulation. For unique designs, we can refer to existing paper patterns as references.Of course, when working on the Superman costume, I didn't follow such strict procedures. Since it is a form-fitting suit, I directly created the base mesh in ZBrush and imported it into Marvelous Designer for fabric simulation and folding. Marvelous Designer can quickly assist us in achieving small wrinkle formations around muscle compressions and structural transitions. It is very convenient to use in this regard.The process of creating textures for clothing is relatively simple. I directly imported the model into Substance Painter and used a tiled texture as the fabric pattern for the garment. Then, I assigned a base color and added some procedural textures as needed. To achieve the desired fabric texture effect, I adjusted the material nodes in Maya, which provides similar results.Production of MaterialsCreating materials for skin is very straightforward. The surface material effect in Arnold can directly present a very natural and realistic result. When adjusting the skin material nodes, it is important to note that the value of surface scale is influenced by the scene's scale, and it should complement the color of the radio to achieve the desired effect. When tweaking the parameters, it is helpful to enable real-time rendering to observe the effects while making adjustments.Production of HairWe use XGen for hair styling as it is a widely-used and highly effective tool for creating hair in the industry.Traditional XGen provides high control and flexibility over the styling of hairs, allowing us to meet most of our requirements. When working on the guide hairs, we need to pay attention to the hierarchy and even distribution of the guides. We can also utilize masking painting and the addition of modifier nodes to achieve different hair descriptions and styles.Above is the main process of making the 3D version of Henry Cavill Superman. The next steps are material rendering and connecting each part, which will not be explained in this article. We hope this article is helpful to you.Source: H cheng
More
2023-07-13
Next-generation Style Scene "House in the Mountain" Making Tutorial
In this article, Fox Renderfarm, the industry's leading cloud rendering service provider and render farm, will bring you a tutorial on making a next-gen style scene shared by a 3D art and design student. This was his first time working with ZBrush and it took almost 4 weeks to complete it as he didn't have much experience. The original painting was from the internet and although the result is not very good in terms of completion and details, there is a lot to gain. Now, let's introduce the production process to you.Final results:Production Process1. Reference/Original PaintingI considered two aspects to select the reference, one is the richness of the object material, because I wanted to exercise my ability to use ZBrush software by making such common objects as rocks and boards; the second is whether there is enough time to finish. In order to make the result not too low completion, it is also very important to plan the time for your work. Finally, I chose this one.2. AnalysisIt is very important to analyze the original painting to improve the efficiency of the following work. By observing the original painting, we can determine the approximate proportions, the parts that are reused, the parts that need to be sculpted, and the materials used (tiles, stone walls, bricks, wood panels, etc.). Then I looked up other references and searched for available resources (material mapping, green transparent mapping, etc.). Split the original painting into sections of houses, props, and rocks and allocate the approximate time needed for each section to ensure completion within the deadline.3. Confirm Project RequirementsProduction specifications are very important, so we should clarify the naming format of the project, the size and number of mapping and other specifications before starting work, otherwise it will become very troublesome to redo it afterwards. Base on the specification to make a good decision on the file model naming, pixel density (1 cubic meter 512 * 512), etc., to complete the prep work.4. Mid-poly ModelingIn order to make the final result almost the same as the reference, the first step is to build the approximate shape. My approach is to roughly build a few boxes → set the camera position and focal length → continue to refine the position and scale of the middle model → finally use PureRef to adjust the transparency and size of the reference image and roughly compare it with my model, adjusting model according to the differences.The original painting I chose is not so complicated, and the objects are relatively neat, so there is no difficulty in making the rough model. The time was mainly spent on comparing the original painting with my model, and at this time, you can associate and copy out the models that are repeatedly used, so that it is convenient to modify them afterwards. For the rocks, which are seriously irregular, you only need to have a general shape, and then use ZBrush for sculpting and reducing the faces. Finally, you can sort out the parts that need to be sculpted first. The parts that need to be sculpted in the original painting are roof tiles, wooden boards, floor tiles, rocks, stakes, etc.In the process of making the mid-poly model, we need to pay attention to continuously refine the rough model while not destroying the big shape, and to add more details, trying to focus on the loop when wiring. Also, pay attention to the overall relationship, and constantly adjust and optimize.5. High-poly ModelingThere are a lot of things that need to be sculpted using ZBrush, and through self-learning, I have mastered some of the methods. My sculpting idea is to make chamfers and add some cracks and other details to give the object a sense of ageing while ensuring the hardness of structures.The process of carving the boards was relatively smooth, but it was more difficult to carve the rocks, which had to restore the shape of the original painting and also conform to the natural formation pattern of the rocks. After continuous modifications, the final result was not bad.6. UV Baking of Low-poly ModelFirst, in order to change the mid-poly model to low-poly model, you can delete useless lines, faces and points. For models that are sculptured excessively, you can use ZBrush to make adjustments. Then start to set the smooth group and split UV. Set smoothing group in the faces with too sharp angle, and the UV must be separated in the places where the smoothing groups are different, otherwise there may be black surface or bad effect when baking normal. There are many reasons for the error in the final result (smoothing group in wrong places, normal direction, high-poly and low-poly model matching, etc.), so we can only correct the errors one by one.7. Making of MaterialsBefore importing the model into Substance Painter, the preparation work must also be done. I had a large number of models, so in order to meet the pixel accuracy of 1 cubic meter/512*512, I divided the model into 12 parts and gave 12 material balls to each part, so that I could operate in 12 layers after importing the models into Substance Painter.My process of making mapping is customarily divided into these steps: create a folder → add a mask for selection → add a fill layer to fill the basic inherent color → add smart materials / mapping resources for fine-tuning changes → add dirty stains (dirty stain generator) → add object relationships (AO generator) → add the upper white and lower black visual effects of the overall object (location generator) → edge wear (metal edge generator) → add details such as dirt. If there are unnatural places, you can add the painting layer to modify.8. RenderingThe last thing is to organize the files and rendering. The texture files exported from Substance Painter must be named well and organized in a uniform way, otherwise it is a waste of time to modify the names and paths again.After organizing all the files into a new model folder, I put the model into the Marmoset Toolbag for the final rendering. Through the study of fog effects and lighting, I put warm light in the scene according to the reference, and cold light behind it for contrast between warm and cold, but I also made the stone look too bright, which was modified and improved after the teacher reminded me. Although the final result was not particularly impressive, I finished the project in a moderate way, and it was still very fulfilling to see the final result.Finally, I am very grateful to my teacher and classmates for their help to complete such a scene. The above is the experience sharing of my whole production process. Although I encountered some difficulties during the process, I finally solved them successfully after hard work. I also hope that I can correct mistakes and make progress in the future based on my previous experience.Sourec: Thepoly
More
2023-05-30
Business Consulting

Global Agent Contact:Gordon Shaw

Email: gordon@foxrenderfarm.com

Marketing Contact: Rachel Chen

Email: rachel@foxrenderfarm.com

Message Us:
Newsletter
Keep up with our latest software updates, special offers and events!
Copyright © 2024 FoxRenderfarm.com. All Rights Reserved.