How to Render in SketchUp: Best Tools and Workflow Tips
SketchUp is widely used for fast and flexible 3D modeling, but creating realistic final visuals requires the right rendering workflow. Lighting, materials, textures, and render settings all play an important role in turning simple models into high-quality architectural or product visualizations.
In this guide, you’ll learn how to render in SketchUp using popular engines like V-Ray and Enscape, along with practical tips to improve rendering speed and visual quality. Whether you’re creating simple scenes or handling large projects, this workflow will help you produce smoother and more professional results.
How Rendering Works in SketchUp
To achieve professional results, it is important to understand that SketchUp serves as the builder while the render engine acts as the photographer. So, before you learn how to render in SketchUp, here is the breakdown of how this partnership works:
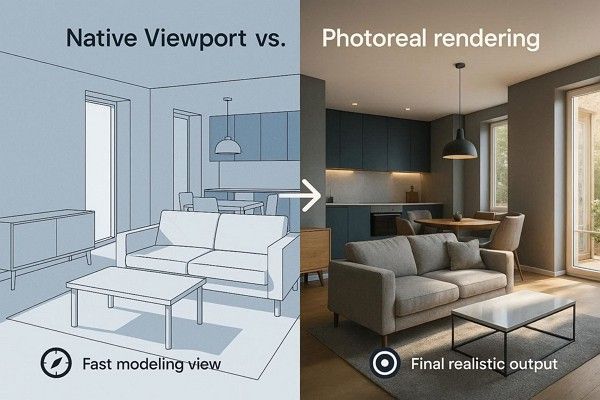
SketchUp Viewport vs Photoreal Rendering
The native SketchUp viewport is designed for speed and modeling. It uses simple colors and lines so you can move around your 3D space without lag, but it cannot show how light truly bounces or how glass reflects.
On the contrary, photoreal rendering is a separate process where a separate engine takes your model and calculates complex physics. It replaces the flat SketchUp colors with the realistic textures, soft shadows, and accurate sunlight to create a final image that looks like a real photograph.
Basic SketchUp Rendering Workflow
Review the mentioned details and understand the process to render the SketchUp model. Most professional artists follow this linear path to keep their projects organized.
- Model: Clean up your geometry in SketchUp and ensure there are no reversed faces, as these can cause rendering glitches.
- Materials: Replace standard SketchUp buckets with Render Ready materials, which add properties like “Refraction” and “Glossiness.”
- Lighting: Set your North point and time of day in SketchUp, then add artificial lights inside the render plugin to brighten dark corners.
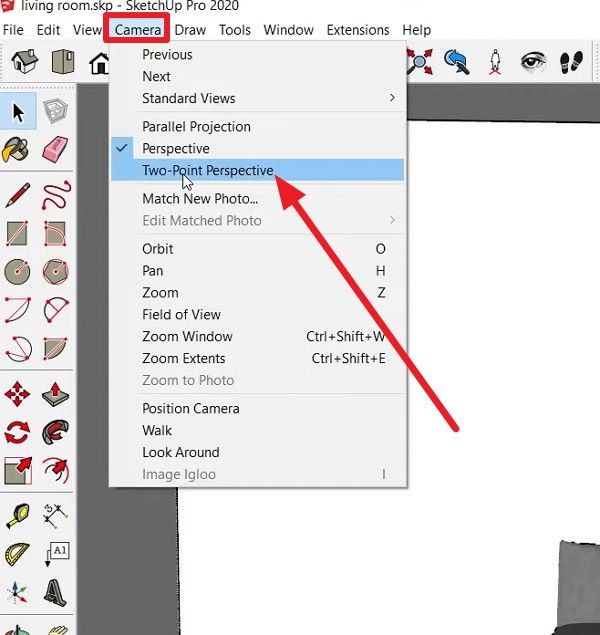
- Camera: Position your view and use the “Two-Point Perspective” settings in SketchUp to keep vertical lines perfectly straight and give the image a professional architectural look.
- Render: Hit the Render button, and the plugin will begin the calculations phase to produce the final high-quality pixels.
Why SketchUp Uses External Rendering Plugins
In the SketchUp 3D rendering, the software is designed to be lightweight and user-friendly. This is why it doesn’t have a high-end render engine built into its core. Instead, rendering engines like V-Ray or Enscape live inside SketchUp as plugins. Thus, it allows SketchUp to stay fast for modeling while the plugin focuses entirely on heavy math.
You can also choose between different engines, and even though they are separate, the plugin stays in sync. This implies that if you move a wall in SketchUp, the rendering engine updates the changes instantly in its preview window.
Best Render Engines for SketchUp
Choosing the right render engine for SketchUp realistic rendering depends on whether you value unmatched realism or real-time speed. In 2026, the market is led by a few compelling options that offer deep integration with the latest versions of SketchUp. Follow the 3 mentioned options and review their perks and pitfalls:
1. V‑Ray
Mainly designed for architectural visualization, V-Ray offers extensive material libraries, including V-Ray Vision for live, interactive rendering and GPU-accelerated rendering for speed. V-Ray Vision provides instantaneous visual feedback while designing, and the engine also includes lighting options such as V-Ray Sun and Sky and Light Gen.
Pros
- Supports PBR materials and includes 200 pre-set materials.
- It is compatible with CPU, GPU (NVIDIA CUDA/RTX), or hybrid rendering.
Cons
- Requires advanced understanding of rendering techniques, lighting, and materials.
- The Asset Editor can be overwhelming, with too many settings and parameters.
2. Enscape
If you’re wondering how you render in SketchUp, Enscape, a real-time rendering and virtual reality plugin, allows you to create high-quality visualizations without interrupting your design workflow. Since it integrates directly with SketchUp, it also provides thousands of pre-optimized, low-poly 3D assets to speed up scene creation.
Pros
- Enables finetuning using PBR materials for realistic surfaces.
- Offers a one-click VR experience to explore 3D models in a headset.
Cons
- It is heavily GPU-dependent and requires a high-end graphics card.
- The built-in asset library is smaller than that of competitors.
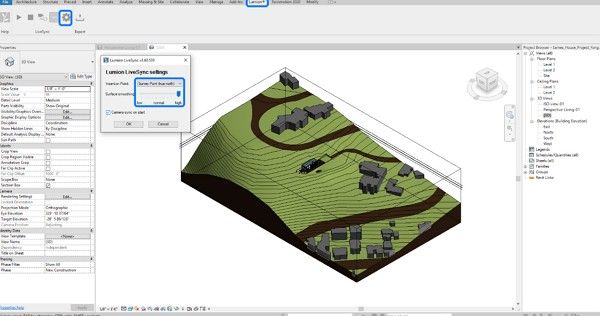
3. Lumion
For interior rendering in SketchUp, this GPU-accelerated rendering engine converts 3D models into photorealistic images with ease and speed via Lumion LiveSync. This plugin enables real-time synchronization between SketchUp and Lumion, so users can modify the model in SketchUp; changes are reflected in Lumion's rendered environment. Furthermore, it includes over 10,000 high-quality assets, including trees, plants, people, furniture, and vehicles for detailed scene production.
Pros
- Recent versions feature ray tracing to automatically enhance shadows and reflections.
- Lightweight, operates directly within SketchUp, providing 4K ray-traced rendering previews.
Cons
- Lumion is built for Windows, making it unusable for native Mac users.
- You cannot truly edit the 3D geometry of your SketchUp model inside Lumion.
How to Render in SketchUp Step by Step
If you are using V-Ray in SketchUp and want to render an interior model, understanding the proper workflow is essential for achieving realistic results. In this step-by-step guide, you’ll learn how to render a SketchUp interior scene using V-Ray efficiently from start to finish.
1. Scene Setup and Camera Calibration
From importing the file to choosing certain settings, here is how SketchUp works:
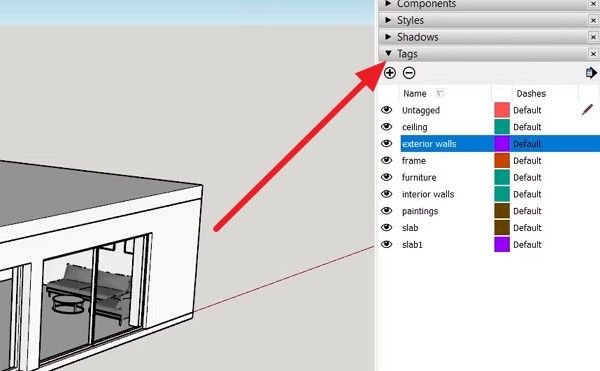
Step 1. Import the file and organize the project using the “Tags” section in the right-hand-side toolbar to hide or unhide elements.
Step 2. After that, use the scroll wheel to zoom and the middle mouse to rotate. Go to the “Cameras” section and set the settings to “Two-Point Perspective” to ensure all vertical lines are perfectly straight.
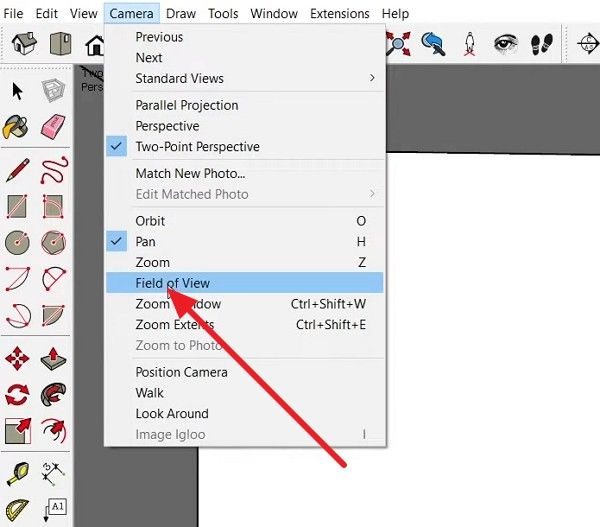
Step 3. In the same section, choose “Field of View,” and from the bottom-right corner, set it to 35° for standard rooms.
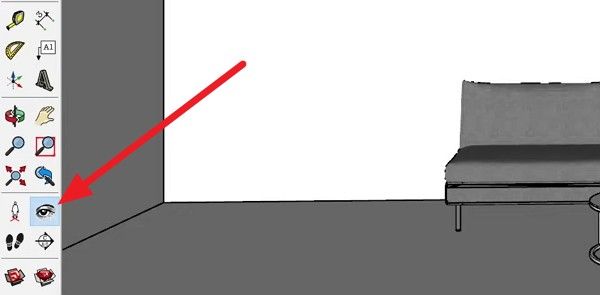
Step 4. Then, set the camera height to about 130 cm for a natural eye-level view by pressing the “Look Around” (Eye) icon.
2. Initial Render Configuration
To know the usage of realistic render SketchUp rendering settings, the steps are mentioned below:
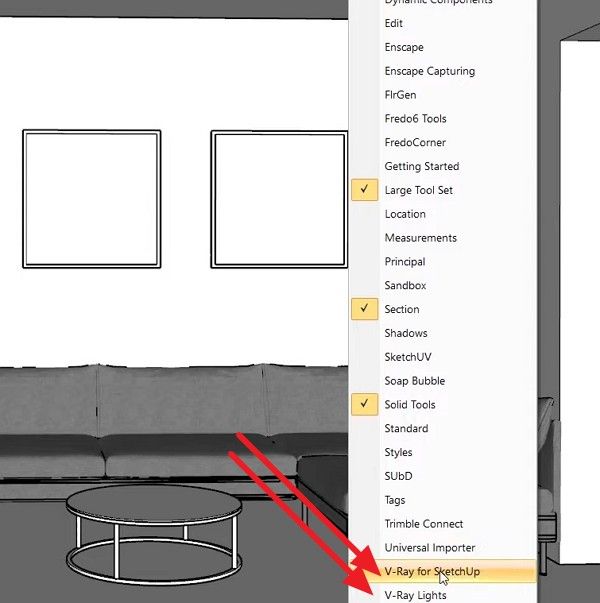
Step 5. Right-click the toolbar, then enable options like “V-Ray for SketchUp” and “V-Ray Lights” in the menu to access them.
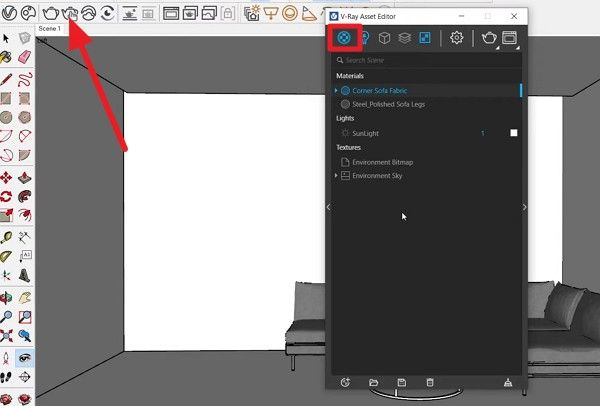
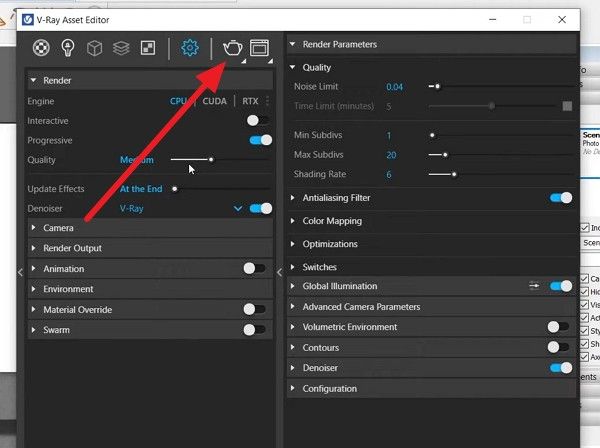
Step 6. Then, press the “Asset Editor” icon (Kettle-like) and head to the “Materials” section.
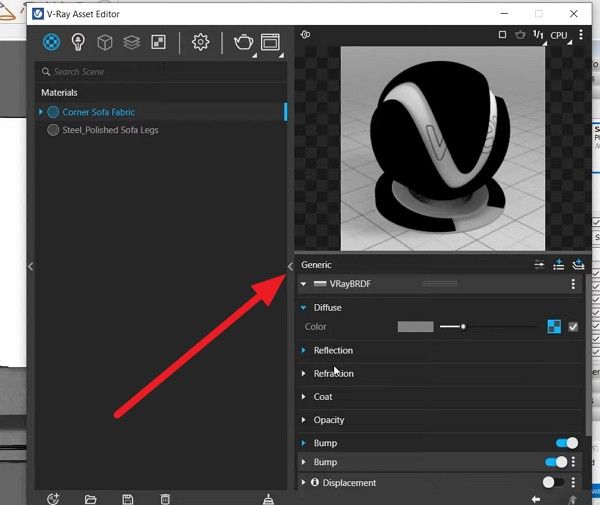
Step 7. To edit a specific material, stretch the side menu and adjust parameters such as “Diffuse, Reflection, Coat, or Opacity.”
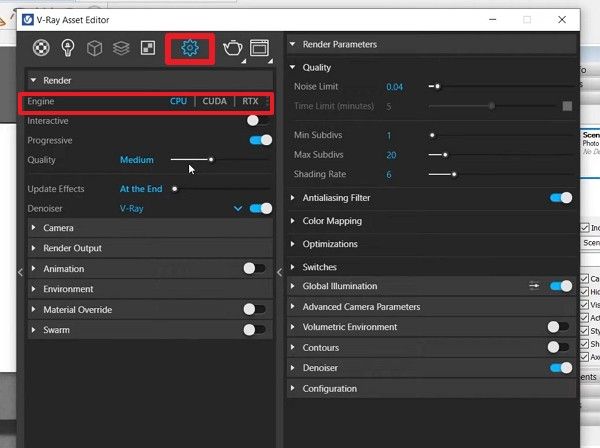
Step 8. In the same window, tap the "Settings" icon and pick "Render Engine" like CPU or GPU, along with cameras or other settings.
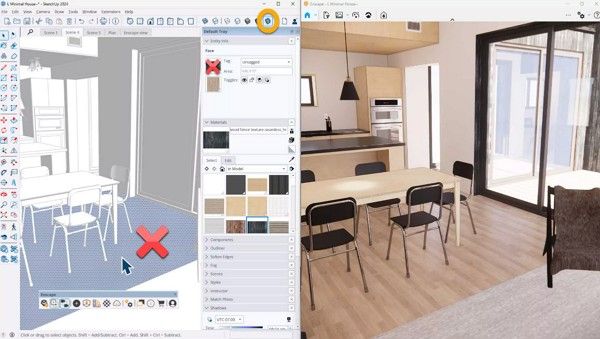
Step 9. Now, press the “Render” icon, and the new window will appear where you can get the real-time preview. Any changes made in SketchUp will appear in the V-Ray Frame Buffer. Drag and drop high-quality assets (pillows, books, rugs) into the scene to add detail. Always check the texture paths to ensure no materials are missing.
3. Post-Production in V-Ray
To ensure less noise in the SketchUp renderer, V-Ray, make the following tweaks:
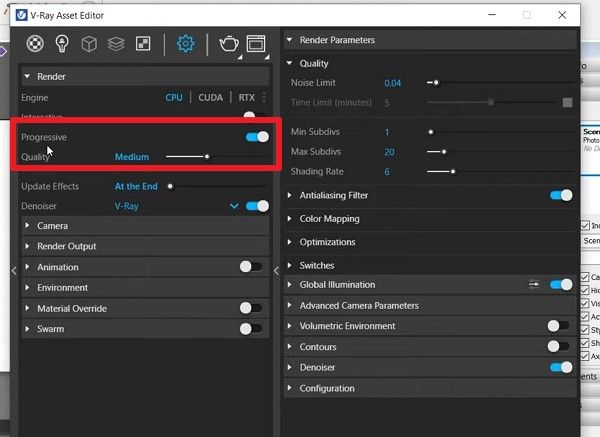
Step 10. For the best, clear shot, turn off “Progressive Rendering” and set the quality to “Medium Plus” or “High” with a resolution of at least 2,000-3,000 pixels.
Why Complex SketchUp Projects Render Slowly
While learning how to render a model in SketchUp, you may notice that complex projects take longer, making it important to understand the underlying causes. Ideally, such scenes render slowly because the software and render engine must process a massive amount of data simultaneously. Even with the latest hardware, certain bottlenecks remain the cause for slow rendering, and most are mentioned below:
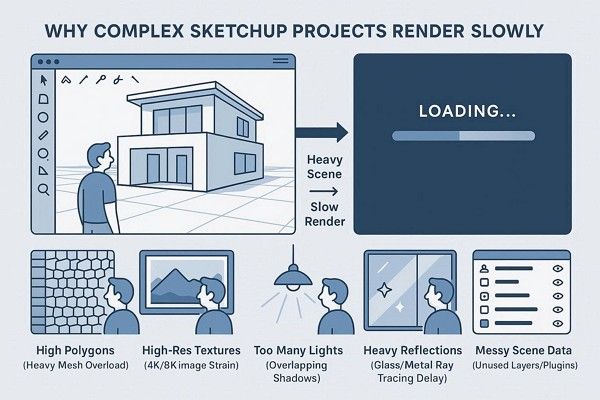
High Polygon Counts
Complex 3D models with millions of edges and faces require massive computational power to process every geometric point. Thus, these heavy assets overwhelm the system’s memory and slow the engine's initial calculation phase.
High-Resolution Textures
Using multiple unoptimized 4K or 8K textures consumes excessive GPU VRAM and increases data transfer issues. Consequently, large files force the renderers to work harder to map detailed patterns onto complex 3D surfaces.
Overloaded Light Sources
Each light source in a scene adds millions of mathematical paths that the software must trace and calculate. Thus, multiple lights create overlapping shadows and reflections, significantly increasing processing time per pixel.
Excessive Reflection Settings
Polished materials and transparent glass require the engine to calculate ray depth to simulate realistic distortions. Hence, these surfaces force the renderer to compute light paths multiple times, creating a massive bottleneck in the workflow.
Unoptimized Plugin Data
Unused layers, hidden geometry, and stray plugin data remain in the background, increasing the total file size. Thus, this junk information forces the software to waste resources scanning data that isn’t visible in the final image.
5 Tips to Speed Up SketchUp Rendering
For SketchUp 3D rendering, efficiency is about managing data flow between your CPU, GPU, and RAM. Here are 5 expert tips to optimize your SketchUp workflow for maximum speed:

Start with Draft Presets
Avoid jumping straight into "High" and "Ultra" settings while you are still testing lighting and materials. Instead, use low-quality draft presets and a higher noise threshold to get instant feedback and save hours of wasted time.
Simplify Your Geometry
High polygon counts from detailed 3D plants or furniture can cause your rendering engine to crash or lag. So, clean up your model by editing unused data and using proxies for heavy objects to keep scenes lightweight.
Optimize Material Settings
Limit complex reflections and displacement maps to the main object in your foreground. In addition, reducing the ray depth for glass and metal will prevent unnecessary engine load and slow calculations.
Manage Your Lighting
Instead of adding dozens of small spotlights, use large invisible rectangle lights to fill the space with a soft glow. Thus, fewer light resources mean fewer shadows for the computer to calculate, leading to much faster processing.
Offload to a Render Farm
Even with optimized geometry, lighting, and material settings, final rendering in V-Ray can still be computationally intensive for complex SketchUp scenes. Cloud render farm solutions such as Fox Renderfarm help distribute rendering workloads across scalable GPU and CPU nodes, improving efficiency for large-scale projects.
FAQs about SketchUp Rendering
1. Can SketchUp produce photorealistic renders on its own?
No, the native SketchUp viewport is designed for modeling and lacks the physics-based engine needed for realism. Thus, you must use a third-party plugin such as V-Ray, Lumion, or Enscape to simulate realistic lighting, shadows, and textures.
2. Do I need a high-end computer to render in SketchUp?
Simple SketchUp scenes can run on most modern computers, but complex projects and GPU-based engines like Enscape, Lumion, or V-Ray require significant processing power. For heavy rendering tasks, a render farm like Fox Renderfarm can offload workloads to remote GPU and CPU nodes, helping improve performance and reduce local system strain.
3. Which render engine is best for SketchUp beginners?
Enscape is widely considered intuitive for beginners as it offers real-time preview experience. In addition, it allows you to see lightning and material changes instantly without waiting for long calculation times.
Conclusion
In summary, understanding how SketchUp and rendering work together is essential for producing high-quality 3D visuals. Different rendering engines such as V-Ray, Enscape, and Lumion offer flexible options depending on your workflow and project needs.
However, when working with complex scenes or high-resolution V-Ray renders, local hardware can quickly become a limitation. In these cases, cloud rendering solutions like Fox Renderfarm can help handle heavy rendering tasks more efficiently and support smoother production workflows.


