How to Use a Render Farm: Step-by-Step Blender Guide

Using a render farm is easier than many beginners expect. Once your scene is prepared correctly, the process is mostly about uploading the project, checking the analysis results, running a test render, and then sending the full job.
In this step-by-step guide, you will learn how to use a render farm with Blender by following the Fox Renderfarm workflow. The same general process also applies to other software such as Maya, Cinema 4D, and 3ds Max.
What to Prepare Before You Start
Before you upload any project to a render farm, make sure your scene is properly packed and all textures, caches, and linked assets are included. This helps avoid missing files, broken paths, and analysis errors later.
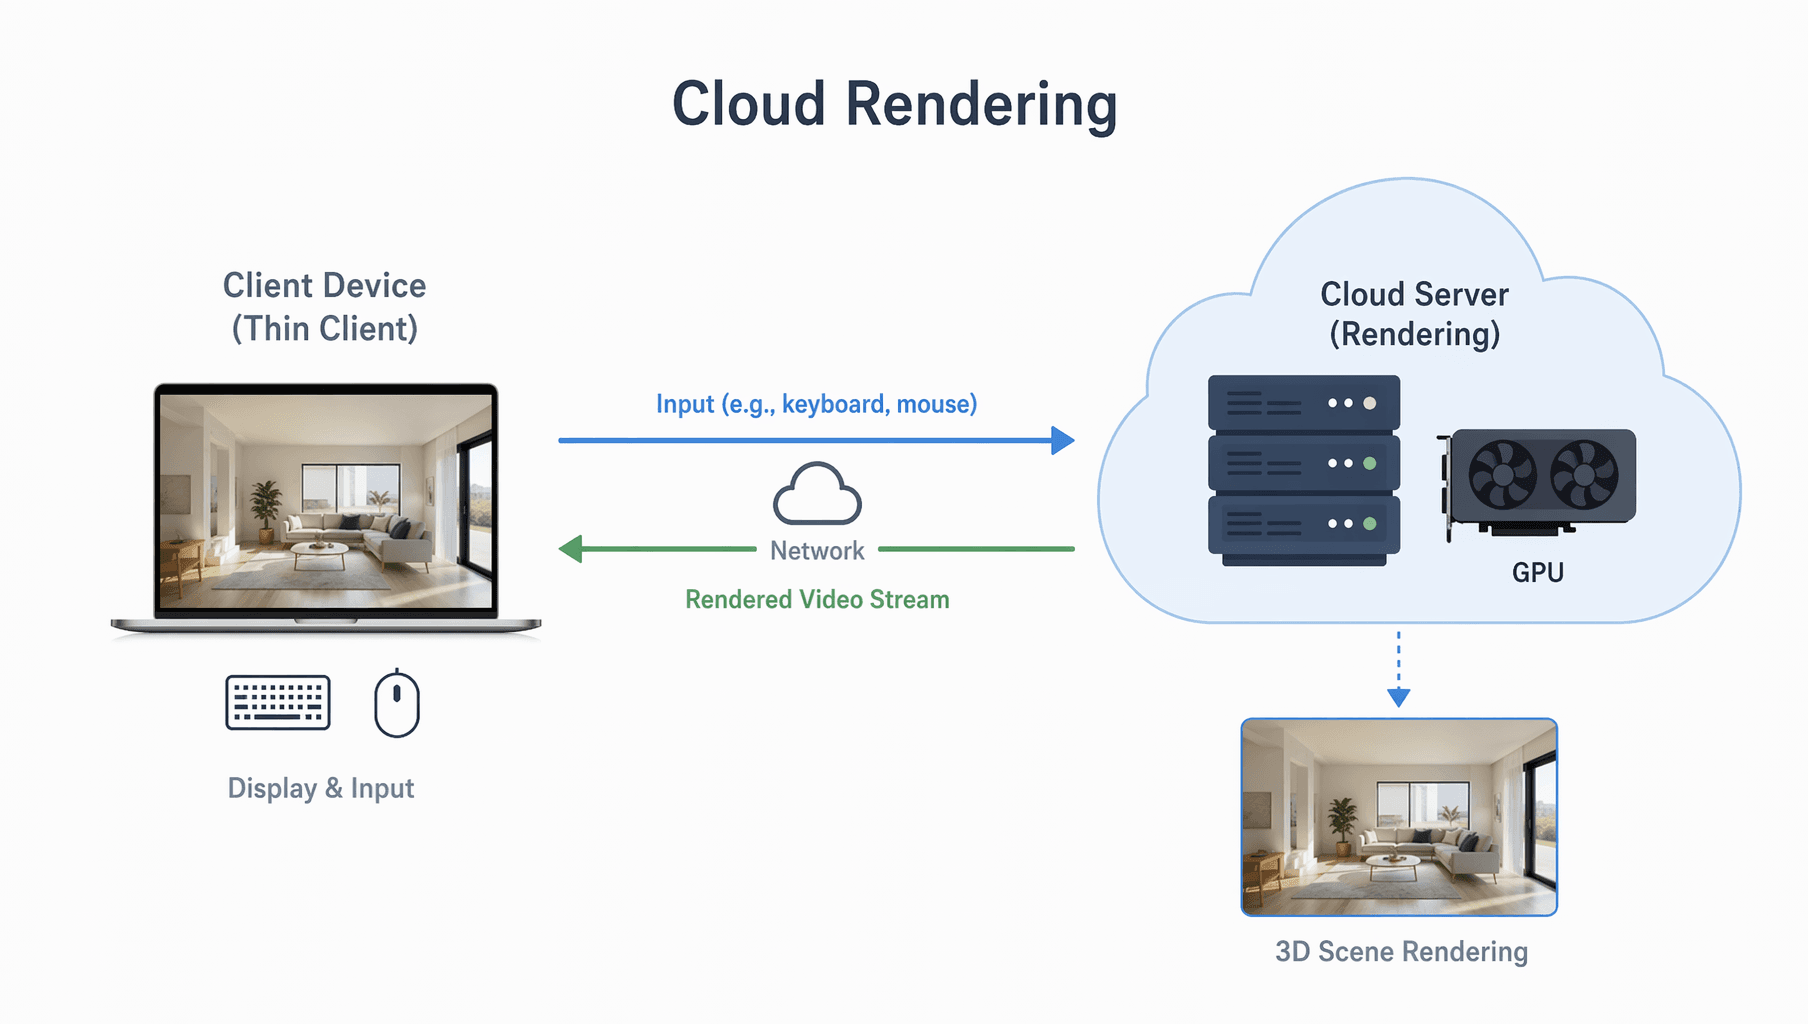
If you are new to cloud workflows, it also helps to understand what cloud rendering is and when it is better than relying only on local hardware. If your machine is already struggling with heavy scenes, you may also want to look at a better PC for modeling and rendering.
How to Use A Render Farm?
Step 1. Prepare Your Project File
Before using a render farm, the most important step is making sure all project resources are collected into one clean file package. Different software handles this differently:
- Maya: Archive Scene
- 3ds Max: Resource Collector
- Blender: Pack Resources
- Cinema 4D: Save Project with Assets
For this tutorial, we will use Blender as the example. Once your scene is ready, use Pack Resources so your textures and other linked data are stored correctly inside the `.blend` workflow.

Step 2. Create Your Account and Open the Platform
Go to the Fox Renderfarm website, register an account, and verify your email. After logging in, you can choose the software you want to render with and enter the web interface.
At this stage, the important part is not the coupon itself, but making sure you enter the correct workflow for your software so the project can be submitted with the right configuration.

Step 3. Get Familiar with the Main Tabs
Inside the web interface, the main tabs are straightforward:
- Overview: job summary, credits, and storage
- Assets: upload project files
- Submit: choose files and create a render job
- Analysis: check the scene for possible issues before rendering
- Rendering: manage current and completed jobs
- Statistics: review render details and job data
Understanding these tabs first will make the rest of the submission process much easier.

Step 4. Install the Upload Tool
Fox Renderfarm uses RaySync to speed up file upload and download. Installing it first makes the submission process much smoother, especially for larger Blender projects.
If you often work with bigger scenes and want to improve efficiency before uploading, this guide on how to render faster in Blender is also useful.

Step 5. CPU or GPU Region
Select your processing hardware relative to your project, if you are using GPU rendering in your project file, select one of the GPU Regions, if you are CPU Rendering, select one of the CPU regions.

Step 6. Adding Coupons
Click User Center in the overview tab, Click Coupon tab on the new page, then select Redeem Coupon on the top right>Use coupon code to redeem.


Step 7. Upload the Project
Head to Assets tab, toggle 'Keep Local Path', and press upload file, and locate your packed Blend file - This will use Raysync to upload.


Step 8. Select Software
Once uploaded, Go to the Submit Tab, Select your Software, and locate your .blend file, select continue.

Step 9. Creating a Config and sending your job for analysis.
You must create a config to continue with your render, enter a config name, e.g. 'Project', select your Operating System, and select the version of the software you are using, in my case it is Blender 3.5.1, then click Save.
You will then be prompted to edit the Hardware Configuration, Select the GPU Model to use (RTX 3090), put GPU Number to 2* and select your RAM as 64GB for a normal project or if you are using a lot of data, you can also use 128GB of RAM (This will incur an additional 20% fee to your project credits)
Send the job to 'Go Analysis'


Step 10. Analysis
In the Analysis Tab, your project will be there pending. This usually takes a few minutes but could sometimes take longer.
Once Analysis is complete, you can go into the details and see if there are any errors or warnings.
Errors mean they need to be rectified and render can not commence.
Warnings mean there may be some advisories but the project can still go ahead if you are happy.
Hint: Seek help from online 24/7 customer service, if you can't solve the problem yourself, they are very fast and reliable.
If you have no Errors or Warnings and are happy to continue, select 'Continue' or 'ignore and continue'.


Step 11. Common Settings
Once 'ignore and continue' was selected, you will be prompted with the common settings tab.
To be safe I would toggle first frame, middle frame and last frame for a test render and select 'Submit' - This will allow you to make sure those 3 renders in your scene are done first so you can check over them before committing to a final render.

Why Test Frames Matter
Before sending the full animation or image sequence, it is always safer to render a few test frames first. A first frame, middle frame, and last frame check can help you catch texture issues, missing caches, lighting problems, or memory limits before you spend credits on the full job.
Step 12. Rendering
You will now be on Rendering Tab where your test rendering will begin, once the 3 renders are done, you can select the project in the scene list, this will open the job details.
Scroll down and take a look at your first frame, middle frame and last frame to confirm everything is okay - you can use the preview window to check the render is okay.


Step 13. Confirming Full Render
Once you are happy with the results you can go back to the scene list in the Rendering Tab, select your project from the check list and toggle the Render Full Job.
You may be prompted with a 'kind tips' pop up if your memory usage was close to the 64gb limit, you can increase to use the 128gb RAM if so which will give you more wiggle room in peak memory usage whilst rendering.
Once confirmed on your 64/128gb Ram size, you will have to repeat the step of selecting the project check box and toggling the 'render full job' option again.
This will prompt you one last time to confirm the test renders you took before are to your satisfaction before the job goes ahead for a full render.


Step 14. Rendering
Full render has now commenced, you will be prompted with an email once completed.

Step 15. Download Results
Once completed, you will be prompted with an email, head back into the rendering tab, select your project from the scene list and click the output file tab.
Scroll through your renders so they all cache into the system and then hit the select all check box then download, this will prompt you with a location needed to save.
Once you chose a location on your device, the RaySync will download the files to this location.
Job Done.

Conclusion
Using a render farm becomes much easier once you understand the basic workflow: prepare the file, upload the assets, run the analysis, check test frames, and then submit the full render. After the first project, the process usually feels much more straightforward.
If you work in software beyond Blender, the same logic still applies. And if you are comparing services before committing, this guide on how to choose a cloud rendering service can help you make a more informed decision.