Next-generation Style Scene "House in the Mountain" Making Tutorial

final result

In this article, Fox Renderfarm, the industry's leading cloud rendering service provider and render farm, will bring you a tutorial on making a next-gen style scene shared by a 3D art and design student. This was his first time working with ZBrush and it took almost 4 weeks to complete it as he didn't have much experience. The original painting was from the internet and although the result is not very good in terms of completion and details, there is a lot to gain. Now, let's introduce the production process to you.
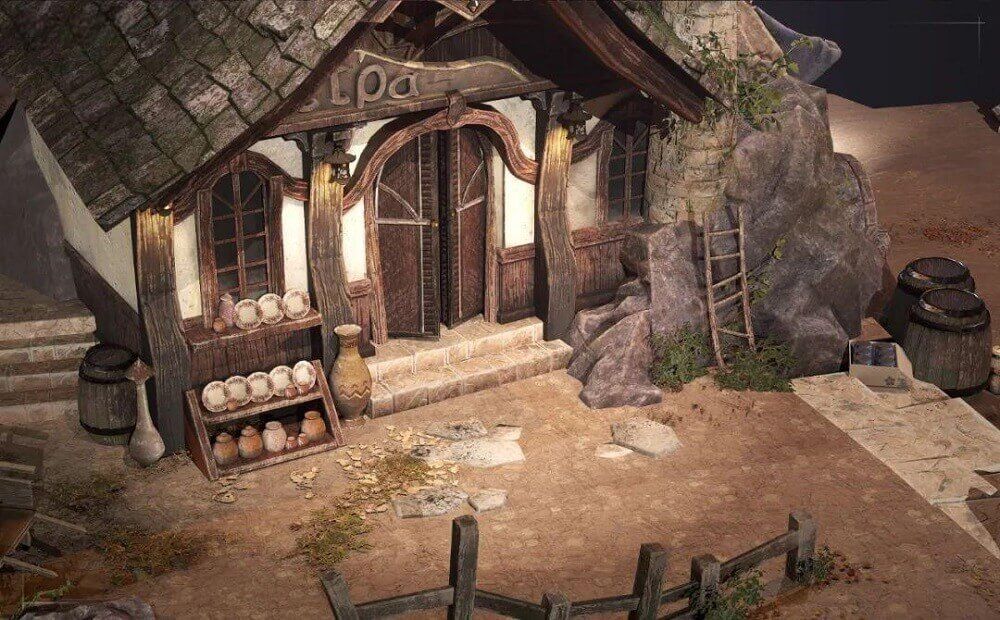
Final results:

final result

final result

Production Process

1. Reference/Original Painting

I considered two aspects to select the reference, one is the richness of the object material, because I wanted to exercise my ability to use ZBrush software by making such common objects as rocks and boards; the second is whether there is enough time to finish. In order to make the result not too low completion, it is also very important to plan the time for your work. Finally, I chose this one.

 original painting

2. Analysis

It is very important to analyze the original painting to improve the efficiency of the following work. By observing the original painting, we can determine the approximate proportions, the parts that are reused, the parts that need to be sculpted, and the materials used (tiles, stone walls, bricks, wood panels, etc.). Then I looked up other references and searched for available resources (material mapping, green transparent mapping, etc.). Split the original painting into sections of houses, props, and rocks and allocate the approximate time needed for each section to ensure completion within the deadline.

Analysis

3. Confirm Project Requirements

Production specifications are very important, so we should clarify the naming format of the project, the size and number of mapping and other specifications before starting work, otherwise it will become very troublesome to redo it afterwards. Base on the specification to make a good decision on the file model naming, pixel density (1 cubic meter 512 * 512), etc., to complete the prep work.

4. Mid-poly Modeling

Mid-poly Modelling

In order to make the final result almost the same as the reference, the first step is to build the approximate shape. My approach is to roughly build a few boxes → set the camera position and focal length → continue to refine the position and scale of the middle model → finally use PureRef to adjust the transparency and size of the reference image and roughly compare it with my model, adjusting model according to the differences.

The original painting I chose is not so complicated, and the objects are relatively neat, so there is no difficulty in making the rough model. The time was mainly spent on comparing the original painting with my model, and at this time, you can associate and copy out the models that are repeatedly used, so that it is convenient to modify them afterwards. For the rocks, which are seriously irregular, you only need to have a general shape, and then use ZBrush for sculpting and reducing the faces. Finally, you can sort out the parts that need to be sculpted first. The parts that need to be sculpted in the original painting are roof tiles, wooden boards, floor tiles, rocks, stakes, etc.

In the process of making the mid-poly model, we need to pay attention to continuously refine the rough model while not destroying the big shape, and to add more details, trying to focus on the loop when wiring. Also, pay attention to the overall relationship, and constantly adjust and optimize.

5. High-poly Modeling

High-poly Modeling

High-poly Modeling

There are a lot of things that need to be sculpted using ZBrush, and through self-learning, I have mastered some of the methods. My sculpting idea is to make chamfers and add some cracks and other details to give the object a sense of ageing while ensuring the hardness of structures.

The process of carving the boards was relatively smooth, but it was more difficult to carve the rocks, which had to restore the shape of the original painting and also conform to the natural formation pattern of the rocks. After continuous modifications, the final result was not bad.

6. UV Baking of Low-poly Model

UV Baking of Low-poly Model

First, in order to change the mid-poly model to low-poly model, you can delete useless lines, faces and points. For models that are sculptured excessively, you can use ZBrush to make adjustments. Then start to set the smooth group and split UV. Set smoothing group in the faces with too sharp angle, and the UV must be separated in the places where the smoothing groups are different, otherwise there may be black surface or bad effect when baking normal. There are many reasons for the error in the final result (smoothing group in wrong places, normal direction, high-poly and low-poly model matching, etc.), so we can only correct the errors one by one.

7. Making of Materials

Making of Materials

Before importing the model into Substance Painter, the preparation work must also be done. I had a large number of models, so in order to meet the pixel accuracy of 1 cubic meter/512*512, I divided the model into 12 parts and gave 12 material balls to each part, so that I could operate in 12 layers after importing the models into Substance Painter.

My process of making mapping is customarily divided into these steps: create a folder → add a mask for selection → add a fill layer to fill the basic inherent color → add smart materials / mapping resources for fine-tuning changes → add dirty stains (dirty stain generator) → add object relationships (AO generator) → add the upper white and lower black visual effects of the overall object (location generator) → edge wear (metal edge generator) → add details such as dirt. If there are unnatural places, you can add the painting layer to modify.

8. Rendering

final result

The last thing is to organize the files and rendering. The texture files exported from Substance Painter must be named well and organized in a uniform way, otherwise it is a waste of time to modify the names and paths again.

After organizing all the files into a new model folder, I put the model into the Marmoset Toolbag for the final rendering. Through the study of fog effects and lighting, I put warm light in the scene according to the reference, and cold light behind it for contrast between warm and cold, but I also made the stone look too bright, which was modified and improved after the teacher reminded me. Although the final result was not particularly impressive, I finished the project in a moderate way, and it was still very fulfilling to see the final result.

Finally, I am very grateful to my teacher and classmates for their help to complete such a scene. The above is the experience sharing of my whole production process. Although I encountered some difficulties during the process, I finally solved them successfully after hard work. I also hope that I can correct mistakes and make progress in the future based on my previous experience.

Sourec: Thepoly

Welcome to join us

render farm free trial

Recommended reading


Top 9 Best And Free Blender Render Farms of 2024

2023-05-06


Revealing the Techniques Behind the Production of Jibaro "Love, Death & Robots", Which Took Two Years to Draw the Storyboard

2023-01-13


Top 10 Free And Best Cloud Rendering Services in 2024

2023-09-26


Top 8 After Effects Render Farm Recommended of 2023

2023-02-02


Shocked! The Secret Behind Using 3D to Make 2D Animation was Revealed!

2022-05-11


How to Render High-quality Images in Blender

2023-01-13


Easy Cel Shading Tutorial for Cartoon in Blender Within 2 Minutes

2022-07-01


8 Best And Free Blender Cloud Rendering Services in 2023

2023-02-02


Partners

Interested

The Ruins of David Made With 3ds Max & ZBrush
In this article, Fox Renderfarm, a leading cloud rendering service provider and render farm in the CG industry, will share with you a 3D scene called "The Ruins of David" that was collaboratively created by a student team over a span of 4 weeks with the PBR process.Final result:Observing and Analyzing Concept Art &x26; Asset AllocationOur reference was inspired by the work of a skilled artist we found online. It was our first attempt to collaboratively create a PBR scene from start to finish as a team. Throughout the process, we were constantly exploring and learning, but fortunately, we managed to complete the project in the end.For our scene, sculpting played a major role. We followed a production workflow that involved using 3ds Max for rough modeling, ZBrush for high-resolution sculpting, and then Topogun for creating low-polygon topology. During the high-resolution phase, we utilized KeyShot for rendering. Afterwards, we used Substance Painter, Photoshop, and Pixplant for texture and material creation. Finally, we rendered and outputted the scene using Unreal Engine 5.To ensure collaborative work while maintaining overall proportion unity, we initially need to establish the rough shape proportions and object placement based on the concept art. Afterward, we assigned tasks and divided the entire scene into five parts: the head of David, the distant mountains, the stairs and platform, the pillars and ornaments, and the background mountains with nearby rocks along with the obscured mountains in the foreground.Asset allocation chartLarge-scale scene constructionMaking Mid-poly ModelIn this scene, the only parts that required mid-poly modeling were the stone pillars, steps, and other small objects. For the rest of the scene, we mainly used a box or sphere shape and directly imported them into ZBrush for sculpting.Mid-poly model of small objectsMaking High-poly ModelCompared to the leisurely mid-poly modeling stage, the high-poly modeling phase is much more lengthy and complex. Approximately 90% of the entire scene required using ZBrush for high-resolution sculpting. Since most objects during the mid-poly modeling stage were very rough, we not only had to shape them but also focus on capturing intricate details. We conducted extensive research and decided to focus on creating a desert and wind-eroded terrain. The majority of the artificial objects in the scene were made of sandstone. During the sculpting process, we had to ensure the integrity of the main structure while considering the effects of wind erosion on the material surface, such as which structures would be eroded and which ones would be preserved. We went through many trial-and-error stages. Initially, we struggled with rigidly replicating the structures, but with guidance from our instructor, we eventually found the correct approach. By closely observing real mountains and wind-eroded statues, we finally achieved the desired aesthetic.Sculpting of Mountain StonesSculpting of pillars and small objectsSculpting on the side of the stoneWhen creating the sculpture of David, as it was our first time sculpting a human figure, we had to make countless modifications just to get the lips right. One moment, it would resemble a rugged, masculine face, and the next moment, it would transform into a delicate, feminine one. It must be said that facial sculpting for the character was indeed one of the challenges in this scene. Even the slightest change could disrupt the overall proportions. There were moments when I looked at the ugly face I sculpted and felt like giving up. Fortunately, with guidance from our instructor and numerous revisions, we were able to somewhat capture the essence of Michelangelo's David.Sculpting of the Statue of DavidFailed versionOf course, there were many other challenges besides these. The making of the candles was also a headache. We struggled for a long time to recreate the true essence, so we decided to simply buy two large candles. We burned them day and night until they finally took on the appearance we desired.Candles dedicated to the artsSculpting of candlesMaking Low-poly ModelIf the previous process was more like creation, then making the low-poly models is more like streamlining and finalizing the previous work. We used two methods to create low-poly models. One method involved using ZBrush's automatic retopology tools to generate the low-poly models, and then organizing the topology in 3ds Max through subtraction. The second method, used for objects like heads and candles, involved using Topogun for retopology. This method required patience and attention to detail. We needed to ensure simplicity, comply with proper topology standards, and also preserve the silhouette contours and main structures as much as possible.Low-poly of Statue of DavidAfter the topology phase, we moved on to the stage of UV unwrapping and baking normal maps. UV unwrapping may seem like an ordinary process, but it actually has a significant impact on the final result. If not done properly, it may even require rework in the later stages. To ensure consistent UV size, we adopted a pixel density of 256 pixels per cubic meter (256/m³) for our production.After the UV layout was completed, the next step was baking. We needed to match the high-poly and low-poly models as closely as possible in 3ds Max, ensuring minimal gaps or low matching accuracy. Afterwards, we exported the models to Substance Painter for baking the normal maps and ambient occlusion (AO). However, due to our limited experience, we often encountered rainbow artifacts, which required numerous iterations of rework. In some cases where certain issues were difficult to resolve, we directly hand-painted the normals using Photoshop to solve the problem.For different materials, we adopted a method of using material balls to differentiate them. It is crucial to have standardized naming conventions for the material balls, as any lack of consistency in naming can lead to significant difficulties during the later stages of production.Making MaterialsWe put a lot of effort into sculpting the details, while the material aspect was relatively easier. We adopted the standard PBR (Physically Based Rendering) workflow for material creation. We focused on establishing the overall volume first and then added specific details such as weathering and cracks. Unlike individual material creation, the team's material production required coordination among members to achieve a unified artistic style and texture. Objects with the same material were assigned identical generators and material balls to maintain consistency in the art style, while incorporating different details to avoid excessive repetition.To avoid significant discrepancies between different team members' work, we would apply similar materials to the engine and observe the overall effect. This allowed us to determine how to modify the materials to ensure a consistent and cohesive final result.RenderingFrom the beginning of the production, we planned to do the final rendering in UE5 (Unreal Engine 5). In order to achieve this goal, we worked overtime and studied UE5 for more than a week. During this stage, we faced considerable difficulties and had to explore and learn as we progressed. We were challenged by various nodes and encountered obstacles along the way. Thankfully, we managed to resolve most of the issues in the end.Making of terrain material ballsCandle making was also a challenging aspect. In order to achieve the effect of flickering flames and dynamic firelight, we chose to use the Niagara particle system for the candle. We worked overtime for several days specifically to study and develop this relatively fundamental effect for the candle's flame.Fire particle effectsRenderingConclusionThe above is our experience and insights into the entire production process. Together, we faced many unprecedented challenges and encountered new software and knowledge. However, with the collective efforts of all team members, we successfully overcome those obstacles. We would like to express our gratitude and appreciation to everyone for their hard work and dedication!Fox Renderfarm is a 3ds Max cloud rendering service provider and 3ds Max render farm dedicated to bringing more useful tutorials to our 3ds Max users. We are offering a free $25 render trial to all new users, get rendering to free up your computer now.Source: Thepoly
More
2023-08-10
Learn How to Make a Henry Cavill Superman in 3D
If you're a 3D learner and love the Superman movie, it's time to make a 3D Superman just for you. Now, follow the industry's best cloud rendering service provider and render farm, Fox Renderfarm, to see how CG artist H cheng made his Superman.Final results of 3D Henry Cavill Superman:The tools used in making 3D Henry Cavill superman are as follows:High-poly: ZBrush, Marvelous DesignerTopology: Wrap4D, MayaMapping: Mari, Substance PainterHair: XGenRendering: Arnold/UECollection of MaterialsBefore we start, we need to decide the theme and collect the required reference material. I chose Henry Cavill as Superman model for this project. Then we can try to collect as many photos of his stylized look shown in the movie as reference.Next, in the portrait making process, we can find some multi-angle life photos or portraits of Henry Cavill, which is convenient for us to observe the structure and capture the shape.Model SculptingIn the modeling process, we need to set the size and proportion of the realistic character model at the beginning. Having a realistic scale for reference will help us in the subsequent detailed production, as well as hair and material production.When working on realistic character or orc-like projects, solid anatomical knowledge and sculpting skills are essential. These factors fundamentally determine the depth and quality of our models. Therefore, it is necessary to practice sketching regularly. For example, I also do similar sketching exercises in my daily routine, trying to control each sketch exercise within half an hour with a specific purpose. During the practice, I can use the built-in slice tool in ZBrush as a basic framework. Its size is based on realistic human head proportions, which allows us to practice skull or muscle anatomy. The exercise is shown in the image below:Once we have acquired a certain level of foundational skills and a wealth of theoretical knowledge, we can use our understanding of anatomy to engage in sculpting exercises for designing orc-like characters.With a solid foundation and extensive knowledge of anatomy, when working on character designs like this, we can analyze the anatomical structures of the human, animal, or orc-like creature in a rational manner during sculpting. Mastering the anatomy of the head, body, or other forms allows us to analyze and refine the design in a logical way. For example, in the case of this orc head model, as shown in the image below:There is actually no difference in terms of muscle structure between his face and a realistic human. We analyze it rationally because it has a different skeletal structure from a human's, and its facial features have distinct shapes, resulting in noticeable differences in the muscle structure. However, under the overall skeletal framework, their muscle anatomy is the same. It's like the same piece of clothing hanging on different hangers, forming different folds, but fundamentally, its essence remains unchanged. Therefore, the formation of the fold shapes follows certain patterns that can be observed. This requires us to have a solid theoretical foundation to support our analysis.We achieve large-scale detailed sculpting using ZBrush, making effective use of scan-based mesh retopology techniques. For quick mesh symmetry, we directly utilize R3DS Wrap. R3DS Wrap is a professional-grade 3D topology tool software that has revolutionized the way we handle 3D scan data. When working with human scans or similar subjects, existing basemeshes can be loosely matched to each scan. It also provides a set of highly useful scan processing tools such as decimation, mesh filtering, and texture projection. Thanks to its node graph architecture, once a single scan is processed, the same approach can be applied to an unlimited number of other scans.Mapping of CharacterAfter completing the high-resolution sculpting of the body, we use Mari to start creating the skin texture channels. The overall workflow is quite simple, and I'll briefly describe it.For color painting, we utilize XYZ scan materials and wrap them using the ZWrap plugin, which serves as a realistic texture base. Then, in Mari, we make adjustments and add details to the projected textures. We overlay multiple color biases on the color map to achieve a rich color effect. Since gorillas have black skin, the details we paint or obtain from XYZ materials may not be clearly visible. Therefore, we add a layer of lighter color contrast to enhance some details.When creating roughness and specular maps, we need to pay attention to the variations in highlight levels and roughness intensity. The highlight map can be created by inverting the colors of the roughness map and then making adjustments accordingly. For the complete set of skin texture maps, I have created the color, specular, roughness, and SSS (Subsurface Scattering) strength and color maps.Production of ClothingFor clothing production, I primarily rely on Marvelous Designer for fabric simulation and utilize ZBrush for quick sculpting and refinement.Marvelous Designer has become widely used in CG art production. Therefore, it is essential for us to learn and master the basic usage of this software.I am not particularly skilled in using Marvelous Designer myself. I am only familiar with its main function of fabric simulation, which assists in model creation. To create realistic clothing patterns, it is necessary to have a basic understanding of garment cutting theory, especially for formal or workwear attire. Details such as waist openings or cuff offsets can affect the final result of fabric simulation. For unique designs, we can refer to existing paper patterns as references.Of course, when working on the Superman costume, I didn't follow such strict procedures. Since it is a form-fitting suit, I directly created the base mesh in ZBrush and imported it into Marvelous Designer for fabric simulation and folding. Marvelous Designer can quickly assist us in achieving small wrinkle formations around muscle compressions and structural transitions. It is very convenient to use in this regard.The process of creating textures for clothing is relatively simple. I directly imported the model into Substance Painter and used a tiled texture as the fabric pattern for the garment. Then, I assigned a base color and added some procedural textures as needed. To achieve the desired fabric texture effect, I adjusted the material nodes in Maya, which provides similar results.Production of MaterialsCreating materials for skin is very straightforward. The surface material effect in Arnold can directly present a very natural and realistic result. When adjusting the skin material nodes, it is important to note that the value of surface scale is influenced by the scene's scale, and it should complement the color of the radio to achieve the desired effect. When tweaking the parameters, it is helpful to enable real-time rendering to observe the effects while making adjustments.Production of HairWe use XGen for hair styling as it is a widely-used and highly effective tool for creating hair in the industry.Traditional XGen provides high control and flexibility over the styling of hairs, allowing us to meet most of our requirements. When working on the guide hairs, we need to pay attention to the hierarchy and even distribution of the guides. We can also utilize masking painting and the addition of modifier nodes to achieve different hair descriptions and styles.Above is the main process of making the 3D version of Henry Cavill Superman. The next steps are material rendering and connecting each part, which will not be explained in this article. We hope this article is helpful to you.Source: H cheng
More
2023-07-13
3D Tutorial of Next-generation Scene "Magic Book Room"
In this article, as a leading cloud rendering service provider and render farm in the CG industry, Fox Renderfarm will bring you a tutorial on creating the 3D scene of the next-generation "Magic Book Room".1. Analyze and Build a Rough ModelThis is a case of PBR process, specifically using 3ds Max to complete the low-poly model, ZBrush to complete the high-poly sculpting, TopoGun for topology, Substance Painter and Photoshop for texture production, and finally using UE4 for rendering.To ensure that we can still achieve model proportion consistency after dividing the workload, we first built the overall scene in 3ds Max based on the original artwork as a reference for proportion. Then, after assigning each person with their respective models and props, we began the production process.2. Making Mid-poly ModelHouse structure: As the basis of the scene framework, the house is divided into three parts: roof, walls, and floor. By analyzing the original painting, the walls and floor are made of four-sided continuous materials, and the walls can be made into modular kits, which can then be reused in the scene.Props part: Scene props include two statues, a number of books, chairs and so on, of which statues, chairs, Roman columns and other props are sculpted in ZBrush, while books are classified based on material mapping, and a total of 18 books are produced to facilitate the future reuse.The process of making a mid-poly model is to refine and add more details on the basis of the rough model. In the pre-production, we should analyze what models need to be sculpted and topped, and what models can be obtained from the low-poly model by reducing the line in the mid-poly model. Pre-production analysis and planning can greatly improve the efficiency of our production.3. Making High-poly ModelThe production of the high-poly model is relatively calm, everyone is doing their own work in a step-by-step manner. The rough model made at the beginning is convenient for the present scale reference, so it is smooth to adjust the scene.Sculpting of statues:Sculpting of props:In order to better reflect the texture of the wooden chair, the wood grains on them were all carved by me one-by-one. I also sculpted the Roman columns, treasure chests, lamps and other props.4. Making Low-poly ModelIn the early stage, we analyzed the assets and found that only two statues needed to be topologized, the low-poly model of the remaining props could be obtained by reducing the line of the mid-poly models. Topping the low-poly model is a simple but patient job. There are several points to note in the process of topologizing statues:(1) Control of model face;(2) How to layout wiring in a reasonable way, and whether some details need to be topologically designed;(3) Whether the wiring density is reasonable;During the low-poly topology phase, there are not many difficulties encountered. We made textures with a standard of 1m3/512 pixels and finally planned the texture reasonably according to the preset pixel density. Then we performed UV unwrapping and layout. During this process, some models had seam problems, but we were able to locate the issue - it was due to some areas of the model not being disconnected from the smoothing group in the UV. When placing the UV, it is important to make full use of the UV space to avoid wasting resources, and further UV rework may be required in the future.Next is to bake the normal map. We matched the high-poly and low-poly models in 3ds Max, and then kept a certain distance between all models to avoid overlapping when baking. If there are issues with the baked normal map, we use Photoshop to repair it. Throughout the baking process, we did not encounter major problems, so any necessary modifications in Photoshop were minor.5. Creating Textures/MaterialsWhen making materials, it is important to focus on the overall volume first before adding the finer details. By "volume," we do not just mean that the material should have a three-dimensional appearance under lighting conditions, but rather there should be a sense of volume even in the absence of lighting effects, through the use of color and shading. The addition of dark tones and textures will further enhance the sense of volume in the model. Finally, a sharpening filter can be applied to make the details more visible, resulting in a material that has a true sense of depth under lighting effects.6. RenderingAfter meticulous file organization, we also standardized the naming of models, material balls, and textures, which made our work much easier when we entered the UE4 engine. After all the preparation work was completed, we began to place the models, add lighting and special effects, and finally set up the camera for rendering. During this process, a lot of time was spent on lighting, and it was difficult to achieve the desired effect in the combination of model materials and lighting. Finally, the problem was solved by using the lighting channel in UE4.Final result:ConlusionThe above is our experience and tutorial sharing on the entire production process. The experience of this month and a half of production has benefited us greatly. We not only consolidated the production process but also learned many production experiences and supplemented previous knowledge. Although we encountered many difficulties during the process, when the final product was completed, we felt that all the previous efforts were worthwhile.Source: ZCOOL
More
2023-05-25
Business Consulting

Global Agent Contact:Gordon Shaw

Email: gordon@foxrenderfarm.com

Marketing Contact: Rachel Chen

Email: rachel@foxrenderfarm.com

Message Us:
Newsletter
Keep up with our latest software updates, special offers and events!
Copyright © 2024 FoxRenderfarm.com. All Rights Reserved.