
3D Tutorial of Next-generation Scene "Magic Book Room"
3ds Max Tutorials
In this article, as a leading cloud rendering service provider and render farm in the CG industry, Fox Renderfarm will bring you a tutorial on creating the 3D scene of the next-generation "Magic Book Room". 1. Analyze and Build a Rough ModelThis is a case of PBR process, specifically using 3ds Max to complete the low-poly model, ZBrush to complete the high-poly sculpting, TopoGun for topology, Substance Painter and Photoshop for texture production, and finally using UE4 for rendering.To ensure that we can still achieve model proportion consistency after dividing the workload, we first built the overall scene in 3ds Max based on the original artwork as a reference for proportion. Then, after assigning each person with their respective models and props, we began the production process.!Rough Model 2. Making Mid-poly ModelHouse structure: As the basis of the scene framework, the house is divided into three parts: roof, walls, and floor. By analyzing the original painting, the walls and floor are made of four-sided continuous materials, and the walls can be made into modular kits, which can then be reused in the scene.Props part: Scene props include two statues, a number of books, chairs and so on, of which statues, chairs, Roman columns and other props are sculpted in ZBrush, while books are classified based on material mapping, and a total of 18 books are produced to facilitate the future reuse.The process of making a mid-poly model is to refine and add more details on the basis of the rough model. In the pre-production, we should analyze what models need to be sculpted and topped, and what models can be obtained from the low-poly model by reducing the line in the mid-poly model. Pre-production analysis and planning can greatly improve the efficiency of our production.!Mid-poly Model 3. Making High-poly ModelThe production of the high-poly model is relatively calm, everyone is doing their own work in a step-by-step manner. The rough model made at the beginning is convenient for the present scale reference, so it is smooth to adjust the scene.Sculpting of statues:!Sculpting of statuesSculpting of props:!Sculpting of box!Sculpting of chairIn order to better reflect the texture of the wooden chair, the wood grains on them were all carved by me one-by-one. I also sculpted the Roman columns, treasure chests, lamps and other props.!Low-poly Model 4. Making Low-poly Model!Making Low-poly ModelIn the early stage, we analyzed the assets and found that only two statues needed to be topologized, the low-poly model of the remaining props could be obtained by reducing the line of the mid-poly models. Topping the low-poly model is a simple but patient job. There are several points to note in the process of topologizing statues:(1) Control of model face;(2) How to layout wiring in a reasonable way, and whether some details need to be topologically designed;(3) Whether the wiring density is reasonable;During the low-poly topology phase, there are not many difficulties encountered. We made textures with a standard of 1m3/512 pixels and finally planned the texture reasonably according to the preset pixel density. Then we performed UV unwrapping and layout. During this process, some models had seam problems, but we were able to locate the issue - it was due to some areas of the model not being disconnected from the smoothing group in the UV. When placing the UV, it is important to make full use of the UV space to avoid wasting resources, and further UV rework may be required in the future.Next is to bake the normal map. We matched the high-poly and low-poly models in 3ds Max, and then kept a certain distance between all models to avoid overlapping when baking. If there are issues with the baked normal map, we use Photoshop to repair it. Throughout the baking process, we did not encounter major problems, so any necessary modifications in Photoshop were minor. 5. Creating Textures/MaterialsWhen making materials, it is important to focus on the overall volume first before adding the finer details. By "volume," we do not just mean that the material should have a three-dimensional appearance under lighting conditions, but rather there should be a sense of volume even in the absence of lighting effects, through the use of color and shading. The addition of dark tones and textures will further enhance the sense of volume in the model. Finally, a sharpening filter can be applied to make the details more visible, resulting in a material that has a true sense of depth under lighting effects.!Creating textures and materials!Creating textures of chair 6. RenderingAfter meticulous file organization, we also standardized the naming of models, material balls, and textures, which made our work much easier when we entered the UE4 engine. After all the preparation work was completed, we began to place the models, add lighting and special effects, and finally set up the camera for rendering. During this process, a lot of time was spent on lighting, and it was difficult to achieve the desired effect in the combination of model materials and lighting. Finally, the problem was solved by using the lighting channel in UE4.!Rendering 1!Rendering 2Final result:!Final result ConlusionThe above is our experience and tutorial sharing on the entire production process. The experience of this month and a half of production has benefited us greatly. We not only consolidated the production process but also learned many production experiences and supplemented previous knowledge. Although we encountered many difficulties during the process, when the final product was completed, we felt that all the previous efforts were worthwhile.Source: ZCOOL

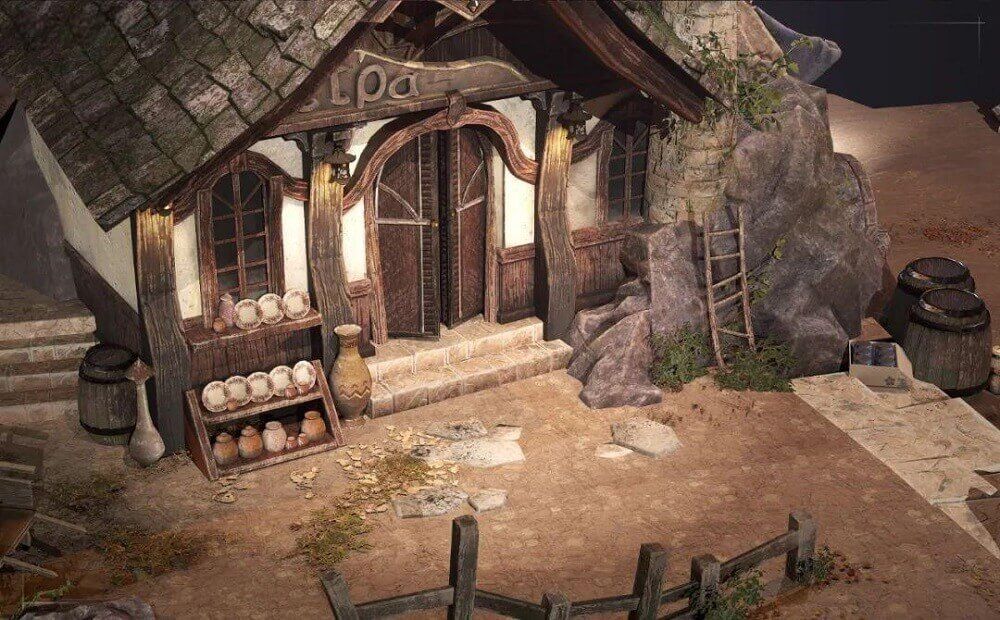
3D Tutorial: "Water Temple" Scene Production
3D Tutorial
In this article, Fox Renderfarm, a leading cloud rendering service provider and render farm, brings you a collaborative 3D scene "Water Temple" created by four students. This project was inspired by artist Sergei PaninPRO.Final result:!Final result 2 1. Analyze Original Painting and Asset Allocation!Analyze Original PaintingThe entire scene is a PBR process case. First, we used 3ds Max's gray box to build the overall framework of the entire scene, in order to ensure that the overall proportion structure is correct. Then, we evenly distributed various asset models inside the framework to each team member, allowing them to improve the details of their responsible models, and then used ZBrush to complete the refinement of the entire high-poly model. We used the Decimation Master and TopoGun 3 Beta in ZBrush for retopology. Afterwards, we used Marmoset Toolbag 4 for high-poly and low-poly matching, and the resulting low-poly model was taken into Substance Painter to complete material production. Finally, we used UE4 to render the images. 2. Making Mid-poly ModelThe production of the mid-poly model involves continuous modification and improvement based on the white-box model. During the early stages of production, various issues such as wiring, sculpting, topology, and which models can be reused to avoid wasting resources must be considered. Since the objects in our scene are made separately, after the team members modify their models, the team leader needs to constantly control the overall proportion of the scene on a large scale. During the production process, the model is continuously refined to achieve a general appearance with reasonable and symmetrical wiring, which is convenient for subsequent high-poly carding and sculpting. And individual components and the overall effect are repeatedly observed, while the proportion size is continuously adjusted to ensure that the model's proportions are not disordered when integrated later.!Making Mid-poly model 3. Making High-poly ModelThe high-poly modeling process went relatively smoothly, and everyone was working step by step on their own tasks. Because the low-poly model served as the basis for proportion, everyone did not encounter many problems when integrating the scene.The entire scene was built up from stacked boxes, and there were no major issues in constructing the low-poly model. The key focus was on high-poly sculpting to recreate the mysterious atmosphere of the ruins, which required a significant amount of stone sculpting. The sculpting approach aimed to ensure uniformity of the stone material and enhance the surface details. Due to a lack of experience, the sculpting process was initially slow, and some patterns could not be reproduced. Some of the methods used for detailing may have been wrong. Finally, with the guidance of the teacher, a method using grayscale maps was found, which saved a lot of time. First find suitable grayscale maps and then generate masks using ZBrush.High-poly models were used for rendering the scene, and to ensure a good rendering effect, we decided to duplicate and place models of flowers, grass, and other vegetation that appeared repeatedly. Finally, we rendered the scene and set up the lighting using Marmoset Toolbag for easy observation of the overall effect.!Making high-poly modelZBrush sculpting!ZBrush sculpting 1!ZBrush sculpting 2!ZBrush sculpting 3 4. Making Low-poly ModelSince most of our models were sculpted, the face count is usually very high. When creating low-poly models, reducing the face count is a very important task that must be prioritized. Therefore, we first used the Decimation Master in ZBrush to perform an initial reduction of the face count for our high-poly models.The purpose of this retopology was to reduce the extremely high number of faces in the high-poly model all at once, while also preserving the structure and preventing deformation during the reduction process. However, one disadvantage is that after using the decimation master to reduce the face count, the topology becomes very messy. Therefore, it is necessary to do a secondary retopology in TopoGun 3 Beta while organizing the topology. Extra topology should be added to areas with important structures, prioritizing structural integrity.!Making low-poly model 1In areas without structure or where there is only one flat plane, such as the following stake, the topology can be simply optimized to further reduce the face count while optimizing.!Making low-poly model 2The retopology process is time-consuming, and if one is impatient, not only will the face count be reduced poorly, but it may also cause issues with the low-poly model. Therefore, it is important to have a lot of patience when it comes to retopology. 5. Making Material For materials, we used Substance Painter for sculpting and texturing. Since this was our first time collaborating to create materials of scenes, initially there were no problems when looking at each person's materials. However, after merging them together, we found issues with the differences in color and style between the materials not matching each other. Afterwards, we discussed and determined the color schemes and textures together, which made the material creation process much smoother.!Making Material 1!Making Material 2!Making Material 3 6. Final Render Why did we choose to render in UE4 instead of Marmoset Toolbag? Because it's more convenient to use the waterfall, river resources, and arrange some vegetation in UE4. Additionally, texturing in UE4 is also faster.After all preparations were completed, the only thing left was file integration. Everyone had been naming and organizing files since the beginning, so the final integration stage went relatively smoothly. Although there were some minor problems, they were all caused by models not being named clearly enough, so it's important to pay attention to proper file naming. The remaining work involved leisurely placing textures, arranging vegetation, and setting up lighting. One point to note about lighting is not to let the scene have areas that are completely black, as this will affect the overall effect of the scene.!Final Render 1!Final Render 2 7. ConclusionThe above is our production process for the entire scene. This experience is truly invaluable, and we hope that everyone can cherish this process. When encountering difficulties or differences of opinion, don't give up. Keep working together to solve problems, because your persistence will definitely lead to better results.Source: Thepoly

Next-generation Style Scene "House in the Mountain" Making Tutorial
ZBrush Tutorials
!final result!final result Production Process 1. Reference/Original Painting I considered two aspects to select the reference, one is the richness of the object material, because I wanted to exercise my ability to use ZBrush software by making such common objects as rocks and boards; the second is whether there is enough time to finish. In order to make the result not too low completion, it is also very important to plan the time for your work. Finally, I chose this one.! original painting 2. AnalysisIt is very important to analyze the original painting to improve the efficiency of the following work. By observing the original painting, we can determine the approximate proportions, the parts that are reused, the parts that need to be sculpted, and the materials used (tiles, stone walls, bricks, wood panels, etc.). Then I looked up other references and searched for available resources (material mapping, green transparent mapping, etc.). Split the original painting into sections of houses, props, and rocks and allocate the approximate time needed for each section to ensure completion within the deadline.!Analysis 3. Confirm Project RequirementsProduction specifications are very important, so we should clarify the naming format of the project, the size and number of mapping and other specifications before starting work, otherwise it will become very troublesome to redo it afterwards. Base on the specification to make a good decision on the file model naming, pixel density (1 cubic meter 512 512), etc., to complete the prep work. 4. Mid-poly Modeling!Mid-poly ModellingIn order to make the final result almost the same as the reference, the first step is to build the approximate shape. My approach is to roughly build a few boxes → set the camera position and focal length → continue to refine the position and scale of the middle model → finally use PureRef to adjust the transparency and size of the reference image and roughly compare it with my model, adjusting model according to the differences.The original painting I chose is not so complicated, and the objects are relatively neat, so there is no difficulty in making the rough model. The time was mainly spent on comparing the original painting with my model, and at this time, you can associate and copy out the models that are repeatedly used, so that it is convenient to modify them afterwards. For the rocks, which are seriously irregular, you only need to have a general shape, and then use ZBrush for sculpting and reducing the faces. Finally, you can sort out the parts that need to be sculpted first. The parts that need to be sculpted in the original painting are roof tiles, wooden boards, floor tiles, rocks, stakes, etc.In the process of making the mid-poly model, we need to pay attention to continuously refine the rough model while not destroying the big shape, and to add more details, trying to focus on the loop when wiring. Also, pay attention to the overall relationship, and constantly adjust and optimize. 5. High-poly Modeling!High-poly Modeling!High-poly ModelingThere are a lot of things that need to be sculpted using ZBrush, and through self-learning, I have mastered some of the methods. My sculpting idea is to make chamfers and add some cracks and other details to give the object a sense of ageing while ensuring the hardness of structures.The process of carving the boards was relatively smooth, but it was more difficult to carve the rocks, which had to restore the shape of the original painting and also conform to the natural formation pattern of the rocks. After continuous modifications, the final result was not bad. 6. UV Baking of Low-poly Model!UV Baking of Low-poly ModelFirst, in order to change the mid-poly model to low-poly model, you can delete useless lines, faces and points. For models that are sculptured excessively, you can use ZBrush to make adjustments. Then start to set the smooth group and split UV. Set smoothing group in the faces with too sharp angle, and the UV must be separated in the places where the smoothing groups are different, otherwise there may be black surface or bad effect when baking normal. There are many reasons for the error in the final result (smoothing group in wrong places, normal direction, high-poly and low-poly model matching, etc.), so we can only correct the errors one by one. 7. Making of Materials!Making of MaterialsBefore importing the model into Substance Painter, the preparation work must also be done. I had a large number of models, so in order to meet the pixel accuracy of 1 cubic meter/512512, I divided the model into 12 parts and gave 12 material balls to each part, so that I could operate in 12 layers after importing the models into Substance Painter.My process of making mapping is customarily divided into these steps: create a folder → add a mask for selection → add a fill layer to fill the basic inherent color → add smart materials / mapping resources for fine-tuning changes → add dirty stains (dirty stain generator) → add object relationships (AO generator) → add the upper white and lower black visual effects of the overall object (location generator) → edge wear (metal edge generator) → add details such as dirt. If there are unnatural places, you can add the painting layer to modify. 8. Rendering!final resultThe last thing is to organize the files and rendering. The texture files exported from Substance Painter must be named well and organized in a uniform way, otherwise it is a waste of time to modify the names and paths again.After organizing all the files into a new model folder, I put the model into the Marmoset Toolbag for the final rendering. Through the study of fog effects and lighting, I put warm light in the scene according to the reference, and cold light behind it for contrast between warm and cold, but I also made the stone look too bright, which was modified and improved after the teacher reminded me. Although the final result was not particularly impressive, I finished the project in a moderate way, and it was still very fulfilling to see the final result.Finally, I am very grateful to my teacher and classmates for their help to complete such a scene. The above is the experience sharing of my whole production process. Although I encountered some difficulties during the process, I finally solved them successfully after hard work. I also hope that I can correct mistakes and make progress in the future based on my previous experience.Sourec: Thepoly

Create A 3D Scene of Middle-earth: Shadow of War
3ds Max Tutorials
- Observe and Analyze Original Paintings & Asset AllocationThis is a case of PBR process, complete the mid-poly model in 3ds Max; sculpture high poly model in ZBrush; use topogun to make low-poly topology; use Substance Painter to add material; finally perform light rendering in Marmoset Toolbag.Be sure to divide the work before production and clarify the specific tasks between each member to reduce possible conflicts among group members during the process of creation.First of all, the team leader needs to build a rough model to determine the scale, and then the group members can use the time to collect references and analyze how their items should be modeled to determine their own ideas. This step is very important, because it is the first time we all cooperate to make the scene. The group members will make the scale with reference to the large scale built by the group leader, so the group leader cannot be lazy. Likewise, group members who do not have sufficient time to think about their tasks can cause the project to stop. So be sure to communicate well. 2. Mid-Poly ModelingAfter analyzing the original paintings, we have developed a new understanding of some of the model assets.The wall can be done with only one sheet in order to save resources.Considering the problem of resource saving and asset sharing, some of the wall tiles and patterns are made into a single decal, and the production is completed by using consecutive double-square and four-square principles later.!2!3 3. Making High-Poly ModelStatue sculpture:!4About the statue part of the character, you can directly use the initial bare model; use 3ds Max to make the mid-poly model of clothes, and after that, turn it into high-poly model; finally, use ZBrush to sculpt. The difficult part is the sculpting of the clothes fabric. You have to first make the folds of the fabric, after which you can use the pushing brush to show the hardness of the stone, and finally add the cracks and noises. 4. Making Low-Poly ModelIt is only for irregular models that we use topology to create low-poly models, such as statues, candles and other assets.!5Topology is a long process and requires patience. Try to create the topology manually by yourself, because the one-click topology method using plugins has a lot of drawbacks. Creating topology manually can better grasp the number of faces and shape silhouette.After the topology is done, it is time to move on to the baking normal session. This part is mainly about finding errors, looking for all kinds of wrong information about your assets and correcting them. For example, polygon point, polygon surface, free point, UV overlap, AO light and shadow information error and other problems. After solving these problems, you can enter Substance Painter to make materials. 5. Making MaterialsThe production of materials is related to the final effect.There are also a lot of tricks to make materials, especially for assets with the same material, just one cross-texture link can make different models with the same material. That is, you only need to make one material, and the others only need to be fine-tuned, which can save a lot of time.The first step in making the material is to find the base color first. If the base color is too different, the production of the later will also be out of the original painting. If you want to show the excellent texture of the stone material, you have to make AO first, because the light and shadow effect of AO can make the statue more three-dimensional. First give it a mask, then add a generator to it, use the AO generator to calculate its light and dark parts. Only after that is to find the relevant material texture to overlay on it, then change the color of the details, etc. Finally, sharpen it to give it a better effect.!6!7 6. RenderingFor the rendering we used Marmoset Toolbag 3. The ray tracing of Marmoset Toolbag 4 consumes the computer configuration and is heavily exposed. Our scene is on the dark side, so the overall sense of atmosphere is more important. Especially the sky light, must be expressed, and the color should be a little warm, forming a contrast between warm and cold.!8!9!10!11The effect of the fog is also important, not too heavy and not too soft. And also the fog should be gathered in the distance, because too close will lead to blurring.!1From: Thepoly

3D Tutorial: How to Make a 3D Gorilla?
ZBrush Tutorials
© H chengH cheng's ArtstationThe software and tools used for the production of each process in this tutorial are as follows:High poly:ZBrush,MD(Marvelous Designer)Topology:Wrap 4D,MayaMapping:Mari,SP(Substance Painter)Hair:XgenRender:ArnoldFinal result:!How to Make a 3D Gorilla 2!How to Make a 3D Gorilla 3!How to Make a 3D Gorilla 4 1. Collecting MaterialsBefore making it, the theme needs to be set and then gather the required reference material. We decide to make a realistic gorilla character this time and want to do a little modern and interesting costume design based on the original realistic one. So we need to find different pictures according to our ideas when we are looking for reference. To do a simple character styling design, in the absence of story background premise, just need to make his image looks reasonable and have a certain sense of beauty. So the reference here is also relatively simple, a color scheme reference, a modeling reference, basically enough to support our model presentation.!How to Make a 3D Gorilla 5 2. Sculpting ModelIn the modeling process, the realistic character modeling needs to be scaled at the beginning. The body part of the character in this case is produced first in ZBrush doing a large sculpture demonstration from zero, and then use a scanned material model with wiring. After that we just need to match the proportion of the material, and then do a little wiring wrapping on it.For the production of realistic anthropomorphic animal characters, relatively solid anatomical fundamentals and certain modeling skills are very necessary, which will fundamentally determine the depth and quality of the model. So it is necessary to do more sketching practice.The images for the exercise are as follows.!How to Make a 3D Gorilla 6(15 minutes)!How to Make a 3D Gorilla 7(30 minutes)With solid basic skills and rich knowledge of anatomy theory, we will unconsciously analyze the anatomy of the person or animal rationally while carving when we do similar role cases. In fact, if we can master the anatomical body of the head or the structure of other forms, then we can successfully learn to analyze rationally.For example, this head model of gorilla:!How to Make a 3D Gorilla 8There is actually no difference between his face and the realistic human in terms of muscles. What we analyze rationally is only the different morphological architecture of the skull and the different shapes of facial features. The different shapes formed under different living habits cause obvious morphological differences between the musculature. But under the whole big skeletal structure, the muscle anatomy is the same. It is like the same piece of clothes hanging on different brackets to form a different pleat shape, but the essence does not change, because the formation of the pleat form has a certain rule to follow. This requires us to have a solid theoretical foundation to support our ideas.In the model rewiring topology, we chose a faster method, using the software Wrap 4D to help complete. Wrap 4D is based on R3DS Wrap and adds a series of work nodes applied to dynamic wrapping, this process is widely used in the popular virtual human production process now. If you are interested, you can visit the official website of Wrap 4D to check the specific functions.R3DS Wrap is a professional 3D topology tool software that changes the way 3D scan data is handled. When working with human-like scan objects, you can use the available basemesh and match it not strictly to each scan, as well as providing a set of very useful scan processing tools such as decimation, mesh filtering, texture projection, etc. Once you process a single scan, thanks to the node graph architecture, you can apply the same method to an infinite number of other scans.!How to Make a 3D Gorilla 9 3. Drawing Character MapAfter completing the body part of the high poly sculpting we move to the mari to start the skin map channel.The entire process is simple. We use scanned materials for xyz, wrapped with the zwrap plugin, as a base for realistic textures, and then move to mari to repair the projected textures and add details. We overlay a lot of different color biases on the color map to get a richer color effect. Because the skin of gorilla is black, the details we draw or get through the xyz materials are not very obvious, therefore we add a layer of lighter color contrast to increase some details.When drawing roughness, specular maps, we have to pay attention to highlight levels and roughness intensity changes. About the highlight map drawing, we can reverse the color using roughness map and then adjust it. We draw color, specular, roughness, sss intensity, sss color, these maps.!How to Make a 3D Gorilla 10!How to Make a 3D Gorilla 11 4. Making of Clothing in MDFor the costume production, we mainly use MD for fabric settlement. Now MD has been widely used in CG art production. So we need to learn the simple use of this software.If you want to do realistic pattern making, you need to know some basic theoretical knowledge of garment cutting. In some special shapes we can find ready-made pattern samples for reference.The idea of costume making is to make the costume fit the body. If you are not satisfied with the costume effect, you can adjust the body shape of the gorilla, such as shrinking the oblique muscles, shrinking the upper limbs and elongating the lower limbs to make him a little more anthropomorphic. Once the pattern making and settlement are completed, the model can be imported into ZBrush for detailed sculpting.!How to Make a 3D Gorilla 12!How to Make a 3D Gorilla 13The creation of textures for clothing is relatively simple. We can import the model directly into Mari, and import a Tiled as the fabric texture of the clothes. Then give it a natural color and do a little logo addition. We can do the fabric texture effect by adjusting the material nodes in Maya.!How to Make a 3D Gorilla 14 5. Mapping MaterialsThe skin material is very simple to create. Arnold's surface material effect can give us a very natural and realistic effect. When adjusting the skin material node, we should pay attention to the impact of the scene scale on the value of the surface scale, and pay attention to the use of the radio color to achieve the effect. When adjusting the parameters, you can turn on real-time rendering and adjust the parameters while observing the effect.The color map in the material of the clothes has only a simple intrinsic color, but we want to give the effect of different fabrics. Whether offline or in the engine, we want to create its texture by shaping his Fresnel properties. Using Arnold material, for some regular fabric, sheen node parameter can help us to do the false reflection and Fresnel effect, but for satin or some smooth fabric material, it may be difficult for us to present that kind of high light reflection texture close to metal by sheen, here we use aiFacingRatio to assist remapvalue node to do the surface false reflection of the strong contrast texture, so that we don't need highlights but can also make the fabric produce a sharp Fresnel effect.!How to Make a 3D Gorilla 15 6. Hair ProductionWe use xgen for hair production. Because xgen is one of the most popular hair styling tools.Traditional xgen has a high degree of controllability and extensibility in the control of the guideline modeling, which can basically achieve all our modeling needs. We need to pay attention to the hierarchy between guidelines and the even distribution of guidelines in the shape of guidelines.Then with the help of mask drawing, adding trim nodes to create shapes for different hairs.!How to Make a 3D Gorilla 16The main process of making a 3D gorilla is described here, hope it will inspire you. As a leading cloud rendering services provider and render farm in CG industry, Fox Renderfarm offers a $25 free trial to every new user! So come and try out the free cloud rendering!

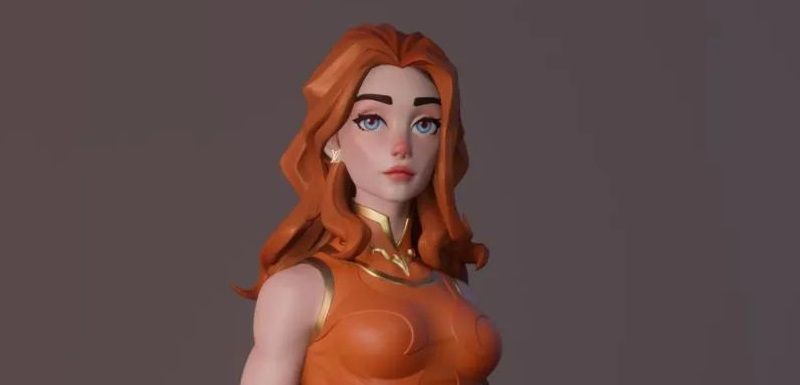
ZBrush Tutorial: A Sharing of 3D Stylized Cheongsam Women
ZBrush Tutorials
In this article, Fox Renderfarm, the best cloud rendering provider and render farm, will share with you Pierson Pang's works of stylized cheongsam girl and approximate production process and experience.Pierson Pang is a 3D character designer who has participated in many AAA realistic and stylized projects in Europe and America, specializing in European and American cartoons and realism.!A Sharing of 3D Stylized Cheongsam Women 1© Pierson PangHe mainly uses the software ZBrush and Blender. Use the sculpting software ZBrush with the emerging set of modeling to render in Blender, can maximize the production efficiency.First look at the final result:!A Sharing of 3D Stylized Cheongsam Women 2© Pierson Pang!A Sharing of 3D Stylized Cheongsam Women 3© Pierson Pang!A Sharing of 3D Stylized Cheongsam Women 4© Pierson Pang 1. Ideas and Reference CollectionPierson initially wanted to do an exercise in generalizing the female body. He combined Chinese femininity and chose the cheongsam for the costume. But at the same time, he wanted to maximize the female form, so made a little change to the cheongsam's shape. Because there was no specific original drawing, he looked for some reference drawings that fit the image in his mind before making it.He looked for exaggerated anatomical drawings of the form as well as fashion show type for reference, which determined the final direction of the character's temperament. Although there are often improvised ideas in future productions, they are within the larger framework. That's why accurate reference is important, as it guides the right production direction.!A Sharing of 3D Stylized Cheongsam Women 5© Pierson Pang 2. Making the ModelCompared with realistic characters, the model of stylized characters requires more general refinement and exaggeration of human silhouette structure and muscle anatomy, and focuses on the overall relationship of sparseness, rhythm and hierarchy of the character. And the stylized character will first discard the irrelevant details.A little advice for beginners:If you want to exercise sensitivity to body type, then you can do a lot of body type generalization exercises at first, including various body types (fat, thin, women of various body proportions). Like the following figure: this combination of deformation through the simplest of spheres will maximize the removal of details, thus focusing all attention on the characteristics of the shape itself. Strengthening this exercise will quickly improve one's ability to capture the shape. The same applies to the character's face, which will be more delicate and faint compared to the larger forms.!A Sharing of 3D Stylized Cheongsam Women 6© Pierson PangBack to the cheongsam girl, Pierson did volumetric generalization on the body shape (elbow joint, knee joint, interpolation generalization between each muscle), emphasizing the contrast between the block structure and the curves of the legs and upper arms. In the profile form, the fullness and curves of the arms and thighs need to be noted.For blocky hair, you need to pay attention to its rhythmic contrast such as sparse and dense layers. The volume structure of the face is mixed with softness and hardness, so it needs to be interspersed to deal with it.Regarding facial treatment, there are various styles of cartoonish block treatment depending on the project.Pierson's way is a combination of soft and blocky interspersed treatment, meaning that there is a sense of breathing. In fact, this sense of breathing is throughout the body in his work. How to grasp the overall rhythm? How to choose the detailed contrast of the specific partial rhythm under the overall rhythm is needed to be carefully examined.!A Sharing of 3D Stylized Cheongsam Women 7© Pierson PangAfter the model is almost done, you can directly use ZBrush to paint the vertex color to observe the character effect.Pierson has always felt that the white model does not represent the end of the high modeling stage. The top color is needed to judge the character's temperament, and painting the top color usually requires learning more about women's makeup. The choice of eye shadow type, the choice of lipstick number, what kind of character positioning and temperament they correspond to, are all very sophisticated and also exercise aesthetics. So you can observe more during your day. The aesthetics of a character's final effect is very important. The software and method skills are all auxiliary. The level of completion of the vertex color can be based on your own preferences, as long as you can roughly express the feeling of the character on the line, or to handle finely, as a base for post mapping.In ZBrush, you can use the skin material ball to observe the effect, as follows:!A Sharing of 3D Stylized Cheongsam Women 8© Pierson PangAfter the Tpose effect is determined, use ZBrush's Transpose Master to give the character a pose, but many people prefer to use DAZ to make it because it is more convenient. Transpose Master is more difficult to pose with, but can exercise dynamic anatomical ability.!A Sharing of 3D Stylized Cheongsam Women 9© Pierson PangPierson usually does not put too much effort into the practice of low-poly modeling and the process behind it, as long as it can express the effect he wants to achieve. Pierson used to paint the vertex color with ZBrush and import it into Blender to render the picture by using the vertex color with the material ball. Of course, it is also possible to draw mapping in a more detailed way to adjust the effect in Blender. 3. Blender RenderAbout the renderer, he earlier used Keyshort, V-Ray and such renderers, as well as Arnold, which is used by many people to do realistic rendering. Blender is a free software with less complex material and lighting properties compared to Arnold, including WYSIWYG rendering speed and render quality, which are friendly to stylized characters.Blender has two rendering methods: eevee and cycles.Eevee is Blender's real-time rendering engine, implemented using OpenGL technology to focus on speed and interactivity while achieving the goal of rendering PBR materials. Eevee can be used interactively in 3D viewports and can also generate high-quality rendering.Eevee uses the same shader nodes as cycles, making it easy to render existing scenes. For cycles users, you can use eevee to preview material effects before using cycles to render the final image to improve efficiency.Unlike cycles, eevee is not a ray tracing engine. It uses multiple algorithms via rasterization to estimate how the light acts with the object's material, while cycles is based on physical ray tracing to calculate the bounce of each ray. Although eevee is designed to use PBR shading materials, it is not perfect. Cycles renderer provides physically more accurate rendering, while Eevee uses rasterized rendering so it has significant limitations.Each of these two rendering methods has its own features and can be chosen according to your character rendering needs.You can read the official tutorials for details:https://docs.blender.org/manual/en/3.3/render/lights/light_object.htmlrenderer-settingsThere are also many Blender tutorials on YouTube, such as: https://www.youtube.com/c/DannyMac3dYou can check out more works of Pierson Pang at at his Artstation:https://www.artstation.com/piersonpangFox Renderfarm hopes it will be of some help to you. We are an excellent cloud rendering services provider in the CG world, so if you need to find a Blender render farm, why not try Fox Renderfarm, which is offering a free $25 trial for new users? Thanks for reading!By Thepoly

How to Make a Beautiful Riverside Town in 3D
Blender
Find ReferenceHow did I find my reference? Actually, when it comes to riverside towns, the scenery of many places in China can be used as a reference. Here I found a lot of references around Wuzhen, which impressed me the most. I found a lot of reference pictures on the Internet, and found a 1.5-hour video of walking around the city on a video website to take a screenshot from it.!How to Make a Beautiful Riverside Town 2 StylingI first created the basic shape of each building in Blender, that is, the white film, and determined a series of settings such as camera position, focal length, aperture, etc.!How to Make a Beautiful Riverside Town 3There are a lot of boards in this scene, which is too time-consuming and cumbersome to place alone, so I chose to use blueprints to control them, place resources along splines, and randomly select meshes, positions, rotations, and zooms, which can improve my work efficiency a lot. In the scene, wood walls, docks, pillars, obstacles, and roof supports can also be controlled in the same way.!How to Make a Beautiful Riverside Town 4!How to Make a Beautiful Riverside Town 5!How to Make a Beautiful Riverside Town 6!How to Make a Beautiful Riverside Town 7 Creating Template AssetsI made several attempts to create a plank asset for the project. Sculpt them in ZBrush, then topology them in Blender, use auto UV, and texture them in Substance 3D Painter with Smart Materials.The dust above is crafted in the UE to make them look more random and reduce some repetition.!How to Make a Beautiful Riverside Town 8!How to Make a Beautiful Riverside Town 9After that I created a second set of boards, which are just textured boxes to add variety to the scene and are not used in important places in the scene.!How to Make a Beautiful Riverside Town 10Here are the main assets:!How to Make a Beautiful Riverside Town 11 The RoofThe roof takes up a large part of the scene, and most importantly, the composition of the scene. Even if the number is large, they all have to look rich and also adapt to complex shapes. First, I sculpted 3 tiles of different sizes in ZBrush and broke each of them a little. Based on these 6 tiles, I combined them into a 2x2m tileable mesh. For smaller buildings, this is pretty much all I use. For larger buildings, I just duplicate the mesh and twist it slightly.The subsequent treatment is very similar to the wood treatment, so I won't go into too much detail here.!How to Make a Beautiful Riverside Town 12!How to Make a Beautiful Riverside Town 13For the top of the roof, I looked at five sets of reference pictures of the roof and copied them. I made another asset pack that also included smaller props and poles for building and dock supports.!How to Make a Beautiful Riverside Town 14 Separate AssetsOnce the planks and roof have been made, 90% of the scene can be built, and the rest can be done pretty fast, which is just regular PBR process.!How to Make a Beautiful Riverside Town 15!How to Make a Beautiful Riverside Town 16After that, a simple simulation of the fabric is carried out, and then the texture is drawn. You can adjust the points according to the effect.For the chimney, I used texture displacement. I downloaded the brick and pavement textures from Bridge, made a simple chimney shape from the concept, and applied the displacement to it. Before proceeding, I checked in the engine whether the proportions of the bricks looked right in the scene, and adjusted the UV in Blender if necessary. Once satisfied with the proportions, I apply the modifier and use the Scraper tool in Blender's Sculpture mode to remove jagged edges from the edges. If you find something missing, you can make it yourself or go to the asset mall to download it.!How to Make a Beautiful Riverside Town 17 Scene ConstructionThen here comes the process of replacing the white film with assets. After the first material iteration, I found that many places were strange and unreasonable, so I made adjustments to some small places.!How to Make a Beautiful Riverside Town 18!How to Make a Beautiful Riverside Town 19When making roofs, I found that straight roofs are not suitable for medium-sized buildings, so use splines to bend them. Pay special attention to turn off Nanite at this time, as it does not support any type of deformation. You can use some irregularly shaped objects to break its silhouette, but just to remember it should be reasonable in the scene.!How to Make a Beautiful Riverside Town 20!How to Make a Beautiful Riverside Town 21 Post ProcessingThe smoke effect is done with UE. Smoke from the chimney, made with Niagara, has the same settings for noise and fog, increases the initial speed of the wind, and expands with the life cycle, becoming more transparent from start to finish, with colors ranging from dark to light.!How to Make a Beautiful Riverside Town 22!How to Make a Beautiful Riverside Town 25 WaterWater is just a flat surface with a normal map on it, and its UV moves in two opposite directions on the map, creating the effect of water flowing.!How to Make a Beautiful Riverside Town 24Then add the effect of ray tracing:!How to Make a Beautiful Riverside Town 23That’s all! Fox Renderfarm hopes it will be of some help to you. As a powerful render farm, we are dedicated to providing cloud rendering services in the CG industry. If you are looking for a fast rendering solution for your 3D software, try Fox Renderfarm! We offer a free $25 trial for new users. Thanks for reading!Author: Thepoly

ZBrush Tutorial: Turning Images Into 3D Relief Models
ZBrush Tutorials
2.Click alpha-import and select the black and white image you just imported.!ZBrush Tutorial Turning Pictures into Relief Models 33.After input, Flip H/Flip V is the horizontal/vertical inversion switch. Rotate (rotation) and Invers (black and white inversion) can be used. MRes is the resolution of the generated model, here choose 2048. MDep is the model thickness, MSm is the degree of smoothing, DblS is the single and double-sided switch.4.When the settings are finished, click Make 3D (Generate 3D Model) and a solid carved model with thickness will be generated.!ZBrush Tutorial Turning Pictures into Relief Models 45.Click Arraymesh in the menu bar, set the number of models (repeat) to 4. Click Rotate (select), set the number of degrees of y-axis rotation to 180.!ZBrush Tutorial Turning Pictures into Relief Models 56.Click Make Mesh to generate the following model.!ZBrush Tutorial Turning Pictures into Relief Models 67.You can also use the above method to import the height map of the stone.!ZBrush Tutorial Turning Pictures into Relief Models 78.We can see the following texture effect created in ZBrush.!ZBrush Tutorial Turning Pictures into Relief Models 8ZBrush can make a variety of textures and material effects, such as walls, stones, etc., by converting images to relief. Fox Renderfarm hopes it will be of some help to you. It is well known that Fox Renderfarm is an excellent cloud rendering services provider in the CG world, so if you need to find a render farm, why not try Fox Renderfarm, which is offering a free $25 trial for new users? Thanks for reading!

How to Create a Stylized Cheongsam Girl in ZBrush and 3ds Max (2)
3ds Max Tutorials
How to create a stylized Cheongsam girl in ZBrush and 3ds Max? In this article, the best render farm and cloud rendering service provider, Fox Renderfarm will share with you the tutorial. For part one:How to Create a Stylized Cheongsam Girl in ZBrush and 3ds Max(1) High polygon model/face/hair/clothing wrinkles When you've carved to a certain extent, you're going to ZBrush to make a high-polygon model. First of all, I add a new hem to the model that needs to be added with subdivision carving. Most of the automatic hem of ZBrush can already meet our manufacturing requirements. If there is some dissatisfaction, it can also be matched with part of the edge ring hem of ZModeler.When carving wrinkles, I usually turn on the Lazy mouse function, which can make the carved lines more smooth, avoid intermittent lines, make the cloth look cleaner and more beautiful, and can also be matched with some Alpha brushes, so that the wrinkles are more detailed and richer.!How to Create a Stylized Cheongsam Girl in ZBrush and 3ds MaxWhen making hair, it is recommended to use simple geometry first, with the SnakeHook brush to quickly make the outline of the hair, for the subsequent hair production to provide a good basis. When using the SnakeHook brush, you can also turn on Sculptris Pro mode in conjunction with it, so that there is no obvious distortion in some places where there is a large change. !How to Create a Stylized Cheongsam Girl in ZBrush and 3ds MaxAfter adjusting the simple outline, you can use the hairbrush to brush the hair out in clusters. Before brushing the hair, make sure that curve mode is turned on, lock the starting point, and then it takes a lot of patience. Of course, the best way is to observe how the real person's hair twists so that the hair will naturally look good. Details need to pay attention to the scalp coverage and to avoid some places "bald" off. In this case, the hair production is not close to the tangent of the scalp, but first grows up, and then falls down. Paying attention to these details, the hair will naturally look good.Finally, we use the "Automatic grouping" in the "Polygon group" to get rich, well-rooted hair, and then use the Move Topological brush to pull out some of the hair and make small broken hair floating outside to make the hairstyle look more vivid and flexible. It should be noted here that the hair pulled out should still float away according to the direction of the overall hairstyle, do not let the separation distance or angle be too large, otherwise, it looks easy to fake or not natural enough.!How to Create a Stylized Cheongsam Girl in ZBrush and 3ds Max RenderingSo far I've only made models, not added materials. In this case, Keyshots are generally used for rendering, because the model without materials rendered by Keyshots will look more delicate and have a good light and shadow effect. Normally, I will first set a warm light main light source from 45° down from the upper left, and then match a cold light auxiliary light source from the back to the front from the right, so that the structure is more vivid.!How to Create a Stylized Cheongsam Girl in ZBrush and 3ds Max

How to Build a Mechanical Warrior in Zbrush(3)
ZBrush Tutorials
To continue with part 1 and part 2, Fox Renderfarm, the No.1 cloud rendering services provider and render farm, will still share with you the tutorial from the 3d artist Dong Chao of part 3 about how to build a mechanical warrior with Maya and ZBrush. LightingAdjust a simple POSE, and then add a scene used in the previous project to test the light rendering. A total of 5 lights were used in this project, 4 VRay Area light sources and one Dome light source. The Dome light source is mainly to add an HDR map inside. Normally, you can check Dome Spherical in the settings, and then add an HDR. Because the final effect is more to highlight the main body, so the intensity is reduced to 0.5.!How to Build a Mechanical Warrior in Zbrush -26The other light sources are all adjusted in size and intensity color. One is the overhead light source, the other is the main light on the side and the two backlights. The final lighting effect is as follows.!How to Build a Mechanical Warrior in Zbrush -13!How to Build a Mechanical Warrior in Zbrush -9The final renderer uses VRay, and all elements in the scene use VRaymtl material. VRaymtl is very easy to use, it only needs simple adjustment to get good results. Especially for the character body, I used a VRayblend material and FastSSS+Vraymtl. In addition to the SSS texture of the character itself, I also wanted to adjust the highlights more delicately, so I superimposed the highlight texture directly on the highlight color of vraymtl. In order to speed up, I used the completed Normal texture to convert it with the Ndo plug-in, and converted it into a concavity and Ao texture, Then I copied the concavity to highlight the concave effect of the skin, and superimposed the previous color texture and adjusted it again can. And the Scatter texture in the SSS material is not drawn, only the color texture is used to modify. The following are the settings of the head body part and the shader of the highlight map,!How to Build a Mechanical Warrior in Zbrush -29!How to Build a Mechanical Warrior in Zbrush -3 RenderingIn the final rendering, I improved the lighting quality and rendering quality, and replaced the body with a 3-level subdivision model in ZBrush, and then used a normal map. In the test, the normal details are displayed better and faster than using displacement maps.Finally, the rendering is divided into channels, and then adjusted using Photoshop. The resolution of the final image is 2.5K * 3K, and the rendering time is about one and a half hours. The following are the renderer settings, and the red box is the place that needs special attention.!How to Build a Mechanical Warrior in Zbrush -17!How to Build a Mechanical Warrior in Zbrush -18!How to Build a Mechanical Warrior in Zbrush -7!How to Build a Mechanical Warrior in Zbrush -32In the compositing stage, I added all the channel renderings to Photoshop for adjustment. I used the channels to refine the final effect, adjusted the depth of field blur, color adjustment, and superimposed a layer of dust and shadows.Final render:!How to Build a Mechanical Warrior in Zbrush -14

How to Build a Mechanical Warrior in Zbrush(1)
ZBrush Tutorials
This time, Fox Renderfarm, the best cloud rendering services provider and render farm, will share with you a ZBrush/Maya tutorial from the 3d artist Dong Chao, about how to build a Mechanical Warrior.Hi, this is Dong Chao. In this tutorial, I will show you the production process of making a mechanical warrior. The focus is on the combination of organic and inorganic matter in the model. Software used: Maya, ZBrush, Mari, UVLayout, Photoshop, and Ndo.The overall production time is about 3 weeks, of which the model production took 2 weeks, and the texture and rendering took a week. ReferencesThe collection of references is an important step. When creating this model, I collected the works on the Internet as references, mainly of various mechanical characters. In the design stage, I made a rough stitching diagram using these reference pictures, and then quickly carried out the detailed design of each part and character in ZBrush. Because there are many small parts, each part keeps as simple as possible. The coordination of completeness and proportions hopes that the roles will be integrated so that the post-production will be relatively quick and simple.!How to Build a Mechanical Warrior in Zbrush -19 ZBrushNow you can start to create the model, I made it in ZBrush. Because there is no specific reference picture, I had to use ZBrush's DynaMesh to start production from Zsphere. Starting with a simple shape, I made a basic body of a monster, and then slowly added details after determining the proportions. The next step was to copy the body to make the outer armor. The following were the brushes that I use frequently. Some of the brushes have been simply modified and then saved as default for use next time.!How to Build a Mechanical Warrior in Zbrush -6The early sculpting process is relatively simple, especially ZBrush is a very easy-to-use software for me.In this step, I carried out some overall carvings on the pre-planned content and element structure, and then cut the model into different subtools, hiding some invisible places, so as to facilitate further conversion into ordinary multi-deformation for fine-tuning. As shown in the figure below, different colors represent one subtool.!How to Build a Mechanical Warrior in Zbrush -2The body model is subdivided, and then the body part is directly carved into the final effect. And the mechanical part can be made according to your requirements. I didn't waste too much time in this step, because in the end, I have to use the hard-edge function to perform the topological conversion. The following is the final ZBrush design drawing.!How to Build a Mechanical Warrior in Zbrush -31!How to Build a Mechanical Warrior in Zbrush -24 The final model in Zbrush and MayaThere are many ways to make mechanical armor because I have already made a shape in ZBrush, so I chose the appropriate method and used ZBrush for topology. And I modeled the small parts in Maya so that it can be copied and aligned conveniently, and most of the armor on the monster body will be hard-edged after topology in ZBrush.Firstly, add a ZSphere to Subtool, and then hide other objects, select ZSphere for topology. Do not use too many turning faces, just use the model to outline the shape, especially where hard edges are required. Precise the line, and then set the appropriate preview thickness. Remember to subdivide the preview to 1, and then you can get an object with a thickness similar to armor during the preview. Create the cut surface that needs hard edges, gives a polish smooth bottom edge at a relatively high subdivision level, and that's it. Finally, you can get some desired details through some methods such as Alpha, eage loop, or extrusion.!How to Build a Mechanical Warrior in Zbrush -15!How to Build a Mechanical Warrior in Zbrush -5!How to Build a Mechanical Warrior in Zbrush -21!How to Build a Mechanical Warrior in Zbrush -4Before making the details, I usually put these mechanical models into the Keyshot for metal texture adjustment and simple GI rendering tests to see if there are any problems with the model. The most important thing at this stage is not the details, but the turning point. The combination of some objects that are troublesome to make with hard edges in ZBrush can also be put into Maya for refinement. Of course, you can also operate according to your own habits.!How to Build a Mechanical Warrior in Zbrush -25!How to Build a Mechanical Warrior in Zbrush -20Final effects of the details,!How to Build a Mechanical Warrior in Zbrush -16Stay tuned for part 2 and part 3.

How To Make An Ancient Warrior Using ZBrush And 3ds Max(1)
ZBrush Tutorials
Fox Renderfarm, the best cloud rendering services provider and render farm, will bring you a tutorial from 3d artist Mars on how to use ZBrush and 3ds Max to make an ancient warrior. Mars will use ZBrush and 3ds Max to make a character of a Japanese samurai and talk about some of the problems encountered in the production process. The whole production is divided into five parts: Introduction, 3D Modeling, UV, Texturing and Rendering.!How To Make An Ancient Warrior Using ZBrush And 3ds Max IntroductionThis Japanese samurai production case specifically used 3ds Max to make the initial model, ZBrush and 3ds Max combined to complete the high polygon sculpting and production, Marvelous Designer to make the cloth, Substance Painter complete the texture, and finally to use Substance Painter for rendering. ReferenceWhen creating a 3D artwork, whether it is realistic or stylized, preparing reference materials is one of the most important parts of the process. After seeing a samurai picture, I decided to make it into my own version and split some elements in the picture. You can see that the samurai in the concept map is mainly armour, and there are many weapons on his body. However, this armour's texture colour is relatively single, and the original painting only has the upper part of the display, so a lot of references must be found.!How To Make An Ancient Warrior Using ZBrush And 3ds MaxThe following is part of the reference pictures found when making samurai armour. Divide the model into different materials, find the corresponding reference, and create the corresponding folder to facilitate subsequent search and use.!How To Make An Ancient Warrior Using ZBrush And 3ds Max -10 Character modelingFirst of all, according to the samurai drawing, I used a basic body model to modify, and may quickly adjust the character's body proportions, shape and movements.!How To Make An Ancient Warrior Using ZBrush And 3ds Max -9After making the basic things, I started to build the equipment in 3ds Max. There are three points to note:1. The size and proportion of the model.2. Some structures need to be extruded to make changes in the shape, and the edges of the model should be chamfered so that the edges do not look particularly sharp.3. Group according to different parts, and the naming and grouping of these models are clearly organized to facilitate the subsequent production management.!How To Make An Ancient Warrior Using ZBrush And 3ds Max -16After the basic proportions of the body are determined, you can make equipment for the character. Samurai equipment has sub-hard structure equipment, such as helmets, shoulder armours, weapons, etc., which can be built directly in 3ds Max. For other items like clothing, pants, etc. I plan to make them through Marvelous Designer. The pants and clothing calculated by Marvelous Designer will be more natural. You can adjust the details of the folds of the clothes through ZBrush later.!How To Make An Ancient Warrior Using ZBrush And 3ds Max -14Finally, combine all the things in 3ds Max to place and adjust the model together. When making the model, you need to pay attention to restore the shape and outline silhouette in the reference picture as much as possible.!How To Make An Ancient Warrior Using ZBrush And 3ds Max -11After the production of these basic models is completed, I first set up the models to facilitate subsequent production.!How To Make An Ancient Warrior Using ZBrush And 3ds Max -4For some hard-surface models, such as breastplates, the previous models are made more refined through some plug-ins or adding wires. However, it should be noted that try not to destroy the original structure of these models, but only add modifications to them. For things like clothes, it is best to put them into ZBrush for sculpting.Here I use pants as an example. First, I export the fabric checked by Marvelous Designer to ZBrush for sculpting, adjust the details, and then split the UV of the model through GUV tiling, and make textures on the pants through the noise.!How To Make An Ancient Warrior Using ZBrush And 3ds Max -19The intensity can be increased appropriately in ZBrush because the damaged details will be weakened when the normals are baked. My approach is to create a new layer to draw, and at the same time, I need to open the transformation target and open the storage transformation target.In this way, the strength of the texture can be adjusted as a whole to facilitate the modification, and the unsatisfactory parts can be restored by restoring the brush later.I need to adjust the number of faces of the model to create a low-polygon model for matching and baking with the sculpted model, so a low-polygon model can be directly adjusted and produced in 3ds Max. It is important to note that some concavo-convex structures can be made by baking, so some structures in the model can be directly deleted, and all the lines that the structure are deleted, which is the largest reduction in the number of models. Part of the sculpted model needs to be made by surface reduction in ZBrush or topology with TopoGun. The production of low-polygon models requires the number of faces to be as few as possible, the position of the line is reasonable, and there should be no more than quadrilateral faces.In part 2 of this tutorial, we’ll be going over the rest of the details of the production process.
Recommended reading
How to Render High-quality Images in Blender
2020-03-09
Top 9 Best And Free Blender Render Farms of 2023
2022-05-09
Revealing the Techniques Behind the Production of Jibaro "Love, Death & Robots", Which Took Two Years to Draw the Storyboard
2022-06-10
How to Render Large Scenes with Redshift in Cinema 4D
2019-10-15
How to Reduce Noise in Corona Renderer - Corona Denoising
2019-05-15
Arnold\ V-Ray\ Octane\ Conora\ RedShift, Which Is The Best 3D Renderer?
2019-04-15
Why V-Ray Render is Black in SketchUp And How To Fix it?
2019-05-07
Arnold for Maya Tutorial: How to Render Wireframe
2021-03-29