20% Bonus On your First Rechargeclose

Rendu architectural avec Blender : Techniques pour des rendus époustouflants

blobid0

Blender est un outil incroyablement puissant pour le rendu architectural, apprécié aussi bien par les débutants que par les professionnels pour sa flexibilité, son accessibilité financière et sa capacité à produire des visuels époustouflants. En tant que logiciel open source, il est accessible à tous, et ses deux moteurs de rendu principaux — Eevee pour le rendu en temps réel et Cycles pour des résultats photoréalistes — offrent une grande polyvalence selon les besoins.

L’optimisation de l’éclairage, des matériaux et des paramètres de rendu est essentielle pour obtenir des rendus architecturaux de haute qualité. Utiliser un éclairage HDRi pour créer des environnements réalistes, affiner les options de débruitage de Cycles et exploiter l’échantillonnage adaptatif peut considérablement améliorer l’efficacité du rendu et la qualité finale.

Qu’est-ce que le rendu architectural avec Blender ?

blobid1

Le rendu architectural avec Blender consiste à utiliser Blender, un logiciel 3D gratuit et open source, pour créer des visualisations architecturales de qualité professionnelle. Ce processus inclut la modélisation de structures, l'application de textures réalistes, ainsi que la production d’images ou d’animations haute définition. Blender propose deux moteurs de rendu principaux : Cycles, réputé pour ses capacités de pathtracing offrant des rendus photoréalistes avec un éclairage et des reflets précis, et Eevee, un moteur de rendu en temps réel basé sur OpenGL, qui privilégie la rapidité et l’interactivité tout en gérant efficacement les matériaux PBR.

Ces fonctionnalités font de Blender une alternative puissante aux logiciels coûteux comme 3ds Max ou V-Ray. De plus, Blender prend en charge des fonctionnalités avancées telles que la modélisation procédurale, les matériaux PBR et un système de shading basé sur les nœuds, ce qui le rend accessible pour la conception architecturale sans compromettre la qualité. Grâce à une communauté active et des mises à jour régulières, Blender reste un choix de premier plan pour les architectes et les designers du monde entier.  

Commencer le rendu architectural avec Blender

Pour débuter le rendu architectural avec Blender, téléchargez le logiciel depuis blender.org et installez-le sur Windows, macOS ou Linux. Pour optimiser les performances, activez le rendu GPU (Édition > Préférences > Système), puis sélectionnez Cycles dans les propriétés de rendu pour bénéficier d’un éclairage réaliste. Ajustez les paramètres d’échantillonnage afin de trouver un bon équilibre entre qualité et vitesse.

Pour modéliser plus efficacement, utilisez les extensions suivantes :

  • Archipack – Fournit des éléments architecturaux paramétriques comme des murs, portes et escaliers pour créer rapidement des structures.  
  • BlenderGIS – Permet d’importer des terrains réels et des données géospatiales pour un rendu plus précis.

Ces outils permettent d’accélérer le flux de travail et facilitent la création de rendus architecturaux de haute qualité dans Blender.

Techniques de base pour le rendu architectural dans Blender

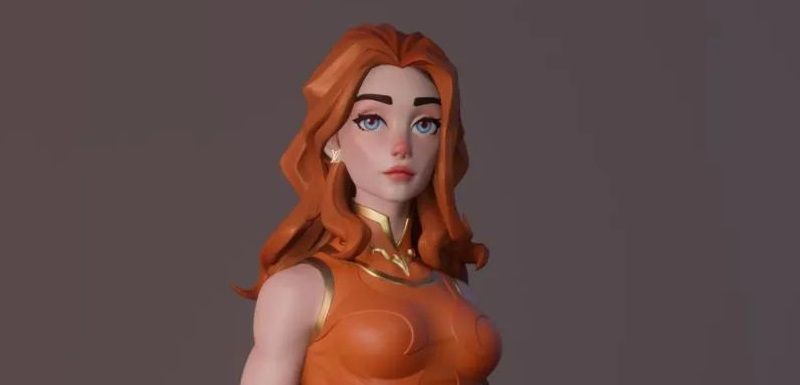
Pour créer des rendus architecturaux réalistes dans Blender, commencez par modéliser les bâtiments à l’aide de formes simples comme des cubes et des plans, ou gagnez du temps avec Archipack qui propose des éléments préfabriqués. Utilisez des lumières Soleil, Aire et Point pour simuler l’éclairage naturel et artificiel, et ajoutez des cartes HDRi pour renforcer le réalisme. Appliquez des textures PBR aux matériaux en ajustant la rugosité, les réflexions et les cartes de normales pour donner de la profondeur. Pour la composition, placez la caméra selon la règle des tiers ou utilisez des objectifs grand angle pour obtenir des vues engageantes. 

Techniques avancées pour le rendu architectural dans Blender

Pour obtenir des rendus architecturaux de qualité professionnelle avec Blender, concentrez-vous sur un éclairage réaliste en combinant des environnements HDRi pour une lumière naturelle et des lumières de type Aire pour des ombres douces. L'intégration de profils IES permet de reproduire fidèlement les schémas lumineux du monde réel. L’utilisation de matériaux PBR haute résolution, de réflexions précises et de techniques de débruitage bien réglées est essentielle pour des textures photoréalistes. Le recours à l’échantillonnage adaptatif permet de réduire le bruit sans altérer la qualité de l’image. Pour optimiser le flux de travail, utilisez des assets liés, adoptez une modélisation modulaire et exploitez l’accélération GPU. Pour les projets complexes, le compositeur de Blender offre de puissantes options de post-traitement, et les services de rendu cloud permettent de gérer des rendus lourds sans surcharger votre machine.

Solutions de rendu plus rapide pour le rendu architectural avec Blender

blobid2

Fox Renderfarm est l’un des services de ferme de rendu les plus performants, idéal pour accélérer les projets architecturaux réalisés avec Blender. Grâce à de puissantes ressources GPU et à des pipelines de calcul optimisés, il gère facilement les scènes complexes, réduisant considérablement les temps de rendu pour les images haute résolution et les textures détaillées. Dotée d’une interface conviviale, la plateforme offre un support professionnel et des performances fiables. Son infrastructure évolutive en fait un excellent choix pour les professionnels à la recherche de rendus rapides et de haute qualité pour leurs visualisations architecturales. Bénéficiez d’un flux de travail plus efficace et de rendus supérieurs grâce à la technologie avancée de Fox Renderfarm.

Erreurs courantes à éviter

L’une des erreurs les plus fréquentes dans le rendu architectural avec Blender est de surcharger les scènes avec trop de détails inutiles. Cela augmente les temps de rendu et rend les scènes difficiles à gérer.  Utiliser des assets modulaires et maintenir des modèles propres et optimisés permet de gagner du temps sans sacrifier la qualité. 

Un autre problème courant est un mauvais éclairage, où des ombres trop marquées ou des zones surexposées rendent le rendu irréaliste. Utiliser des environnements HDRi, équilibrer les intensités lumineuses et privilégier des ombres douces améliore grandement le rendu final. 

En outre, le fait de négliger le positionnement correct de l'appareil photo peut donner lieu à des compositions ternes—l'apprentissage de techniques de cadrage telles que le nombre d'or peut améliorer l'attrait visuel.

Conseils rapides pour améliorer vos rendus architecturaux dans Blender

Activez l’enregistrement automatique de Blender pour éviter toute perte en cas de plantage. Gardez vos modèles simples et bien structurés : évitez la géométrie excessive pour réduire les temps de rendu tout en conservant une bonne qualité. Expérimentez avec différents matériaux et configurations d’éclairage : utilisez des textures PBR, ajustez la rugosité et les réflexions, et testez plusieurs environnements HDRi pour un rendu plus réaliste. 

Conclusion

Maîtriser le rendu architectural avec Blender demande du temps et de la pratique, mais en suivant les bonnes techniques, chacun peut créer des visualisations époustouflantes. De la modélisation et l’éclairage de base jusqu’au rendu photoréaliste avancé, chaque étape permet d’améliorer ses compétences et son efficacité. Maintenir des modèles optimisés, expérimenter avec les textures et l’éclairage, et utiliser efficacement Cycles et Eevee mène à des résultats optimaux. Blender est un outil remarquable pour la visualisation architecturale, et en appliquant ces méthodes, les concepteurs peuvent produire facilement des rendus de qualité professionnelle.

Pour accélérer le flux de travail et gérer des scènes complexes, les services de rendu cloud de Fox Renderfarm offrent une alternative puissante au rendu local, garantissant une qualité optimale sans solliciter excessivement le matériel. Pour ceux qui souhaitent lancer rapidement leurs projets, Fox Renderfarm propose un bon de rendu gratuit de 25 $ — une excellente occasion de découvrir une ferme de rendu Blender et d’améliorer sa productivité.


Interested

Which is Better, Maya or Blender?
If you want to learn about 3D, then you must have heard of Maya and Blender, both are commonly used 3D software, but which one is better? Here's an article about the difference between Maya and Blender from the best cloud rendering provider and render farm, Fox Renderfarm.What is Maya and what is Blender?Maya is a 3D computer graphics application developed by Alias Systems Corporation and currently owned by Autodesk, Inc. It runs efficiently on Windows, Mac OS, and Linux. Maya is used to create various things such as video games, animated movies, TV shows, visual effects, etc.Maya provides a comprehensive set of tools for modeling, animating, and other 3D creation tasks. Developers can edit and create 3D models in a variety of formats, and then animate those models using the animation tools provided by the Maya suite. The tools can be used to efficiently render realistic images and animated visual effects based on animated 3D scenes.Blender is an open source 3D computer graphics software toolset developed by the Blender Foundation. It is used to create animated movies, visual effects, 3D models and video games. It is available for Windows, Mac OS and Linux.The Blender Foundation is the non-profit organization that actually keeps Blender running and organizes this open source project. Blender has a wide variety of tools for almost any type of media project. With Blender you can efficiently create animated feature films, games, interactive applications, including kiosks and scientific studies.Maya is available to users in an integrated software application that is designed to increase productivity and ease of use. Its software interface is customizable; therefore, skilled developers can take their productivity to a higher level. It allows developers to extend their Maya capabilities by providing access to the (MEL) Maya embedded language. Using MEL, developers can customize the interface by writing scripts and macros.The Best Cloud Rendering for Maya of 2023Blender is a cross-platform application that runs on Linux, Mac OS and Windows systems. Its memory and hard drive requirements are minimal compared to other 3D creation tools, and Blender's interface uses OpenGL to provide a consistent experience on all supported hardware and platforms.A full set of APIs (Application Programming Interfaces) is available to accelerate the features and functionality of Maya. It also provides a Python-based API for those who want to use it.Top 9 Best And Free Blender Render Farms of 2023Blender comes with a wide range of basic tools such as modeling, rendering, animation, video editing, VFX, texturing, rigging, simulation and game creation. Blender adds complexity and jargon. There are multiple terms such as UV mapping, materials, meshes, shaders, etc. which are the artist's medium. Understanding these terms will help developers take full advantage of Blender.Maya Dynamics helps developers create compelling visual simulations. Many more dynamics tools are available. To simulate and render viscous fluids, atmospheres, fireworks, and ocean effects, use Maya Fluid Effects. For clothing and fabrics, the nCloth effect is available, and nParticles can be used for effects including liquids, clouds, smoke, spray, and dust.Author: Ashif AliThe Main Differences Between Maya and BlenderThe differences between Maya and Blender are explained in the following points.1.Maya provides customization through MEL (Maya Embedded Language); interfaces can be extended with it, and Blender embeds Python3 for writing add-ons, binding roles, and more.2.For years, Maya has been the industry standard for 3D modeling and animation, and Blender's 3D painting and sculpting tools cannot match Maya's standard.3.Maya is better suited for large studios, while Blender is ideal for smaller startups.4.Maya has received extensive support from Autodesk and users around the world, while Blender is open source software, which is heavily documented on its website, and the rest of the support is provided through community tutorials.5.Maya exposes a node graph architecture where each node has its own properties and customization, while Blender has a node-based compositor that provides comprehensive video sequencing and post-processing capabilities.6.With Maya, rendering an animation for the first time can be quite a challenge, and Blender can make the rendering process a little easier to render an animation or a series of frames.7.Maya is the industry standard for 3D animation and is used by professionals around the world, while Blender lives in the shadow of Maya and is useful for freelancers and small startup projects.8.Maya is more powerful, but this powerful function comes with a lot of complexity, and Blender can solve some of Maya's complex problems, such as the rendering engine.9.Maya is a licensed product that comes with fewer bugs, while Blender tends to be error-prone, resulting in bugs in every version.10.Maya has a moderate learning curve with a more expressive toolset, while with Blender, it can be daunting when first trying to master the subject matter.Author: Sam Laerte ConclusionThere is no doubt that Maya is the industry standard for 3D applications, and there are good reasons to support it. It is a very powerful program that allows users to model, texture, render, and run simulations and animations. Blender, on the other hand, has always lived in the shadow of Maya and is considered the underdog of the 3D industry. But that doesn't mean that Blender is a worse tool than Maya.Blender is more intuitive than Maya in some ways. The same animations, assets or renders can be created in Maya or Blender. It depends on the skill and efficiency of the developer or artist, which determines the creation of the product.Of course, Blender has many unique features that can help speed up the workflow or make tasks easier. As well, Maya offers certain components that are superior to Blender. Each has its own benefits. Before choosing Maya or Blender, project timelines and costs need to be highly considered. For now, Maya will be much more in demand than Blender for corporate job applications, so if you are changing careers, it is recommended that you choose Maya to learn first.If render farm renders are needed for Maya and Blender, then Fox Renderfarm, which offers leading cloud rendering services, is a great choice. We also offer a $25 free trial for every new user! Thanks for reading!
More
2023-01-13
How to Render High-quality Images in Blender
In this article, the best CPU & GPU cloud render farm and cloud rendering service provider, Fox Renderfarm, will tell you how to render high-quality images in blender.Top 9 Best And Free Blender Render Farms of 2024With the development of computer technology, Blender has been widely used in the field of graphic design, so that ordinary people also have the opportunity to come into contact with Computer Graphics technology referred to as "CG technology". Computer Graphic Image is also computer 3D animation technology, referred to as "CGI". Whether it is "Toy Story", "The Lion King" or "1917", the success of these world-class blockbusters can not be separated from the establishment of models in 3D software, and then to visual effects, post-production software composition, Editing, and more.Image via blendercn.orgAs a new star in 3D software, blender integrates modeling, sculpting, binding, particles, animation, etc., and is a software that supports commercial creation for free forever. So how do we use blender to output high-quality images?Blender has 2 renderers that can convert a 3D scene into a 2D image.Eevee is a physics-based real-time renderer.Cycles is a physically-based ray-tracing renderer.Use plugins to add more third-party rendering engines. Each renderer has its own rendering settings to control rendering quality and performance. And the rendering effect is determined by the camera, lighting,and materials, which also determine the quality of the output images.Image via blendercn.orgHere is the Cycles renderer that comes with Blender as an example. As a GPU-based rendering engine, rendering effects have become more and more mature, and its speed is much faster than the CPU renderer. So where does it affect the output image quality?SamplingThe sampling method determines how the light is calculated. The light is emitted from the camera into the scene and bounces back and forth until they find a light source, such as a light object, a glowing object, or the ambient background light. Number of light path traces for a single pixel in the final render. The more samples there are, the less noise there will be in the result and the more accurate it will be.Path trackingThe rendering attribute is the amount of light emitted from the camera to each pixel. The view attribute is used for scene rendering in the view. A value of 32 means that each pixel will be tracked by 32 rays.)NoiseNoise in the image will greatly affect the image quality because 32 beams of light per pixel are not enough to produce a high-quality image (To reduce the noise by 50%, double the number of lights, so the rendering time will also double, depending on the computer configuration to set the value, at least 1024 if you want a better effect.Rendering propertiesThe rendering properties greatly affect the rendering quality, try to adjust to the maximum value that the view can reach, and adjust the view back to 32 to maximize the quality.Optical Path LengthIt refers to the value of the number of bounces to track the path of each beam. The difference between 0 and the maximum will be very large.Camera PropertiesCamera size: It needs a proper ratio and size, and the focal length needs to be adjusted according to the content of the image. The appropriate size can display the details of the Depth of field.Depth of field: The choice of lens will affect the depth of field details. The depth of field determines how far away the object will be displayed clearly.Aperture radius: determines how far the object in the radius is clear, and it will become blurredFocus: Focus needs to be adjusted. Set important objects in the image as axes and adjust the appropriate aperture radius to show the correct object to the viewer.If you want to improve the quality of the images, you can try some of the suggestions above. Improving the quality of images is not something that can be improved by reading an article. Continuous learning and practice is the best way.Cycles is undoubtedly a young renderer. Blender is also constantly improving some of the features of Cycles, and it has a lot of room for development in the future. As a TPN-accredited render farm, Fox Renderfarm supports most mainstream 3D software, renderers, and plugins, including Blender, 3ds Max, Maya, Cinema 4D, Unreal Engine, and more. So if you want to use a renderer other than cycles, you can also consider Fox Renderfarm, which is undoubtedly a powerful, fast and safe render farm. It can easily help you render high-quality images in Blender.Fox Renderfarm hopes it will be of some help to you. It is well known that Fox Renderfarm is an excellent cloud rendering services provider in the CG world, so if you need to find a render farm, why not try Fox Renderfarm, which is offering a free $25 trial for new users for signing up? Thanks for reading!
More
2024-12-04
ZBrush Tutorial: A Sharing of 3D Stylized Cheongsam Women
In this article, Fox Renderfarm, the best cloud rendering provider and render farm, will share with you Pierson Pang's works of stylized cheongsam girl and approximate production process and experience.Pierson Pang is a 3D character designer who has participated in many AAA realistic and stylized projects in Europe and America, specializing in European and American cartoons and realism.© Pierson PangHe mainly uses the software ZBrush and Blender. Use the sculpting software ZBrush with the emerging set of modeling to render in Blender, can maximize the production efficiency.First look at the final result:© Pierson Pang© Pierson Pang© Pierson Pang1. Ideas and Reference CollectionPierson initially wanted to do an exercise in generalizing the female body. He combined Chinese femininity and chose the cheongsam for the costume. But at the same time, he wanted to maximize the female form, so made a little change to the cheongsam's shape. Because there was no specific original drawing, he looked for some reference drawings that fit the image in his mind before making it.He looked for exaggerated anatomical drawings of the form as well as fashion show type for reference, which determined the final direction of the character's temperament. Although there are often improvised ideas in future productions, they are within the larger framework. That's why accurate reference is important, as it guides the right production direction.© Pierson Pang2. Making the ModelCompared with realistic characters, the model of stylized characters requires more general refinement and exaggeration of human silhouette structure and muscle anatomy, and focuses on the overall relationship of sparseness, rhythm and hierarchy of the character. And the stylized character will first discard the irrelevant details.A little advice for beginners:If you want to exercise sensitivity to body type, then you can do a lot of body type generalization exercises at first, including various body types (fat, thin, women of various body proportions).Like the following figure: this combination of deformation through the simplest of spheres will maximize the removal of details, thus focusing all attention on the characteristics of the shape itself. Strengthening this exercise will quickly improve one's ability to capture the shape. The same applies to the character's face, which will be more delicate and faint compared to the larger forms.© Pierson PangBack to the cheongsam girl, Pierson did volumetric generalization on the body shape (elbow joint, knee joint, interpolation generalization between each muscle), emphasizing the contrast between the block structure and the curves of the legs and upper arms.In the profile form, the fullness and curves of the arms and thighs need to be noted.For blocky hair, you need to pay attention to its rhythmic contrast such as sparse and dense layers. The volume structure of the face is mixed with softness and hardness, so it needs to be interspersed to deal with it.Regarding facial treatment, there are various styles of cartoonish block treatment depending on the project.Pierson's way is a combination of soft and blocky interspersed treatment, meaning that there is a sense of breathing. In fact, this sense of breathing is throughout the body in his work. How to grasp the overall rhythm? How to choose the detailed contrast of the specific partial rhythm under the overall rhythm is needed to be carefully examined.© Pierson PangAfter the model is almost done, you can directly use ZBrush to paint the vertex color to observe the character effect.Pierson has always felt that the white model does not represent the end of the high modeling stage. The top color is needed to judge the character's temperament, and painting the top color usually requires learning more about women's makeup. The choice of eye shadow type, the choice of lipstick number, what kind of character positioning and temperament they correspond to, are all very sophisticated and also exercise aesthetics. So you can observe more during your day. The aesthetics of a character's final effect is very important. The software and method skills are all auxiliary. The level of completion of the vertex color can be based on your own preferences, as long as you can roughly express the feeling of the character on the line, or to handle finely, as a base for post mapping.In ZBrush, you can use the skin material ball to observe the effect, as follows:© Pierson PangAfter the Tpose effect is determined, use ZBrush's Transpose Master to give the character a pose, but many people prefer to use DAZ to make it because it is more convenient. Transpose Master is more difficult to pose with, but can exercise dynamic anatomical ability.© Pierson PangPierson usually does not put too much effort into the practice of low-poly modeling and the process behind it, as long as it can express the effect he wants to achieve. Pierson used to paint the vertex color with ZBrush and import it into Blender to render the picture by using the vertex color with the material ball. Of course, it is also possible to draw mapping in a more detailed way to adjust the effect in Blender.3. Blender RenderAbout the renderer, he earlier used Keyshort, V-Ray and such renderers, as well as Arnold, which is used by many people to do realistic rendering. Blender is a free software with less complex material and lighting properties compared to Arnold, including WYSIWYG rendering speed and render quality, which are friendly to stylized characters.Blender has two rendering methods: eevee and cycles.Eevee is Blender's real-time rendering engine, implemented using OpenGL technology to focus on speed and interactivity while achieving the goal of rendering PBR materials. Eevee can be used interactively in 3D viewports and can also generate high-quality rendering.Eevee uses the same shader nodes as cycles, making it easy to render existing scenes. For cycles users, you can use eevee to preview material effects before using cycles to render the final image to improve efficiency.Unlike cycles, eevee is not a ray tracing engine. It uses multiple algorithms via rasterization to estimate how the light acts with the object's material, while cycles is based on physical ray tracing to calculate the bounce of each ray. Although eevee is designed to use PBR shading materials, it is not perfect. Cycles renderer provides physically more accurate rendering, while Eevee uses rasterized rendering so it has significant limitations.Each of these two rendering methods has its own features and can be chosen according to your character rendering needs.You can read the official tutorials for details:https://docs.blender.org/manual/en/3.3/render/lights/light_object.htmlrenderer-settingsThere are also many Blender tutorials on YouTube, such as:https://www.youtube.com/c/DannyMac3dYou can check out more works of Pierson Pang at at his Artstation:https://www.artstation.com/piersonpangFox Renderfarm hopes it will be of some help to you. We are an excellent cloud rendering services provider in the CG world, so if you need to find a Blender render farm, why not try Fox Renderfarm, which is offering a free $25 trial for new users? Thanks for reading!By Thepoly
More
2022-10-27
Business Consulting

Global Agent Contact: Evan Zhang

Email: evan.zhang@foxrenderfarm.com

Marketing Contact: Evan Liu

Email: evanliu@foxrenderfarm.com

Message Us:
Newsletter
Keep up with our latest software updates, special offers and events!
Copyright © 2025 FoxRenderfarm.com. All Rights Reserved.