3ds Max Cloud Rendering Tutorials and Render Farm Recommendations

3ds Max Cloud Rendering Tutorials and Render Farm Recommendations

2023-05-06

3ds Max Tutorials

3ds Max is a 3D professional modeling software, animation and rendering application builder, formerly 3D Studio and 3D Studio Max, used to create 3D animations, models, interactive games and visual effects for the entertainment industry. 3Ds Max plays a big role in designing the 2D cross-sectional shapes of 3D models. It can bring characters to life by using a special feature called inverse kinematics that can connect the different components of a character together. So whether you are an architect, a product designer or an illustrator, using 3ds Max to create your projects is a good choice for you. The 3D models are usually converted to CGI through a rendering process.We see a lot of beautiful results after the project is rendered. But rendering in 3ds Max can sometimes take a long time and it doesn't have much to do with your system itself when it comes to rendering. Long rendering times can be affected by many factors, so for creators who use 3ds Max as their primary tool, speeding up 3ds Max rendering times is a huge relief.3ds Max cloud rendering is a useful way to speed up rendering. Many people have only heard of cloud rendering but don't know what it is or how to do it. In fact, cloud rendering, a cloud service that relies on cloud computing, can also be called an online render farm. Fox Renderfarm is a powerful 3ds Max cloud rendering farm, with tens of thousands of rendering machines supporting CPU and GPU rendering, serving over 200,000 users around the world. The following is the tutorials of 3ds Max cloud rendering at Fox Renderfarm.Tutorials for Using 3ds Max Cloud Rendering**3ds Max Cloud** Rendering Web Submit TutorialStep 1. Preparations for 3ds Max web submission:1.1 Register to get an account with $25 free trial. In the case of web login, please visit web login for details.1.2 In the case of web transfer, please visit web-upload for details.1.3 Compare the local and could asset directories.Step 2. 3ds Max web submission process (4 steps: submit > analyze > render > download).2.1 Click the “Submit” button on the left, select the software for submission > set a project path (Note: this project path contains all the materials used for the Max file) > select the document for rendering, then click “Continue”.2.2 Select software version and hardware configuration corresponding to the file (Note: selection of the rendering system), click "Go Analysis", and wait patiently for the analysis to complete.2.3 Click the job with “Analysis Done”, set render parameters and then submit it for rendering (Note: the actual rendering starts only at this job)2.4 On the rendering page, click the job > export the file > download.3ds Max Cloud Rendering Desktop Client Submit TutorialStep 1. Start the desktop client, select the platform to log in, and enter the main interface.Step 2. Drag the max file to the job area in the client, thus to trigger the submission and start the scene analysis.Step 3. Select software version and hardware configuration corresponding to the file, and click "Next" to enter the analysis page.Step 4. Click “Next” when the analysis is done (Note: corresponding prompt will appear in case of any error in the analysis results or warning thereof) and set render parameter setting (including: common settings and Vray settings).4.1. Common setting:4.2. Vray settings:Step 5. Click “Submit” to start the uploading. The rendering is automatically started upon the completion of submission, and hence the submission job is successful.That is all about tutorial of 3ds Max cloud rendering. If you have anything else you don't understand, you can consult the customer service or your account manager, but remember to sign up to get an account, and the benefit for new users is a $25 free rendering voucher. If you are a student or educator, you can get a bigger discount, check out our GoCloud Program. Fox Renderfarm is always committed to providing better and more affordable cloud rendering services for everyone in the CG industry!


3ds Max Tutorials of “God of War 86''(2)

3ds Max Tutorials of “God of War 86''(2)

2022-07-01

3ds Max Tutorials

Continue the 3ds Max Tutorials of “God of War 86”(1), the fastest GPU and CPU cloud rendering services provider and render farm, Fox Renderfarm still share with you how to create "God of War 86" in 3ds Max.Next, I will explain how I added some details by referring to the picture. First, analyze the original painting. we can clearly see that in terms of the accuracy of the original painting’s model, it can only be regarded as a hand-held mecha. Many of the mecha details have not been made. The following is an analysis of the reference I found.References,We can see that the heads of these mechas all have a bumper similar to the head protection. So we can consider adding this detail to the head position when making the head.In order to consider the rationality, I added a model similar to a retainer at the end of the protective bar and added some similar protective sleeves to reduce impact in the middle.Next, we continue to analyze the references.On these mechas, there are obviously similar wires and small pipes interspersed on the model. This is what we want because these will make the mechas more accurate. So when I make these details, I also have to consider whether I was reasonable or not.By constantly adding details, the mecha model is made to look a little more refined, and the presence of those parts looks real and reasonable.High PolygonI use the traditional way of making hard surface models and the Chamfer plug-in. The higher version of 3ds Max comes with a Chamfer plug-in, which will cut corners and card lines based on the distinction of smooth groups, which is very useful for hard surfaces making. This is a screenshot according to Chamfer:It should be noted that in the From Smoothing option, we need to check the third Unsmoothed Edges option. In the Tension option, we also need to call up our desired edge between 1 and 0 according to the effect.One more thing to note is that before using Chamfer, the smooth groups must be distinguished. All surfaces do not need to be connected to a quadrilateral, but there will be no problems if the lines are connected to a flat surface.It can be seen that the effect of using Chamfer is very good, saving us a lot of working time, and improving work efficiency very well!Low PolygonLow Polygon production is actually a very simple step. It just needs to copy a set of High Polygon models to reduce the lines on the model without affecting the appearance. Since this is personal work, there is no need to be too strict on the number of faces, and it can be relaxed appropriately.Low PolygonThe part 3 will be continued soon.


3ds Max Tutorials of “God of War 86"(1)

3ds Max Tutorials of “God of War 86"(1)

2022-07-01

3ds Max Tutorials

The fastest GPU &x26; CPU cloud rendering services provider and render farm, Fox Renderfarm still share with you 3ds Max tutorials. 
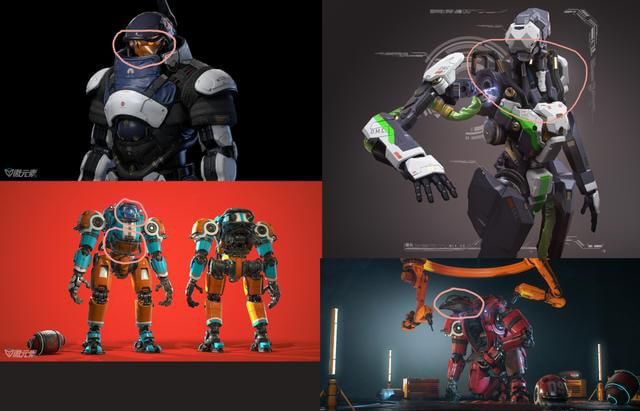
This project is made by the 3D artist, Yuliang Zhou. He made the "God of War 86" in 3ds Max, Substance Painter, Photoshop, and others. In this tutorial, he will introduce his workflow.IntroductionIn this tutorial, I will share the production process of one of my works "God of War 86" finished within 3 weeks. To complete a mecha within 3 weeks, it is a big challenge. Thanks for the help of my friend Xiao Zuo. I will also share the whole production process and some techniques used, including modelling, texturing lookdev, and lighting.Concept/ReferencesWhen choosing a concept, it needs to make some preparations in advance. When I saw the figure of the 86 Mecha Ares, I was like making a 3D model of it. The production of this model is not difficult, but it has a lot of small parts that take time to produce. And the difficulty lies in whether the overall proportions can be the same as the original image.I really like to add some of my own ideas when making models to enrich the work, so I will also find some reference pictures of other mechas on the Internet before starting to make them.BlockingOnce the concept is clarified, we can start to make the model. The first step is to use the blocking of the basic shape BOX to make the appearance. In this process, we must ensure that the basic shape is the same as the appearance of the reference. It does not need to be smoothed. We can make the foundation body in all places first. When the foundation body is done, open all the parts, and then make the details for each position. Do not start with small parts in a certain part from the beginning.I added some details to the model, such as the anti-collision bar of the head guard, pipes, wires, and some small parts to make the mecha more realistic. Hence, it is really important to find references! Next, I will briefly explain the process of a part when I make a mid-poly model. Here I have selected the main body of the head.We can see the basic shape of the head, the part of the red frame is a cuboid with a smaller front part. The green line is where the model is recessed. It takes time to make a slightly complicated structure like this. Once we have ideas, it will be relatively simple for us to start production. After adjusting the points and adding lines, we get the following model,Next, let’s look at the yellow circle again. It is obvious that there is a model similar to a lighting lamp stuck in the brain in the yellow circle. At first, I thought that just make a lighting lamp and insert it directly. But after I tried it, I can obviously see that there will be many connection problems in the interspersed place, and it will obviously feel fake when making the material. I will release the comparison chart below,It can be clearly seen from the above two pictures that the method of using Boolean to create a pit in the first picture is obviously more realistic and reasonable than the direct interspersed in the second picture. In contrast, there will be a little difficulty in the card line.Part 2 and Part 3 will be continued soon.


The Biggest Ever Sale is Now LIVE - Render With Fox Renderfarm

The Biggest Ever Sale is Now LIVE - Render With Fox Renderfarm

2022-07-01

3ds cloud rendering

To thank our beloved customers' support and love this year. Fox Renderfarm, the best cloud rendering services provider and render farm, launched the biggest sale from Nov. 15th to Dec. 31st, 2021(UTC+8).For this Ultimate Christmas Rewards 2021, you can recharge and get extra 100% CPU coupons or 50% GPU coupons. E.g., recharge US$100 &x26; get US$100 + an extra US$100 CPU coupon or US$100 + an extra US$50 GPU coupon.Details1· The minimum recharge amount is $10.2. The offers apply to any user within the official pricing scheme.3· Coupon's validity time: 1 year.4. Fox Renderfarm reserves the right to alter, amend or add these conditions at any time without prior notice.


2021 FGT Art May Winner Anahad Kashyap

2021 FGT Art May Winner Anahad Kashyap

2021-07-14

3D Rendering

How to create a cute story about a little bulb by Blender? Introducing FGT Art May Winner, Anahad Kashyap, a young freelance artist who is proficient in Blender regarding modelling, animating, and rendering.As a platform to show CG talent, FGT Art welcomes CG artists all over the world to show off their impressive 3D artworks which were rendered with the best render farm, Fox Renderfarm. Learn more: How to Create a Cute Story About a Little Bulb by Blender: Introducing FGT Art May Winner, Anahad Kashyap


3D Artwork A Hidden Treasure Created by Iasonas Raptopoulos

3D Artwork A Hidden Treasure Created by Iasonas Raptopoulos

2021-02-26

3ds Max Tutorials

A hidden treasure © Jason Raptopoulos The nostalgic Alfa Romeo racing car is created by Jason Raptopoulos (Iasonas Raptopoulos), a 3D generalist from Greece. Made with 3ds Max, Substance Painter, Marvelous Designer, Adobe Photoshop and After Effects, the project took Jason about one and a half months, which brings a feeling of warmth and nostalgia. Let’s find out how he made the beautiful 3D artwork in the exclusive interview with the best cloud rendering service provider, Fox Renderfarm.Alfa Romeo is a company with a long history in the automobile and motorsport industry. As a huge car lover, Jason Raptopoulos, the 3rd place winner of Hum3D Car Render Challenge 2020, chose a rare model of Alfa Romeo that few will know of as his inspiration.Jason Raptopoulos (Iasonas Raptopoulos)3D artist / GeneralistGreeceHit the link to find out how he made the amazing artwork.How To Create A Nostalgic Alfa Romeo Racing Car With 3ds Max


3D Artwork The Mini Dream Created by Phil Derbyshire

3D Artwork The Mini Dream Created by Phil Derbyshire

2021-02-25

3ds cloud rendering

The Mini Dream © Phil Derbyshire What a fantastic and microscopic world!Hum3D Car Render Challenge, an annual render challenge, announced the winner of 2020 recently. As the long term partner of Hum3D, the best cloud rendering services provider, Fox Renderfarm is pleased to witness that there are more and more excellent car render artworks emerging year by year. This time we are honored to interview Phil Derbyshire, the 2nd place winner of the challenge and also the special prize winner from our Fox Renderfarm team.Phil’s award-winning artwork, The Mini Dream, shows a fantastic and microscopic world, made with 3ds Max, Redshift, Quixel Megascans, Forest Pack Pro, ZBrush, Substance Painter, Affinity Photo and Affinity Designer. Phil described the artwork,”No matter how small you may be in the grand scheme of things, there is absolutely nothing that can stop you from dreaming big!”Phil Derbyshire3D Artist at TekVisual, LLCAmericaHit the link to find out how he made the amazing artwork.How to Use 3ds Max to Create A Photorealistic Car Render Giving Fairytale Mood


How to Use 3ds Max to Create A Brave Warrior

How to Use 3ds Max to Create A Brave Warrior

2021-02-22

3ds cloud rendering

Bravehearts © Reyaz Alankandy Have a look at the amazing mood, lighting and composition!The work, Bravehearts, is created by Reyaz Alankandy, a freelance 3D artist based in India. It’s a proud tribute to these brave warriors for their selfless hard work through the pandemic.In “My own 2020” Evermotion Challenge 2020, Reyaz Alankandy, the champion of the competition, shows his own 2020 by creating the artwork “Bravehearts”.In this artwork, Reyaz portrays a railway station that used to overflow with bustling life, but during the pandemic, it emptied all except the sanitation workers busy in the task.Made with 3ds Max, Corona Renderer, Photoshop, the award-winning artwork shows a proud tribute to these brave warriors for their selfless hard work. As Reyaz said, while the world hid, some rose to fight back, to stand a chance against the virus.As a freelance 3D artist specialized in architectural and interior visualization, Reyaz created many excellent artworks, and he adores every challenge and new opportunity along his archviz journey. In the interview with Fox Renderfarm, the largest cloud rendering services provider in the CG industry, Reyaz talked about how he created the work and his career experience.Reyaz AlankandyFreelance 3D Artist3D VisualizerIn our exclusive interview, Reyaz introduced how he created this amazing piece.More about interview detials Tribute To Bravehearts In My Own 2020: Introducing 3D Artist, Reyaz Alankandy


3ds Max Tutorials of “God of War 86”(3)

3ds Max Tutorials of “God of War 86”(3)

2020-11-17

3ds Max Tutorials

Continue the 3ds Max Tutorials of “God of War 86”(1) and 3ds Max Tutorials of “God of War 86”(2), the fastest GPU &x26; CPU cloud rendering services provider, Fox Renderfarm still share with you 3ds Max Tutorials of “God of War 86”(3).UVSAfter preparing the model, it is the UV part. There are four unwrapping UVS, namely hands, feet, body, and head. This workload is already a lot. When scaling UVS, we can use a scale to align the size of the checkerboard.In the process of making a model, there will be a lot of trouble when reducing the surface.If the UV is too fragmented, the texture will cause seams in many places. So my UV will not be very fragmented. For those seam problems, we need to use Edit normal to fix some normal problems, and we can also use the vertex normal transfer plug-in to achieve perfect normals.BakingThe baking of the model uses Substance Painter. Now the names of High Polygon and Low Polygon are named in 3ds Max. Due to a large number of mecha model parts, it is likely that some places are not baked. In order to prevent this phenomenon, we will first test and bake to ensure that there are no problems before importing all models into Substance Painter.When baking in Substance Painter, we need to pay attention to some problems that often occur.TexturingWhen making textures, it’s vital to observe the references. Since the references are pictures of hand-made models, we can see that the textures of the model are relatively simple, and the references of the metal part need to be searched again.The following is the process of making textures.I plan to make it look like a battlefield. Its appearance is rather worn, not so new, there will be some dust, stains and other things, showing a sense of oldness. Then, we can start making textures.First, make the most basic texture, which is divided into three layers, inherent color, light, and dark. These three layers of texture are the most critical. Only when these three layers are superimposed can the effect of worn-out dirt be better. What still needs to be considered is what other details will be on the metal surface. It is best to look for references.As we can see in the above references, the details on the metal surface are still rich, including dust, scratches, breakage, paint peeling, dark edges of objects, strong reflections, rough surfaces, etc. Of course, the fastest way is to directly use the material that comes with Substance Painter to test what we need. Other textures are made in the same way, including wood, plastic, and so on.Since the color of the texture and the color of the metal are both cold, it is necessary to add some color changes to the metal when making the texture, such as adding some warm stains, so that the complementary colors will not appear as monotonous.One more thing to note is that lighting should also be considered when making textures in Substance Painter. A good model must be equipped with good lighting to show the best results. If possible, we can perform a rendering test when making textures.Texture map made by Substance Painter,RenderingWe need to set up the light before Renderer. Since the color of the mecha and the metallic tone are relatively cold, the main light source must be a warmer light. For the backlight, I chose a purple light to illuminate the outer contours of the back. Since the mecha is still relatively large, many places are not illuminated by the main light source, so we still have to make some warm light to illuminate partially dark places.


Is This Simulated By Houdini? No! This Is Max!

Is This Simulated By Houdini? No! This Is Max!

2019-09-30

tyFlow

First, let's take a look at a work released by Tyson Ibele on Instagram. Perhaps you can hardly believe that such accurate rigid body collision and fragmentation calculations are actually simulated inside 3DS Max? Even using Houdini to simulate is also difficult, and the use of Particle Flow. Particle Flow is a new feature in the Max 6 version. It was also Max's first particle tool to break the no-node function. In the years that just came out, the utilization rate was still relatively high. However, with Houdini and some Max plug-ins more and more stronger, the PF is slowly weakened, and PF has become not very important in Autodesk.There are Max users who want to replace PF, so Max and Houdini have a fight, some people think that it is impossible, after all, the advantages of each of Autodesk's products are there, it is impossible to develop a block separately.Tyson Ibele is an animator who has lived in Toronto, Canada for a long time. He rewrote the ParticleFlow in 3ds Max and got a tool called tyFlow.The physical flow of tyFlow is inseparable from its bound skin system. By combining them, it is very easy to simulate effects like rigid body deformation. In this video, the car's outer casing is a rigid body that combines with the PhysX constraint of tyFlow. The tyFlow constrained deformation system is capable of local deformation when the pressure on certain parts of the constrained mesh reaches a certain amount.Every part of the system is controlled by the tyFlow program, so it is easy to iterate and tweak.


Welcome to join us

render farm free trial

Recommended reading


How to Render High-quality Images in Blender

2023-01-13


Top 9 Best And Free Blender Render Farms of 2024

2023-05-06


Revealing the Techniques Behind the Production of Jibaro "Love, Death & Robots", Which Took Two Years to Draw the Storyboard

2023-01-13


How to Render Large Scenes with Redshift in Cinema 4D

2022-06-09


Top 10 Free And Best Cloud Rendering Services in 2024

2023-09-26


Top 8 After Effects Render Farm Recommended of 2023

2023-02-02


How to Reduce Noise in Corona Renderer - Corona Denoising

2023-01-13


Arnold for Maya Tutorial: How to Render Wireframe

2023-01-13


Partners

  • Foxrenderfarm

    Powerful Render Farm Service

  • TPN
  • TPN

    Business Consulting

    Global Agent Contact:Gordon Shaw

    Email: gordon@foxrenderfarm.com

    Marketing Contact: Rachel Chen

    Email: rachel@foxrenderfarm.com

    Connect with Us

Fackbook Customer Reviews