Top 9 meilleures fermes de rendu Blender gratuites
2026-03-26


꼭 알아야 할 최고의 3ds 최대 렌더 팜 탑5
3ds Max Render Farm
3ds Max는 많은 3D 아티스트와 스튜디오에서 널리 사용되며, 렌더팜과 프로그램의 호환성이 매우 중요합니다. 이 글에서는 2024년 상위 5개의 3ds Max 렌더팜을 살펴보겠습니다. 자세히 살펴보겠습니다.

3ds Maxレンダーファームのベスト5選
3ds Max Render Farm
3ds Maxは、多くの3Dアーティストやスタジオに人気があり、レンダーファームとプログラムの互換性は非常に重要です。この記事では、2024年の3ds Maxレンダーファームのトップ5を取り上げます。それでは、詳細をご覧ください。

5 Best 3ds Max Render Farm You Should Know
3ds Max Render Farm
3ds Max is popular among many 3D artists and studios, and, the compatibility of render farms with the programme becomes crucial. In this article, we will cover the top 5 3ds Max render farms of 2024. Let's dive into the details.

Any Free Render Farm for Cinema 4d, Maya, 3ds Max?
Maya Cloud Rendering
I think you always search for a free render farm for Cinema 4d, Maya, 3ds Max, but you will find that a completely free render farm does not exist, to be honest, most of the platforms needs to charge due to the reasons below.

Get Started on Game Modeling with 3ds Max Modeling Tips
3ds Max Tutorials
In this article, the best cloud rendering service provider and render farm, Fox Render****farm will show you some practical 3ds Max modelling tips.

3ds Max Cloud Rendering Tutorials and Render Farm Recommendations
3ds Max Tutorials
How to improve the rendering speed of 3ds Max? Using 3ds Max cloud rendering is a great way to do it. Let's follow Fox Renderfarm, the best cloud rendering service provider, to read the article.

How to Create a Stylized Cheongsam Girl in ZBrush and 3ds Max (2)
3ds Max Tutorials
How to create a stylized Cheongsam girl in ZBrush and 3ds Max? In this article, the best cloud rendering service provider, Fox Renderfarm will share with you the tutorial.
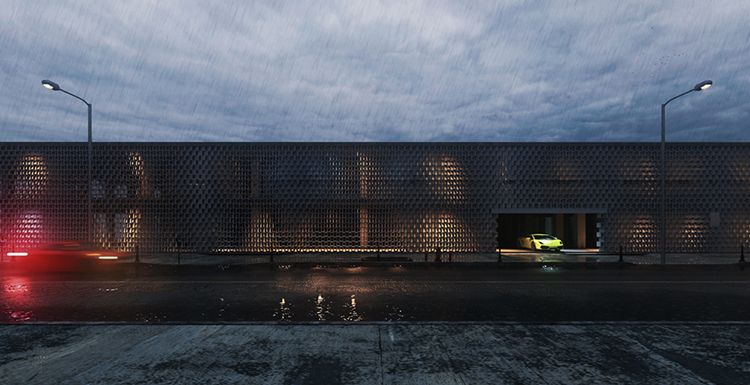
Rainy Scene Performance of Building Exterior
V-Ray for 3ds Max
This is a rainy scene performance of building exterior, from 3D artist Han Shilin. The software used is SketchUp, 3ds Max, V-Ray for 3ds Max, Photoshop, and Substance Painter, etc.

How to Make A Tomahawk in 3ds Max
3ds Max Tutorials
1 month rendered in 2 hours, the fastest GPU & CPU cloud rendering services provider, Fox Renderfarm still shares with you 3ds Max tutorials, how to make a tomahawk in 3ds Max.

How To Make An Ancient Warrior Using ZBrush And 3ds Max(1)
ZBrush Tutorials
Fox Renderfarm, the best cloud rendering services provider, will bring you a tutorial from 3d artist Mars on how to use ZBrush and 3ds Max to make an ancient warrior.

How to Create Chinese Style Scenes in 3ds Max and ZBrush
ZBrush Tutorials
In this article, your trusted CPU & GPU cloud rendering services provider, Fox Renderfarm will share with you a production process about how to create Chinese style scenes in 3ds Max and ZBrush from 3d artist ZX.

3ds Max Tutorials: Semi-realistic 3D Game Scene Interior Production Sharing (2)
3ds Max Render Farm
Fox Renderfarm, as the best Maya render farm** in the CG industry, the tutorial we shared for you this time is from the 3D artist Thepoly, on how to use 3ds Max and Maya and other software to make a semi-realistic 3D game scene interior production process.