Rainy Scene Performance of Building Exterior

The best cloud rendering services provider and GPU & CPU render farm, Fox Renderfarm will share with you a good 3D tutorial to make rainy scene.
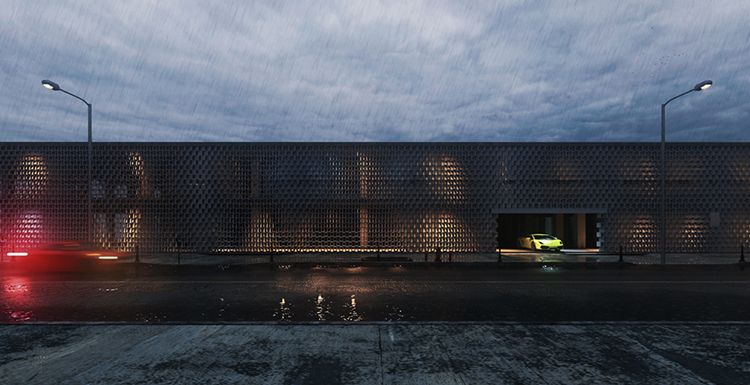
This is a rainy scene performance of building exterior, from 3D artist Han Shilin. The software used is SketchUp, 3ds Max, V-Ray for 3ds Max, Photoshop, and Substance Painter, etc.
How to be "realistic"?
"Realism" doesn't just give each material a very accurate parameter that can be applied to any environment, so that it can render a very realistic effect. It also refers to realistic performance = according to your own visual experience, controlling parameters to make the map in line with expectations.
The difference between the two understandings is that the former has no control and expectation of the final result, and is based on the idea that "parameters are correct.".
Reference
The reference picture is very important, this is an expectation of the final effect, such as light and shadow, atmosphere, composition. And it is recommended to combine all the reference pictures into one plate.

In order to show a sense of tranquility and quietness, a darker, rainy weather was set. The architectural details of this scene are not many, the atmosphere of light and the treatment of the ground part are very important.
Modeling
Grasshopper makes the appearance, imports SketchUp to make the main body of the building, and then imports into 3ds Max, and rendered with V-Ray. The process is very simple.
The important thing is to do a good job of layering, otherwise, it will become more troublesome when importing into 3ds Max.
As for the composition, a very low angle was used, as much as possible to expose the ground material and the wider sky.
Texture
The main body of the building is far away from the lens, so only ordinary materials are needed, and the texture of the materials can be maintained. Taking the skin material as an example, the rest of the building materials are very basic.

Sidewalk and road eaves: indoor concrete texture package, because there will be a lot of dirt in the outdoor scene, so the concrete texture and the dirt texture are mixed together. The area in the close shot is relatively small, so the repeatability of the material is serious. Since it is a rainy scene, the roughness value is also very low.

PS. The main building can be modeled in SketchUp and then imported into 3ds Max. The environment and settings of the scene are best created with 3ds Max because the SketchUp model will have some problems when imported into 3ds Max, such as the UV will be messed up.
Performance details (Substance Painter draws some textures)
From the perspective of the camera, the pavement greatly affects the picture, so its material is very important. You need to import this pavement into Substance to draw textures.
Import the mesh file that needs to draw textures into Substance Painter.

Remember to turn off the channels other than the natural color when drawing the natural color map. After drawing the natural color map, create a new layer and draw the bump.

Then you can add some standing water to both sides of the road.

There are many ways to draw. One of the simpler methods is to add a material to adjust a very flat height and then apply it several times with a dirt brush to get a better random effect. Because what to do is a rainy scene, there is no wet feeling. So adjust the level of the roughness layer.

One thing to note is that if you want to get the same effect in 3ds Max as in Substance Painter when importing the texture, adjust the blur to 0.2. For sharper effects, lower it. In addition, the imported map gamma needs to pay attention to, the map color of the natural color is selected automatically, and the rest are all 1.0.

Then it is relatively simple work and found some model-rich scenes from Evermotion's model library.
Such as the middle and lower left cars. After that, I used V-Ray rendering in 3ds Max, and finally adjusted it in Photoshop.
Fox Renderfarm hopes it will be of some help to you. It is well known that Fox Renderfarm is an excellent cloud rendering services provider in the CG world, so if you need to find a render farm, why not try Fox Renderfarm, which is offering a free $25 trial for new users? Thanks for reading!
Recommended reading
Top 9 Best And Free Blender Render Farms of 2025
2024-12-30
Revealing the Techniques Behind the Production of Jibaro "Love, Death & Robots", Which Took Two Years to Draw the Storyboard
2025-02-10
Top 10 Free And Best Cloud Rendering Services in 2025
2025-03-03
Top 8 After Effects Render Farm Recommended of 2025
2025-02-10
Top 5 Best and Free 3d Rendering Software 2025
2025-02-10
Shocked! The Secret Behind Using 3D to Make 2D Animation was Revealed!
2025-02-10
How to Render High-quality Images in Blender
2024-12-04
Easy Cel Shading Tutorial for Cartoon in Blender Within 2 Minutes
2025-02-10
Partners
Previous: The Benefits and Disadvantages of Cloud Rendering
Next: V-Ray 3.4 For Sketchup To Make A Work "Container Cabin"
Interested


