Top 9 Best And Free Blender Render Farms of 2025
2023-05-06


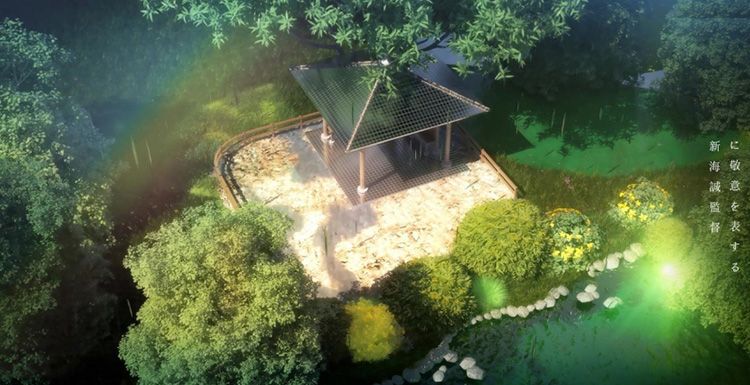
Creation Analysis: Using 3D to Make 2D Style Scene(1)
V-Ray for 3ds Max
The best cloud rendering services provider and 3ds Max render farm, Fox Renderfarm will share with you a tutorial of using 3D to make 2D style scene.In this case, we show the use of 3ds Max to create 2D animated movie-style scenes and will focus on explaining the Makoto Shinkai-style picture performance. From his animation works, we can feel a strong personal style, exquisite light, and shadow app
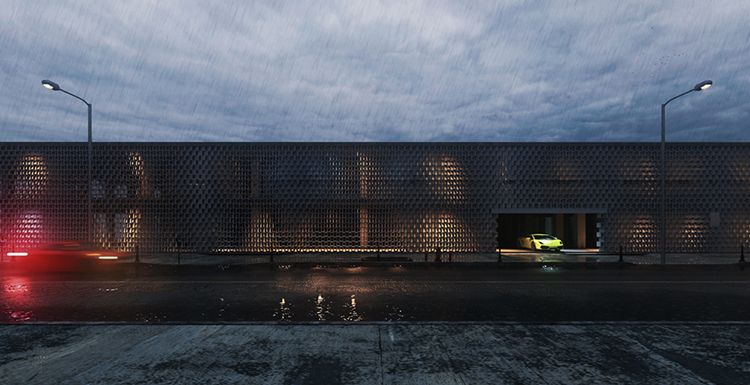
Rainy Scene Performance of Building Exterior
V-Ray for 3ds Max
The best cloud rendering services provider and GPU &x26; CPU render farm, Fox Renderfarm will share with you a good 3D tutorial to make rainy scene.This is a rainy scene performance of building exterior, from 3D artist Han Shilin. The software used is SketchUp, 3ds Max, V-Ray for 3ds Max, Photoshop, and Substance Painter, etc.How to be "realistic"?"Realism" doesn't just give each material a very a

3ds Max Tutorials: Making a Sci-fi Scene in 3ds Max (1)
V-Ray for 3ds Max
Your powerful CPU &x26; GPU cloud rendering services and TPN-Accredited cloud render farm, Fox Renderfarm still shares with you the 3ds Max tutorial. In this tutorial, I conceived a sci-fi style scene, and named it "Fortress".IntroductionBefore I started production, I just made a preliminary idea. Because I didn't have too much time to create, I didn't draw a conceptual drawing. I just made a mode

3ds Max Tutorials: Making a Sci-fi Scene in 3ds Max (2)
V-Ray for 3ds Max
Continue the 3ds Max Tutorials: Making a Sci-fi Scene in 3ds Max (1), the fastest GPU and CPU cloud rendering services provider and TPN-Accredited render farm, Fox Renderfarm still share with you the part of texturing and rendering in making a Sci-fi scene.TexturingMaking textures is the most interesting part of the work, but realistic textures are also the most difficult to make. Understanding th

Making a Japanese-style Scene in 3ds Max(2)
3ds Max Tutorials
Continue the Making a Japanese-style Scene in 3ds Max(1), the fastest GPU and CPU cloud rendering services provider and render farm, Fox Renderfarm still share with you how to create a Japanese-Style Scene in 3ds Max.High-polyAfter the mid-poly is finished, some models with very few details, such as lanterns, can be converted into high-poly models with threading. When adding threads, be careful no

3ds Max Tutorial: Analysis of Building Rendering in Dusk
V-Ray for 3ds Max
Fox Renderfarm, as a leading archive render farm and cloud rendering services provider, brings to you the analysis of architectural renderings at dusk made with 3ds Max and V-Ray. An outstanding works include two aspects: one is the picture effect, including color matching and composition of the picture. This is the key, as well as professional knowledge and photography skills, and the level of ap

How to Use 3ds Max to Make a Game Environmental Scene
3ds Max Render Farm
Hi, this is Cassie from the best cloud render farm and fast cloud rendering services provider, Fox Renderfarm. This time, I will share with you an article about how to use 3ds Max to make a game environmental scene.Observe and analyze the original painting and asset allocationThis is a case of the PBR process, specifically used 3ds Max to complete the low-poly model, ZBrush to complete the high-po

72 Tips And Technical For V-Ray in 3ds Max That You Should Know
V-Ray for 3ds Max
In writting this article, the leading cloud rendering service provider and the best render farm, Fox Renderfarm wants to share some tips in the rendering process for V-Ray in 3ds Max, which can save rendering time and improve rendering speed.Try to limit the number of Ploygons, the less the faster rendering speed.If you use V-Ray, use Proxy instead of the high-surface model.When making shadows, su

How to Make a Sci-fi Spaceship with 3ds Max (1)
V-Ray for 3ds Max
The best CPU &x26; GPU render farm and cloud rendering service provider, Fox Renderfarm, is sharing an article for you this time on how to make a fish-shaped spaceship with 3ds Max.IntroductionThis work is inspired by spoons. One day, I saw the spoons when I was eating in the restaurant, I suddenly felt that the spoons turned upside down looked like some kind of fish, and some of them looked like

How to Make a Sci-fi Spaceship with 3ds Max (2)
3ds Max Tutorials
The best CPU&x26;GPU render farm and cloud rendering service provider, Fox Renderfarm, is still sharing with you the production of how to make a Sci-fi spaceship with 3ds Max.How to Make a Sci-fi Spaceship with 3ds Max (1)RenderingThe background production directly used a previous project and made some modifications according to the reference diagram. The lighting adopts the sunlight and skylight

Using V-Ray For 3ds Max To Create A Real Grass Field
V-Ray for 3ds Max
The fast cloud rendering services provider and GPU&x26;CPU render farm, Fox Renderfarm will share with you a 3D tutorial. In this project, we will learn to use V-Ray for 3ds Max to create a real grass field.Grass field is an important element of natural landscape scenes, so how can we make natural and real grass field in the simplest way? Contrast the two pictures as below, it is not difficult to

Tutorial: V-Ray for 3ds Max Making Forest Park Restaurant
V-Ray for 3ds Max
As the leading cloud rendering services provider, Fox Renderfarm is here to tell you how to make forest park restaurant using V-ray for 3ds Max.The case study presented to you this time is based on a person's conceptual design - a restaurant that is intended to be built next to a waterfall and surrounded by vegetation. From design to final performance, it is all done by one person. The overall pro