3ds Max Tutorial: Analysis of Building Rendering in Dusk

3ds-Max-Tutorial-Analysis-of-Building-Rendering-in-Dusk

Fox Renderfarm, as a leading archive render farm and cloud rendering services provider, brings to you the analysis of architectural renderings at dusk made with 3ds Max and V-Ray. An outstanding works include two aspects: one is the picture effect, including color matching and composition of the picture. This is the key, as well as professional knowledge and photography skills, and the level of appreciation of photographic works. Another aspect is technology, which can use various tools. This is extremely critical. You must fully understand what to do and how to do it. If you can balance these two aspects well, you can make effective works

Software used

3ds Max, V-Ray, Solid Rocks, Forest Pack Pro, Siger Shaders, Photoshop Cs6, Red Giant Magic Bullet and Nik Software.

Reference picture

Before the production of the artwork, the key step is to find the correct reference photos, prepare the reference for the future atmosphere, lighting and post-production, and try to approximate the reference photos.

3ds Max Tutorial Analysis of Building Rendering in Dusk (12)

Basic Settings

Linear Workflow is a highly recommended way of working, the basic settings are shown in the figure,

3ds Max Tutorial Analysis of Building Rendering in Dusk (1)

Modeling All models are based on flat design drawings. The basic model of this figure is made using Autocad and then imported into 3ds Max. The details after that are added based on your own imagination without any reference.

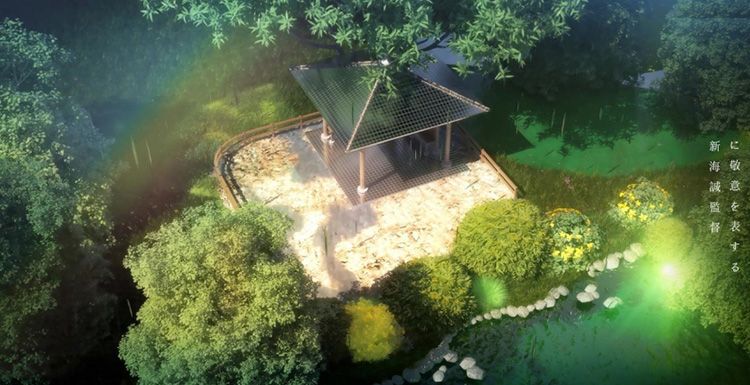
The terrain and surrounding environment are modeled using Forest Pack Pro, which can make stones, grass, and trees with a random and natural feel. The plants on the side of the building should be arranged according to the layout indicated in the drawings of the landscape design.

3ds Max Tutorial Analysis of Building Rendering in Dusk (2)

Materials and texturing

All textures in the scene use the Siger material as the base texture. Based on this texture, the texture effect is made according to the needs of the project. Keep the texture as simple as possible, using only some basic channels, such as Diffuse Map, Specular Map, Bump Map, etc. It is produced according to the reference in the reference. Using the texture library is a time-saving method. You don't need to spend a lot of time to make each texture from beginning to end. You can make some adjustments on the basis of the texture library to meet the requirements of the project.

The material of the swimming pool is a little tricky in refraction on the water surface, and the final result is very close to the reference picture.

3ds Max Tutorial Analysis of Building Rendering in Dusk (3)

Lighting

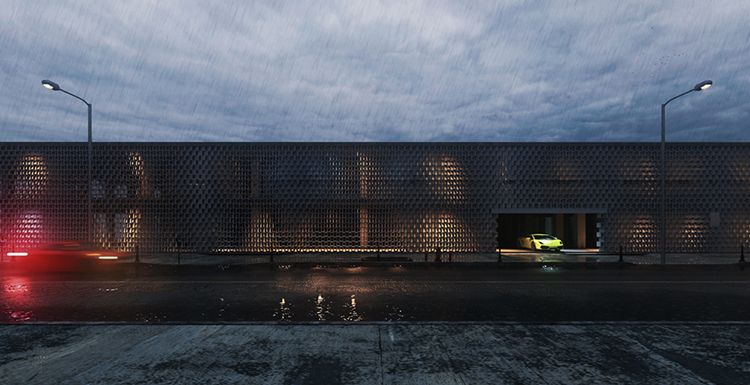
HDRI lighting technology is one of the very useful ways to achieve real effects, which can get very realistic and accurate lighting effects. When setting the position of the main light source sun, you can have several options, place it on one side, use warm colors, and then set a transition light source from warm to cold and light to dark. This transition light source can give with a more natural effect on the picture, the light won't appear too flat.

In terms of outdoor light sources, the Dome light plus HDRI method uses Peter Guthrie's PG SKIES 2028 for the texture, and the indoor light uses a standard Target combined with V-Ray shadows and V-Ray surface light to match the IES. The small downlight on the ceiling uses V-Ray light to simulate the feel of a light bulb.

3ds Max Tutorial Analysis of Building Rendering in Dusk (4)

Rendering

This part is a bottleneck for many people. How to set a set of effective parameters? A very old but extremely useful plugin for Solid rocks is used here. Solid Rocks has a very useful set of V-Ray parameters. The interface is very simple. As long as you know V-Ray, you can understand it. Basically it covers all the parameters needed. It is very convenient and quick to use. For those who are not interested in going deeper V-Ray's parameters are very suitable for those who influence the rendering process behind the scenes. Here are the very basic parameters.

3ds Max Tutorial Analysis of Building Rendering in Dusk (5)

In V-Ray Elements, it is required to be able to control some effects such as light and dark contrast, reflection and refraction, etc. The V-Ray Raw Global Illumination channel has been added for better post-control. Finally, if you want the effect to be realistic, especially if your local machine fails to meet the rendering hardware requirements, often when the machine crashes, it is recommended that you use a cloud rendering services to render.

Post-production

The beginning of a work starts from the post-production period, and the earliest reference picture found determines the effect of the final artwork.

In the post-production processing, try to keep everything simple, use the V-Ray Raw Global Illumination channel, change the layer to Hue / Saturation overlay mode, and adjust it to indoor without exposure. Then add some texture on the left cement floor.

3ds Max Tutorial Analysis of Building Rendering in Dusk (7)

So far, everything has been made with 3ds Max and V-Ray. If you need to adjust the color, you can use the Selective Color adjustment layer, because only this layer can make every color in the scene controllable. The principle is keep the effect of the transition light in the scene, because the four colors in this layer basically cover all the colors in the scene, so this provides the flexibility of color control of this scene, which can well harmonize various colors and tones.

The color balance is changeable, so a good reference picture is necessary, as long as you try to imitate the effect in that photo, the trick is actually to find a photo close to the existing rendering effect as a reference, so for post-processing the process is relatively easy. You can also use Hue / Saturation or Curves with this Selective Color adjustment layer.

3ds Max Tutorial Analysis of Building Rendering in Dusk (8)

Observe the artwork with your own eyes and make adjustments, such as the halo of the light bulb, you can simply draw a halo around the light bulb to simulate the temperature of the light bulb (the light bulb has no color, only the temperature). This halo can be made a little bit The feeling of exposure.

3ds Max Tutorial Analysis of Building Rendering in Dusk (9)

There are two main plugins used in the final step: Magic Bullet Photolooks and Nik Software. The main purpose is to better integrate the adjustments made before, so that the colors, brightness, saturation and saturation in the picture are more natural.

As a night scene, you must be aware of the characteristics of the light at night. In photography technology, you need to reduce the shutter speed to get more light through the lens, and observe more photographic works to simulate the characteristics of such photos to achieve realistic effects.

3ds Max Tutorial Analysis of Building Rendering in Dusk (10)

Because real photos do not have anti-aliasing, you can use Analog Efex Pro 2 to simulate some graininess and do a little blurring, so that the picture will look more like a real photo and more natural.

Hue is a difficult topic to define. It is definitely wrong in real photography, but in the post-production of PS adjustment, this hue technology is used everywhere because the human eye is seeing a picture with a color tone. Unconscious people will think this is a photo, so I will use this feature to use this color tone technology in PS. The suggestion is not to use it excessively, but to control it when using it so as not to cause unnatural effects.

The final step is to use High Pass Filter to sharpen the picture, the final renderings,

3ds Max Tutorial Analysis of Building Rendering in Dusk (11)

Above is the analysis of architectural renderings at dusk made with 3ds Max and V-Ray brought by Fox Renderfarm. As the leading cloud rendering services provider and best 3ds Max render farm, Fox Renderfarm continues to bring the latest news about 3D art. We hope you can learn something from our article.

Welcome to join us

render farm free trial

Recommended reading


How to Render High-quality Images in Blender

2023-01-13


Top 9 Best And Free Blender Render Farms of 2024

2023-05-06


Revealing the Techniques Behind the Production of Jibaro "Love, Death & Robots", Which Took Two Years to Draw the Storyboard

2023-01-13


How to Render Large Scenes with Redshift in Cinema 4D

2022-06-09


Top 10 Free And Best Cloud Rendering Services in 2024

2023-09-26


Top 8 After Effects Render Farm Recommended of 2023

2023-02-02


How to Reduce Noise in Corona Renderer - Corona Denoising

2023-01-13


Arnold for Maya Tutorial: How to Render Wireframe

2023-01-13


Partners

Interested

Creation Analysis: Using 3D to Make 2D Style Scene(1)
The best cloud rendering services provider and 3ds Max render farm, Fox Renderfarm will share with you a tutorial of using 3D to make 2D style scene.In this case, we show the use of 3ds Max to create 2D animated movie-style scenes and will focus on explaining the Makoto Shinkai-style picture performance. From his animation works, we can feel a strong personal style, exquisite light, and shadow applications, strong light and dark contrast and gorgeous colors are the biggest features of his works, these features make his works look more real. Reference material from Makoto Shinkai’s animated film "Koto no ha no niwa".Some pictures material comes from the 2D animated film "Koto no ha no niwa", and some screenshots are found for reference.The whole idea:Composition layout and lighting testMaterial adjustment and rendering settingsUse of channelsColor comparison and synthesisComposition layout and lighting testIt is very important to make scene lights in this style, often in small details, such as the bright and dark junction of very bright objects, reflections in small details, the color gradient of objects under the influence of light, and the objects interspersing and blocking, the resulting changes in light are all things we need to pay attention to. Every time I watch an animation, I am always moved by these nuances. The models used in this tutorial are very simple. When doing interior scenes, it is often to build a simple BOX first and modify the approximate shape to test the lights to see if they meet the expectations. But when making, it is better to have an imaginary picture first, so that you can judge whether you have achieved the desired effect when you are done, but you must know what kind of effect you want before you do it.This is a scene from the animated movie "Koto no ha no niwa", which is real in Shinjuku Gyoen Park, Japan. What I want to do now is to make the 2D animation feel with 3D. First, use a simple model to determine the main pavilion. And the location of the surrounding trees, place the camera, as the picture shows:Then we can see through the original animation that the light is shining from the bottom left corner.Here, a standard target parallel light is used as the main light source. The angle of light and the attenuation range of the illuminated area are adjusted. The shadow length and direction of the trees are observed and adjusted to a suitable position. Adjust the UVW in the shadow parameters to blur the tree projection to make it unreal. Open the environment and effects panel, add a VRaySky map to the environment map, drag it to the material panel by example, check the first column, pick the target parallel light in the scene, and set the map light intensity to 0.03. You will get a sky environment that matches the scene lighting, making the rendering more realistic.A high light and dark contrast picture is needed here, so no ambient light is used in this scene. In addition, a VRayLight was created in the direction of the light to simulate a small range of strong sunlight. It can produce more intense light and shade. The parameter settings are the shape of the light is spherical, the intensity is 200, the color is warm, and the light is not visible.Open GI and test the lighting effect, as follows:After the lights are almost well, we start to refine the scene, and finally, it looks like this:In order to simulate the feeling of the rainy season in the original animation, I used the 3ds Max particle system to simulate some raindrops, created a standard particle flow source, and added a random rotation to make the raindrops have some random changes.I also used the MultiScatter plugin to plant some grass.Material adjustment and rendering settingsIn terms of materials, I will focus on the material of the pavilion and the surface of the water. The material of the pavilion must be rendered wet and wet. Because the scene is rainy, I chose mirror high reflection on the material. I did not check Fresnel. The top will be completely reflected in the surrounding trees, plus the projection of the tree occlusion to get a similar effect.The water surface did not make it reflect the sky and clouds like the original painting, but chose a green that matches the scene, as shown in the following figure:The material of water is as follows:Next, we can adjust the rendering parameters. Anti-aliasing uses Catmull-Rom with a certain sharpening effect, which can make the details of the trees richer. Turn on the reflection environment. A VRayHDRI map is added to the reflection environment. The exposure selection is the last one. The term Reinhard mixed exposure is similar to the combination of exponential exposure and linear exposure. Set the blend value to 0.7.VRayHDRI is displayed as a sphere with an intensity of 4.Using the VRayHDRI map can increase the reflection details of some scenes. Turn on the GI and use the Irradiance Map for the first bounce. The first bounce is the first global light calculation for the direct light. The second bounce uses the Light Cache. Actual calculation, turn on display calculation phase. As the picture shows:Open the rollout of the light cache, set the light subdivision to 1500, andcheck the options in the figure.The rendering effect is as follows:Now please follow the best CPU &x26; GPU render farm and cloud rendering services provider to our next part: Creation Analysis: Using 3D to Make 2D Style Scene(2).
More
2022-07-27
Creation Analysis: Using 3D to Make 2D Style Scene(2)
As the leading cloud rendering services provider and GPU &x26; CPU render farm, Fox Renderfarm is here to continue to share with you how to make 2D scene with 3D.Creation Analysis: Using 3D to Make 2D Style Scene(1)In this article, we still show the use of 3ds Max to create 2D animated movie-style scenes and will focus on explaining the Makoto Shinkai-style picture performance.The use of channelsWhen rendering into a map, we need to add some channels to the rendering elements to help us post-process the scene. I added VRGI channels, VR lighting channels, VR reflection channels, VR shadow channels, VR highlight channels, and Z channel. The Z channel needs to test the distance of the camera in advance. It can be measured directly with a tape measure, or the camera's ambient range display can be turned on. The rendering results are as follows:Adjust the color and compositionIn the last step of color processing, you must first have a clear understanding of the overall picture effect processing ideas. Let's analyze the original picture of Makoto Shinkai first. "Koto no ha no niwa" uses the delicate design and delicate application of color elements to enhance the overall expression of the work. In the picture, the author uses a variety of green and gray with different purity and brightness. Multi-tones such as blue, white, and white are painted and painted. The crystal clear and colorful colors contrast with each other, forming the vivid art style of the film. The courtyard scene uses high-purity dark green forest leaves as the main thing, and the dark parts are generally biased to cool gray, so we must focus on these factors in the post-processing.Select the color of the GI channel and the reflection channel for the superposition method, and select the soft light for the superposition method of the light channel. Adjust the opacity of the screen overlay according to the picture conditions. The Z channel is reserved, and then the center of the picture is brightened with warm colors. The colored sky map gives the original image a soft light overlay. The opacity is set to 50% to make the picture breathable. Then adjust the color balance, saturation, and curve of the overall picture to improve the overall color purity and contrast of the picture. Warm color filter, as shown below:Next, use the Z channel to create the blue fog effect in the dark part at the top of the screen. Display the Z channel separately, adjust the color level to make the black and white obvious. Then, in the RGB channel, Ctrl + left mouse button to select the white selection area. One layer, fill it with blue-gray, and adjust the opacity as shown:Create a new layer, use the radial gradient in the gradient to make a rainbow in the upper left corner, wipe out the desired shape, and then add a Gaussian blur to give the rainbow a foggy feel.Next, create a soft light effect for the overall screen. Ctrl + Alt + Shift + E stamps all visible layers duplicates one layer and uses Image-Adjust- Threshold to change the image to black and white. Similarly, select the white part of the selection, Ctrl + J duplicates one layer, uses soft light for the superposition method, and gives a Gaussian blur with a value of 10, so that you can get a soft light effect that enhances the bright part of the overall picture, adding a depth of field effect, and the final effect is shown in the figure:Fox Renderfarm hopes it will be of some help to you. It is well known that Fox Renderfarm is an excellent cloud rendering services provider in the CG world, so if you need to find a 3ds Max render farm, why not try Fox Renderfarm, which is offering a free $25 trial for new users? Thanks for reading!
More
2020-02-12
Rainy Scene Performance of Building Exterior
The best cloud rendering services provider and GPU &x26; CPU render farm, Fox Renderfarm will share with you a good 3D tutorial to make rainy scene.This is a rainy scene performance of building exterior, from 3D artist Han Shilin. The software used is SketchUp, 3ds Max, V-Ray for 3ds Max, Photoshop, and Substance Painter, etc.How to be "realistic"?"Realism" doesn't just give each material a very accurate parameter that can be applied to any environment, so that it can render a very realistic effect. It also refers to realistic performance = according to your own visual experience, controlling parameters to make the map in line with expectations.The difference between the two understandings is that the former has no control and expectation of the final result, and is based on the idea that "parameters are correct.".ReferenceThe reference picture is very important, this is an expectation of the final effect, such as light and shadow, atmosphere, composition. And it is recommended to combine all the reference pictures into one plate.In order to show a sense of tranquility and quietness, a darker, rainy weather was set. The architectural details of this scene are not many, the atmosphere of light and the treatment of the ground part are very important.ModelingGrasshopper makes the appearance, imports SketchUp to make the main body of the building, and then imports into 3ds Max, and rendered with V-Ray. The process is very simple.The important thing is to do a good job of layering, otherwise, it will become more troublesome when importing into 3ds Max.As for the composition, a very low angle was used, as much as possible to expose the ground material and the wider sky.TextureThe main body of the building is far away from the lens, so only ordinary materials are needed, and the texture of the materials can be maintained. Taking the skin material as an example, the rest of the building materials are very basic.Sidewalk and road eaves: indoor concrete texture package, because there will be a lot of dirt in the outdoor scene, so the concrete texture and the dirt texture are mixed together. The area in the close shot is relatively small, so the repeatability of the material is serious. Since it is a rainy scene, the roughness value is also very low.PS. The main building can be modeled in SketchUp and then imported into 3ds Max. The environment and settings of the scene are best created with 3ds Max because the SketchUp model will have some problems when imported into 3ds Max, such as the UV will be messed up.Performance details (Substance Painter draws some textures)From the perspective of the camera, the pavement greatly affects the picture, so its material is very important. You need to import this pavement into Substance to draw textures.Import the mesh file that needs to draw textures into Substance Painter.Remember to turn off the channels other than the natural color when drawing the natural color map. After drawing the natural color map, create a new layer and draw the bump.Then you can add some standing water to both sides of the road.There are many ways to draw. One of the simpler methods is to add a material to adjust a very flat height and then apply it several times with a dirt brush to get a better random effect. Because what to do is a rainy scene, there is no wet feeling. So adjust the level of the roughness layer.One thing to note is that if you want to get the same effect in 3ds Max as in Substance Painter when importing the texture, adjust the blur to 0.2. For sharper effects, lower it. In addition, the imported map gamma needs to pay attention to, the map color of the natural color is selected automatically, and the rest are all 1.0.Then it is relatively simple work and found some model-rich scenes from Evermotion's model library.Such as the middle and lower left cars. After that, I used V-Ray rendering in 3ds Max, and finally adjusted it in Photoshop.Fox Renderfarm hopes it will be of some help to you. It is well known that Fox Renderfarm is an excellent cloud rendering services provider in the CG world, so if you need to find a render farm, why not try Fox Renderfarm, which is offering a free $25 trial for new users? Thanks for reading!
More
2022-07-13
  • Foxrenderfarm

    Powerful Render Farm Service

  • TPN
  • TPN

    Business Consulting

    Global Agent Contact:Gordon Shaw

    Email: gordon@foxrenderfarm.com

    Marketing Contact: Rachel Chen

    Email: rachel@foxrenderfarm.com

    Connect with Us

Fackbook Customer Reviews