Top 9 Best And Free Blender Render Farms of 2025
2023-05-06


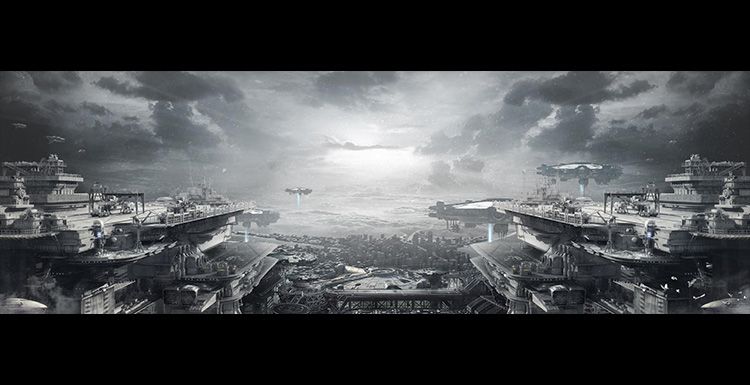
The Creation Analysis of A Sci-Fi Scene
V-Ray for Maya
The fast cloud rendering services provider and GPU &x26; CPU render farm, Fox Renderfarm will share with you a creation analysis of a sci-fi scene.Share the creative process of this piece of "Airport". The general idea is that the idea - modeling - lighting - material - rendering - synthesis, this is the production process that everyone is used to. Softwre used: 3ds Max, Zbrush, V-ray.Scene point
Interview with Iavor Trifonov from Chaosgroup for the Future Cooperation
V-Ray for Maya
2018 must be a big year for Fox Renderfarm, we sincerely hope to cooperate with more 3d software and renderer companines as much as we can, that's why we communicate with them so positively and discuss about the future cooperations and benefits for both parties. Here is the detail interview with Iavor Trifonov from Chaos Group as below:Iavor Trifonov,Vice-President Cloud &x26; IntegrationsChaos Gr
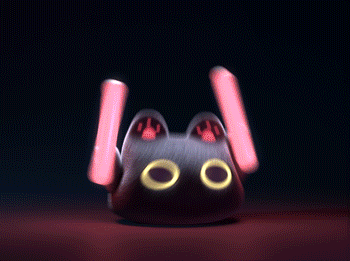
V-Ray for Maya Tutorial: A Cute 3D Cat Emoji Making Process
V-Ray for Maya
This article is organized by Fox Renderfarm, a well-known render farm in the CG industry, and shares the process of making a 3D version of a cute emoji package from 3d artist Bao Xiaoge. The software used is Maya, V-Ray, etc. The inspiration for the creation comes from a mobile game, and the prototype is very cute, so I want to make it a 3D dynamic version. The overall is very simple, and there is

"Coffin Dance" Produced by Peru Animation Studio According to Ghana’s Dancing Pallbearers(2)
V-Ray for Maya
The TPN-Accredited Maya render farm will still share the production experiences of the CG artwork "Coffin Dance" and "Cookie Cat" with you. Hope that helps you.How about other artworks created by your studio?Marsha Pavlich: "Cookie Cat" is also a social short film with a similar purpose to "Coffin Dance". We hope to produce eye-catching animations to attract more people's curiosity on social media
Behind the Scenes: Avatar of A Man
V-Ray for Maya
Fox Renderfarm, your TPN-Accredited render farm, bring you a production process sharing from the 3D artist Lee Guagua about the use of V-Ray for Maya to make the film and television model "Avatar of An Old Man". This is a realistic character production process, I hope that some skills and methods in this production process can help everyone.InspirationBefore making a production, you must choose a

Behind the Scenes: Demon Warrior Character
V-Ray for Maya
Hey, I’m Dong Chao. I used to work at the Industrial Light &x26; Magic (ILM), Lucasfilm's VFX and animation studio in Singapore. Now I am a professional freelance artist and have long been involved in role-related work. This time I want to share some of the production process and experience of a 3D CG character produced in the project. I hope to help everyone. The software and plugins used in the

3D Works Mouse! Mouse! Production Analysis
Maya Render Farm
This work is the result of whim. The mouse is a relatively common animal at home. When you see it, you want to shoot it on the bricks. The mechanical characters of science fiction and the ordinary environment can have a certain association. From the visual performance, through the stop of the instantaneous action, the viewer has a kind of front and back association effect, let's share the product

TOTAL CHAOS: Chaos Group Launched Its Second Annual Computer Graphics Conference
V-Ray for 3ds Max
On May 17, Chaos Group launched its Total Chaos conference in Sofia, Bulgaria with a keynote from the minds behind **V**-**Ray** and Corona. The company rein**for**ced its dedication to research and inno**v**ation, its commitment to bringing **V**-**Ray** to di**v**erse creati**v**e industries and its continuing support **for** the creati**v**e community. After an energetic per**for**mance from Rio Dance Crew 360 and singers Torlashki Nap
V-Ray For Maya of Work “A Girl Under The Maple Tree”
V-Ray for Maya
This work is inspired by the fact that I saw an original painting of a hand-painted artist named Sunmomo on the Internet. I really like the feeling of this painting, so I want to use MAYA to try to make it into three-dimensional, and make a model with maya. I will share my production process, hoping to bring some benefits to other 3d artists. The software used: Maya, V-Ray, PS, ZBrush This is the

The V-Ray Next for Maya 2019 Has Been Updated
V-Ray for Maya
Recently, Chaos Group released the **Maya** **v**ersion of the **V**-**Ray** Next update, which is the latest **v**ersion of the renderer, adding a new system **for** tracking and reporting scene memory usage, compatible with **Maya** 2019. Also added support **for** cur**v**ature maps, gloss Fresnel effects and **V**-**Ray** AlSurface skin textures in the **V**-**Ray** GPU rendering engine, and Cryptomatte support **for** **V**-**Ray** proxy sub-objects.A n