Top 9 Best And Free Blender Render Farms of 2025
2023-05-06


Métodos Comumente Usados para Desembrulhar UVs no 3ds Max
3ds Max
Neste artigo, a Fox Renderfarm, uma das líderes em serviços de renderização em nuvem e fazendas de renderização no setor de CG, vai compartilhar com você algumas técnicas frequentemente usadas para desembrulhar UVs no 3ds Max. Embora a versão instalada do 3ds Max seja de 2014, isso não afeta muito o processo como um todo.Para edi

"Doom: Gore's Podium" Scene Production Process Sharing
3D Tutorial
In this article, Fox Renderfarm, a renowned render farm service, and cloud rendering provider in the computer graphics business, will present a sharing process for the "Doom: Gore’s Podium" scene production.Next, I will share my production process and some insights along the way.Final Render Result:This is a PBR case study. The specific software used includes modeling in 3ds Max, high-poly s

Insights and Sharing on Creating the Next-Gen Scene 'Sacred Relic Box’
3D Tutorial
In this article, the leading cloud rendering service provider and render farm, Fox Renderfarm will introduce you to the imitation work of a personal prototype designer, old Xia, “Sacred Relic Box” production process.This is the author's first attempt at creating a PBR workflow. Next, let me introduce the creative process, the challenges encountered during the creation of this scene, an

3ds Max Cloud Rendering Tutorials and Render Farm Recommendations
3ds Max Tutorials
3ds Max is a 3D professional modeling software, animation and rendering application builder, formerly 3D Studio and 3D Studio Max, used to create 3D animations, models, interactive games and visual effects for the entertainment industry. 3Ds Max plays a big role in designing the 2D cross-sectional shapes of 3D models. It can bring characters to life by using a special feature called inverse kinema
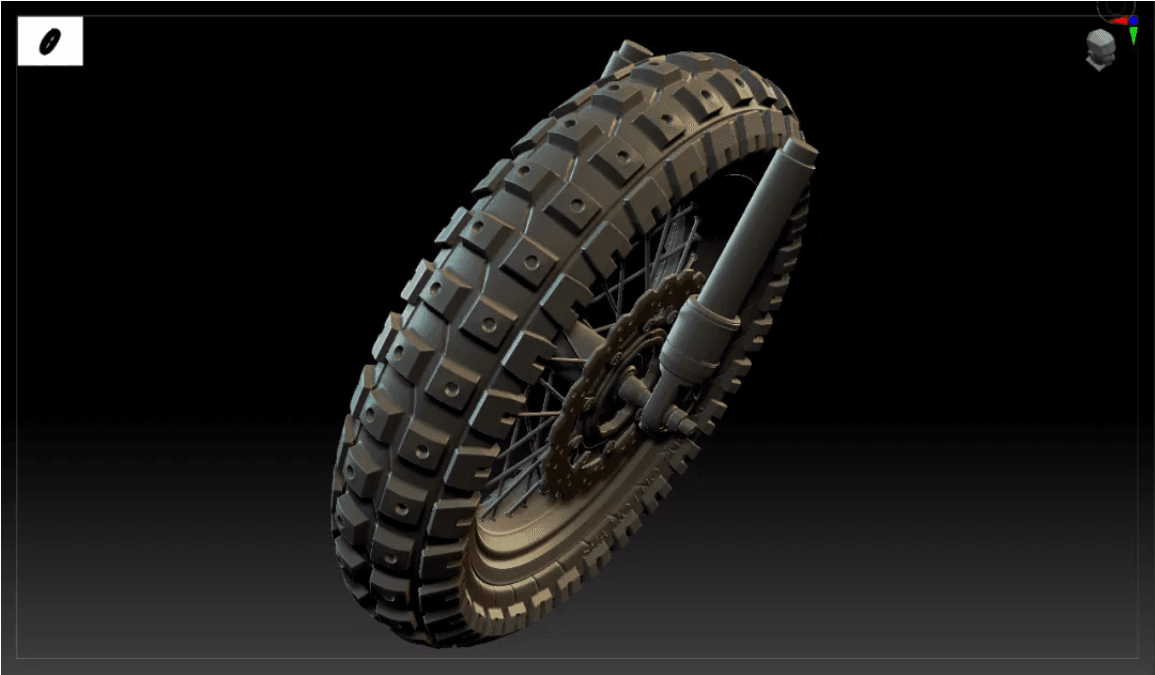
How to Make High-precision Models For Motorcycle Tire Patterns And Wheels in 3ds Max and Zbrush(1)
3ds Max Tutorials
In this tutorial, Fox Renderfarm, your TPN-Accredited cloud rendering service provider and render farm, will bring a set of vehicle model making skills. This article mainly explains how to use 3ds Max and Zbrush to make high-precision models for motorcycle tire patterns and wheels to help you improve the quality and efficiency of the vehicle model.High Poly EffectThe overall process of the case:Th
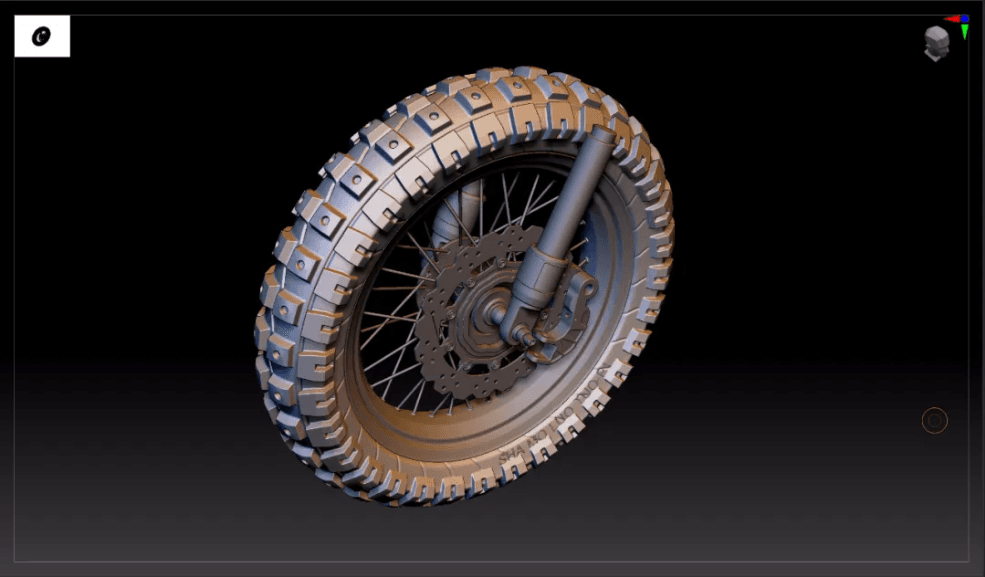
How to Make High-precision Models For Motorcycle Tire Patterns And Wheels in 3ds Max and Zbrush(2)
3ds Max Tutorials
In this tutorial, Fox Renderfarm, your TPN-Accredited cloud rendering service provider and renderfarm, will still bring a set of vehicle model making skills.C. Wheel productionThe production of the wheel: firstly outline the cross-sectional structure;Add a lathe, an angle of 360, a number of segments of 60, and click on a subset to adjust the radius of the wheel;Add symmetry to bilateral symmetry

"Coffin Dance" Produced by Peru Animation Studio According to Ghana’s Dancing Pallbearers(1)
3ds Max Tutorials
Speaking of the most popular online clips in recent times, it must be "Ghana’s Dancing Pallbearers". This time, the powerful and affordable cloud rendering services provider and render farm, Fox Renderfarm will bring you an artwork "Coffin Dance" produced by Peru animation studio according to Ghana’s dancing pallbearers. The six Ghanaians are wearing suits and dancing magical dances at the solemn

How to Make A Tomahawk in 3ds Max
3ds Max Tutorials
1 month rendered in 2 hours, the fastest GPU &x26; CPU cloud rendering services provider and render farm, Fox Renderfarm still shares with you 3ds Max tutorials, how to make a tomahawk in 3ds Max.IntroductionHello everyone! What I want to share with you today is to use 3ds Max to make a tomahawk and share some skills and techniques used in the production process. This is a relatively basic tutoria
3ds Max Tutorials of “God of War 86''(2)
3ds Max Tutorials
Continue the 3ds Max Tutorials of “God of War 86”(1), the fastest GPU and CPU cloud rendering services provider and render farm, Fox Renderfarm still share with you how to create "God of War 86" in 3ds Max.Next, I will explain how I added some details by referring to the picture. First, analyze the original painting. we can clearly see that in terms of the accuracy of the original painting’s model

3ds Max Tutorials of “God of War 86"(1)
3ds Max Tutorials
The fastest GPU &x26; CPU cloud rendering services provider and render farm, Fox Renderfarm still share with you 3ds Max tutorials. This project is made by the 3D artist, Yuliang Zhou. He made the "God of War 86" in 3ds Max, Substance Painter, Photoshop, and others. In this tutorial, he will introduce his workflow.IntroductionIn this tutorial, I will share the production process of one of my works

Behind the Scenes: 3D Game Scene
Maya Render Farm
Today, as the leading cloud rendering services provider and 3D render farm, Fox Renderfarm will share a production process of a 3D game scene. This project uses the standard PBR process, and uses 3ds Max to complete the basic modeling, determines the proportion of objects. Finish sculpting in ZBrush for high poly, topology in Maya, baking in Marmoset Toolbag 3, finish making PBR materials in Subst

How To Use Fox Renderfarm for 3ds Max
Render Farm
This is a tutorial show you how to submit 3ds Max project for rendering on render farm of Fox Renderfarm. Maybe we published it before, but we have an updated recently, so we should do it again, hold it can help you soon.Firstly, there are several kindly notes, please pack the scene and all the assets before uploading. After uploading is completed, please unzip the package and then submit the job