Top 9 meilleures fermes de rendu Blender gratuites
2026-03-26

How to Use KeyShot 9 to Render Christmas Scene - Tutorial
Keyshot
This article is a 3d rendering tutorial about how to use KeyShot 9 to render christmas scene by 3d artist Drown. The article is organized by Fox Renderfarm, the leading cloud rendering service provider in the CG industry.

KeyShot Tutorial: How to Render Realistic Ice
Keyshot
The best cloud rendering services provider, Fox Renderfarm will share with you a KeyShot tutorial about how to use Keyshot to render realistic ice.
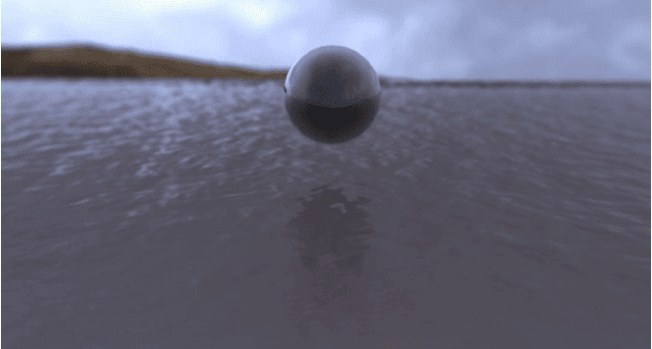
How to Render Water Surface in KeyShot?
render farm for keyshot
Fox Renderfarm, as the best render farm in the CG industry, we will often share some production skills and some of the industry's latest and hottest information, hoping to be helpful to your 3D learning. This time we will share how to render the water surface in KeyShot.

KeyShot Tutorial: How to Render a Teapot in KeyShot 9
Keyshot
In this article, the best cloud rendering services provider, Fox Renderfarm will share with you a Keyshot tutorial from 3d artist Drowm about how to render a teapot in Keyshot 9.

How to Make a Train Head Model in KeyShot (2)
Keyshot
In this Keyshot tutorial article, your render farm, Fox Renderfarm will share with you the tutorial on how to make train head models in KeyShot.

Top 6 Best KeyShot Render Farms
Keyshot
Are you looking for KeyShot render farm and keyshot cloud rendering services? Fox Renderfarm, the leading cloud rendering service provider and render farm, will introduce to you 6 best render farms for keyshot.

How to Make a Train Head Model in KeyShot(1)
Keyshot
In this Keyshot tutorial article, your Keyshot render farm, Fox Renderfarm will share with you the tutorial on how to make train head models in KeyShot.

KeyShot 9 Tutorial: Leather Chair Rendering Guide
render farm for keyshot
Fox Renderfarm, a powerful and affordable cloud render farm, organizes the leather chair rendering guide from artist Zolmo's tutorial on KeyShot 9.

4 Ways To Make Guns Quickly With 3ds Max
Keyshot
As the leading cloud rendering services provider, Fox Renderfarm is here to explain the 4 methods of making high-profile models, which involves many methods and techniques, which can help you quickly make hard surface models such as guns.