


Fox Renderfarm Blog
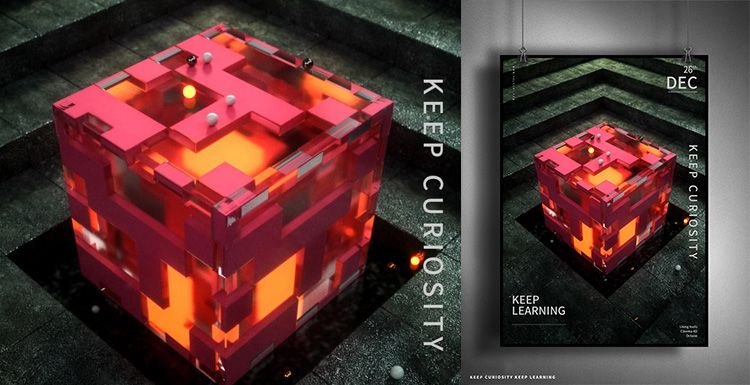
Octane For C4D Tutorial: How To Make A Strange Cube
Octane for C4D
As the leading cloud rendering services provider and GPU &x26; CPU render farm, Fox Renderfarm is here to share with you a Octane for C4D tutotial.It is not difficult to make the above-mentioned block effect. It is mainly the application of the mixed material of Octane renderer. Let us look at how this strange cube is made. The main software that we use including Cinema 4D, Octane renderer and so on.Firstly, we should create a rounded cube, and a new clone of the cube.In this file, 15 copies are cloned in each axis, because the cube is 100 * 50 * 100 px, so the size is 1400 * 700 * 1400 px.On the premise of selecting the cloned object, create a new motion graphics-effects-simple effector, turn on the attenuation, the attenuation type is square, the attenuation is adjusted to 100%, then adjust the attenuation size, and then adjust the position of the Y-axis parameters. The feeling of layer by layer is coming out.The material of the ground material under the middle cube of the reference picture is different from the material of the scene. Here, a new plane is placed on top, and a new cube is placed again, placed in the middle, and the rounded corners are also given to a parameter.The model part has almost been created, and now you can start making the lighting part. Create a new HDR light for lighting.Firstly, create a new reflective material, modify its color, roughness and reflection intensity to adjust to the appropriate effect. Create a new transparent material, here modified the refractive index, the real effect may be seen when rendering, can be fine-tuned after rendering.Create a new hybrid material again, mix the transparent material and the reflective material, and add a noise map to select the type of noise as a unit, so that the texture will be displayed in the form of a square, then control the global zoom, brightness, contrast Wait to control the range of the display.Directly copy the noise map directly to the replacement channel, and the parameters of the replacement can also be adjusted.I feel that there should be another layer outside the cube, so I copied a cube and slightly enlarged it to give a transparent material. Temporarily hide the two cubes just now, and then create a smaller cube to create a glowing material.The scene material is a reflection material, where 3 stone texture maps are attached, and the texture can be modified to change the gamma value or intensity depending on the situation. Then the UV map is projected in a cube. The plane below the cube is also a reflective material, then a noise is added to properly adjust the roughness and the intensity of the reflection.Now set the output size, place the camera, then fill the light, change the color temperature, and if the cube reflects the light.The cube also needs to add some decorative spheres, create a new emitter and sphere, make the sphere a subset of the emitter, adjust the emitter parameters appropriately, and check the display object. Add the analog tag rigid body to the emitter, apply the inheritance tag to the subset, and select the individual elements. Add the analog tag collision body to the cloned object and the outermost glass cube. Click the play button and the ball will naturally fall on it.Now add a little depth of field, the effect is almost the same. That's all.Fox Renderfarm hopes it will be of some help to you. It is well known that Fox Renderfarm is an excellent cloud rendering services provider in the CG world, so if you need to find a render farm, why not try Fox Renderfarm, which is offering a free $25 trial for new users? Thanks for reading!Reference Source: Https://www.bilibili.com/read/cv2176795?from=search
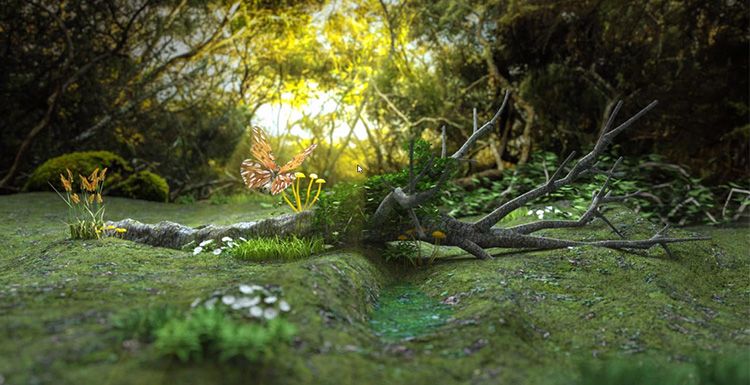
Octane For C4D Tutorial - Making Forest Scene Model Light Rendering (2)
Octane for C4D
As the leading cloud rendering service provider, Fox Renderfarm, is going to share with you the second part of the tutorial of Octane for C4D, making forest scene model light rendering as an example.Octane For C4D Tutorial - Making Forest Scene Model Light Rendering (1)In the previous tutorial, in order to make the scene more natural, many kinds of plants were added to the scene. After preparing to use the Octane renderer, all textures need to be converted to Octane's texture.You can select all shaders that are not Octane, and convert all shaders to Octane shaders in Convert Matenials under Materials.After converting the shader, remember to clean up the shaders before.What you need to deal with now is the texture of the ground and the texture of the dead tree. The texture of the ground is Octane GLossy Material, which adds a total of Diffuse, Specular, Bump, Normal, Displacement.Add a picture to the background and adjust it to the appropriate size and position.Add the mushroom material, create a new Octane Specular Material shader, modify the Medium and Fake Shadows, change the mushroom to yellow and modify the butterfly material.Now adjust the lights. Octane's Octane Arealight is used here, and the position of the light source simulates the sun's lighting effect according to the position in the background image. First illuminate the background with a light, then use another light to illuminate the tree.Remember to turn off the light display and the lights will not be rendered in the rendered view. Be sure to adjust the intensity of the light with reference to the background image. Now adjust the light while rendering. This is a step that needs to be tested continuously.The outlook is a bit dark, copying the care of the Octane Arealight supplement.In the process, I feel that the position of the mushroom has exposed. Now put the mushroom in a lower position to avoid exposure.Modify the camera settings, Kernels changed to Pathtracing option, Max samples changed to 1000, Diffuse depth changed to 8, the rendering speed will be slower. Change the GI clamp to 3 to reduce the noise of the exposure.When Cameralmager's Response is changed to Linear, the rendering effect will be closer to reality.Now focus on the butterfly and add some depth of field.Now that the effect is nearing completion, you only need to add some light fog in the later stage.ConclusionThe above is all of the tutorial of Octane For C4D for this time. Fox Renderfarm hope it will be of some help to you.As you know, Fox Renderfarm is an excellent cloud render farm and leading cloud rendering services provider in the CG world, so if you need to find a render farm, why not try Fox Renderfarm, which is offering a free $25 trial for new users? Thanks for reading!
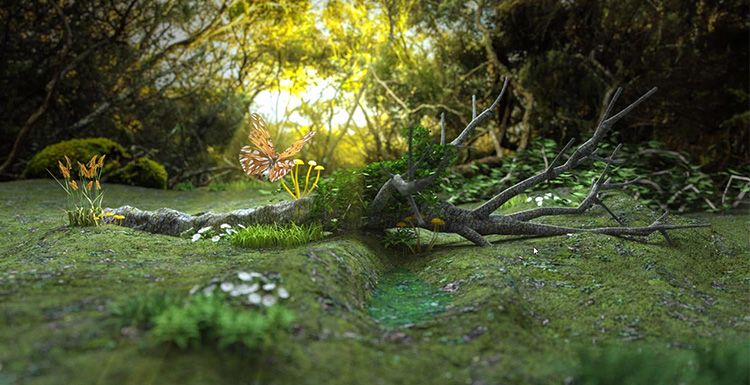
Octane For C4D Tutorial - Making Forest Scene Model Light Rendering (1)
Octane Render
As the leading cloud rendering service provider, Fox Renderfarm, is going to share with you a tutorial of Octane for C4D, making forest scene model light rendering as an example.This is a simple natural forest scene production, the main elements are composed of branches, butterflies, grass, mushrooms, vines and several kinds of grasses, divided into three parts including foreground, medium and background. The main production software and plugins for this small scene model lighting rendering tutorial include C4D, Forester, Levy Grower, Octane renderer.Making TerrainCreate a new terrain, turn the function off to sea level that can get the terrain. Modify the terrain to achieve a satisfactory effect, and create a surface behind the scene for background texture.Making BranchesForester's plant library is very rich, and you can choose a satisfactory tree to generate. The tree used in this scene should be a relatively dry tree, so make some adjustments on the basis of the original. Remove excess branches and twist the trunk.Adjust the Position of the Placed Tree.Firstly, we should determine the camera position, then place the model of other objects according to the camera position. It is recommended to use the Octane renderer’s camera. Now adjust the lens position in the view, in this process you need to mainly reserve the foreground and the background position.Now the interaction between the ground and the trunk is not enough, so you can use the brush to adjust some of the unevenness of the ground, so that the combination of the branches and the ground is more natural.Add a mushroom to this step. You can make a cluster first, then copy the mushrooms and then scale and place them.The butterfly directly uses an existing model to find the location directly in the camera. Now that the models that need to be prepared in the early stage are available, the rest of the elements can be created with plugins.In order to look more natural, there should be some vines placed in the distant background map, and Lvy Grower is very simple to make vines. Some vines are also added to the trunk.Don't forget to adjust the position of the plants in the lens. Remember that both the foreground and the mid-range need to be placed. Use Forester to continue adding other types of plants and adjust them while continuing to place.In the real-time selection, change the ground mode to the vertex drawing mode, and then you can draw the area that needs to grow the grass, which can be random. You can now select the Objects/Octane Scatter in the Octane renderer and add the grass to the Octane Scatter and place the terrain on the Surface of the Octane Scatter. Change the Distribution mode to Surface mode, and then map the previously drawn vertices to the Vertex Map under Octane Scatter. Now only the area that was previously drawn will grow out.Use the Octane renderer to see the effect.We need to add a random effect for the grass. Add effects to the Effectsor under the Octane Scatter and turn off the position changes in the random effects. Just select the zoom size and rotate randomly.Now the effect of the grass is ok, but some flowers are still missing. Continue to use Forester to plant some flowers for the grass.In order to enrich the level, you need to add a few shorter shrubs. The more plant species, the richer the picture looks.Now that the plant is almost finished, how to make it later, please follow the best cloud rendering services provider adn CPU &x26; GPU render farm to our next article — Octane For C4D Tutorial - Making Forest Scene Model Light Rendering (2).

A Tutorial Of Night Illuminator Scene Production By Octane For C4D
Octane for C4D
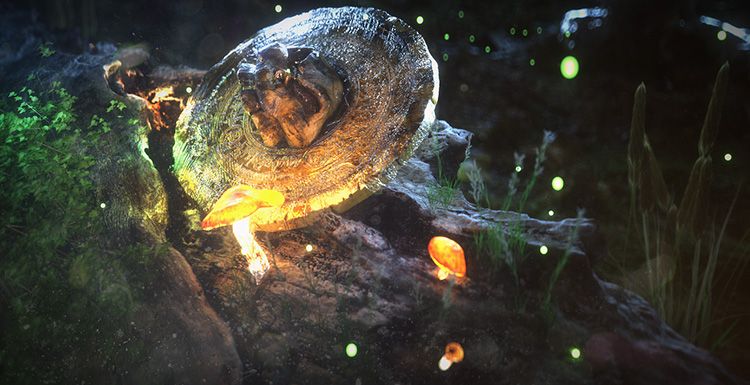
The fast cloud rendering services provider and GPU&x26;CPU render farm, Fox Renderfarm, will share with you a C4D tutorial.Octane for C4D is really powerful, especially in addition to the easy-to-use and high-quality rendering of the Octane renderer. Another important reason is speed. Today we use an existing C4D model file to share how to use Octane to make these beautiful night illuminator scene.Preliminary IdeaThe first thing to do is to figure out the approximate effect to be presented and the position of the light source. I want to do something that glows on the stone in the night, and the objects are as transparent as glass. So there will be some illuminants and some auxiliary light sources. With these ideas, you can light it up.Lighting AdjustmentWhat I want is the effect of the night, so first open the sky color and adjust it to black. The black sky will make us see more clearly. Then add a light, and in the rendered window we can see the effect of the real-time lighting.Rotate to adjust the light to achieve a desired effect. Then change the light to an effect that is not visible when rendering. Check camera visility in the Visbility of the light. Reduce Power to 5 and change the color to blue.Now that the main light source is available, start adjusting the auxiliary light source. The auxiliary light source does not need to be too strong, reducing its Power to 5 and changing the color to bluish. Two lights will give the scene model a corresponding feel. When adjusting, remember that the highlights of the objects on the stone should also be noticed. Throughout the process we have to constantly adjust the light to find the best results.After the rendering test, the highlights are still a bit bright, then we need to adjust the power of the lights again. After the test, the main light was not bright enough, and it lacked some contrast with the auxiliary light. I raised the main light source again. It now looks like contrast.Now I find that the lower right corner is darker, so I need to add another light to it. Lower Power to 5, change the color to bluish, render, and continue to adjust the light level.MaterialFirst of all, the main body of this model is stone, and then there is some bright light on the stone. So first give the stone a black material, but don't be too dark. Don't make the reflection of the stone too strong, raise a little Float, and add a displacement map to the stone to make the bump. This effect can also be achieved by adding noise.Noise can look for a stone-like one, then change Amout to 3. For better results, you can also add noise Into Diffuse. Now we can see that the stones are already bumpy. In the process, we can adjust other values to make the noise produce some different changes.You can break the link to the texture before proceeding to the next step. Re-create a new diffuse material to make the light, remember to remove the DIFFUSE of the shader, just keep the light. Next, add an RPG to the shader. I hope the stone will emit a yellow spot, so change the shader to yellow.Now we can mix the two shaders. So create a shader and blend the noise with the two shaders. Adjust the size of the noise to control the yellow display to see the effect of the integrated rendering.Now that the stone's departmental effect is ready, we can hide it to adjust the part above the stone. Create a new glass ball, then give it blue and adjust the 3S to the shader. The part of the value needs to be fine-tuned. Modify the display of the Density control color and increase the specular depth of the glass to reduce the black portion. But the color is not enough, you need to add another color and change the Density to 100.But I need the position of the stone below the model to be more like glass, so I have to rebuild a glass material and blend it with the previous material and add a gradient. Look, the effect is now closer to my expectations.All models use clones, so we only need to modify the UV of a model.We need the model above is 3S below the glass, so we need to give the UV a gradient, adjust the gradient to achieve the effect we need.Finally AdjustmentAdjust the final effect in the Octane Settings. Bloom power and Glare power directly affect the final result. But I found that the yellow part of the stone was a little less, so I changed its Power to 500. Well, it is now closer to the ideal state.To achieve the desired result is not a quick process and needs to be adjusted step by step. Keep trying other methods, maybe there will be good results. And, what matters is not the result, it is the process of learning.Fox Renderfarm hopes it will be of some help to you. It is well known that Fox Renderfarm is an excellent cloud rendering services provider in the CG world, so if you need to find a render farm, why not try Fox Renderfarm, which is offering a free $25 trial for new users? Thanks for reading!
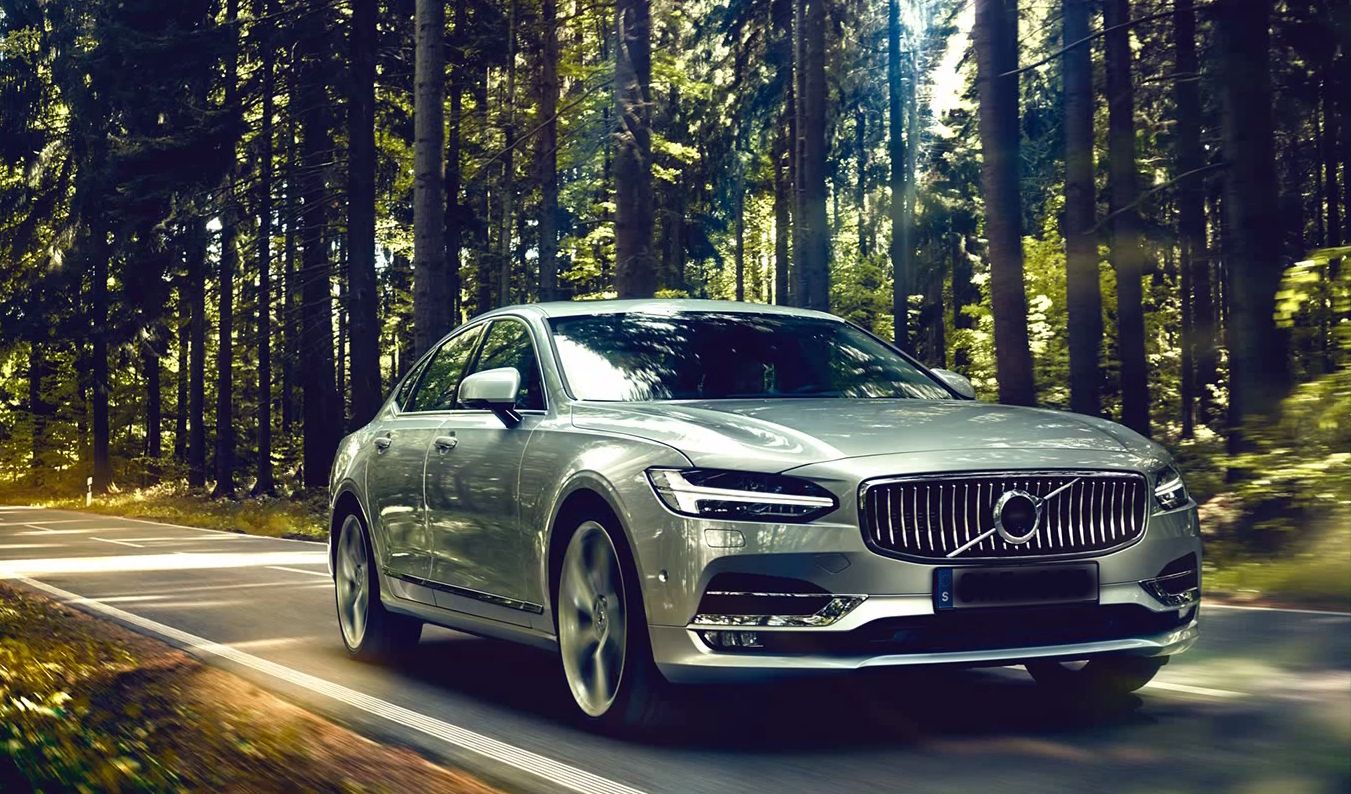
Using Octane for C4D to make a natural scenes (2)
Octane for C4D
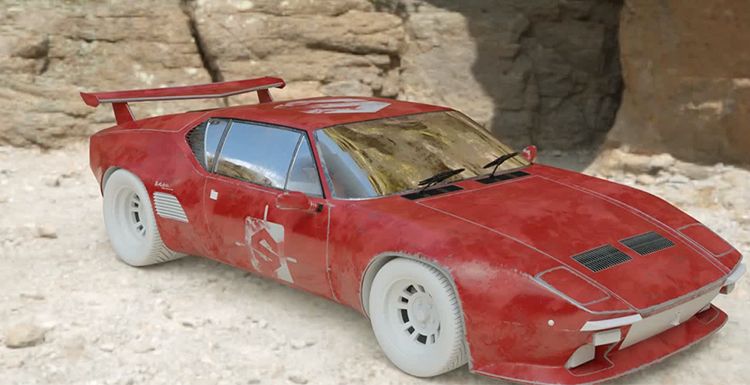
As the leading Cinema 4D render farm in the CG industry, Fox Renderfarm will continue to show you how to use Octane for C4D to make a natural scenes.Using Octane for C4D to Make a Natural Scenes (1)In the previous article of production process, the forest was already done, and the part of the road was relatively simple, and the road model in the C4D preset library could be used directly.After rendering, you can see that the overall picture is already there. But there is a black color at the junction of the ground and the sky, because there is no model occlusion in the distance. Then this place needs to add some fog to block the black place.And compared with the real environment, there is still some environmental fog and depth of field, but also need to add some light and shadow, the part of the sun needs to be adjusted.If you want the current environment and the reference map to look similar, then the angle and strength of the light source need to be adjusted to add fog.Reduce the density of fog and increase the sense of the atmosphere. After the rendering, you can see the sun through the woods.Now that the woods look a bit narrow, you can increase the length of the woods and increase the number of trees to make the forest look denser.Using an Octane camera, with a suitable angle, you can see that the overall light and shadow effect is great.But now there is still a problem, the tree in front of the camera is a bit dark because of the backlight. This requires adding a slightly brighter HDIR to the entire scene. Rendering again, you can see that the entire scene is lit, and the light looks very good.It can now be seen that the reflection of the road is too strong and the color is also problematic. Then you can adjust the road material, reduce the reflection, increase the roughness, and add some dirt to the Shader's Amount layer.Now you can see the reflections and bumps on the road. If you want to be more realistic, you can add some old textures and stains to the road.The scene has been basically completed, you can compare the effects in the reference.Now you can add a car and render again to see the final effect.This workflow only explains how to make an outdoor scene. We hope you can learn something from this article. If you need a rendering service, why not try us at Fox Renderfarm, we have been the leading cloud rendering services provider in the industry for many years. Don't understand why you need a render farm? Then why not find out what is a render farm? Fox Renderfarm continues to bring news of modelling with various 3D software, so feel free to follow us!
Using Octane for C4D to Make a Natural Scenes (1)
Octane for C4D
As the leading Cinema 4D render farm in the CG industry, Fox Renderfarm will always gather some tutorial about 3D software, renderers. In this article, we will teach you how to make a natural scene in Octane for C4D. In terms of scenes, there are many types, like sci-fi scenes, realistic natural scenes, cartoon scenes, and so on. Different scenarios have different ways of creating them.We will use one of the production methods to explain the process and ideas of the creation of realistic natural scenes.Realistic natural scene referenceScene ConstructionTaking the reference picture as an example, the scene ground is mainly divided into two materials, the middle is the road, and the two sides are the muddy mountains.According to the reference picture, the middle ground is a long road, so first create a ground in the C4D according to the reference picture, then use an ‘Octane Daylight’ to properly adjust the angle of the light to simulate the sunset.Firstly, creating a standard shader to make the land, in the mountains you can turn off some unwanted reflections, just use diffuse reflection, then add color, AO, Normal map, and adjust the UV mapping. The next step is to add plants using Cinema 4D’s Forester Tree and modify the tree type in the Tree Library. Before the modification, you can look at the trees in the reference picture and modify the size, height, color of the leaves, length of the branches, etc. according to the reference trees. After modifying the parameters,Before using cloning, you need to make several different shapes of trees. Adjust the height and shape of the tree to use as a cloning template to avoid being too repetitive in the final use.Here we use the Octane’s Clone. First, create an ‘Octane Scatter_Tree’ group and drag the three trees you just made below the ‘Octane Scatter_Tree’. Then use ‘Octane Scatter’ to clone the tree onto the ground of the well-prepared land.Changing the way of generated trees by Distribution to clone in the Surface.Add a layer of Noise in the Distribution under ‘’Octane Scatter to find the appropriate Noise type. Adjust the size of the tree and the direction of rotation.Now adjust the material of the leaf, first convert the material to the material of Octane, and then adjust. Copy a copy of Diffuse to the Transmission to increase the transparency of the leaves and look closer to the real feeling.Then adjust the trunk to achieve the final effect.Next, use Multiflora under Forester to select a suitable grass for adjustment. Use Multiflora to add some other plants.Continue to add other plants, adjust the size and position of the plants, make the grass look diverse, and adjust the plant material.The big environment has been built, and we will publish the part 2 next time.Now follow the leading cloud rendering services provider, Fox Renderfarm to read the next part: Using Octane for C4D to make a natural scenes (2)Article written by 3d artist Qixi.
Octane for Cinema 4D Tutorials: Making Cups and Grapes (2)
Octane for C4D
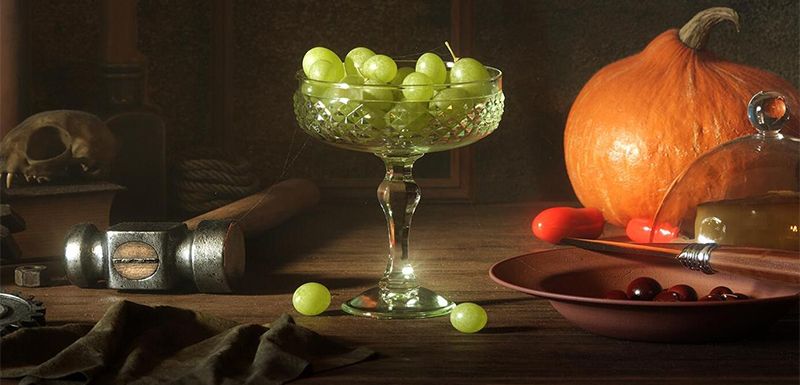
Fox Renderfarm, a powerful but affordable cloud render farm, shared this article from 3D artist Qixi is a cup and grape made by Octane for Cinema 4D. We have already talked about the glass making process in the previous article, and the next is grapes production and rendering analysis.The grape model is very simple, you can make one first, then put it in Unfold3D to place the UV, and then copy and place it.The texture of the grape is made in Substance Painter. It should be noted that the surface of the grape will have a layer of dust-like texture. After testing some materials, 5 textures are output to simulate the effect of that layer.Since the grape is a translucent object, it can be adjusted based on the 3S material. And increase the diffusion and roughness, after adjusting the effect is as follows,Once the texture of the grape is satisfactory, you can then copy it and place it on the plate. To save time, you can create a cylinder as the emission range of the particles and a circular patch as the base. After adding random size changes to the grapes, use dynamic simulation to place the grapes on the plate.In order to make the effect look more natural, I copied some grapes and placed them on the table next to the cup. Now I can test the rendering.After the test, I feel that the glass is a bit too smooth, and a little roughness needs to be added. Then added a roughness texture to the glass.After testing the rendering again, I feel that the picture is bright, which may be due to HDR problems. Finally, replace an indoor HDR texture and turn the power down.The current display looks better, but the background part is still a bit far away. Now add a wall to the back of the glass. Does the effect of the glass material look better?The overall picture still lacks some details, you can add an older texture to the wall, and test the rendering again (note that the texture is proportional to the size).In order to enrich the lighting details, a flat can be added to the top of the cup to make the roof. Change the focal length so that the focus is on the cup and increase the environmental fog. The color of the fog changes to yellow.
Octane for Cinema 4D Tutorials: Making Cups and Grapes (1)
Octane for C4D
Fox Renderfarm, a powerful but affordable cloud render farm, shared this article from 3D artist Qixi is a cup and grape made by Octane for Cinema 4D. This article analyzes the scene's modeling and rendering.First of all, this is not an original project. The 3D artist refers to the conceptual diagram above, and he wants to restore the glass in the picture. Then we shared how to make them work with Cinema 4D and Octane renderer, and shared the production process of the glass filled with grapes in the concept map.ReferenceThe difficulty of the glass in the concept map is divided into three points:Round glass notchThe middle of the cup handle is a six-diamond structureRendering of the diamond-shaped bump material of the cup bodyModelingFirst, put the concept map into Cinema 4D as a reference. Use the cylinder to create the part of the glass cup handle. You can adjust the overall shape first and then add the subdivision adjustment.To adjust the details of the bottom of the cup, you need to first seal the bottom of the cup to make a slightly convex shape.The glass is transparent, but its structure is very complicated. In particular, there will be some subtle changes in the shape of the interface, and it is necessary to constantly subdivide and observe the structural changes and continuous modifications. The structure of the model itself must be achieved, and the final effect will be more realistic.Next, the part of the cup body is made in the same way as above. Special attention should be paid to the position where the cup mouth is recessed. If you want a sharper edge, you need to add a line to the edge to ensure that the shape is maintained after subdivision.In order to make the structure of the six diamonds more obvious, the position of the handle is increased by adding lines on both sides of the rhomboid to maintain the shape. The other lines need to be treated with this additional line.The diamond-shaped convex surface of the cup body is not well controlled if the model is made directly. So prepare to use the texture to make the diamond convex surface, you need to do UV before texture. UV uses another production called Unfold3D, which is very fast and convenient and can improve work efficiency.However, if the diamond-shaped convex surface is simply drawn using Photoshop, the effect will not be too good. So I decided to make a model of the diamond-shaped convex surface and then baked the bump texture to use in the diamond-shaped texture part.The rhombus gives a white material and adjusts the effect after adding lights. The white areas are convex and the black areas are concave. Export this texture to Photoshop. The next step is to use the glass texture of the Octane renderer to link the previous map to the Displacement Maps and put it on the cup for testing. The effect is closer to the concept map.Create a flat surface to place the cup on, and use the basic texture of the Octane renderer to add wood grain material. But now the background light is excessive, but the reflection of the cup body is not strong enough.Add an area light to make the reflection brighter, and change a slightly darker HDIR to highlight the main body of the cup. After adjustment, it is already closer to the concept map.

Octane for Cinema 4D: To Make A Fantasy Forest Scene
Octane for C4D
Fox Renderfarm, your TPN-accredited cloud render farm, organizes this sharing experience comes from the 3D artist Luren4796 for you. The main software used is Octane and Cinema 4d. Luren4796 share us the entire production process about this fantasy forest scene. I hope you can learn something.This fantasy forest scene was inspired by the artwork of other artists. Luren4796 took inspiration from it and wanted to make a fantasy forest with a metal altar in the middle of the forest. So he combined the two works of art to conceive a unique artwork.The reference artworksModelingThe modeling of the main body ball is very simple. It mainly uses a plug-in called Trypogen. This plug-in is very good. It can easily change the basic sphere of Cinema 4D into other arbitrary shapes. I suggest you try it.The ring around the sphere is also very simple. It is also modified using the circle that comes with Cinema 4D. The more convenient point is that the UV of the built-in model is already split, and you can use it with a slight modification.UV uses a software called RizomUV, which can quickly place the UV in the way you want.If the model of the altar is split, it is also quite simple. The only trouble is the edge wear on the base. This is a deliberate use of a broken plug-in, which can quickly create broken edges on the cylinder.Scene makingFirst, a displacement map was used on the ground, and then, the AO discover, replace, bump and specular map was used. Then add an HDIR to the scene, and a blue fill light on the right, and an increase on the left. An orange fill light. An orange light was added directly in front of it to add color to the subject.Textures for ground useLight source positionThe tree in the scene is made of Forester Tree Library. In order to have a better final effect, you can place the camera first, and make some optimizations and adjustments according to the foreground in the lens.The foreground looks relatively empty. After consideration, some stones and stumps made in the previous project were added as decoration.Add some decorative flowers and trees according to the lens again, still made with Forester Tree Library. Now you can see that the background and the sphere and some models of the altar are all made.The texture of the ground looks good. In order to better integrate the ground and the altar, you can try adding texture to the altar to test the effect. But the foreground still looked a bit monotonous, so some water elements were added to the grass, and the prominent part of the altar was modified into a gem. And add water and gem materials to self-illumination to make the dream effect look more prominent.Particles and fogThe particles use the default particles, which increases the number and reduces the speed, and adds a dry wave to increase the randomness of the particles. Change the shape to a sphere and add a glowing material. Create a random color node connected to the gradient (color setting: same as the scene orange and blue) to make the rendering look more natural.Added a layer of fog behind the bushes to make the scene feel more volume.TexturingThe texture in the middle of the sphere uses a sub-surface scattering associated with the metal layer. The color of the Transmission is adjusted to blue, which increases self-illumination and adds a layer of scratches on the bumps. The outer ring part is painted by hand. Increasing roughness increases bumps and specular reflection. The general effect is as follows:After testing the rendering, I felt that the picture was not rich enough, so I added 2 butterflies below the ring. Adjusted reflection, refraction, and saturation and color temperature in PS after layered output. And here is the final rendering,
An Artwork Production Sharing By Octane For C4D
Octane Render
The software used are C4D, Megascans, Zbrush, Substance painter, Octane renderer Collecting material The early data collection is also necessary. I usually look for good ideas on Painterest and then find out what these things look like on Google. This method is not limited to this one. Making a model In the ZBrush engraving model, I am not very good at ZBrush, but fortunately my model does not require too much delicate engraving, as long as it produces a large shape. UV I import the model into Unfold3D and expand the UV. The UV parts are kept as continuous and do not overlap, but multi-stretching is good. Material and details I use Substance painter to make the material and use the material to make up for the details without engraving. (I don't have a ZBrush topology. In order to keep the model number is not too big, I also saved a lot of small details. So I used bump in the Substance painter to make small details. C4D environment construction I picked the right trees and stones and fungal models in megascans, then put them into C4D and built the environment and lighting. (At first I thought that only three lights could be used, but during the production process I added more lights to outline the gold coins. Rendering I used the octane renderer for rendering, which has accurate spectral calculations. There are many ways to achieve the desired effect in post-production, and you can choose what you are good at. The color of the original image is too saturated, I lowered the saturation and added a little dirty stain, and then adjusted to increase the blurring of the vignetting and the edge, making the lens feel stronger. This production process is shared here, and some processes may not be the best. But there are many ways to make a picture. The software is just a tool. How to use it is depending on the person who uses it. I hope everyone can like it. My other works, By: Xclucis
Welcome to join us

Recommended reading
Top 9 Best And Free Blender Render Farms of 2025
2024-12-30
Revealing the Techniques Behind the Production of Jibaro "Love, Death & Robots", Which Took Two Years to Draw the Storyboard
2025-02-10
Top 10 Free And Best Cloud Rendering Services in 2025
2025-03-03
Top 8 After Effects Render Farm Recommended of 2025
2025-02-10
Top 5 Best and Free 3d Rendering Software 2025
2025-02-10
Shocked! The Secret Behind Using 3D to Make 2D Animation was Revealed!
2025-02-10
How to Render High-quality Images in Blender
2024-12-04
Easy Cel Shading Tutorial for Cartoon in Blender Within 2 Minutes
2025-02-10
Partners


