Top 7 Redshift Cloud Rendering Services
Redshift render farm
Rendering services in the cloud have revolutionized the way graphics and visual effects are created for film, animation, and other industries. Among the top contenders in this field is Redshift, a powerful, GPU-accelerated renderer. Redshift has gained popularity for its speed, efficiency, and scalability, making it a go-to choice for many professionals and studios. In this article, we will explore the top 7 Redshift cloud rendering services.1. Fox Renderfarm: Best Redshift Cloud Rendering ServiceWhen it comes to Redshift cloud rendering services, Fox Renderfarm stands out as one of the best options available. Fox Renderfarm has a strong infrastructure and technology to significantly reduce rendering times through the power of multiple servers and GPUs. They allow customization of needs based on your project requirements, providing flexible rendering resources. Fox Renderfarm prioritizes reliability and data security, taking strong measures to ensure uninterrupted rendering and protect valuable project assets. They offer flexible pricing, providing varying levels of discounts to help artists and studios achieve more cost-effective rendering. A $25 free trial is available for all new users to test their cloud rendering service.2. iRender: An Acclaimed Redshift Cloud Rendering ServiceiRender is a highly acclaimed Redshift cloud rendering service that provides high-performance computing resources for rendering 3D graphics, animations, and simulations. It offers powerful GPUs to accelerate the Redshift rendering process, allowing users to complete complex rendering tasks more quickly and efficiently. iRender supports various software and plugins commonly used in the animation and visual effects industry, making it a versatile solution for professional artists, studios, and designers.3. Rebusfarm: A Leading Redshift Cloud Rendering ServiceRebusfarm is a reputable and trusted provider of Redshift cloud rendering services, offering a range of features and benefits that cater to the needs of artists and studios. RebusFarm supports Redshift as one of the rendering engines available on its platform. With RebusFarm, users can submit their Redshift-rendering jobs to the cloud and take advantage of the platform's powerful computing resources. The distributed network of servers provided by RebusFarm enables efficient and fast rendering of Redshift scenes, reducing the time required to complete complex projects. By offering Redshift cloud rendering, RebusFarm provides artists and studios with the flexibility and scalability to meet their rendering requirements while optimizing their workflows and reducing hardware costs.4. Garagefarm: An Efficient Redshift Cloud Rendering ServiceGaragefarm is a top-notch provider of Redshift cloud rendering services that provides on-demand access to high-performance computing resources for 3D rendering. They support various popular render engines, including Redshift. GarageFarm makes it easy for studios to gain access to powerful computing power through thousands of render nodes and "plug-and-play" integration with existing 3D tools. 3d artists can utilize their cloud rendering technology to meet on-demand rendering needs at a lower cost.5. Ranch Computing: An Outstanding Redshift Cloud Rendering ServiceRanch Computing is a Redshift cloud rendering farm based in Paris. Their powerful servers help you handle the rendering phase of your images with complete confidence while controlling deadlines and budgets. They offer powerful GPU and CPU computing servers for all graphic designers, no matter what industry they work in or the size of their organization. Ranch Computing operates globally and develops services that provide increasingly comprehensive solutions based on the needs of their users.6. 3S Cloud Render Farm: A Reliable Redshift Cloud Rendering ServiceCreated by a group of 3D fans, 3S Cloud Render Farm is a passionate platform that supports the Redshift cloud rendering service. It allows users to offload rendering tasks to a network of computers, utilizing the combined power of multiple computers to speed up the Redshift rendering process.7. Drop and Render: Redshift Cloud Rendering Service for Cinema 4DDrop & Render is a render farm designed for Cinema 4D rendering with support for Redshift cloud rendering. If you use Redshift for Cinema 4D, then Drop and Render is a good choice. They support all versions of Redshift. Their Render Farm plugin allows you to not leave your 3D software. They send all your settings securely to the server and automatically store the render frames on your hard drive. This means you don't have to take extra steps to get your files or wait for long download times, saving your time.ConclusionThere are many render farms that support Redshift cloud rendering and you can choose the one that works best for you. If you don't know which one to pick, we recommend Fox Renderfarm, which offers a $25 free trial!
Top 6 Best Redshift Render Farms
Redshift render farm
Are you looking for a suitable Redshift render farm? In this article, Fox Renderfarm, the leading Redshift cloud rendering service provider and render farm, will introduce to you 6 best render farms for Redshift.What is Redshift?Redshift is the world's first renderer fully accelerated by GPU. It supports 3D software such as Cinema 4D, Houdini, Maya, 3ds max, Blender, etc. Redshift is a biased renderer that does not pursue physically realistic rendering results, but optimizes rendering as much as possible, it focuses more on speed and quality. Redshift is also faster than other renderers at the same rendering quality.Let's check the Redshift render farms now.1. Fox Renderfarm - Best Redshift Render FarmFox Renderfarm has been dedicated to the cloud rendering service for many years and is always a fast and secure Redshift render farm. In addition to Redshift, it also supports other major 3D software such as Blender, Maya, 3ds Max, Unreal Engine, Cinema 4D, V-Ray, etc.Fox Renderfarm is available at prices as low as 0.0306/core hour and offers a price estimator. Fox Renderfarm supports both GPU and CPU rendering. It offers a $25 free trial to all new registrants.2. Rebusfarm - Redshift Render FarmRebusFarm supports all common 3D applications, including Redshift, as well as both CPU and GPU rendering.RebusFarm's software, called RebusDrop, supports both Windows and Mac, and it offers a free trial for $25.31.RebusFarm offers many video tutorials for using Redshift.About the version supported of Redshift, you can go to the official website and ask his customer service, they offer 24✖7 hours service.3. iRender - High-Speed Redshift Render FarmiRender, as an IaaS provider, is also a Redshift render farm. It supports almost all 3D software that uses Redshift such as Cinema 4D, Houdini, Maya, 3ds Max, Blender, etc. iRender is optimized for Redshift multi-GPU rendering tasks.iRender offers a free tool called GPuHub Sync that helps users transfer their files from their local computer to a remote server, even if the server is down and your files can be transferred.iRender charges based on time of use and supports 24/7 live chat.4. Drop and Render - Redshift for C4D Render FarmDrop & Render is a render farm designed for Cinema 4D (Drop & Render now also supports Blender). Drop & Render is the official Redshift render farm, offering tiled renders, AOV, Cryptomatte, Redshift proxy and more services for your C4D projects. It supports all Redshift versions and offers free €10 render farm credits.5. 3S Cloud Render Farm - Redshift Render Farm3S is composed of a group of members who are passionate about 3D design and have extensive experience in computer technology. 3S Farm supports Blender, Houdini, Cinema 4D, Maya, 3ds Max, and Redshift for Maya, Houdini and C4D, so it's also a Redshift render farm.A $5 free trial is available and 15% extra bonus on first deposit for new users, only applicable within 72 hours of account registration.6. VFXFARM - Redshift Cloud RenderingVFXFarm, for Redshift, supports 3ds Max, C4D, Maya, Houdini cloud rendering. It offers an awesome user experience, friendly interface, nice positioning, color management, application from website to Windows and Mac, automatic synchronization of cloud rendering project output, and much more. He offers both CPU and GPU cloud rendering services.SummaryThe best redshift cloud rendering service is the one that fits your needs. If you're still confused, try Fox Renderfarm, a Redshift render farm and leading cloud rendering service provider, offering a $25 free trial!
Fox Renderfarm Launches GPU Rendering
Blender Cycles
Rendering and previewing in a flash! The craze for Marvel’s superhero movie Deadpool swept over the world.As the first full CGI realistic human feature film in Asia, Legend of Ravaging Dynasties dominated the headlines once the trailer came out.These two movies were rendered with GPU rendering engines.Obviously, GPU computing card and GPU rendering engines are gradually used in film production. It is a good start!Now, as the leading render farm in the industry, Fox Renderfarm launches GPU rendering. Let’s start free trial with Fox Renderfarm’s GPU rendering. Let’s get it started!What’s the differences between GPU and CPU?A simple way to understand the difference between a CPU and GPU is to compare how they process tasks. A CPU consists of a few cores optimized for sequential serial processing, while a GPU has a massively parallel architecture consisting of thousands of smaller, more efficient cores designed for handling multiple tasks simultaneously. Adam Savage and Jamie Hyneman made a painting demonstration to show the difference between CPU and GPU:Mythbusters Demo GPU versus CPUWhat’s the advantage of GPU Rendering ?In the field of graphics rendering, not only films and animations, but also CG art, GPU with its computing ability and architecture specially designed for graphics acceleration provides the users with a more efficient rendering solution, namely the GPU rendering solution. GPU rendering has great advantage of fast speed and low cost. Moreover, GPU rendering becomes more and more available now, lots of works with high quality rendered with GPU has come out. GPU rendering tends to be popular with users at home and abroad.Thinking of the CPU as the manager of a factory, thoughtfully making tough decisions. GPU, on the other hand, is more like an entire group of workers at the factory. While they can’t do the same type of computing, they can handle many, many more tasks at once without becoming overwhelmed. Many rendering tasks are the kind of repetitive, brute-force functions GPUs are good at. Plus, you can stack several GPUs into one computer. This all means GPU systems can often render much, much faster!There is also a huge advantage that comes along in CG production. GPU rendering is so fast it can often provide real-time feedback while working. No more going to get a cup of coffee while your preview render chugs away. You can see material and lighting changes happen before your eyes.GPU Renderer 1.Redshift is the world’s first fully GPU-accelerated, biased renderer and it is also the most popular GPU renderer. Redshift uses approximation and interpolation techniques to achieve noise-free results with relatively few samples, making it much faster than unbiased rendering. From rendering effects, Redshift can reach the highest level of GPU rendering, and render high quality movie-level images.2.Blender Cycles is Blender’s ray-trace based and unbiased rendering engine that offers stunning ultra-realistic rendering. Cycles can be used as part of Blender and as stand-alone, making it a perfect solution for massive rendering on clusters or at cloud providers.3.NVIDIA Iray is a highly interactive and intuitive, physically based rendering solution. NVIDIA Iray rendering simulates real world lighting and practical material definitions so that anyone can interactively design and create the most complex of scenes. Iray provides multiple rendering modes addressing a spectrum of use cases requiring realtime and interactive feedback to physically based, photorealistic visualizations.4.OctaneRender is the world’s first and fastest GPU-accelerated, unbiased, physically correct renderer. It means that Octane uses the graphics card in your computer to render photo-realistic images super fast. With Octane’s parallel compute capabilities, you can create stunning works in a fraction of the time.5.V-Ray RT (Real-Time) is Chaos Group's interactive rendering engine that can utilize both CPU and GPU hardware acceleration to see updates to rendered images in real time as objects, lights, and materials are edited within the scene.6.Indigo Renderer is an unbiased, physically based and photorealistic renderer which simulates the physics of light to achieve near-perfect image realism. With an advanced physical camera model, a super-realistic materials system and the ability to simulate complex lighting situations through Metropolis Light Transport, Indigo Renderer is capable of producing the highest levels of realism demanded by architectural and product visualization.7.LuxRender is a physically based and unbiased rendering engine. Based on state of the art algorithms, LuxRender simulates the flow of light according to physical equations, thus producing realistic images of photographic quality.GPU Computing Card Parameter Table Now Fox Renderfarm is applicable to Redshift for Maya and Blender Cycles. There are more than 100 pieces of NVIDIA Tesla M40 cards in Fox Renderfarm cluster, each server has 128G system memory with two M40 computing cards. Welcome to Fox Renderfarm to experience the super fast GPU cloud rendering!
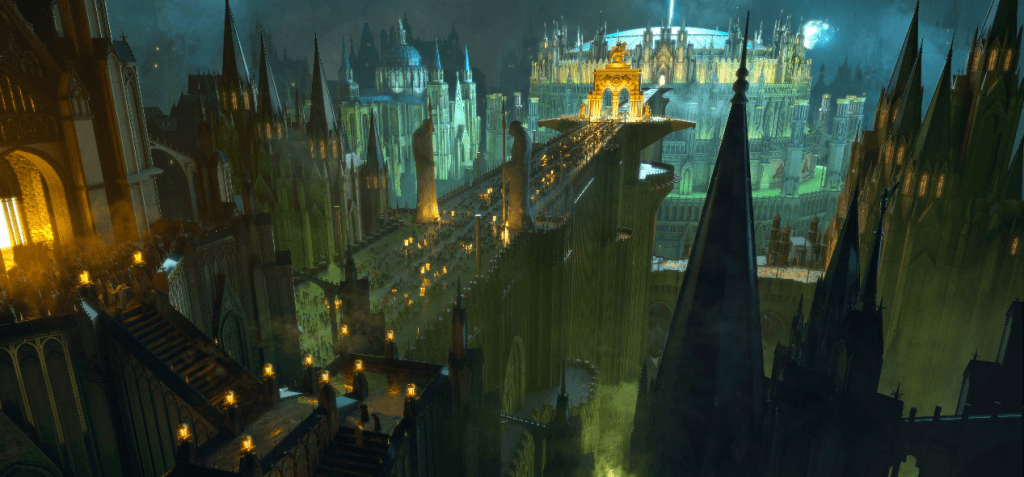
A Redshift Production Breakdown and Experience Sharing from Lighting/Rendering Artist Jiaxuan Wang
Redshift
Final Render In this article, Fox Renderfarm, the best could rendering services provider, will share with you a Redshift production breakdown and experience sharing from lighting/rendering artist Jiaxuan Wang.Introduction: Hi, everyone! This is Jiaxuan Wang. I’m so happy to have gained some popularity for my artwork and have seen my progress along the way.We were given a pretty complex theme, especially on the modeling and lighting. I rendered it with Redshift.Render without Lighting We can separate the models into 6 sections: foreground, the bridge, architectures on both sides, the cathedral, background and the crowd. When I started dealing with the rendering, it took a very long time since there were too many polygons. Before I could optimize the models, it took nearly 6 minutes just to read the models. So I decided to separate the models. Coincidentally, I found that after dealing with some unnecessary UVs, and combining some models, the time of the input process and the size of the files both would shrink drastically. This allowed me to manage the lighting and rendering with all the models. Thus, for the second time, I input all the 6 files into one to render with Reference. Speaking of texturing, most of the models are attached with textures. Some silhouettes and simple models, I chose to use simple color texture to save time. And the lighting part, besides the radiating window, there are 240 lights in total. A lot of Area Lights were used. Through adjusting the position, strength and so forth to add more details.The first render is not that satisfying. Since this is my first time dealing with this kind of fantasy style, I paid too much attention to working on the fog but ignored the importance of basic lights. Additionally, I just simply multiplied the lights without finding the main light source, which turned out to be a lot of shadows and strong contrast without fine details. My teacher recorded a long video to give me some advice, telling me details like the foreground is too bright, it is too hollow under the bridge, there is no visual focus in the image, etc. I was more experienced on my second render. And I began to think like a concept artist, considering the position of the lights and how I want the shadows and contrast to transit in the picture. Then comes the ambient adjustment, about the fog. Most of them were composited in Nuke afterwards according to my teachers’ advice.Nodes Tree
Using Redshift For Cinema 4D To Render a Glass Ceramic Scene
Redshift
As a leading render farm in the CG industry, Fox Renderfarm supports major software, renderers and plug-ins including Cinema 4D, Redshift. The text and images in this article refer to a tutorial produced by an artist named 1314, a rendering guide for a glass and ceramic class of Redshift for C4D. Fox Renderfarm hopes that sharing this tutorial will help more people learn Redshift for C4D. The difficulty in the production of this tutorial is the adjustment of the material of glass and water. The materials for wood and metal forks are made using textures.The final rendering is as follows:The part of the scene building model is very simple and consists of several elements: cola bottles, bowls and water, chopsticks, forks, plates, tablecloths and tables. One of the parts to note is that the cola bottle and the cola water inside are made up of two models, and the model of the cola water needs to be made separately.Now we mainly explain the lighting and rendering parts.LightingCreate an area of light that adjusts the direction of the light, which is used to reflect the high light of ceramics and glass. Create a camera and change it to Redshift mode. It can now be seen that the rendering is still dark.Create a Redshift material to increase the brightness and intensity of the Area light and test the brightness of the picture. Some of the northern part is dark, you need to open the GI part and brighten the dark part to see the details. And add a Dome Light to the scene, using an indoor texture to reflect the HDR. This part needs constant adjustment to find the most appropriate angle.MaterialFirst create a Redshift material to adjust the texture of the water. The water material is very simple, the most important part to remember: the water LOR is at 1.333.The bowl and the saucer use the same material and add a texture.The chopsticks are rough, remember to reduce the reflection, and the Reflection/Roughness value should be higher. In addition to Color, a Bump map has been added to add chopsticks to the wood texture.The IOR of the cola bottle is adjusted to 1.6, and the Samples of the Refraction/Transmission are adjusted to the highest. The IOR of the cola water is adjusted to 1.3The reflection of the metal is the highest and the IOR of the fork is adjusted to 3.The tablecloth uses a texture that lowers Weifht and reduces the texture a bit. The table also uses a wood grain map.Now all the textures have been completed, but the light on the table is a bit exposed. In the production, it is necessary to leave some room for the later adjustment. If the exposure is too much, it will not be adjusted in the later stage. Therefore, when making, it should be neutral, not too dark or too bright, and used for later adjustment.In the Filter can also be adjusted, brightness, hue, saturation and the like, so here you can adjust and test the rendering to see the effect. Now try to weaken HDR a little bit. Then perform a rendering test.Now you can see that the refraction of ceramics, forks, glass and water is very good.Fox Renderfarm hopes it will be of some help to you. It is well known that Fox Renderfarm is an excellent cloud rendering services provider in the CG world, so if you need to find a render farm, why not try Fox Renderfarm, which is offering a free $25 trial for new users? Thanks for reading!
Redshift for Cinema 4D Tutorial: Interior Design Rendering
Redshift
This time, the CG industry's leading cloud rendering service provider, Fox Renderfarm brings you a case study tutorial of Redshift for Cinema 4D for interior rendering. This is a basic case of Redshift's interior rendering, so the case uses an existing interior model, the focus of this case is the lighting adjustment and rendering settings.The effect in the image below is to use the Octane renderer, which will now be recreated using Redshift.Lighting adjustmentBefore you make the lights, turn on the GI and choose the most appropriate way for this scene. The Primary GI Engine chose Irradiance Cache, and the scone GI Engine chose Irradiance Poince Cloud.In order to match the light source, an Area Light is placed in each window to simulate the skylight. The advantage of using three lights separately is that it can be adjusted separately and saves rendering efficiency.The default material for Cinema 4D will be darker, so before the rendering test, you can create a new Redshift material, adjust the Color Picker up to 70%, and turn off the Weight. Give the material to the model, and the rendering test shows that the model is much brighter.Now you can see that the overall color of the light is white, so you need to adjust the color, first change all the light modes to Temperature, the window light is blue, and the room is warm. And make up a light on the left side.Adjust the brightness of the light to the right position. If the picture is still dark, you can also adjust the camera's Film Speed (ISO). Now you can see that the light is no longer a problem.MaterialUse glass material. First adjust the glass material, you can directly use the preset glass material that comes with Cinema 4D. You can make a material and copy it to adjust other glass materials on this basis. Next to the toilet and sink, the bathtub is made of ceramic material, and the Chrome ball is used here.The hangers and door handles are made of metal. You can also create a preset metal ball to give them and adjust them on this basis.The mirror material uses the Material shader, and the Reflection/Fresnel Type is changed to IOR, and the IOR is changed to 30, which is basically a mirror effect.The following content is selected from other materials. The wall uses a tile-like texture with wood grain on the floor. Because this material is built into the model, so just paste it back, but the details can be adjusted.Now you can see that the material of the large model has been adjusted, leaving some details, such as baskets, branches in vases, books, bath towels, etc.If the scene is exposed, you can adjust the value of the camera's Exposure/Tone Mapping/Allowed Overexposure, where the value that allows exposure within the camera is controlled.Put it into Photoshop after rendering, the final result,Fox Renderfarm hopes it will be of some help to you. As you know, Fox Renderfarm is an excellent cloud rendering farm in the CG world, so if you need to find a render farm, why not try Fox Renderfarm, which is offering a free $25 trial for new users? Thanks for reading!Content quoted from:Https://www.bilibili.com/video/av15713359?from=search&x26;seid=5150307806316506488
How to Render Large Scenes with Redshift in Cinema 4D
Redshift render farm
How to manage large scenes in Cinema 4D's Redshift renderer, how to optimize things in the scene, and how to optimize rendering settings in the Redshift renderer. These are relatively far-reasonable things. How to optimize them is very helpful for scene management.Proxy fileFor the Redshift renderer, you can generate proxy files from the scene and export them before rendering. For trees, the scenes with a lot of flowers and grasses are very suitable for the Redshift renderer. This is the theme that the leading cloud render farm in the CG industry, Fox Renderfarm, brings to you in this article.How to generate a proxy file? Now you need to generate the proxy file and export the Redshift Proxy (*.rs) to where it is needed. Proxy settings: after the ‘Add’, ‘Proxy to Scene’ are checked, the generated proxy file will generate a proxy file in the location where you want to export the file. If the exported file is animated, then ‘Range’ must be changed to ‘All Frames’. Then the generated proxy file will not occupy too many scene resources, and the production software operation will be smooth. And if you use a proxy file for replication, it will also reduce the resources of the system.Like the scenario below, most of the models are proxyed, so the rendering resources needed are even more economical. Take the following scenario as an example. Its number of faces is very large, and it will be stuck when it is operated. And all the models in the scene do not use proxy files, so you must optimize the rendering settings.SamplingBefore optimization, you must have a certain understanding of the working principle of Redshift. In the default case of Redshift, it does not emit light to the object through the light to show the light and dark effect. Redshift is the light emitted by the camera, hit on the object, and then the object will look for the source of the light to present the light and shade, which is somewhat different from other renderers.The two values in the picture below are generally used to reduce noise. Samples Min means that the minimum amount of light emitted from the camera is four, and the value below Samples Min can adjust the secondary reflection of the object.&x3C;p class='img-source'>Sampling principle&x3C;p class='img-source'>NoiseThe Samples MAX value, if adjusted too high, the camera calculations consume more resources, rendering time will increase a lot. In general, the values are around 64. However, if the motion blur is turned on, then the value should be at least 256 or so.&x3C;p class='img-source'>Samples Min=4, Samples MAX=256&x3C;p class='img-source'>Samples Min=4, Samples MAX=16If the noise is obvious, try to adjust the ‘Brute Force GI/Number of Rays’ under GI.&x3C;p class='img-source'>GI adjustmentThe ‘General/Primary GI Engine’ under GI is a primary feature, and the Secondary GI Engine controls the number of bounces.Calculating the GI information of the scene under /Primary GI Engine/Irradiance Caching will be faster. The number of light carried by Num Rays, Adaptive Amount represents the attenuation ratio of divergent rays. If Num Rays is 200, then Adaptive Amount 0.8 will decay by 80%.The above are several ways to optimize large scenes and rendering. By optimizing the scene and rendering settings, you can save more time and resources during rendering, and better complete the scene production.Fox Renderfarm hopes it will be of some help to you. As you know, Fox Renderfarm is an excellent CPU&x26;GPU cloud rendering farm in the CG world, so if you need to find a render farm, why not try Fox Renderfarm, which is offering a free $25 trial for new users? Thanks for reading!
Using redshift to render a work Zen Bamboo
C4D
This time, the cheapest cloud render farm for VFX, animation, CGI projects in the world, Fox Renderfarm wants to use a case to show the powerful rendering features of Redshift.In this case, C4D and Redshift are used to render a photo-level picture of fresh bamboo. The main elements in this picture are composed of several parts, bamboo and glass bottles, which are the most prominent places in the picture. The difficulty lies in the part of the bamboo, especially the part of the bamboo texture.Scene constructionThe elements of the scene are simple, including tables, books, clocks, bottles and plants in the foreground. It is also possible to use some existing models directly, and choose an angle that shows the bamboo. It is still very simple to see the entire project now.The bottle uses an existing model and there is a layer of water inside the model.There is still a problem. The bottle is empty and needs to add some stones and bamboo. So, to make a stone first, you can add a launcher under Simulate / Particles / Emitter to make a stone.Transmitter settings,Create a sphere to make a stone, then make a different shape, drag all the stones under the emitter, then play to a suitable height and convert the stone into an object. The floating stones can be hidden.Create a bamboo using a Tube.Create other items for the scene, the wall and the wooden table.Place the camera:MaterialThe material starts from the simplest. All the props do not use the Redshift material, but use the Cinema 4D's own shader.The background wall adds a default material to place the lights.Add wood grain to the board.Next, the bottle material uses the default Glass. After adjusting the value, copy a layer of glass material to the water level, modify the preset Water, and continue to adjust the value.The stone material uses a random color that makes the stone look more versatile.The bamboo material uses a gradual overshoot to increase exposure.Make a bamboo node using Vertex Attribute and Ramp.Lighting and adding other itemsIn addition to Dome Light, you need to add an Infinite Light to change the brightness and keep the scene from being too bright. Adding a plant from the own plant library to the foreground of the lens, you can see that the effect of the lens is already very good. But trying to achieve the best results requires constant experimentation.Add other items, clocks, books, milk cartons, and photo frames to the scene, all using existing models and materials. Then output the test results.Post-production adjustmentAdjust brightness, contrast, exposure, and change colors.
Recommended reading
Top 9 Best And Free Blender Render Farms of 2024
2024-08-30
Revealing the Techniques Behind the Production of Jibaro "Love, Death & Robots", Which Took Two Years to Draw the Storyboard
2024-08-30
Top 10 Free And Best Cloud Rendering Services in 2024
2024-08-08
Top 8 After Effects Render Farm Recommended of 2023
2024-08-30
Shocked! The Secret Behind Using 3D to Make 2D Animation was Revealed!
2022-05-11
How to Render High-quality Images in Blender
2024-08-30
Easy Cel Shading Tutorial for Cartoon in Blender Within 2 Minutes
2022-07-01
8 Best And Free Blender Cloud Rendering Services in 2024
2024-08-30