
 Blender
 Cinema 4D
 Arnold
 3ds Max
 Houdini
 V-Ray
 Maya
 Unreal Engine
 Nuke
What Is the Parallax Effect? A Guide to 2D and 3D Animation
 Ryan Thompson
The parallax effect creates an illusion of depth by making objects at different distances appear to move at different speeds. It is widely used in 2D animation, 2.5D compositing, 3D camera animation, motion graphics, and video games.
For 3D artists and motion designers, parallax is more than a visual technique. Camera movement, layer separation, depth information, and rendering settings all affect the final result. This guide explains how parallax works, how to create it in different production workflows, and how to avoid common problems.
What Is the Parallax Effect?
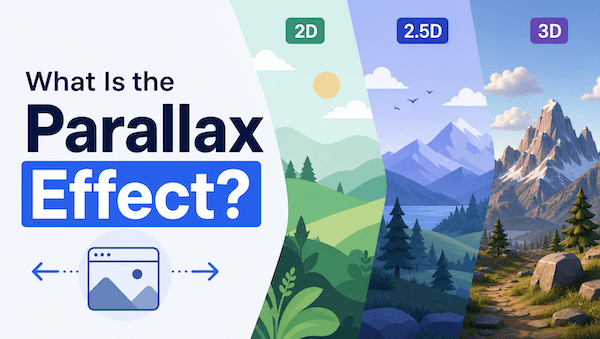
The parallax effect is the apparent change in an object's position relative to other objects when the viewing position changes. Objects closer to the camera appear to move more than objects farther away.
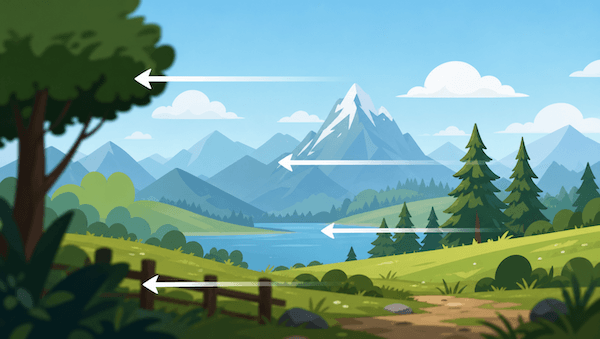
You can observe this when looking out of a moving car. Nearby trees seem to pass quickly, while distant mountains appear to move slowly. This difference in apparent movement creates a sense of depth.
In animation and digital production, artists recreate this effect by placing visual elements at different distances and moving the camera or individual layers.
How Does Parallax Work in Animation?
The basic principle is to create different movement speeds between foreground, midground, and background elements.
Imagine an animated forest scene:
- Foreground: tree branches and leaves move across the frame quickly.
- Midground: trees and rocks move at a moderate speed.
- Background: distant hills and the sky move very little.
When the camera moves horizontally, the different movement rates make the scene feel deeper than a flat image.
There are two common ways to create this effect:
- Layer-based parallax: Separate an image into multiple layers and move them at different speeds. This is common in 2D animation and motion graphics.
- Camera-based parallax: Place objects at different depths in a 3D scene and move the camera. The distance between objects determines how much their apparent positions change.
What Are the Different Types of Parallax Effects?
Parallax can be created through several techniques. The right approach depends on the visual style, production pipeline, and amount of depth required.
1. Motion Parallax
Motion parallax occurs when the viewer or camera moves relative to objects at different distances. Nearby objects appear to move faster than distant ones.
In 3D animation, this is the natural result of moving a camera through a scene with spatial depth. It is often used in tracking shots, camera fly-throughs, and environment animation.
2. Parallax Scrolling
Parallax scrolling is a technique in which background and foreground elements move at different speeds as a user scrolls through a webpage.
For example, a background landscape may move slowly while text and foreground graphics move at the normal scrolling speed. This creates a layered visual effect without requiring a fully 3D environment.
3. Layered Parallax
Layered parallax uses separate 2D images or artwork placed at different virtual depths. Each layer moves at a different rate when the camera or scene moves.
It is commonly used in 2D games, animated backgrounds, motion graphics, and 2.5D scenes. The technique is relatively efficient because artists do not need to model every object in three dimensions.
Watch this Unity 2D tutorial to see how layered backgrounds create an endless parallax scrolling effect.
4. 3D Camera Parallax
3D camera parallax is created by moving a camera through a scene containing objects at different depths.
Unlike a flat layered setup, a 3D scene can include real geometry, lighting, shadows, reflections, and depth of field. This makes it suitable for cinematic camera moves, product visualization, and VFX shots.
|
Type |
How It Works |
Common Applications |
|
Motion parallax |
Relative movement changes with object distance |
3D animation, camera tracking |
|
Parallax scrolling |
Layers move at different scrolling speeds |
Web design, interactive pages |
|
Layered parallax |
2D layers move at different rates |
2D animation, motion graphics |
|
3D camera parallax |
A moving camera reveals spatial depth |
3D animation, VFX, cinematics |
How Is the Parallax Effect Used in Digital Production?
Parallax is used across different production workflows. The main difference is how artists build depth and control the movement of visual elements.
Parallax in 2D Animation
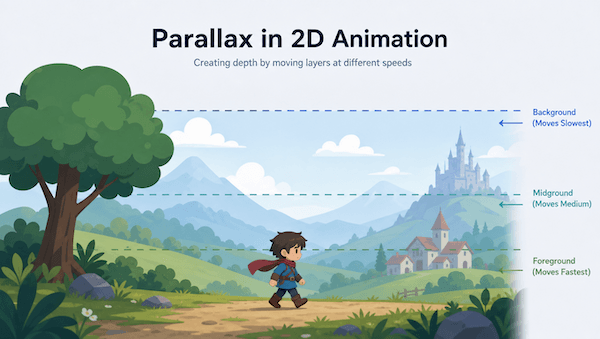
In 2D animation, artists often use a multiplane camera technique. Background artwork is divided into layers and placed at different distances from a virtual camera.
As the camera moves, each layer shifts by a different amount. This creates depth while preserving the original 2D artwork.
For example, an animated landscape may contain separate layers for clouds, mountains, trees, and foreground plants. Moving the camera across these layers produces a sense of depth without requiring 3D models.
The technique is useful for scenes with stylized artwork, limited animation, or hand-painted backgrounds.
Parallax in 2.5D Animation and Compositing
A 2.5D workflow places flat images or 2D elements in a 3D environment. Artists can then move a camera around them to create depth and perspective.
This approach is common in motion graphics, title sequences, explainer videos, and visual effects. It can turn a collection of still images into a moving scene without building a complete 3D environment.

However, 2.5D parallax introduces a common compositing problem: edge bleeding.
When you cut a foreground object out of its original background, the extracted image may retain background-colored pixels around its edges. As the layer moves in 3D space, these pixels can stretch into visible halos, dark fringes, or color contamination. Depth of field and motion blur can make the problem more obvious.
To prevent these artifacts:
- Extend the matte: Use edge expansion or matte dilation to prevent small gaps around the silhouette. Avoid expanding it so much that the object develops an unnaturally thick outline.
- Create edge padding: Extend the object's colors and textures beyond the alpha boundary. This gives the layer additional image information when it moves or becomes blurred.
- Check alpha interpretation: Incorrect premultiplied alpha handling can create dark or bright fringes when a cutout is placed over a new background. Check the footage's alpha interpretation and use the appropriate unpremultiply and premultiply workflow.
- Paint hidden areas: If camera movement reveals parts of an object that were hidden in the original image, use clean plates or paint extensions instead of stretching nearby pixels.
- Test the full camera range: A cutout may look clean in the starting frame but reveal gaps at the widest camera position.
In After Effects or Nuke, inspect the edges at final output resolution. Fixing matte and edge problems before the final render is usually more effective than trying to hide them with heavier blur or denoising.
See how to create a 2.5D parallax animation by separating image layers and animating a 3D camera in After Effects.
Parallax in 3D Animation
In 3D animation, parallax is mainly controlled through camera movement and scene depth. Objects closer to the camera move across the frame more quickly, while distant objects appear to shift less.
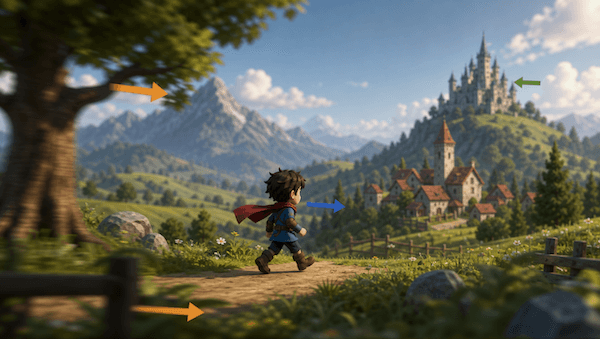
Camera movement also changes the relationship between foreground and background elements:
- Truck: The camera moves horizontally or vertically, changing the relative positions of objects at different depths.
- Dolly: The camera moves forward or backward, revealing changes in perspective and the spatial relationship between objects.
- Pan and tilt: The camera rotates around its position. These movements can change the composition, but do not create the same depth displacement as translating the camera.
A strong parallax shot needs more than a moving camera. Scene layout matters. If all objects are placed at similar depths, the movement may feel flat. If foreground objects are too close, they can move across the frame too quickly and dominate the composition.
In VFX, parallax is also important when matching virtual elements to live-action footage. A camera track must reproduce the original camera movement accurately. If the tracked camera or scene scale is incorrect, CG objects may appear to slide against the background rather than remain anchored in the scene.
Parallax Workflows in 3D Software
The core setup is similar across 3D applications: build depth into the scene, animate the camera, and render the resulting movement. However, each application has its own workflow considerations.
Blender: Manage Depth Passes and Camera-Dependent Artifacts
In Blender, you can build a parallax scene using image planes, layered geometry, or a fully modeled environment. For 2.5D scenes, image planes are quick to set up, but each plane needs enough image coverage for the camera's full movement.
If you plan to add depth-based effects in compositing, render a Z pass alongside the beauty pass. The Z pass can drive depth fog, atmospheric separation, and depth-based adjustments.
Be careful when using depth information around transparent objects, fine details, and heavily blurred areas. A Z pass does not necessarily reproduce the beauty render's optical effects perfectly, especially when depth of field or motion blur is involved. Inspect the pass before building the entire composite around it.
Maya: Check Motion Blur and Camera Sampling
In Maya, a moving camera can create strong parallax even when most objects remain static. This makes camera animation and motion blur settings important.
Enabling 3D motion blur on every object by default may add unnecessary render cost. Static background elements generally do not need object motion blur. Use per-object controls where appropriate, especially in scenes with many layered elements.
Also check the camera's shutter settings and objects near the lens. Fast-moving foreground elements can produce long blur trails and reveal gaps or missing geometry that are not visible in a sharp preview. Render test frames at the fastest camera movement and inspect the edges before rendering the full sequence.
Cinema 4D: Control Motion Blur and Render Passes
Cinema 4D artists often combine camera movement, layered geometry, and Redshift rendering to create parallax shots. Multi-Pass or AOV output can separate depth, motion vectors, and other render data for compositing.
With Redshift, distinguish between transformation motion blur and deformation motion blur. Deformation blur tracks changing vertex positions and can consume more memory, particularly with dense or displaced geometry. If an object only moves, rotates, or scales, deformation blur may not be necessary.
For close foreground objects, check the camera's focus distance and aperture. A wide aperture can create pronounced depth-of-field blur, while fast camera movement adds motion blur. Both effects can increase render time and memory use. Test the most demanding frames first, then adjust sampling and blur settings based on the actual result.
Explore camera projection techniques in Cinema 4D and Redshift for building depth and creating camera-driven animation.
Rendering Challenges in Complex 3D Parallax Scenes
A simple layered parallax shot may render quickly, but a complex 3D camera move can be much more demanding.
As the camera travels through a scene, close foreground objects may pass quickly across the frame while distant layers remain visible. High-resolution geometry, detailed textures, reflections, shadows, depth of field, and motion blur all add to the rendering workload.
The most demanding frames are not always the first or last frames. A camera passing close to dense geometry may require more sampling to resolve fine details. Strong defocus and motion blur can also increase render time and memory consumption. A few difficult frames can become bottlenecks in an otherwise manageable sequence.
Before rendering the full animation:
- Test demanding frames first. Choose frames where the camera is closest to foreground objects or moves fastest.
- Check memory usage. Dense geometry, displacement, textures, and deformation blur can push a workstation beyond its available memory.
- Optimize effects selectively. Avoid enabling deformation blur on objects that only undergo rigid transformations. Adjust depth of field and sampling based on the shot's visual requirements.
- Render representative frames. Check sharpness, motion blur, depth passes, and compositing edges before submitting the complete sequence.
For long animations, rendering every frame on a single workstation can create a serious production bottleneck. A render farm distributes frames across multiple render nodes, allowing many frames to be processed in parallel instead of waiting for one machine to finish the entire sequence.
Fox Renderfarm provides cloud rendering for 3D production workflows. You can submit your project and render frames across its distributed infrastructure, reducing the time spent waiting for a long animation to finish on a local workstation. Before submitting, check software versions, plugins, textures, caches, and render settings to make sure the project is ready for network rendering.
If your parallax animation contains demanding camera passes, test a small frame range first. This helps identify missing assets, rendering differences, and memory issues before the full sequence enters production.
Parallax in Video Games and Web Design
In video games, parallax creates depth in 2D environments. Background layers move at different speeds as the player or camera moves, making a flat scene feel more expansive. It is common in platformers, side-scrolling games, and stylized environments.
In web design, parallax scrolling adds movement as visitors scroll through a page. Background images, text, and foreground elements can move at different speeds to create a layered experience.
For more complex scroll-based animations, developers can use libraries such as GSAP ScrollTrigger rather than building every interaction from scratch. Keep performance and accessibility in mind: avoid excessive effects, test on mobile devices, and provide a reduced-motion experience for visitors who prefer less animation.
See how GSAP ScrollTrigger can create smooth, scroll-driven parallax effects for interactive web pages.
How to Create a Parallax Effect
The exact workflow depends on whether you are working with 2D artwork, 2.5D layers, or a fully modeled 3D scene. The following steps provide a practical starting point.
Step 1: Prepare Your Layers or 3D Objects
For a 2D or 2.5D scene, separate the artwork into foreground, midground, and background layers. Remove unwanted background pixels and extend image areas that may become visible during camera movement.
For a 3D scene, arrange objects at different distances from the camera. Make sure the scene has enough depth to produce visible relative movement.
Step 2: Set Up the Camera
Position the camera to frame the scene. For layered artwork, use a 3D camera and place each layer at a different depth.
For a fully modeled scene, choose a camera path that reveals the spatial relationship between objects. Avoid placing foreground elements so close that they move out of frame too quickly.
Step 3: Animate the Camera or Layers
Move the camera horizontally, vertically, or forward and backward. In a layer-based workflow, you can also animate each layer independently.
Start with a subtle movement. The goal is to create a clear difference in relative motion without making the foreground distracting.
Step 4: Adjust Depth and Movement
Review the distance between layers and the speed of their movement. Increase the depth separation if the scene feels flat. Reduce it if the effect looks exaggerated or artificial.
For 3D scenes, check the camera's focal length and movement path. These settings affect perspective and the strength of the parallax effect.
Step 5: Preview and Render
Preview the entire camera movement rather than checking only the first frame. Look for exposed gaps, edge artifacts, unexpected intersections, and objects leaving the frame.
For final rendering, test representative frames with the intended depth of field, motion blur, and sampling settings. Once the results are consistent, render the full sequence.
Common Parallax Problems and How to Avoid Them
Even a simple parallax setup can reveal problems once the camera starts moving. The following issues are worth checking before final output.
|
Problem |
Why It Happens |
How to Avoid It |
|
Gaps behind layers |
The original image does not contain areas revealed by camera movement |
Extend backgrounds or paint hidden areas |
|
Edge bleeding |
Cutout edges retain pixels from the original background |
Use matte dilation, edge padding, and correct alpha handling |
|
Unreliable depth data |
Transparency, fine details, and blur complicate depth information |
Inspect depth passes and use separate compositing adjustments where needed |
|
Unnatural camera movement |
Layer spacing or camera speed is poorly balanced |
Adjust depth separation and review the full camera path |
|
Long render times |
Complex geometry, DOF, motion blur, and high sampling increase render cost |
Test demanding frames and optimize settings before final rendering |
For web-based parallax, performance is another concern. Too many animated layers or large images can make scrolling feel sluggish, especially on mobile devices. Use lightweight assets and avoid unnecessary effects. Also respect the prefers-reduced-motion setting so visitors can reduce or disable non-essential movement.
Frequently Asked Questions
How do you fix edge bleeding in 2.5D parallax animation?
Edge bleeding usually occurs when a cutout retains background pixels around its alpha boundary or does not contain enough image data outside the visible matte. Use matte dilation, edge padding, and clean-plate extensions to fix the problem. Also check premultiplied alpha settings when compositing layers in After Effects or Nuke.
How can you reduce render times for 3D parallax animations?
Start by identifying the most demanding frames, especially those with close foreground objects, fast camera movement, strong depth of field, or motion blur. Optimize sampling and blur settings, disable unnecessary deformation blur, and check memory usage. For long sequences, a cloud render farm can distribute frames across multiple render nodes.
Why does motion blur look wrong in a 3D camera parallax shot?
Incorrect shutter settings, insufficient motion sampling, and missing geometry can all affect the result. Check the camera's shutter settings and render a frame where the camera moves fastest. If the scene contains deforming objects, verify that deformation blur is enabled only where needed and that its sampling settings are sufficient.
Should you render depth passes for a parallax animation?
A depth pass is useful when you need depth-based compositing effects, such as atmospheric fog or selective depth adjustments. However, depth data may not accurately reproduce every effect in the beauty render, especially around transparency, motion blur, and depth of field. Always inspect the pass before relying on it in the final composite.
Can a cloud render farm handle complex 3D camera animations?
Yes. A cloud render farm can distribute animation frames across multiple render nodes, which is useful for sequences with demanding geometry, lighting, and camera effects. Before submitting, verify the project's software versions, plugins, assets, caches, and render settings. A short test submission can help identify issues before the full render.
Conclusion
The parallax effect adds depth and movement to 2D, 2.5D, and 3D animation. Whether you use layered images, a multiplane camera, or a fully modeled 3D environment, the key is to control the distance between elements and plan camera movement carefully.
For complex 3D parallax animations, pay close attention to edge quality, depth information, motion blur, and rendering performance. Testing demanding frames before the final render can help prevent costly production issues.
Working on a demanding 3D parallax animation with a tight deadline? Try Fox Renderfarm and claim $25 in free render credits as a new user. Render your animation across multiple nodes and spend less time waiting for your frames to finish.


 Ryan Thompson


