Blender
 Cinema 4D
 Arnold
 3ds Max
 Houdini
 V-Ray
 Maya
 Unreal Engine
 Nuke
How to Add Textures in Blender
 Ryan Thompson
To add textures in Blender, give your object a material, load an image into an Image Texture node, and connect its Color output to the Principled BSDF’s Base Color input. Then switch to Material Preview to see the result.
This beginner’s guide shows how to apply a texture to an object in Blender using a simple plane. You’ll also learn how to adjust its size, assign it to selected faces, and fix textures that appear gray, pink, or stretched.
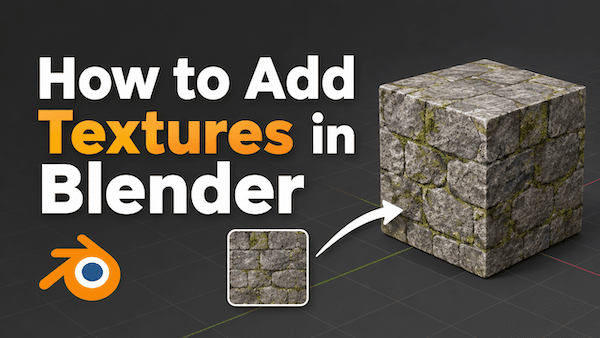
How to Add an Image Texture in Blender
Start with a plane and a JPG or PNG saved on your computer. A square image keeps this first example simple. You can see the whole image on the flat surface before trying the same setup on a model with several faces.
1. Select Your Object and Create a Material
Create the material before editing its nodes:
- In the 3D Viewport, make sure you’re in Object Mode, then choose Add → Mesh → Plane.
- Keep the plane selected. In the Properties editor, open Material Properties, identified by the red material sphere icon.
- Click New to create a material. If the object already has a suitable material, select it instead.
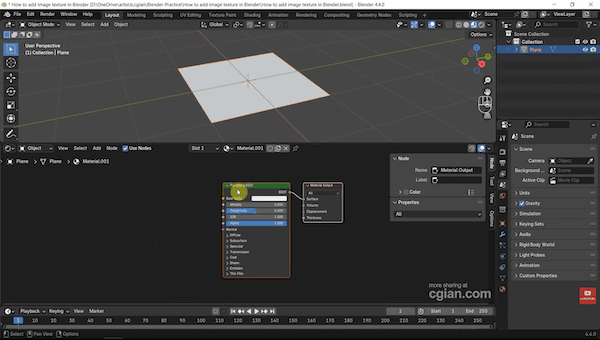
- Open the Shading workspace. In the Shader Editor’s header, set Shader Type to Object and confirm your material is selected.
Object edits the selected object’s material; World edits the scene’s background.
You should see a Principled BSDF node connected to Material Output. This is the material you’ll add the image to. If you see Background and World Output nodes, switch the Shader Type back to Object.
2. Add and Load an Image Texture
With your pointer inside the Shader Editor:
- Press Shift + A, then choose Texture → Image Texture.
- Place the node to the left of Principled BSDF.
- Click Open, choose your image, and select Open Image.
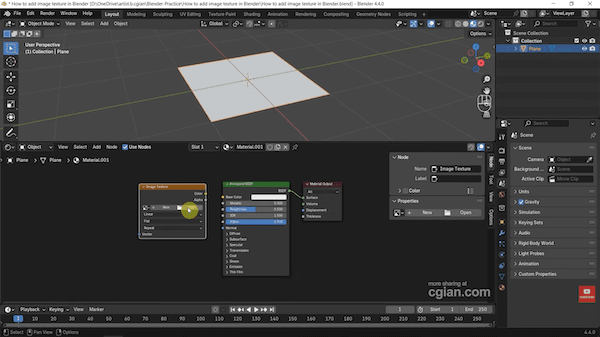
The node should show the image’s filename. If you downloaded a texture set, choose the base color or albedo image here. Loading the file alone won’t change the surface; the node needs a connection.
3. Apply the Image Texture to Your Material
To apply the image texture to your material, drag its yellow Color output to the Base Color input on Principled BSDF. Keep the shader connected to Material Output.
Your two connections should be:
Image Texture: Color → Principled BSDF: Base Color
Principled BSDF: BSDF → Material Output: Surface
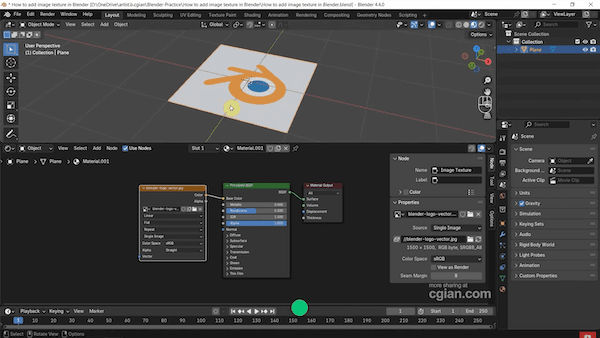
Use Color, rather than Alpha, for this connection. Leave an ordinary color image’s color space at sRGB. Roughness and normal maps have different roles; they aren’t needed for this first color texture.
4. Show Textures in the Blender Viewport
To show textures in Blender’s viewport, select Material Preview from the shading icons at the upper right. Allow a moment for it to load.
Expected result: the image appears across the plane. If it’s stretched, adjust the UV mapping next. If it doesn’t appear, check the troubleshooting table below.
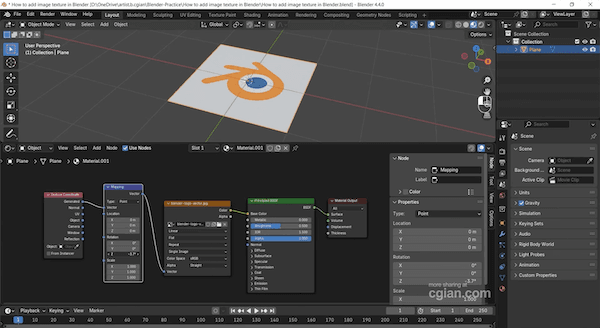
The same material setup works on a cube or an imported mesh. Its UV layout determines how the image wraps around the surface.
For a visual walkthrough, watch CGian’s “How to add image to plane in Blender”.
How to Scale Textures in Blender with UV Mapping
A UV map is a flat layout of a mesh’s faces. It tells Blender which part of the image belongs on each face. Unwrapping creates or recalculates that layout.
A newly added plane already has a layout when Generate UVs is enabled, which is the default. A default cube also has UVs. An imported or heavily edited model may have usable UVs, missing UVs, or a layout that no longer fits.
Check the existing layout before unwrapping:
- Select the object and open UV Editing.
- Over the 3D Viewport, enter Edit Mode if needed and select the faces.
- In the UV Editor, choose your texture from the image dropdown. Look for the selected faces’ UV outlines over the image.
- If the layout is missing or unsuitable, keep the faces selected, move your pointer over the 3D Viewport, press F3, and run Smart UV Project. Confirm the settings.
Smart UV Project is a quick starting point for simple hard-surface shapes. Detailed models may need planned seams and manual adjustments.
To reposition the image, select the UVs in the UV Editor:
- G: move the UVs.
- S: scale the UVs.
- R: rotate the UVs.
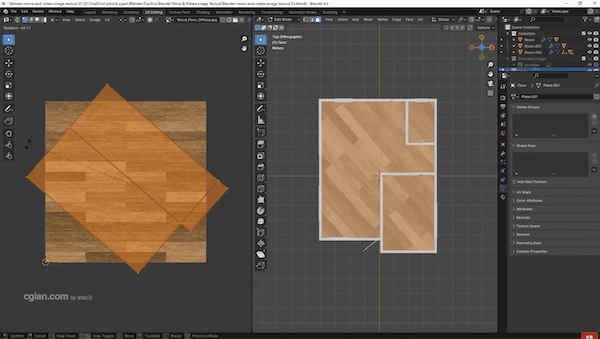
With the Image Texture node set to Repeat, enlarging the UV layout makes the image repeat more often, so each copy looks smaller. This texture mapping guide explains the broader workflow.
How to Apply a Texture to Selected Faces in Blender
To add a texture to only part of an object in Blender, use separate material slots. For example, a cube can have one textured face while the others stay plain.
Start with a plain material assigned to the whole cube. Then:
- In Material Properties, click+to add another material slot.
- Choose your existing textured material from the material dropdown.
- Enter Edit Mode, use face selection, and select only the target faces.
- With the textured material slot active, click Assign.
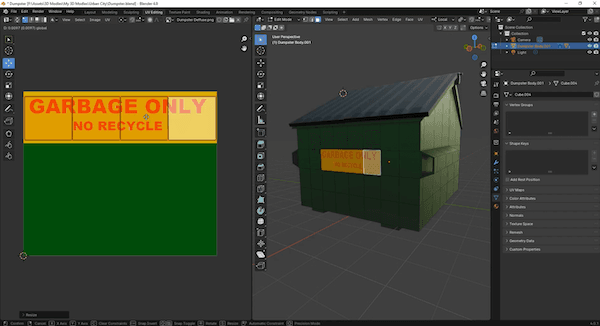
Adding a slot doesn’t assign it to faces. Each face’s UVs still determine how the image fits.
Why Is My Texture Not Showing in Blender?
If your Blender texture is not showing, first check the display mode, assigned material, and node connections. A loaded image won’t affect the surface until it contributes to the material’s output.
|
What you see |
What to check |
What to try |
|
Gray surface |
Viewport shading and material assignment |
Switch to Material Preview. Confirm the object or faces use the textured material. |
|
One flat color |
Image selection, connections, and UVs |
Load the image and connect Color to Base Color. Check that the UVs cover more than a tiny patch. |
|
Pink or magenta surface |
Missing or unreadable image files |
Reopen the image, or use File → External Data → Find Missing Files to locate moved assets. |
|
Stretched or smeared image |
UV layout and object proportions |
Adjust the UVs. If the object was scaled unevenly, apply Scale in Object Mode before unwrapping again. |
|
Preview and render differ |
Scene lighting, material output, and render engine |
Check the output connection and compare scene lighting with the preview environment. |
Material Preview can use its own environment lighting. Switch to Rendered shading to inspect the material under your scene’s lights. A different appearance doesn’t necessarily mean the texture is broken.
How to Save and Pack Textures in Blender
Before moving a textured model, check its images. Blender may reference external files; moving them can break those links.
Save newly created or edited images, then choose File → External Data → Pack Resources. Save the .blend file afterward. Packing includes eligible resources, so check other external dependencies separately.
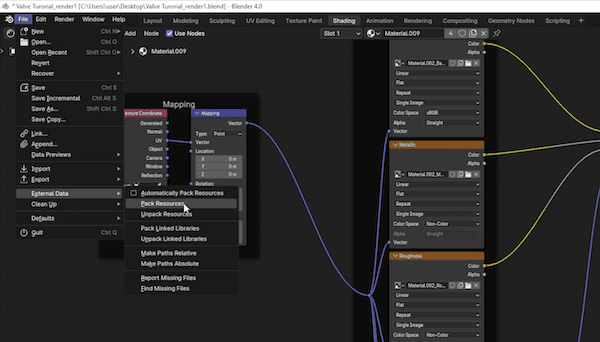
Reopen the project and render a test frame. If the textures look right but each frame takes too long locally, a longer animation can turn that wait into a production bottleneck. For projects that need additional rendering capacity, a Blender render farm lets you move rendering to cloud resources.
FAQs About Adding Textures in Blender
What is the difference between a material and a texture?
A material defines how a surface responds to light, including its color, roughness, and transparency. A texture supplies an image or pattern that controls one or more of those properties. One material can use several textures.
Can I add a texture without UV unwrapping?
Yes. Procedural textures and some image projection setups can use Generated or Object coordinates instead. The texture still needs coordinates that place it on the surface. For precise image placement, a suitable UV layout is often easier to control.
How do I add multiple texture maps to one material?
Use separate Image Texture nodes for the maps and connect each to the appropriate shader input. Normal maps need a Normal Map node; set data maps such as roughness and normals to Non-Color. For the full workflow, follow our guide to using PBR textures in Blender.