 Blender
 Cinema 4D
 Arnold
 3ds Max
 Houdini
 V-Ray
V-Ray Maya
Maya Unreal Engine
 Nuke
NukeHow to Do Motion Capture in Blender?
 Ryan Thompson
You can do motion capture in Blender by generating or downloading motion data, importing it as a BVH or FBX file, retargeting it to your character rig, and cleaning up the animation before rendering or exporting it. For most beginners, the easiest route is to process a short video with an AI mocap tool, export the result as FBX, and then use Blender for retargeting and cleanup. If you already have a BVH or FBX file, you can start at the import stage.
The key distinction is between the source armature, which contains the original motion, and the target rig, which belongs to your character. Importing a mocap file creates the source armature; you still need to retarget it, test the result, clean the curves, and then render or export the animation.
Choose the Right Mocap Workflow
|
Workflow |
Input |
Hardware |
Best For |
Main Trade-off |
|
Video-to-mocap |
Recorded video |
Usually none |
Quick tests and original performances |
Tracking errors require cleanup |
|
BVH or FBX import |
Existing motion file |
None |
Ready-made mocap or motion libraries |
Retargeting is usually required |
|
Real-time mocap |
Live performer data |
Often required |
Previsualization and live animation |
More setup and software dependencies |
|
Motion library |
Downloaded animation clip |
None |
Blocking and background actions |
Less control over the performance |
For a first test, use a simple 5- to 10-second clip rather than a long performance or complex production rig.
Motion Capture Tools That Work With Blender
AI video-to-mocap tools such as DeepMotion, Rokoko Vision, Plask, and Move AI can convert recorded footage into body animation. Motion libraries such as Mixamo and MoCap Online provide ready-made walks, runs, and idle actions. Either way, expect different bone names, rest poses, and cleanup requirements.
Rokoko's Blender integration is better suited to live streaming, while Auto-Rig Pro's Remap tool is practical for transferring offline BVH or FBX clips to a character rig. See Rokoko's Blender resources for the real-time workflow.
Prepare Blender Before Importing Motion Data
Before importing, confirm that the target character already works as a rigged character. In Pose Mode, rotate a shoulder, elbow, hip, and knee. If the mesh does not follow correctly, fix the rig or weight painting first; motion capture cannot repair a broken deformation setup.
Make a backup, then confirm the character's T-pose or A-pose, forward direction, scale, foot placement, scene frame rate, and root, hip, or pelvis bone.
Apply transforms to the target character when appropriate with Ctrl+A > All Transforms. If the character is part of a more complex production rig, follow the rig's own setup instructions instead of applying transforms blindly.
Keep the source armature and target rig in separate collections, such as Mocap_Source, Target_Rig, and Retargeted_Action.
Create Motion Capture From Video
If you are using an AI video-to-mocap service, record a short, controlled performance with the performer visible from head to feet. Use even lighting, a stable camera, low motion blur, and a background that contrasts with the performer. Keep the feet visible for walks and jumps, then upload and trim the clip. FBX is convenient for character pipelines, while BVH mainly carries a skeleton and its animation.
After import, scrub through the entire clip and check foot sliding, unstable hips, missing hands, sudden limb rotations, and frame timing. Retargeting will not fix a broken source animation.
Import a BVH File Into Blender
Blender's current BVH workflow is available from File > Import > Motion Capture (.bvh) or the corresponding Import/Export entry in the File menu, depending on the version and workspace layout. The official Blender BVH documentation describes the importer as a way to bring in a skeleton and its animation.
Use this first-pass setup for a typical human mocap file:
|
BVH Setting |
Recommended Starting Point |
Why |
|
Target |
Armature |
Most mocap BVH files contain an animated skeleton |
|
Scale |
1.0 |
Start at the file's original scale and change it only if needed |
|
Start Frame |
1 |
Keeps the test easy to compare with the timeline |
|
Scale FPS |
Off for the first test |
Avoids changing timing until the source FPS is understood |
|
Update Scene FPS |
Off unless you want Blender to match the file |
Set the scene FPS deliberately |
|
Loop |
Off during troubleshooting |
Prevents a bad cycle from hiding the end of the clip |
The axis settings require more care. A useful starting point for many human mocap files is Forward: -Y and Up: Z, but this is not a universal rule. The correct pair depends on the application that exported the file. If the source application uses a Y-up coordinate system, Blender's documentation gives a different conversion example: -Z forward and Y up. Treat the settings as a test, not a fact that applies to every BVH file.
After choosing the settings, click Import BVH, select the imported armature in Object Mode, and press Alt+G and Alt+R only if you need to clear an unwanted object transform. Do not reset the pose bones themselves. Play the animation and check the direction, scale, frame timing, and foot placement before moving to retargeting.
If the skeleton faces the wrong way, delete the test import and try a different axis conversion rather than rotating the final character. If it is too large or too small, change Scale during import instead of resizing the target rig. If playback speed is wrong, compare the source and scene FPS before using Scale FPS or changing the timeline.
Import an FBX Mocap File Into Blender
Use File > Import > FBX (.fbx) to import an FBX animation. The current Blender FBX documentation identifies FBX as a common format for animated characters and complex scene data.
For a source armature that will be retargeted, use this first-pass approach:
1. Open File > Import > FBX (.fbx).
2. Set Scale to 1.0 unless the source tool specifies another unit conversion.
3. Keep animation import enabled.
4. Enable Ignore Leaf Bones for most human mocap skeletons so extra end-marker bones do not clutter the hierarchy.
5. If your Blender build or importer exposes Automatic Bone Orientation, enable it when the imported bones have inconsistent local axes. If the import becomes worse, disable it and follow the source tool's axis recommendations instead.
6. Click Import FBX.
The exact labels can vary between Blender versions. Import the source armature first and inspect it before bringing in a production character. If you are retargeting to your own character, an armature-only import is usually easier to manage. Check the Dope Sheet or Action Editor to confirm that an action and the expected frame range were created.
Retarget Mocap With Auto-Rig Pro Remap
For repeated character work, an add-on is usually more practical than building dozens of native Copy Rotation and Copy Location constraints by hand. Auto-Rig Pro's Remap tool is designed to transfer an armature animation to another armature, including imported BVH and FBX motion.
1. Install the Add-on and Prepare the Target
Open Edit > Preferences > Add-ons, choose Install, select the Auto-Rig Pro ZIP, and enable it. Auto-Rig Pro is paid; for another option, test Rokoko or Expy Kit against your Blender version.
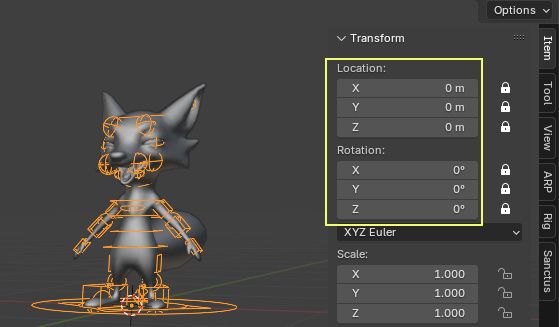
Open the character file, select the target armature in Object Mode, and clear object-level Location and Rotation when safe for the rig. Non-zero transforms can create remapping errors, so save a backup before pressing Alt+G or Alt+R.
source: lucky3d.fr
2. Import the Source Armature
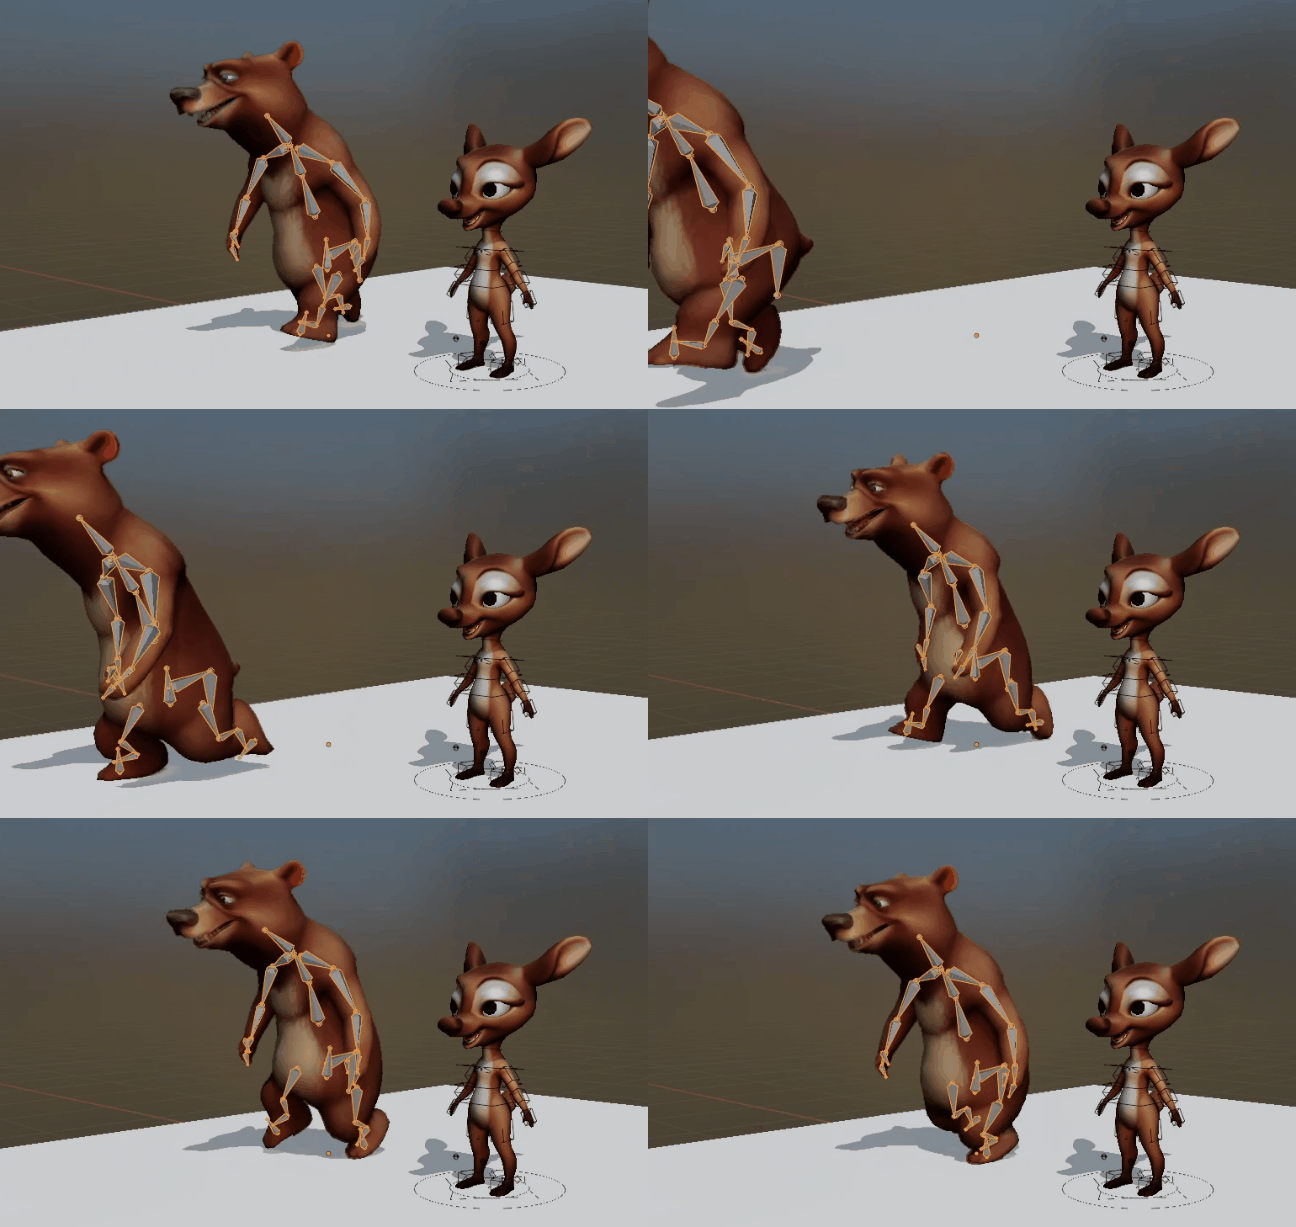
Import the BVH or FBX source armature and keep it visible beside the target. Check that both armatures face the same direction in their rest pose. Their proportions do not need to match, but an A-pose source and T-pose target may require a rest-pose correction.
3. Assign Source and Target
Open the Auto-Rig Pro Remap panel. Set:
- Source: the imported animated armature
- Target: your character's armature
Use Auto-Scale when their sizes differ. Enable In Place for a walk or run that should stay in place; otherwise keep root translation for travel.
source: lucky3d.fr
4. Build and Check the Bone List
Click Build Bones List. Auto-Rig Pro can use presets for common skeletons such as Mixamo or Rokoko, but check the result manually.
Verify at least these mappings:
|
Source Bone |
Target Bone |
|
Hips |
Pelvis or Hips |
|
Spine |
Spine |
|
Spine1 or Chest |
Chest or Upper Spine |
|
Neck |
Neck |
|
Head |
Head |
|
LeftUpArm |
Left Upper Arm |
|
LeftForeArm |
Left Forearm |
|
LeftHand |
Left Hand |
|
LeftUpLeg |
Left Thigh |
|
LeftLeg |
Left Calf |
|
LeftFoot |
Left Foot |
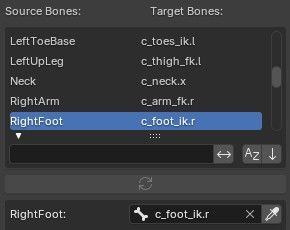
If names have a namespace such as mixamorig: Hips, use namespace replacement or edit the mapping manually. A wrong hand, foot, or left-right mapping can break the result even when the torso looks correct.
5. Set Root and IK Options
Set the hips or pelvis as the root when both translation and rotation should transfer. If you need rotation only, leave it as a regular mapped bone.
Enable IK for feet and hands when the target rig supports IK controls, and set the knee or elbow pole bones. When source data is noisy, a relative IK pole mode may be more stable than an exact world-space calculation.
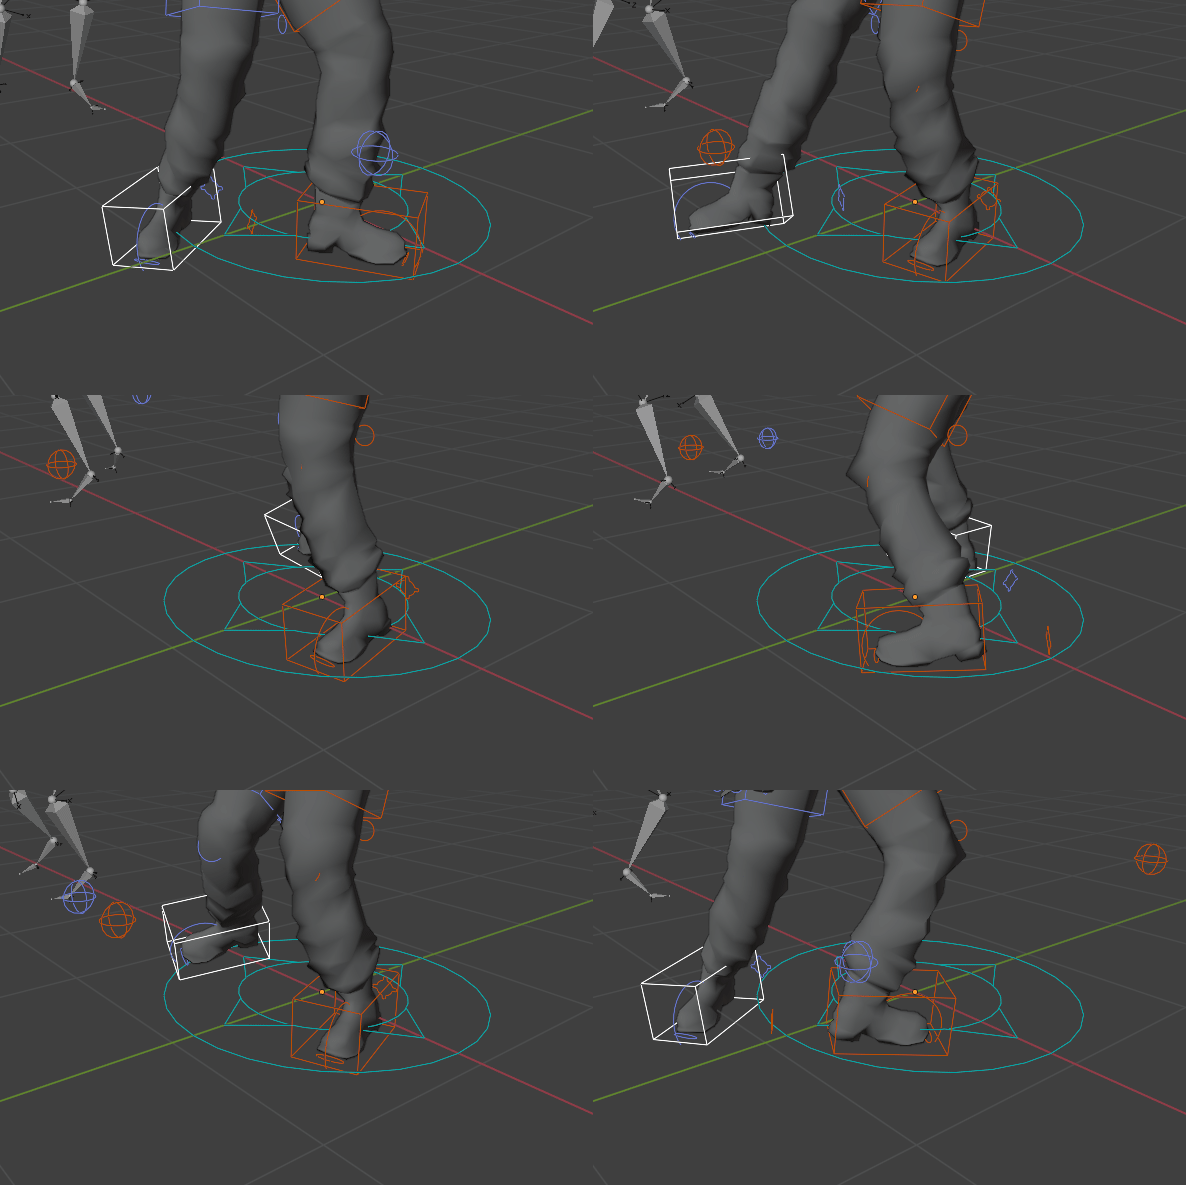
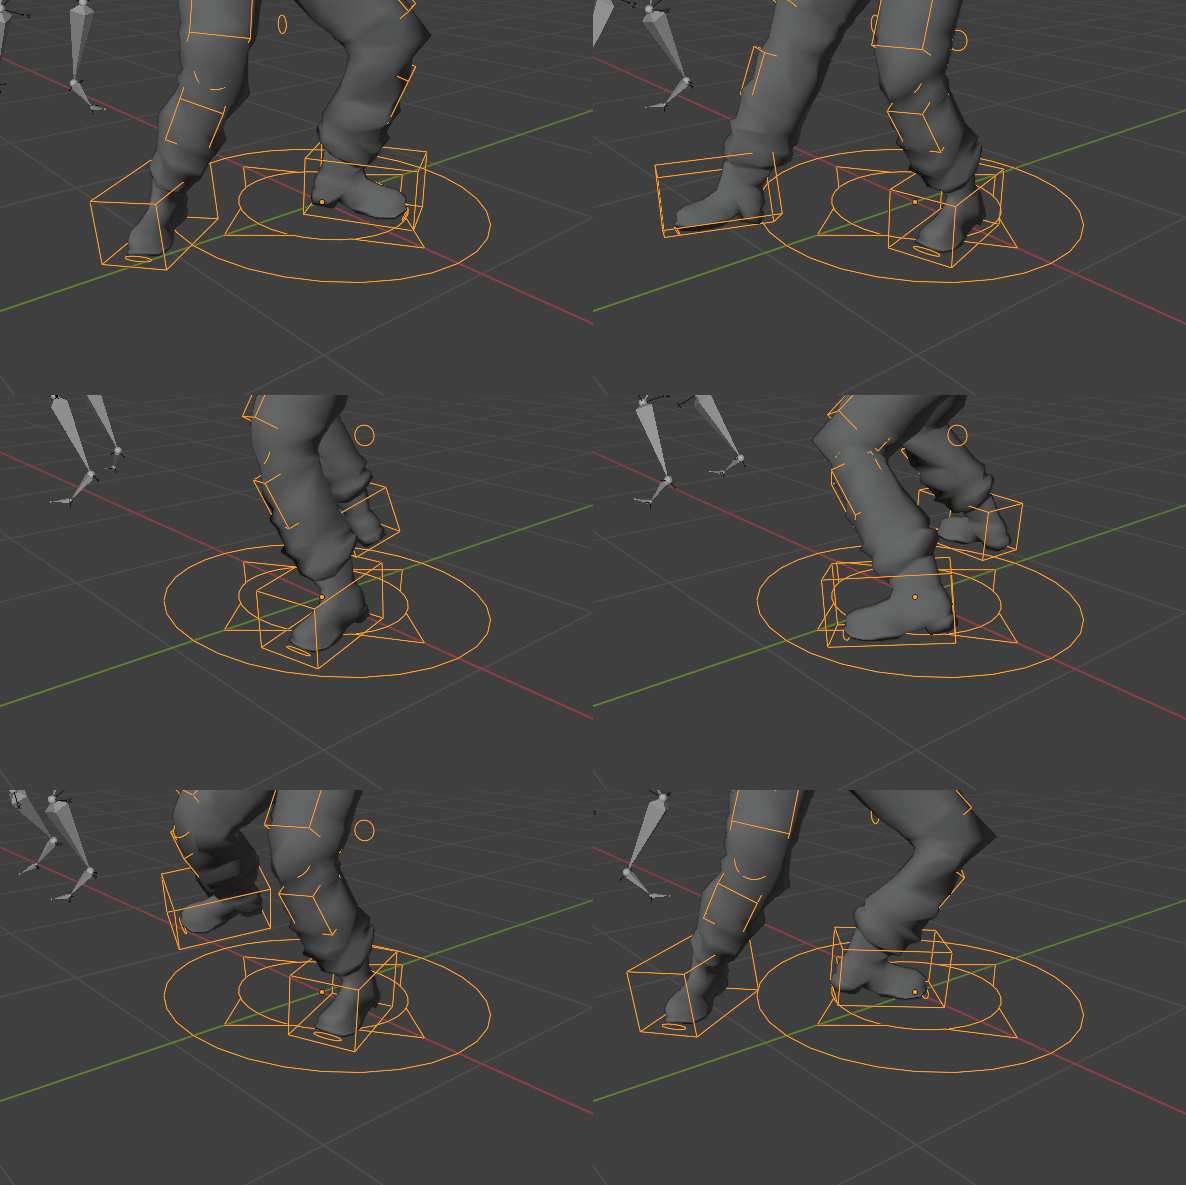
source: lucky3d.fr
6. Fix the Rest Pose and Retarget
Enter Edit Mode on both armatures and compare their rest poses. Rotate the armature object if their forward directions differ. For an A-pose/T-pose mismatch, use the Remap rest-pose controls and preserve the original pose when possible.
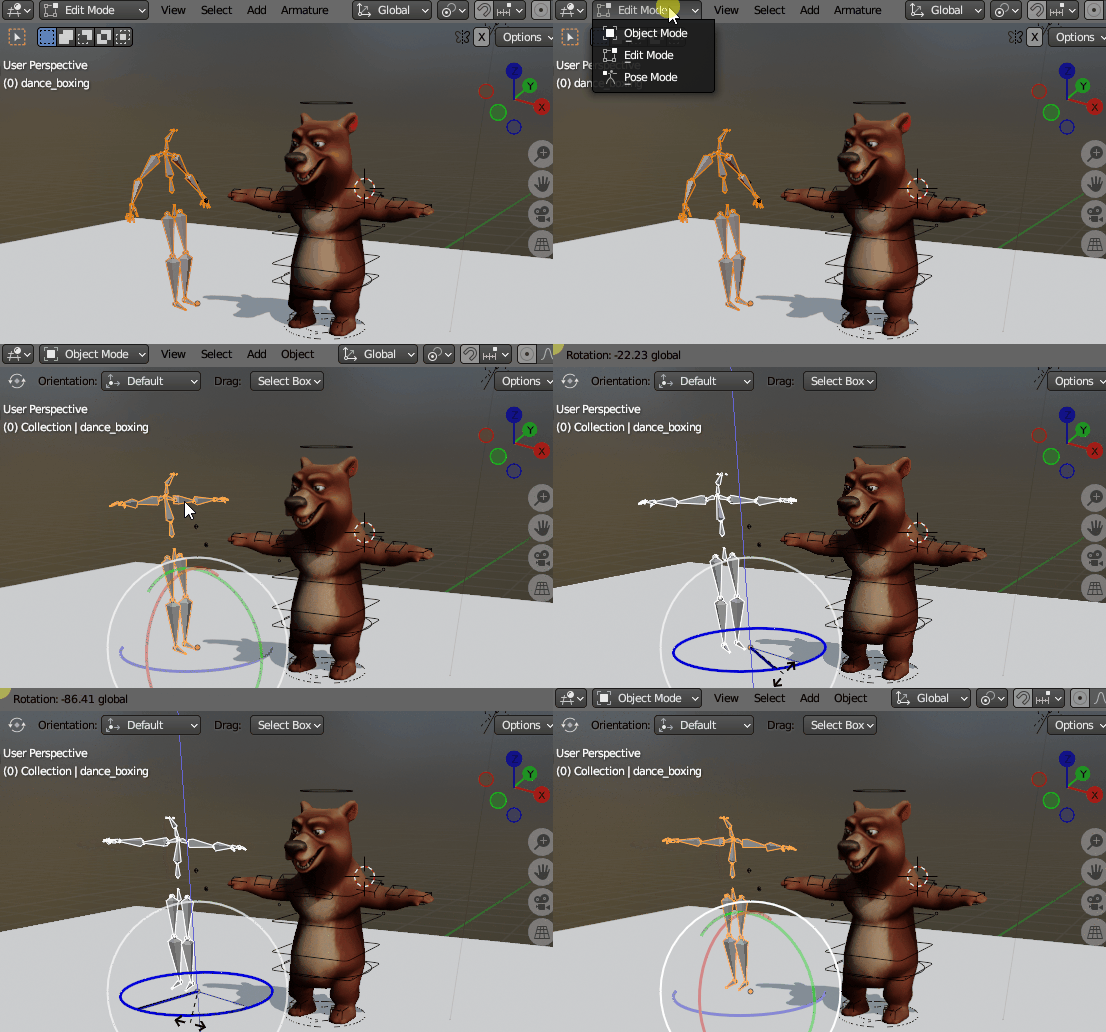
source: lucky3d.fr
When the mapping and rest pose are correct, click Re-Target. Preview the target and test frames 1 to 30 before processing a long clip.
For small adjustments, use the add-on's interactive tweaks or an additive NLA strip instead of rebuilding the mapping.
7. Save or Bake the Result
Save the retargeted action separately on the target rig. Keep the source armature and action until review is complete. Once stable, bake the target animation if the downstream workflow needs ordinary keyframes.
For repeated actions, store walk, run, idle, and correction clips as separate NLA strips so the original action remains reusable.
Use Rokoko for a Real-Time Blender Workflow
Rokoko's Blender integration is a better fit for live streaming than for retargeting a finished offline file. Install the current Rokoko Studio software and Blender integration, connect the Blender panel, select the target character, verify the rest pose and mapping, and record a short test. Fix sliding feet or incorrect elbows before capturing a full performance. Verify current features and licensing in Rokoko's documentation before production use.
For a visual look at live capture, watch Rokoko's 2025 Best BLENDER Motion Capture Workflow. It shows how performance data can be streamed into Blender and retargeted to a character in real time. The video complements the offline BVH and FBX workflow in this guide, rather than replacing it.
Clean Up the Retargeted Animation
Fix Foot Sliding
Foot sliding usually comes from incorrect root motion, different proportions, missing foot IK, or a source performance without stable foot contact. Check the target scale and rest pose, identify contact frames, then adjust an IK foot control and keyframe the planted foot. Refine the hip movement and remove small foot or ankle translations in the Graph Editor.
For a walk-in-place result, use In Place during retargeting. For travel, keep root movement and correct only local foot drift.
Remove Jitter
Open the Graph Editor and isolate the noisy bone or channel. Smooth carefully, remove obvious spikes manually, and preview at normal speed. Do not smooth every body part equally; preserve sharp performance accents.
Correct Twisted Limbs
Twisted limbs usually indicate incorrect bone axes, an A-pose/T-pose mismatch, or a wrong left-right mapping. Compare rest poses, import orientation, and the mapping list. A problem on both arms points to axes or rest pose; a one-sided problem points to bone naming. Fix the mapping before adding corrective keys.
Add Secondary Motion
After the body motion is stable, add small corrections for the head, hands, fingers, shoulders, clothing, and hair. An additive NLA layer is cleaner than editing the base action and remains easy to disable.
Common Blender Mocap Problems
|
Problem |
Likely Cause |
First Fix to Try |
|
BVH imports sideways |
Axis conversion mismatch |
Re-import with the source tool's axis convention; use -Y / Z only as a starting test |
|
BVH is too large or too small |
Source scale differs from Blender scene |
Change import Scale rather than resizing the target character |
|
FBX bones twist |
Bone axes or rest pose do not match |
Check automatic orientation if available and verify the rest pose |
|
Character faces backward |
Source and target forward directions differ |
Correct the source armature orientation before retargeting |
|
Feet slide |
Missing IK, wrong root motion, or proportion mismatch |
Enable foot IK and correct root or foot curves |
|
Animation timing is wrong |
Source FPS and scene FPS differ |
Check FPS before using Scale FPS or Update Scene FPS |
|
Some bones do not move |
Incomplete mapping |
Rebuild and manually check the bone list |
|
Mesh deforms badly |
Rig or weights are incorrect |
Test the target rig without mocap |
|
Viewport playback is slow |
Too many keys or a heavy scene |
Simplify curves and preview with lower-quality scene settings |
Debug in this order: orientation, scale, rest pose, bone mapping, IK, and finally curve cleanup. This order matters because a wrong axis or wrong mapping cannot be repaired reliably with smoothing.
Render or Export the Final Animation
Before the final render, set the frame range, resolution, output format, frame rate, camera, lighting, materials, and render engine. Render a short test range first so you can catch missing textures, incorrect deformations, motion blur artifacts, or lighting problems before committing to the entire sequence.
An image sequence is often safer than rendering directly to a video file. If one frame fails, you can correct and rerender that frame without restarting the whole animation.
When exporting to Unity, Unreal Engine, or another application, check the FBX export settings for selected objects, baked animation, frame range, unit scale, root motion, and armature options. Test the exported file in the destination application before deleting the Blender source.
Detailed characters, cloth, hair, particles, simulations, and large environments can make a mocap animation expensive to render locally. Fox Renderfarm, a Blender Render Farm supports Blender workflows using Cycles and EEVEE and can distribute animation frames across CPU or GPU rendering nodes. A cloud render farm can also help when a long animation needs more capacity.
For a fuller Blender submission workflow, see How to Render Animation in Blender for Beginners.
FAQ About Blender Motion Capture
What Forward and Up Settings Should I Use for a BVH File?
There is no universal pair because BVH files can come from applications with different coordinate systems.Forward: -Y and Up: Z is a useful first test for many human mocap files. If the source application uses Y-up coordinates, try the conversion recommended by its documentation, often -Z forward and Y up. Re-import and verify the armature direction before retargeting.
Why Does My FBX Character Twist After Import?
The usual causes are inconsistent bone axes, a rest-pose mismatch, incorrect scale, or a left-right mapping error. Inspect the imported source armature before retargeting. If your Blender version exposes an automatic bone-orientation option, test it on a duplicate import and compare the result.
Should I Use Auto-Rig Pro or Rokoko for Blender Mocap?
Use Auto-Rig Pro Remap when you are transferring offline BVH or FBX animations to a character and need repeatable bone mapping, root settings, and IK controls. Use Rokoko's Blender integration when you need a live stream from Rokoko Studio or a real-time performance preview. They solve related but different parts of the workflow.
Should I Bake Mocap Before Cleaning It?
Usually, test the retargeting first and bake only after the source and target mapping work correctly. Baking too early can create a large number of incorrect keyframes. Once the action passes a short-range test, save a separate baked copy for cleanup and export.
How Do I Keep Feet Planted During Retargeting?
Use a target rig with usable foot IK, enable IK during retargeting when supported, and check the root and hip translation. Then keyframe the planted foot positions and clean the foot curves in the Graph Editor. If the motion should stay in place, enable an in-place option instead of removing root motion after the fact.
Final Thoughts
Motion capture in Blender is most reliable when you treat it as a pipeline rather than a single import command. Start with a short and clean motion clip, confirm the source armature's orientation and scale, prepare the target rig in a compatible rest pose, and use a dedicated retargeting workflow before baking the animation. Once the feet, hips, and main body motion are stable, refine the curves and add secondary motion. When the final scene includes heavy lighting, effects, or long frame ranges, a render farm can help complete the Blender animation without forcing the entire workload onto one workstation.