Blender
 Cinema 4D
 Arnold
 3ds Max
 Houdini
 V-Ray
 Maya
 Unreal Engine
 Nuke
 Pricing
 New User Bonus
 Cost Estimator
 Christmas Sale


Set render parameters
Overview
Render parameters decide which frames a job renders, which camera it uses, how large the output is, and whether a few frames are tried first. Only jobs that had the parameter switch turned on in Submit a job stop on this page. With the switch off — the default — analysis passes and the job is submitted automatically, so this page never appears.
Once a job stops here it sits on Rendering parameter settings (Optional); change what you need and submit. The step is optional: keep the scene's own values and submit as they are.
Parameters fall into two groups. Scene parameters are read from the scene file and differ by software. Priority frames, render settings and prerender/postproduction tasks are identical in the web console and the desktop client, and they are what this page is about. Software-specific parameters are covered in that software's page under Software guides.
Scene parameter settings
Here you can change the render layers, frame range, camera, resolution (width and height), output name and format. Values come from the scene file and are edited in place in the table row. Which settings appear depends on the software — see its page under Software guides.
Restore defaults puts the scene parameters back to their initial state. Batch sync modify writes one value across several layers or jobs. Submit each layer as a separate job makes one job per layer, which is easier to check and download layer by layer.
Priority frames
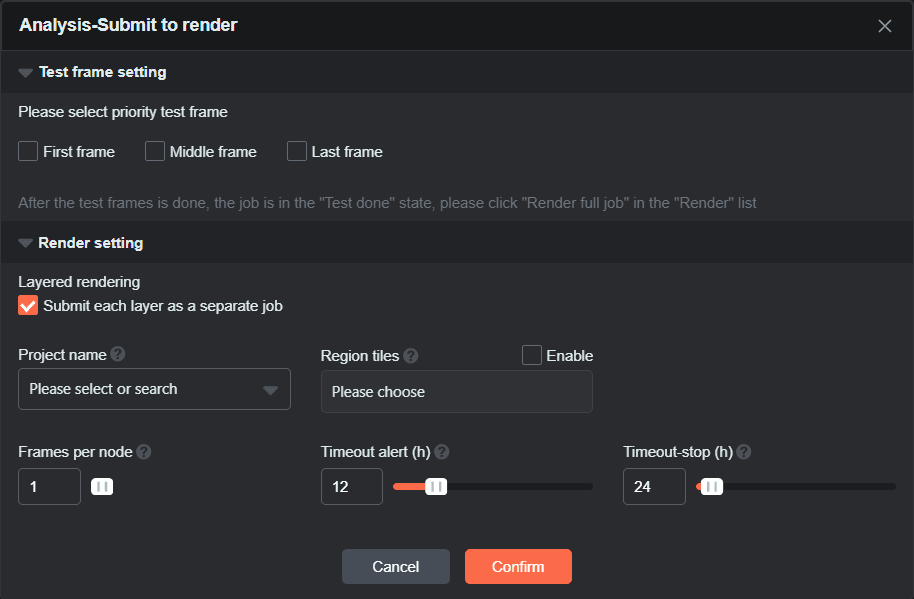
Priority frames render only a few frames first, so a wrong camera, light or parameter shows up before the whole sequence is done.
1、In the initial state, three frames—the first frame, middle frame, and final frame—are automatically selected.

2、Custom test frames are allowed, with a maximum of 10 frames that can be entered.

3、Check the result. The job then sits at Test done — go to Monitor a job and click Render full job to render the rest. The full flow is in Test frames and full render.
Render setting
These usually stay at their defaults; adjust them only when needed.

-
Project name — empty by default, not required. Groups the job under a project, so progress and the bill can be checked per project. Pick an existing project or create one.
-
Region tiles — off by default. Splits one frame into blocks rendered on several machines and composited afterwards, to shorten a heavy frame. Different render engines composite blocks with different quality; confirm with priority frames before using it in production.
-
Frames per node — off by default, one frame per machine at a time. Turn it on only when the software or plugin cannot render one frame per machine, for example UE cam360; some UE jobs must also run every frame on a single machine for the output to be correct, which is a limit of the software or plugin. Start with a small range before using it broadly.
-
Timeout alert (h) — 12 hours by default, settable from 0 to 72; 0 means no limit. An alert is sent when a single frame runs longer than the limit; rendering continues.
-
Timeout stop (h) — 24 hours by default, settable from 0 to 876; 0 means no limit. That frame is stopped and a notification sent when it runs longer than the limit. Set it by the normal duration of one frame so that heavy frames are not cut short. The stop value must be greater than the alert value.
The mailbox that receives these notifications is set in the web console under Job message settings.
Prerender and postproduction tasks
These are processing tasks the farm runs before or after the render: a prerender task runs before rendering starts, a postproduction task after it finishes. Work that normally happens locally before submission, or after the frames arrive, becomes part of the same flow on the farm.
When they help
-
Prerender — when the files must be processed before rendering, for example generating an XGen cache in Maya, exporting a DCC cache from UE, or changing scene render settings. The farm handles it before rendering, which removes a local step and an extra upload, and it avoids errors caused by files that were not ready.
-
Postproduction — when the output needs work afterwards, for example compositing or denoising a frame sequence. The farm does it directly, so the frames do not have to come down first.
How to set them
1、Once analysis passes, a Prerender and Postproduction settings step appears in the submit form.
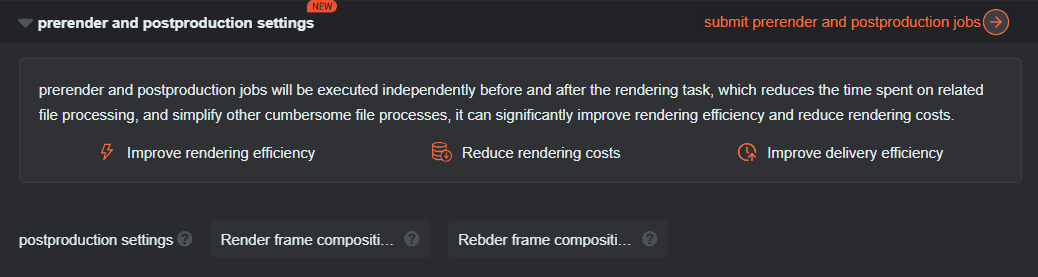
2、Click Go to submit prerender and postproduction tasks and tick the tasks to run; only ticked tasks take effect.
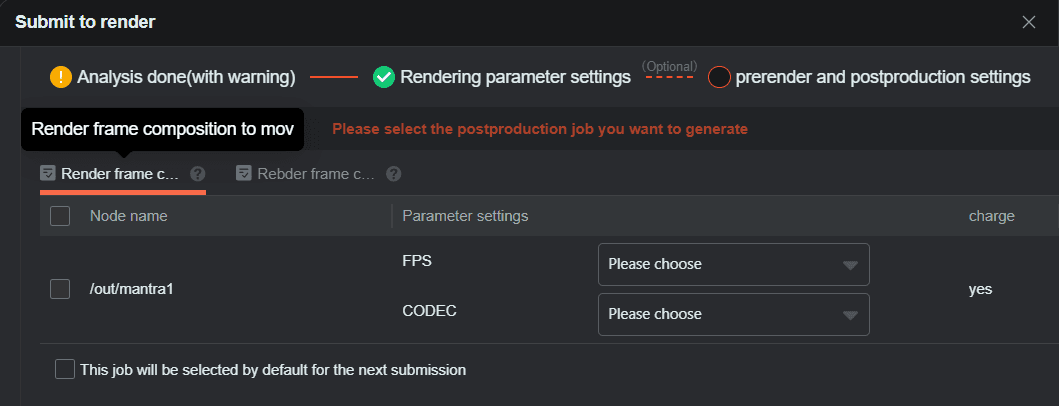
3、Click Submit to render.
Where to see them
Each pre/post task is its own job inside the same parent job, listed together in the Rendering list with its own status and result. Three labels matter:
-
P number — the running order; a smaller number runs first.
-
Task type — prerender, render job, or postproduction.
-
Charge marker — whether the task is billed; pre/post tasks are billed like a normal render job.

Rules
-
Prerender and postproduction tasks do not support priority frames, region tiles or frames per node.
-
A prerender task can be started, stopped, resubmitted and deleted; a postproduction task can also have its result downloaded.
-
Batch start, stop, resubmit and delete only accept one task type at a time — all prerender, all render, or all postproduction.
-
When a render job is cloned, unfinished prerender tasks and all postproduction tasks can come along.
Submit
Click Submit to render and the job moves to the Rendering list.
Bulk submission
Jobs sent in a batch use a shorter dialog — priority frames, layer submission, project name, region tiles, frames per node and the two timeouts. Jobs that need per-layer settings or pre/post tasks must be submitted one at a time; see the batch section in Read analysis results.